Adobe Photoshop is a powerful image editor. Although, if you’re looking to go beyond simple image modifications like cropping or blurring your photo, you need to know your way around the software.
This time we’ll look at how to replace or change color in Photoshop. There are a few different paths you can follow here, depending on your end goal. Whether you’re looking to apply a cool color effect to your photo, or change the color of a specific part of your image, here are a few different ways to replace color in Adobe Photoshop.

How to Quickly Replace One Color With Another in Photoshop
The first method of replacing one color with another in Photoshop is good for when you need to change the background color, or any solid color that takes up a lot of your picture. Background manipulations in Photoshop often take up a lot of time. However, here’s how you can easily change your background’s color in just a few steps.
- Open your image in Photoshop.
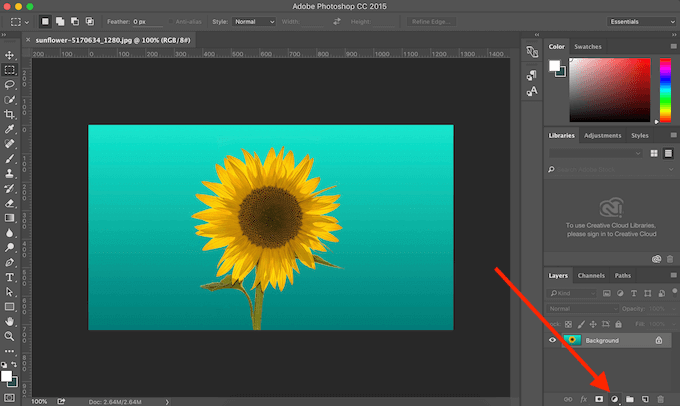
- In the Layers panel at the bottom-right corner, find the Create new fill or adjustment layer menu.
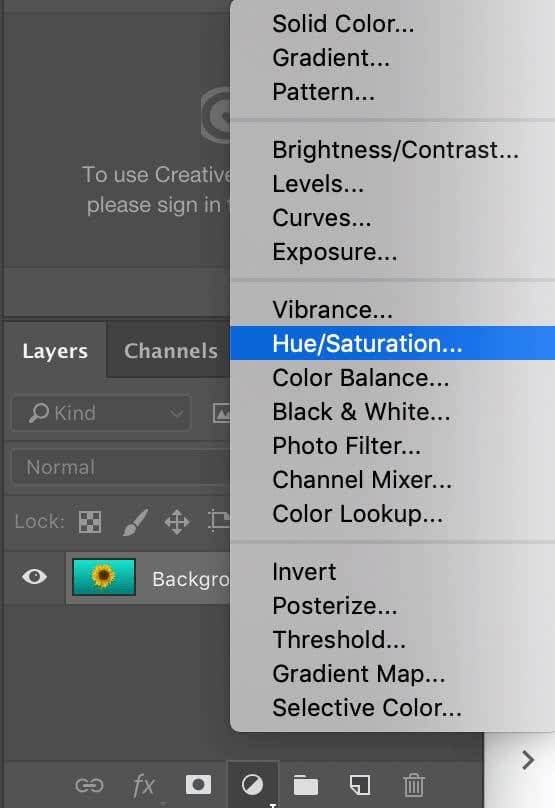
- Select Hue/Saturation.
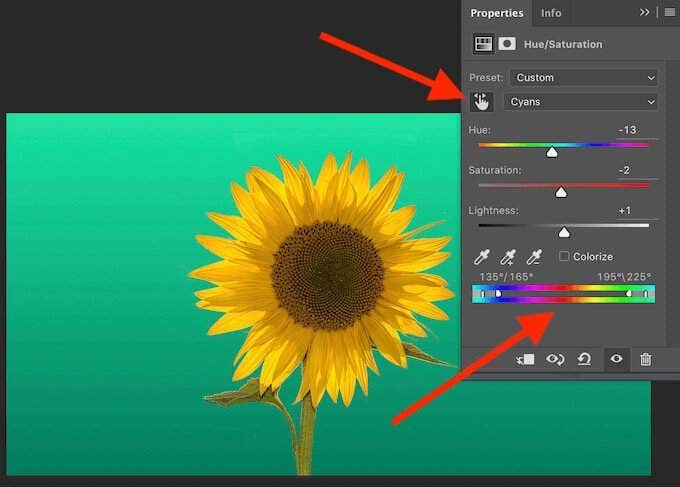
- From the pop-up Properties panel, select the Finger icon to Click and drag in image to modify Saturation. Under Properties, you can now see that the color is isolated on the gradient scale by sliders, making sure that’s the only color that you’ll change.
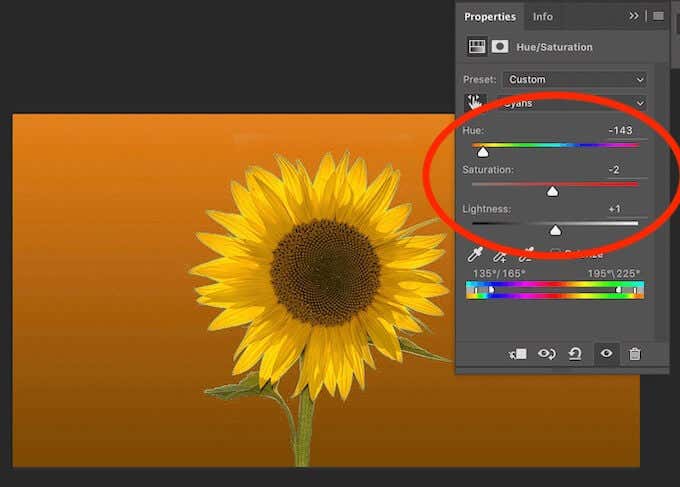
- In your image, select the color you want to change. To change the color you chose, move the Hue slider.
You can experiment with different Hue, Saturation, and Lightness levels until you’re happy with the new color.
How to Change Color Using Quick Selection Tool
When you need to change the color of an object in your picture rather than the background, you can do it using Photoshop’s Selection tool. This way gives you more options for blending and allows for smoother color transitions. To replace color using the Selection tool, follow the steps below.
- Open your image in Photoshop.
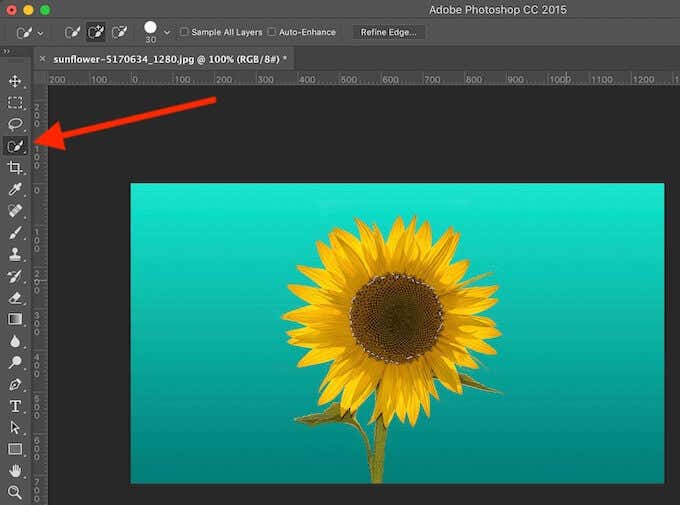
- From the Tools panel on the left side of your screen, select Quick Selection Tool.
- Make a selection around the object you want to change the color of. If that seems difficult, you can make a selection around the more solid background and then invert it instead. To invert a selection, use a shortcut Cmd + Shift + I (for Mac) or Ctrl + Shift + I (for Windows).
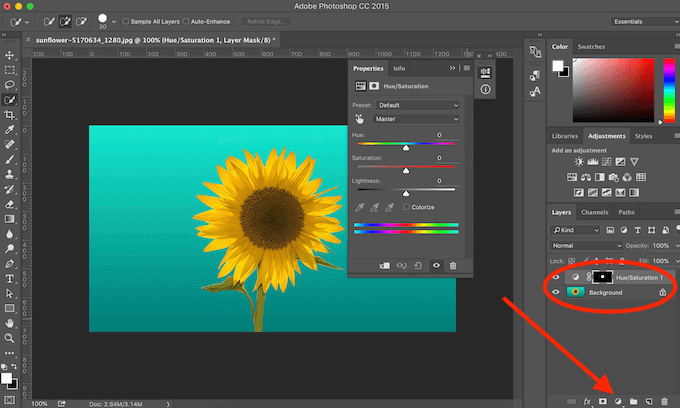
- In the Layers panel at the bottom-right corner, find the Create new fill or adjustment layer menu and select Hue/Saturation. This will copy your selection to a new layer.
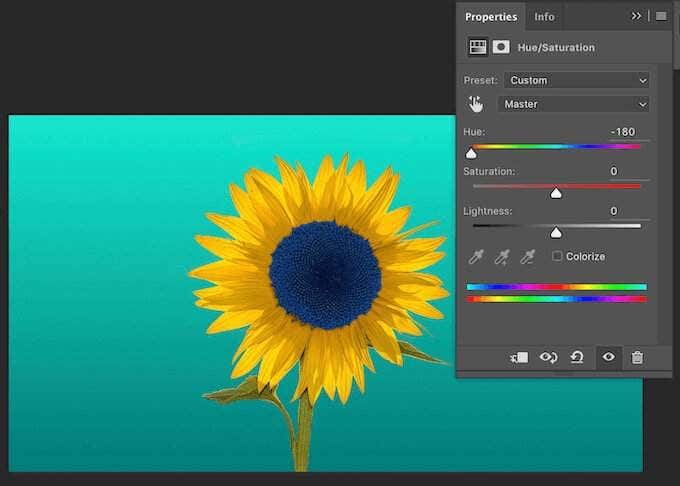
- To change the color of your selected object, move the Hue slider.
If you’re also looking to blend the new color and make it look more natural, follow the steps below.
- After you selected an object or area of your image and changed its color, go to the Layers panel.
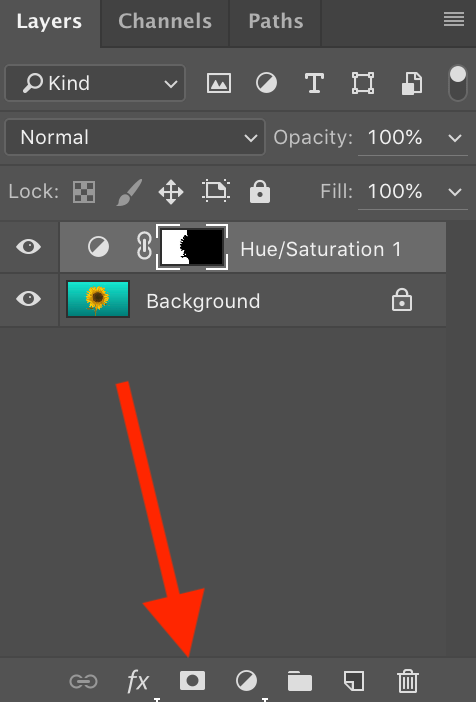
- Select the Layer Mask icon (to the right from fx) to add a new layer mask.

- From the Tools panel, select the Gradient tool.
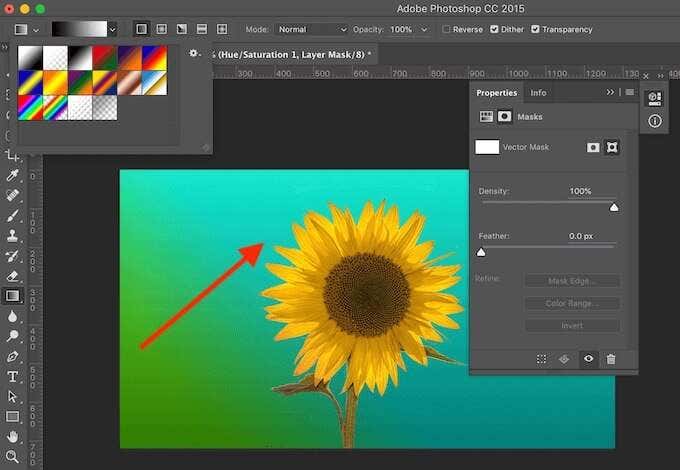
- Make sure you still have the layer mask selected, and drag the gradient through your image to blend. You can edit Gradient to your liking to change the direction and/or colors of the blending effect.
How to Replace the Color of a Single Object in Photoshop
The following method is suitable for when you want to replace a color of a single object in your picture without having to cut it out.

We’ll take this stock image with multiple sunflowers as an example and try to change the color of one of them without affecting the rest of the picture.
- Open your image in Photoshop.
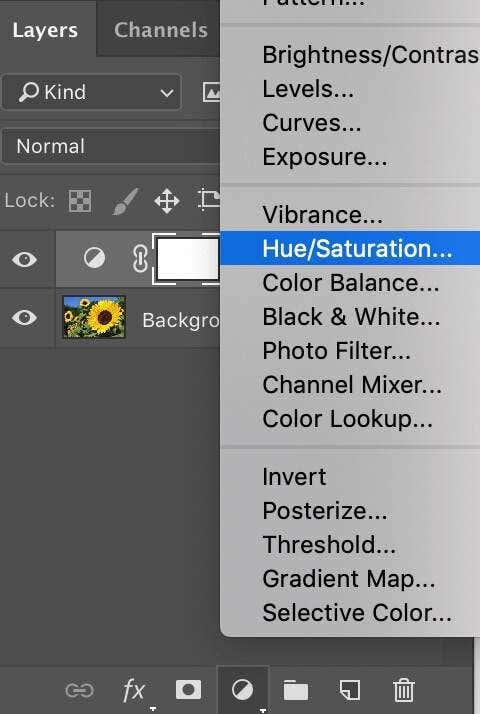
- From the Layers panel at the bottom-right corner, add a new Hue/Saturation adjustment layer.
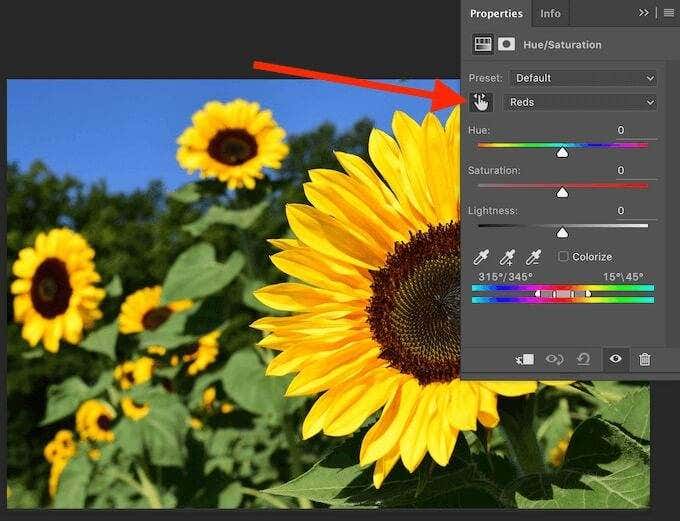
- From the pop-up Properties panel, select the Finger icon and click on the image area or object that you want to replace the color of.
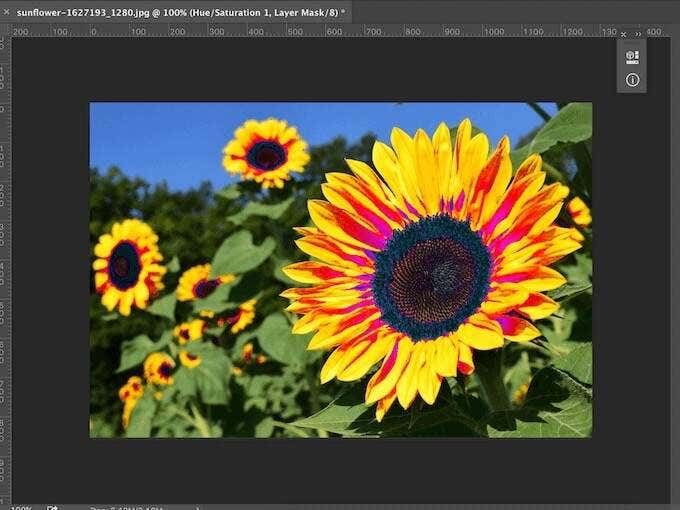
- Move the Hue slider to change the color.
You’ll notice that aside from your selected object, other parts of the picture were affected by the color change. To fix that and tighten up the color of the rest of your image, follow the steps below.
- Make sure you have the layer mask still selected. Then select a Brush from the Tools panel.

- Set foreground color to black and background color to white.

- Using the Brush tool, paint over the areas that you don’t want to be affected by the color change.
How to Change the Color of Multi-Color Objects
If you’re looking to change the color of an object with a complex color structure, you can do it with the help of Photoshop’s Color Range tool.
- Open your image in Photoshop.
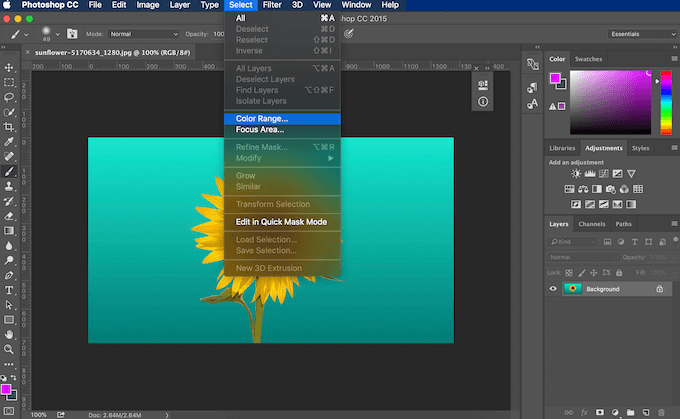
- In the ribbon menu on top of the screen, follow the path Select > Color Range.
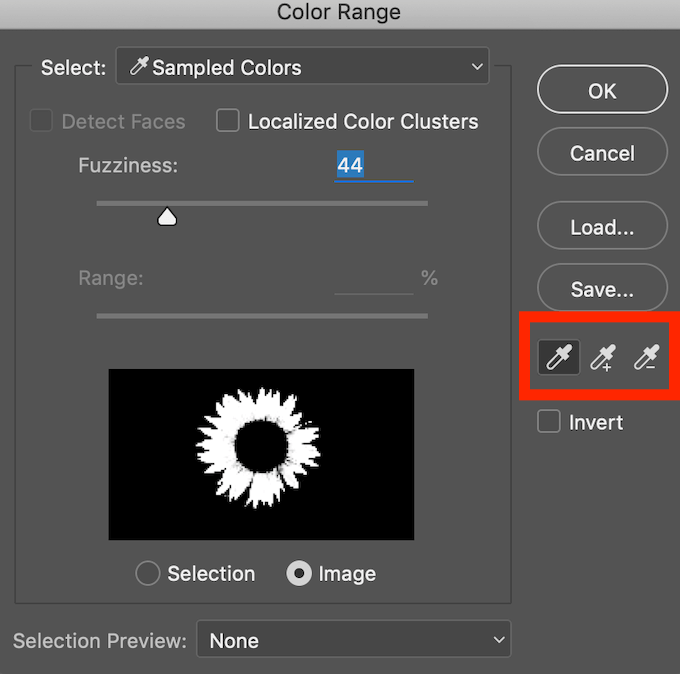
- Select the desired object or area via the Eyedropper tool. To edit the selection displayed in the Color Range menu, use the Eyedropper tool with the plus or minus sign next to it to add or subtract from the selection.
- Select OK to confirm.
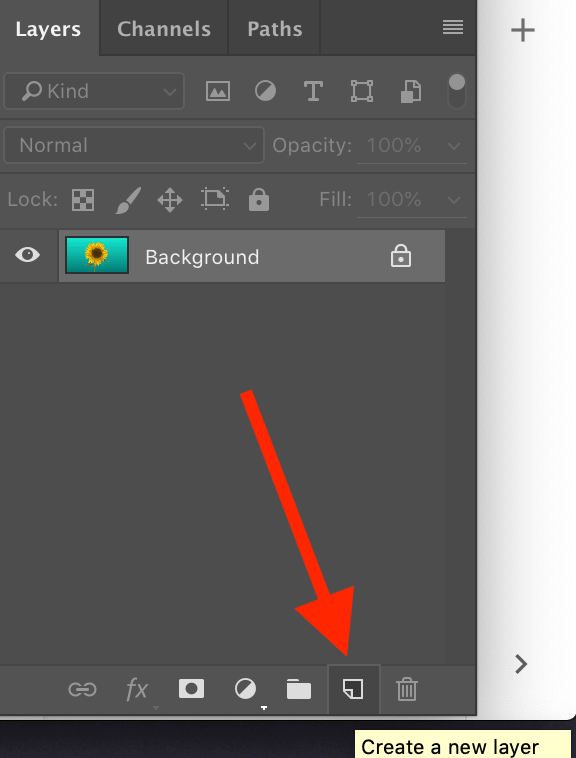
- In the Layers panel, select Create a new layer.
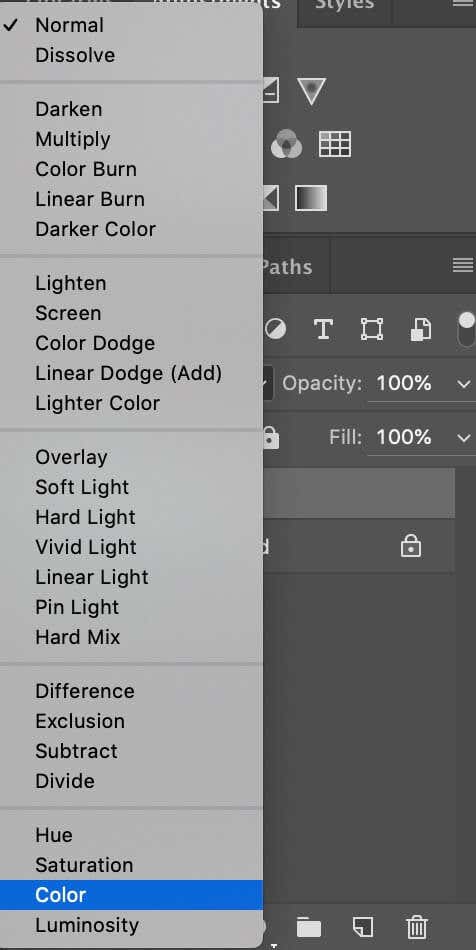
- Set the layer type to Color.
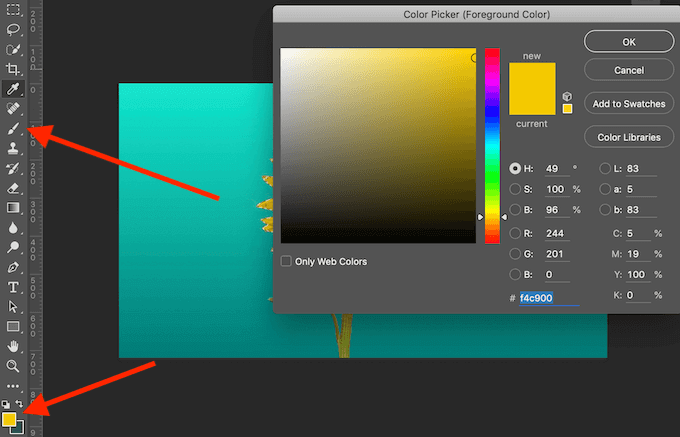
- Select a Brush from the Tools panel. Then set the new color as foreground color.
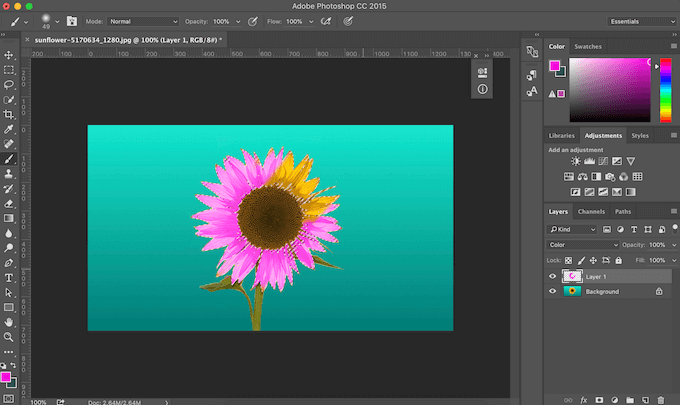
- Start painting over your selected object.
When you start painting over the picture, you’ll notice that the color stays within the area you selected. All the original tones and shades within this area also stay intact. This is a great method for when you want to manually paint over the picture to change its colors.
Use Photoshop to Paint Your Photos Any Way You Like
Photoshop is a great tool for those looking to enhance their creativity. If you’re not happy with the colors of your photos, use the software to paint over them and bring boring grey pictures back to life with bright colors. Luckily, Photoshop offers a few different ways to change colors of an image. Pick the one that suits your needs best and start turning your photos into works of art.
Have you used Photoshop to replace colors before? Which method did you use? Share your Photoshop knowledge with us in the comments below.
Related Posts
Anya is a freelance technology writer. Originally from Russia, she is currently a full-time Remote Worker and Digital Nomad. With a background in Journalism, Language Studies, and Technical Translation, Anya couldn’t imagine her life and work without using modern technology on a daily basis. Always looking out for new ways to make her life and location-independent lifestyle easier, she hopes to share her experiences as a tech- and internet-addict through her writing. Read Anya’s Full Bio
