If you own a Samsung Galaxy S8 or newer, then you already have the Bixby voice assistant available on your phone. It was created specifically for Samsung Galaxy devices that feature the Bixby button on the side.
When you first launch Bixby for the first time, you’ll need to go through a quick setup process to sync Bixby with your Samsung account. Once this is done, you can start using all of the voice-assistant features that are available.
In this article, you’ll learn how to work through that initial setup process, as well as how to set up Bixby and all of the other features that come included with the Bixby voice assistant.
How to Set Up Bixby
To launch Bixby for the first time, just press the Bixby key on the left side of your Samsung phone. If you’re using the Note10, Note20, Fold, Z Flip, or S20 Series and up, then this will be the Side key (opposite side as the Volume button).
Press this to launch Bixby, and you’ll initially see a welcome screen, then a screen for you to change the default language (if you wish) and confirm your Samsung email address. Select Next.
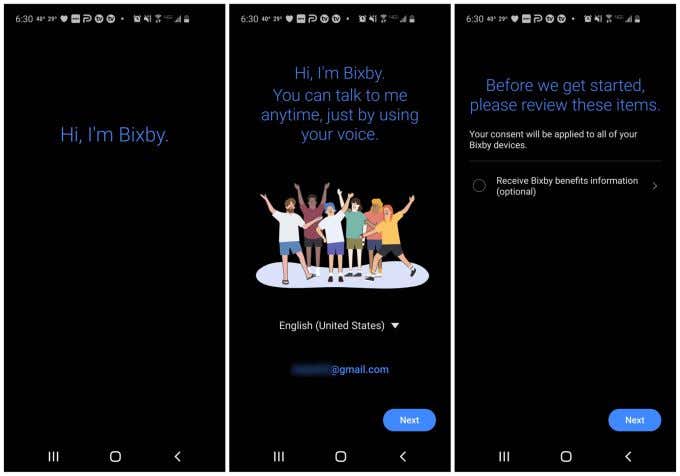
You’ll see a consent screen for receiving Bixby “benefits information”. This is optional and you don’t have to accept it. Make your choice and then select Next again.
You might be prompted to set up Voice wake-up. If you do, select Next again and then select Done.
Other Bixby Button Results
If you’ve already opened Bixby in the past but didn’t set it up, when you press the Bixby key you might see other windows. The window that appears depends which state you last left Bixby when you used it (even inadvertently).
You may just see a partial window with several Bixby consent options. Just approve these to complete Bixby setup.
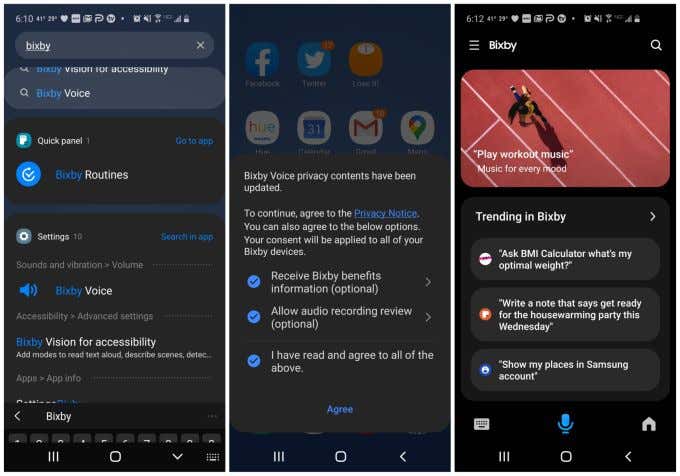
If you aren’t sure where your Bixby button is, an alternative way to open the app is just searching your device apps for Bixby, and tapping Bixby Voice in the results.
At some point, once you’ve completed the basic initial setup, every time you select the Bixby button, you should see the Bixby Voice window displayed on the right screen in the image above.
How to Set Up Bixby Vision
What’s not obvious about Bixby on your Samsung device is that it actually integrates with a lot of aspects of your device. It’s incorporated into your camera app, your reminder app, and is in general always listening for your next command.
You do need to set up the vision and reminder integration features.
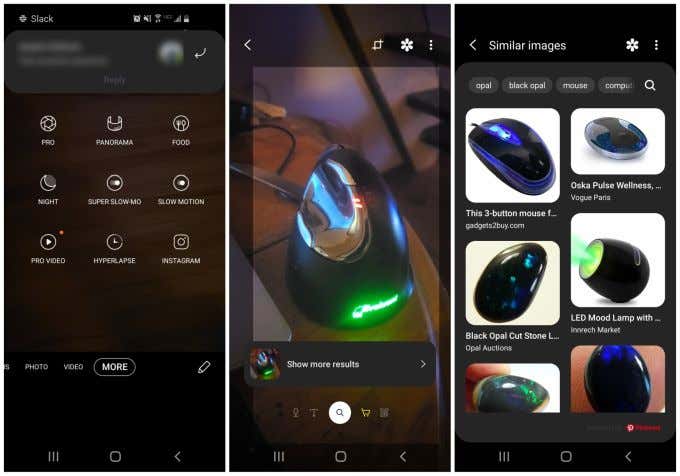
To set up Bixby Vision:
- Launch your Camera app and select More at the right side of the menu at the bottom of the window.
- On the next screen, select Bixby Vision at the upper right corner of the window.
- This will launch your camera in Bixby Vision mode. Bixby will automatically try to recognize any objects you point your camera at. When it does, you’ll see a Show more results link below the camera frame.
- Tap the link and Bixby will show you links to similar images on the web.
This feature is useful for identifying things as you’re traveling, whether you want to figure out the brand of a gadget, the identity of a flower, or anything else where image recognition technology can help.
How to Set Up Bixby Reminders
One of the more useful features of Bixby is that it can save your memory. Any time you want to remember something, just say, “Bixby, create a reminder to go to the grocery store.”
If you want to launch this feature using the Bixby Reminder app, you’ll need to enable it first.
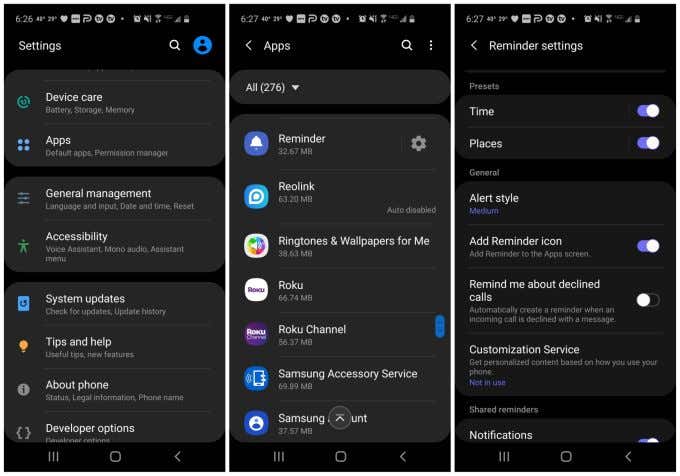
To set up Bixby Reminder:
- Open your Samsung Settings.
- Scroll down and tap Apps in the Settings menu.
- Select the Reminder app from the list of apps.
- Select Reminder settings in the next menu.
- Enable the Add Reminder icon toggle.
Now you can either use your voice to trigger Bixby Reminder, or tap the Reminder icon and launch it that way.
Bixby Vision and Bixby Voice Settings
There are additional ways you can configure both Bixby Vision and Bixby Voice to your liking. Access these additional settings by going into your Samsung Settings and selecting Apps.
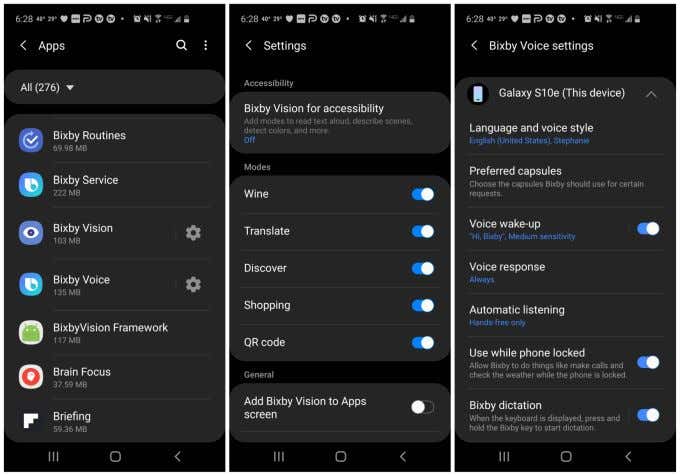
In the Apps menu, you’ll see both Bixby Vision and Bixby Voice with a settings icon to the right of them.
If you tap the Bixby Vision settings icon, you can enable or disable:
- Accessibility options: Reading text aloud, describing scenes, and more
- Wine Mode: Tells you the ranking of wine and food that pairs with it, based on the label
- Translate Mode: Scan any text with your camera and Bixby Vision will translate it
- Discover Mode: Scan objects to learn more about them
- Shopping Mode: Take a picture of something you’d like to buy and see online listings where you can buy it
- QR code: Enables Bixby to scan and identify QR codes
If you tap the Bixby Voice settings icon, you can configure:
- Default language and voice style
- Preferred capsules (services) for things like news and radio
- Enable the ability to wake up Bixby by saying “Hi, Bixby”
- Enable voice responses to your requests
- Enable automatic listening
- Allow Bixby to work even when the phone is locked
- Let Bixby dictate your voice whenever the keyboard is displayed
- Enable the Bixby key
Access Bixby Settings Via the Bixby App
There are multiple ways to access these same settings. You don’t have to go through the Settings menu. From inside the Bixby app, if you select the menu icon and then select the Settings icon, you can access all of the same Bixby Voice settings listed above.
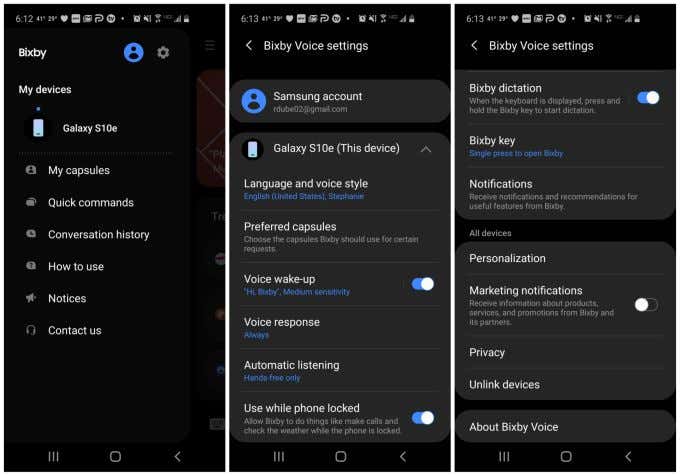
The path you choose really depends on which you find most convenient. The idea is that you don’t have to worry about how you’ve initially set up Bixby. You can always revisit these settings and adjust them later.
How to Reset Bixby
If you’ve set up Bixby but you can’t seem to get it to behave the way you want it to, it’s possible to quickly reset the app and start over.
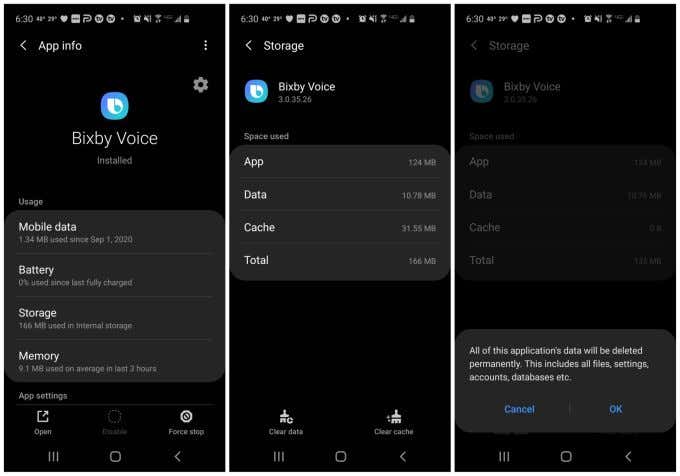
To reset Bixby:
- Open your Samsung Settings menu.
- Navigate to and tap Apps and select Bixby Voice.
- Select Storage under the Usage section.
- Select Clear cache at the bottom right side of the screen.
- Select Clear data at the bottom left side of the screen.
- Confirm that you want to clear all the app data by selecting OK.
Now, the next time you launch Bixby, you’ll see the initial setup wizard again just like you’ve never used the app before.
Just because you use a Samsung phone doesn’t mean you’re stuck with Bixby. If you prefer using some other app, there are plenty of other AI assistant apps to choose from.
Related Posts
- How to Repair a Corrupted User Profile in Windows 11
- Preparing for Windows 10 End of Support: Upgrading to Windows 11
- How to Access and Change Your WiFi Router Settings (2025 Edition)
- How to Install the Latest Large Language Models (LLMs) Locally on Your Mac
- How to Find Circular References in Microsoft Excel