As magical as our computers may be, they don’t run on unicorn kisses and fairy dust. In the end, there’s good old electricity running through your PC’s electronic veins. Just like any electronic device, the components inside your computer run at specific voltages. That is, the amount of pressure pushing electrons through the circuits inside your computer.
Your CPU is designed to run at a specific voltage, but you can adjust that number to be higher (overvolting) or lower (undervolting). It’s the latter (undervolting a CPU) we want to discuss in this article, and we’ll start with the most important question first.

Why Undervolt a CPU?
Electronics are not 100% efficient. Which means that some of that electrical energy running through your CPU is turned into heat. That’s why your CPU needs a heatsink and fan assembly so it doesn’t overheat. Reducing the voltage of a CPU also reduces the amount of electrons flowing through the system. This translates to less heat.
The first benefit of this is that a cooler CPU will have a longer lifespan. Also, reducing the CPU voltage also means the CPU will use less power. So for devices that run from a battery, undervolting can be a way to extend battery life.

Undervolting can also be a way to achieve higher clock speeds in some cases, where high temperatures are limiting overclocking efforts. However, it’s usually overvolting that allows for stable overclocking, so undervolting a CPU is not the go-to method for performance junkies.
Why Does Undervolting Work?
You might wonder why manufacturers set their CPUs to a certain voltage when they’ll work at a lower one. After all, if undervolting is so great, why not ship the CPUs at the lower voltage? The answer to this is that CPUs are each a little different.
Two identical CPUs can have different outcomes at those low voltages. The approved voltage is one that’s guaranteed to work with the largest percentage of processors. In some cases a given individual CPU will really only work with the official voltage, but for the most part you’ll find that you can bring it down at least a little without any negative effects.
Is Undervolting Dangerous?
The answer to the question of whether undervolting is dangerous depends largely on what you consider to be dangerous or what sort of risks you are comfortable with. Reducing the voltage of a CPU won’t hurt the CPU or any other components. However, it can create system instability, which can in turn lead to data loss. When undervolting it’s important to test and validate your lower voltage setting before doing anything remotely important with your computer.

Apart from potential data loss, another real danger when it comes to undervolting is that you accidentally overvolt your CPU. Too much voltage is a fast and effective way to permanently fry a CPU, so make 100% sure that you’re turning the voltage dial in the right direction!
Undervolting Through the BIOS
The purest way in which to undervolt your CPU is the BIOS. That’s the firmware that makes your computer run before the operating system even kicks in. Each motherboard has slightly different BIOS menus, names and steps. So you’ll have to refer to your motherboard manual to know exactly where to go in order to change the CPU voltage in the BIOS.
While this is a legitimate way to undervolt a CPU, using the BIOS can be incredibly tedious. Since after every adjustment you’ll need to boot into Windows, run a test and then adjust again. This lengthy process of validation is why most people use a software utility to mess with their voltages.
Be aware that if you don’t have a performance-oriented BIOS, it’s possible that there are no CPU voltage controls for you to tweak.
Undervolting a CPU With a Software Utility
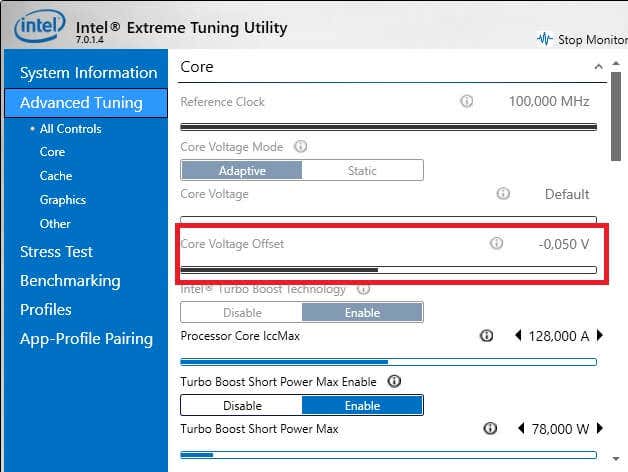
There are two popular utilities that avid undervolters use to wean their CPUs off the juice. If you’re using an Intel CPU, then the Intel Extreme Tuning Utility (XTU) is a good choice. No one knows Intel’s CPUs better than Intel, after all.
Sadly, the program isn’t the most user-friendly in the world and it has a heap of settings and sections that can be confusing if you aren’t familiar with all the CPU jargon. Luckily for undervolting we only have to care about a small number of settings. In XTU these are all under the “core” section of the app. What matters is “core offset voltage”.

Modern CPUs, especially those in laptops, don’t use a static voltage. Instead, the voltage is adjusted as per the amount of load in the CPU. This is one of the reasons undervolting doesn’t get quite the results it used to, since the CPU is actually undervolting itself when idle. By adjusting the voltage offset, we change the minimum and maximum voltage range the CPU will use.
NOTE: If you see that Core Offset Voltage is greyed out, this is possibly due to a security patch that some OEM (Original Equipment Manufacturer) have implemented. This mainly affects laptops, but can also be true of certain prebuilt desktop systems.

This is thanks to a hacking exploit known as Plundervolt. The only way to get the function back would be to flash an older unpatched version of the BIOS, if available. We don’t recommend you do this unless you know exactly what you’re doing.
So, what about AMD users? We didn’t have an AMD machine to test, but the principle remains the same. The main issue is that XTU doesn’t work with AMD CPUs. The good news is that AMD have their own utility known as Precision Boost Overdrive.
The latest version of the software offers an adaptive undervolting feature which can have a significant effect on performance, heat and battery life. So if you’re using a recent AMD CPU definitely look into it.
Testing Your Undervolted Settings
With every new voltage setting you need to make sure everything is still working as intended. It’s inevitable that you’ll get a crash or system freeze at some point, which is usually an indication that you have to back off a notch or two. But even if everything seems fine, you’ll have to do a thorough job of validating your settings. Here’s the sequence of steps we recommend when undervolting a CPU:

- Before changing anything, run your CPU benchmark of choice and write down the score. Make a note of the peak temperature of your CPU. CPU-Z is a great program for that purpose.
- Reduce the voltage offset by 5mv. If you’re feeling brave you can get a headstart with a 50mv reduction, from there 5-10mv is the most sensible increment.
- After the reduction, run a stress test such as Prime95 or the built in stress test in XTU.
- Assuming the stress test passes, run your benchmark again. Performance should be the same or better.
- Repeat the process.
If your CPU becomes unstable or your performance starts to get worse compared to the previous benchmark, dial your voltage back to the last successful attempt and use that as your go-to setting.
Undervolting is Cool, Literally
Overclockers and other CPU mavericks have done a lot for the entire computing industry. Today CPUs are very good at overclocking themselves and the same is becoming true of undervolting.
Within a few years there won’t be much to gain from manually undervolting a CPU, thanks to sophisticated self-tweaking in new CPUs. However, it’s still worth doing on current and past computers. The best thing about it is that there’s very little risk. So why not give it a go?
Related Posts
- Preparing for Windows 10 End of Support: Upgrading to Windows 11
- How to Fix a “This file does not have an app associated with it” Error on Windows
- How to Fix an Update Error 0x800705b4 on Windows
- How to Resolve “A JavaScript error occured in the main process” Error on Windows
- How to Fix the Network Discovery Is Turned Off Error on Windows
Sydney Butler is a social scientist and technology fanatic who tries to understand how people and technology coexist. He has two decades of experience as a freelance computer technician and more than a decade as a technologies researcher and instructor. Sydney has been a professional technology writer for more than five years and covers topics such as VR, Gaming, Cyber security and Transhumanism. Read Sydney’s Full Bio
