

Double-clicking an old DOS .EXE on Windows 10 or 11 gives you “This app can’t run on your PC”, or just nothing. That’s because 64-bit Windows has no 16-bit subsystem, so DOS programs need an emulator or virtual machine to run.
You still have solid options. For most people, DOSBox or its more modern fork DOSBox-X will get your old games and programs running in under ten minutes. If you’re dealing with complex business software that needs a full OS environment, a virtual machine running FreeDOS or 32-bit Windows XP is the better path.
Which Method Should You Use?
| Your situation | Best approach | Difficulty |
|---|---|---|
| DOS games, simple programs | DOSBox or DOSBox-X | Easy |
| Tricky games, exotic hardware requirements | DOSBox-X (menu-driven, more compatible) | Easy–Medium |
| Legacy business software, printers, networking | VM with FreeDOS or 32-bit Windows XP | Medium–Hard |
| Quick one-off test, no install wanted | Browser-based DOS emulator | Easy |
Method 1: Classic DOSBox (Windows 10 and 11)
Classic DOSBox 0.74-3 is still the baseline most tutorials and game distributions reference. It’s command-line driven but straightforward once you’ve mounted a drive once.
Step 1: Download and install DOSBox
- Go to dosbox.com/download.php and download the Windows installer.
- Run the installer and accept the defaults. It creates a Start menu shortcut and a desktop icon.

Step 2: Create a folder for your DOS programs
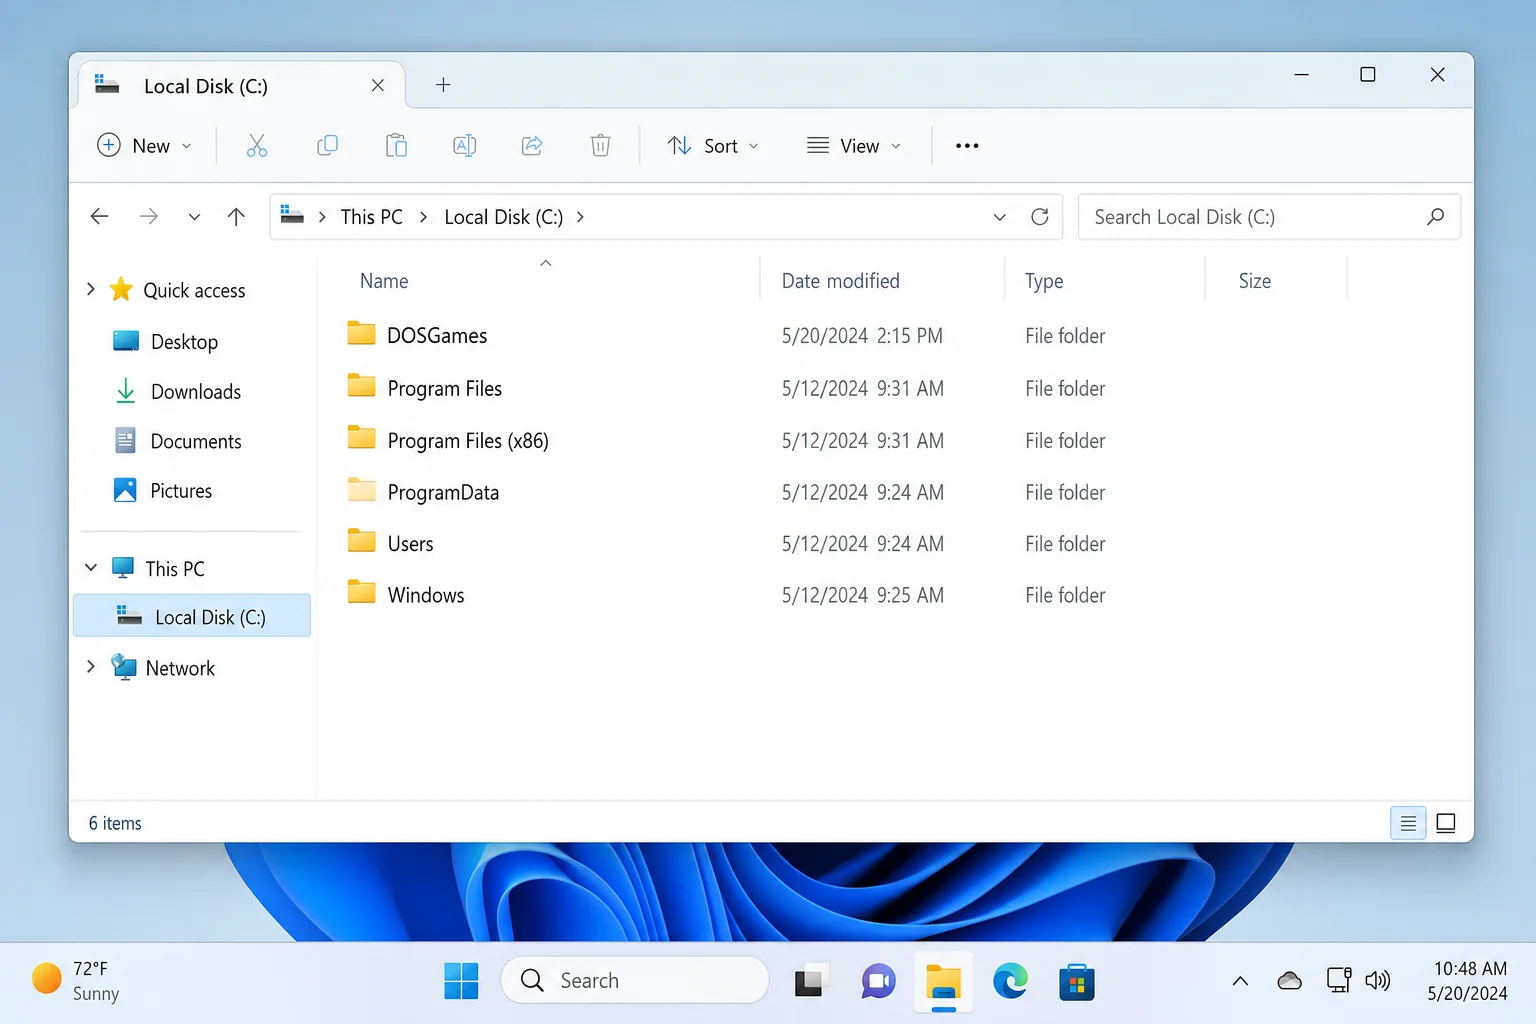
- Open File Explorer and create a new folder at
C:\DOSGames(orC:\DOSAppsfor non-game software).
- Keep the folder name to 8 characters or fewer, letters and numbers only. No spaces. DOS has strict naming rules.
- Copy your DOS program files or game folders into that directory.
Step 3: Launch DOSBox and mount your folder
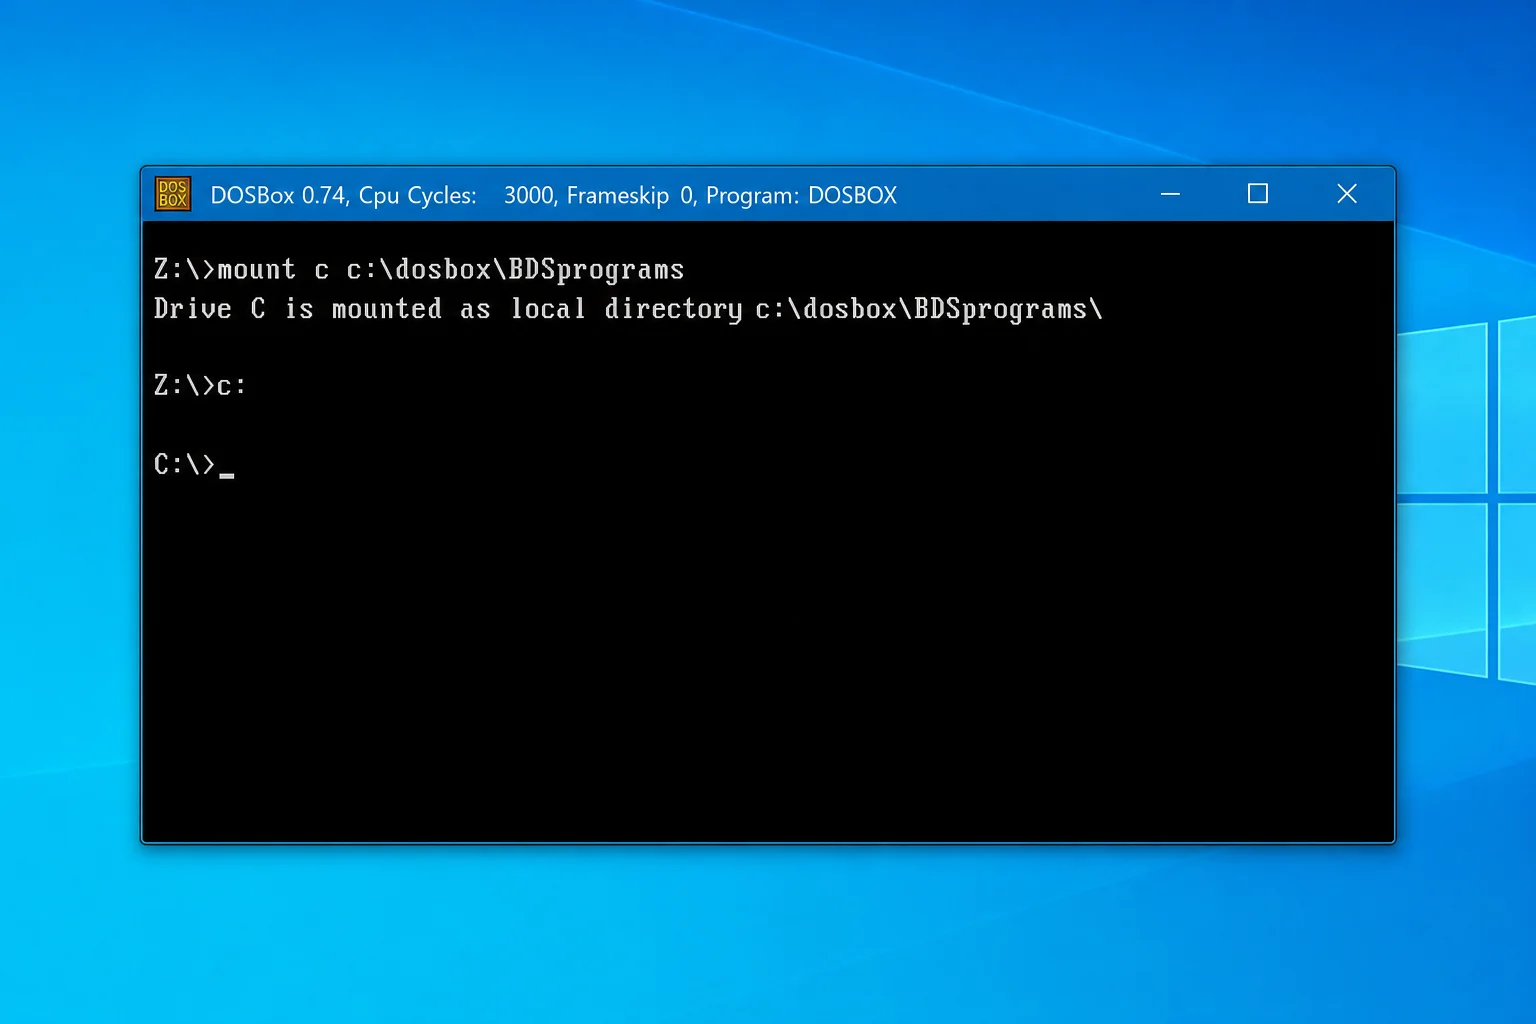
- Launch DOSBox from the Start menu or desktop shortcut. A command-line window opens at a
Z:\>prompt.
- Type the following command and press Enter, replacing
C:\DOSGameswith your actual folder path:MOUNT C C:\DOSGames. You should see: Drive C is mounted as local directory C:\DOSGames\
- Type
C:and press Enter to switch to your newly mounted drive. The prompt changes toC:\>.
Can’t type a backslash? Some keyboard layouts conflict with DOSBox’s default key mapping. Press
Ctrl + F1to open the keymapper, delete the backslash entry, and re-add it to remap the key correctly.
Step 4: Navigate to your program and run it
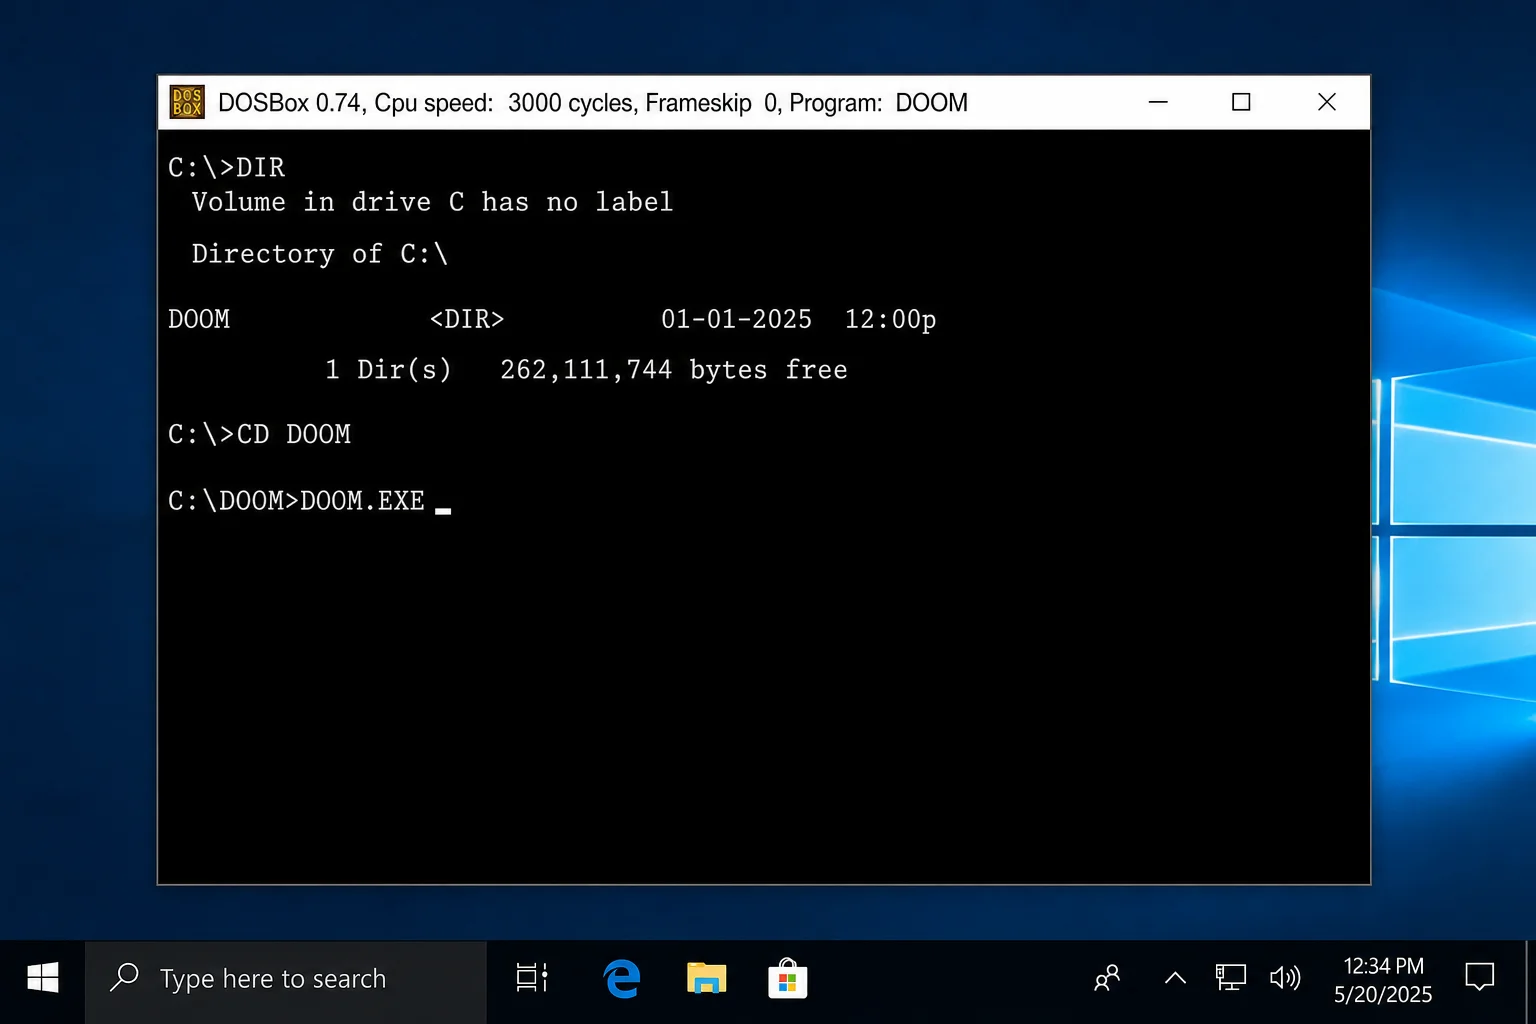
- At the
C:\>prompt, typeDIRand press Enter to list the contents of your DOS folder.
- If your program is in a subfolder, type
CD FOLDERNAME(for example,CD DOOM) and press Enter.
- Type
DIRagain to find the main executable, look for a.EXEor.COMfile.
- Type the filename (without the extension, usually) and press Enter to launch it. For example:
DOOM
Step 5: (Optional) Auto-mount your drive on every launch
Retyping the mount command every session gets old fast. You can make it automatic:
- Open the Start menu, find the DOSBox folder, and click DOSBox Options (this opens
dosbox.confin Notepad).
- Scroll to the very bottom of the file and find the
[autoexec]section.
- Add your mount commands below the
[autoexec]line:
[autoexec]
MOUNT C C:\DOSGames C:- Save the file. Next time you launch DOSBox, the drive mounts automatically and you land at the
C:\>prompt.
Method 2: DOSBox-X (Recommended for Tricky Games and Non-Technical Users)
DOSBox-X is a feature-rich fork of classic DOSBox with GUI menus that replace most command-line steps. It also offers better compatibility with complex games, unusual hardware configurations, and business software. If classic DOSBox gives you trouble, start here instead.
Step 1: Download and install DOSBox-X
- Go to dosbox-x.com and download the latest Windows installer.
- Run the installer and accept the defaults.
Step 2: Create your DOS folder
- Create
C:\DOSGamesin File Explorer and copy your programs there, same as Method 1.
Step 3: Mount your folder using the menu
- Launch DOSBox-X from the Start menu.
- In the menu bar at the top of the DOSBox-X window, click Drive → C → Mount folder as hard drive…
- Browse to
C:\DOSGamesand click OK. DOSBox-X mounts it as the C: drive automatically.
Step 4: Mount a CD image or physical CD (if needed)
- For a CD image (
.isoor.cuefile): click Drive → D → Mount a disk or CD image file…, then browse to your image file.
- For a physical CD: click Drive → D → Mount folder as CD drive…, then select your optical drive letter.
Step 5: Install or run your program
- In the DOSBox-X command window, type
D:and press Enter to switch to the CD drive.
- Type
DIRto see the contents, then run the installer (usuallyINSTALLorSETUP). Files will install into yourC:\DOSGamesfolder.
- After installation, type
C:to switch back, navigate to the program folder, and run the executable.
Step 6: Save your configuration so you don’t have to redo it
- Once everything is working, click Capture → Save State… in the menu bar.
- Next time, open DOSBox-X and use Capture → Load State… to restore your full environment instantly.
Method 3: Virtual Machine with FreeDOS or Windows XP (Best for Business Software)
If your old software expects a specific OS environment, such as a network printer, a serial port, or a particular version of DOS, running it inside a full virtual machine is more reliable than DOSBox. This is the right call for legacy accounting software, industrial control programs, and anything that flat-out refuses to run in DOSBox.
Step 1: Install VirtualBox
- Download VirtualBox (free) from virtualbox.org and install it on your Windows 10 or 11 machine.
Step 2: Get a DOS operating system
- FreeDOS is the easiest free option: download the installer ISO from freedos.org. It’s actively maintained and runs most DOS software.
- If you need to run 16-bit Windows apps as well as DOS programs, a licensed copy of 32-bit Windows XP in a VM handles both.
Step 3: Create a new VM and install your DOS OS
- In VirtualBox, click New. Name your VM (e.g., “FreeDOS”), set the type to Other and version to DOS.
- Allocate at least 32 MB of RAM (FreeDOS needs almost nothing; XP needs at least 512 MB).
- Create a virtual hard disk. 500 MB is plenty for FreeDOS; 10–20 GB for XP.
- In the VM’s Storage settings, attach your FreeDOS ISO as a virtual optical drive.
- Start the VM and follow the FreeDOS installer prompts.
Step 4: Share files between Windows and the VM
- In VirtualBox, go to your VM’s Settings → Shared Folders.
- Add a shared folder pointing to a Windows folder (e.g.,
C:\DOSFiles) and give it a name likeSHARED.
- Inside the FreeDOS VM, the shared folder appears as a mounted drive you can copy files to and from.
Security note: Keep old OS VMs (DOS, Windows 9x, XP) with network access disabled or heavily restricted. These OSes receive no security updates and should never be exposed to the internet.
Fixing Common DOSBox Problems
Full-screen is tiny or doesn’t fill the monitor
On 4K or high-DPI displays, DOSBox defaults to a small window. To fix it:
- Open
dosbox.conf(via DOSBox Options in the Start menu).
- Find the
[sdl]section and set:
fullresolution=desktop
windowresolution=1280x960
aspect=true- Save and relaunch DOSBox. Press
Alt + Enterto toggle full-screen.
DOSBox-X and DOSBox-Staging have scaling and filtering options directly in their menus, which is easier than editing config files manually.
No sound or music
Most DOS games expect a Sound Blaster card. If you get silence:
- When the game’s installer or setup program asks for a sound card, choose Sound Blaster 16 (or Sound Blaster Pro).
- Use the default settings: IRQ 7, DMA 1, port 220. DOSBox emulates these by default.
- If music is missing but sound effects work, the game probably uses MIDI. Check DOSBox’s
[midi]config section or use DOSBox-X’s sound card menus.
Program runs too fast or too slow
- Press
Ctrl + F11to decrease CPU cycles (slow the emulation down).
- Press
Ctrl + F12to increase CPU cycles (speed it up).
- For a permanent fix, open
dosbox.confand adjust thecyclesvalue in the[cpu]section. Settingcycles=autoworks well for most games.
A Note on Legality
DOSBox and DOSBox-X are free and legal to download. Your DOS programs are a different matter. Many classic games remain under copyright, so you should only run software you legally own. Some titles have been officially released as freeware, and digital storefronts like GOG sell classic DOS games pre-configured with DOSBox included.
Wrapping Up
For most people, DOSBox-X is the easiest starting point in 2026. The menu-driven drive mounting removes the biggest stumbling block of classic DOSBox, and compatibility is better for anything beyond simple games. If DOSBox-X still can’t handle your software, a FreeDOS VM in VirtualBox is the next step up. The VM route takes longer to set up but gives you the most authentic DOS environment possible on modern hardware.