No matter how you accidentally deleted a person’s mailbox in Exchange, you can probably restore it using PowerShell (PoSh). The key is doing it as soon as you realize the mailbox has been deleted.
It’s a heart-jumped-into-my-throat moment when we realize we’ve accidentally done this. If you’ve only deleted a few email messages, we can show you how to recover deleted emails in Office 365 too.

Before we begin, note that this is meant for restoring deleted mailboxes in Exchange Online for the Office 365 environment and Exchange 2010. We’re also assuming that you have the administrative rights to use the methods described and have done some basic PowerShell scripting.
What Happens When a Mailbox Is Deleted?
The mailbox gets moved to either the Azure Active Directory (AD) recycle bin in Exchange Online or the Disconnected Mailboxes directory in Exchange 2010.
It may sit there for up to 30 days depending on the retention policies that are in place. That gives us a grace period to recognize our mistake and recover from it.
Restore a Deleted Mailbox In Exchange Online

Connect To Exchange Online Via PowerShell
In your local session, open the Powershell console and use the following command to set your login credentials into the variable.
$userCredential
This makes it easier to work with other scripts later on.
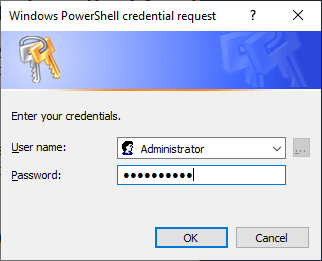
$userCredential = get-Credential
A window will open where you can enter your username and password for managing Exchange Online.

Next, set the execution policy level so that we can actually do things in our session. This allows us to run our unsigned commands. But you may want to learn best practices for signing PowerShell scripts too.
set-ExecutionPolicy Unrestricted
When prompted, press Y for Yes.
Now we’ll create the variable $session to be used to open a connection between the local computer and Exchange Online.
$session = New-PSSession -ConfigurationName Microsoft.Exchange -ConnectionUri https://outlook.office365.com/powershell-liveid/ -Credential $userCredential -Authentication Basic -AllowRedirection
Powershell-liveid is the id of your Office site. Usually this is some variation of your company’s name.
Use the following command to open a PoSh session on Exchange Online:
import-PSSession $Session -DisableNameChecking
Now we’re working with PowerShell directly in Exchange Online, even though we’re sitting at our own computer.
Restore a Deleted Mailbox With PowerShell
The next part is super easy. Making the connection will have taken us far longer.
All we have to do is run the cmdlet shown below:
undo-SoftDeletedMailbox user@mycompany.com -WindowsLiveID user@mycompany.com -Password (ConvertTo-SecureString -String 'newpassword' -AsPlainText -Force)
Change both instances of user@mycompany.com to the appropriate mailbox name and Windows LiveID of the mailbox we want to restore. Note that they may not be the same.
We also have to set a new password for the mailbox. Change newpassword in the script to the password of your choice. You’ll need to relay that to the user and ask them to change their password the next time they log in.
Finally, use the next cmdlet to check to make sure that this worked.
get-Mailbox user@mycompany.com
If it has been restored, the cmdlet will return information about the restored mailbox. If it returns an error, go through the commands again and ensure that the correct mailbox and Windows LiveID are being used.
If that still doesn’t work, then we’ll need to restore the mailbox from a system backup. There’s many types of system backups, so that’s beyond the scope of what we’re doing today.
When we’re done, we must close the PoSh session. The number of PoSh sessions we have running is limited. Leaving it open uses one of those sessions. Unless we close it, we’ll have to wait for the session to time-out before we can start another one.
remove-PSSession $Session
That’s it. You may even want to script this into a PowerShell Module for ease of use if it happens again.
Restore a Deleted Mailbox In Exchange 2010
This doesn’t work for Office 365 or hybrid environments. It only works for Exchange 2010 on-premises.
On the mail server, open the Exchange Management Console (EMC).
Navigate to Recipient Configuration > Disconnected Mailbox. We should see the user’s mailbox there.
If we don’t, then the mailbox database cleaning process hasn’t happened yet. That’s OK, we can force it.
- Open the Exchange Management Shell (EMS) as administrator. This is where we can do Exchange-specific PowerShell work.
- Now we enter the cmdlet:
Get-MailboxDatabase | Clean-MailboxDatabase
- Once that is done, let’s go back to the EMC and right-click on Disconnected Mailbox, then click on Refresh.
- We should see the mailbox there now, and it is, along with another one that was deleted recently.
- Go back to EMS and enter the cmdlet:
Connect-Mailbox -Identity "username" -Database "Mailbox Database" -User "username"
- Username is the person’s Windows account name (like Test User), and Mailbox Database is the name of the database listed beside their name in the Disconnected Mailbox window in EMC.
- Refresh Disconnected Mailbox and you should see that their mailbox is no longer displayed there. Navigate to Recipient Configuration > Mailbox and ensure the user’s mailbox is there.
Check it to make sure all the settings are correct, like e-mail address and alias. If it looks good, the next time the user opens their Outlook, everything will be there just as it was.
Mailbox Restored
That’s how to use PowerShell to restore mailboxes in Exchange Online and Exchange 2010. If you’ve got a hybrid environment, it’s a bit more complicated but it can be done.
Just knowing that these different cmdlets exists puts you in a good position to work with Exchange, no matter what version or configuration.
Related Posts
- How to Repair a Corrupted User Profile in Windows 11
- Preparing for Windows 10 End of Support: Upgrading to Windows 11
- How to Access and Change Your WiFi Router Settings (2025 Edition)
- How to Install the Latest Large Language Models (LLMs) Locally on Your Mac
- How to Find Circular References in Microsoft Excel