Not many Excel users name their cells, constant values, or formulas inside the worksheet. However, there’s a purpose to Excel names. They make the worksheet content easier to read, write, and reuse. It’s easier to find content in a named range of cells than by using the cell references. It’s also fun as you can add unique characters to the name and create symbols such as smiley, or a heart.
Microsoft Excel allows you to make two types of names, the Defined and Table name. The Defined name refers to a cell, a range of cells, a constant, or a formula. It’s these names that this article will teach you how to use in a Name Box. The Table names are given to the tables when you insert them into the Excel spreadsheet. But before you start naming your Excel data ranges, let’s learn more about the Name Box in Excel!
What Is Name Box in Excel and Where Can You Find It?
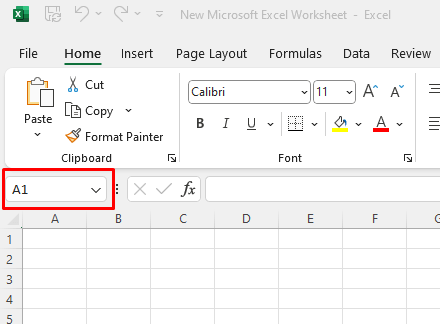
A Name Box in Excel is used to give cells, ranges of cells, or tables a name. It’s a box located to the left of the formula bar. When you select a certain cell in the spreadsheet, this Name Box will display its name. For example, selecting the cell A1 will result in the Name Box displaying A1.
You can use this Name Box to assign the group of cells a unique name, instead of the combination of their row and column designations.
How to Give a Name in the Name Box
Naming individual cells or a group of cells is as easy as simply typing the name you want in the name box. Just ensure you have selected a cell or a range of cells before typing the name in the Name Box. That’s how Excel will know what range of cells you’re referring to.
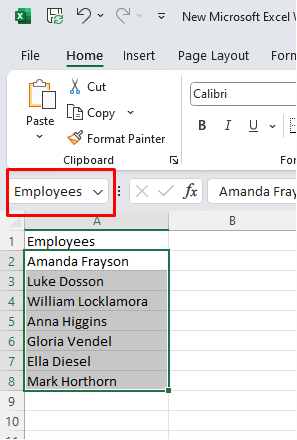
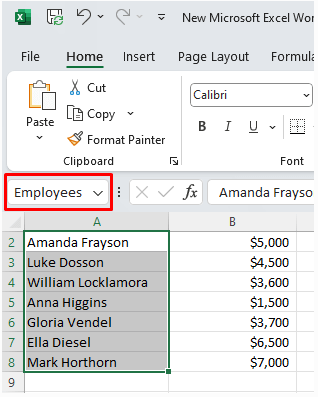
Let’s see it as an example. If you have a list of names, let’s say of employees in your company, you can select all the cells containing names (without a header) and give that range of the cells the name “Employees”. After typing the name you want in the Name Box make sure to press Enter Key on your keyboard to finish creating the name.
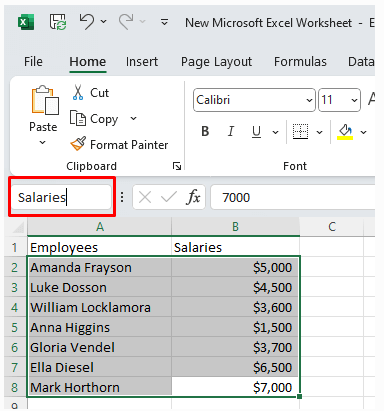
If you want to expand this range and include column B which would contain their salaries, you can do so by selecting the data in both the Employees and Salaries columns (without headers) and typing the new name designation in the Name Box.
Using the Excel Name Box to give a name to a range of cells is easy. But you might still be wondering why you would do that.
How to Use the Name Box
Now that you learned how to name cell ranges by typing the designation of your choosing into the Name Box, let’s see how you can use it. The Name Box gives you access to different features you’ll use daily in your work with Excel spreadsheets. Some of these features are crucial if you’re working with large Excel databases.
1. Quickly Find a Specific Cell
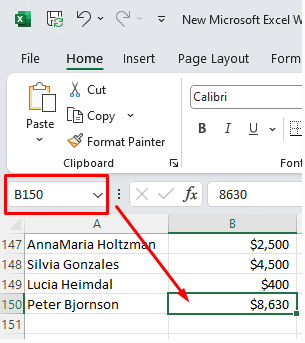
Let’s say your Excel worksheet is filled with data, but you need to find specific data. You know it’s in a cell designated B150. Scrolling through the worksheet to find cell B150 can consume your time needlessly. Instead, you can use the Name Box to quickly find and select that specific cell.
All you need to do is select the Name Box and type B150 in it. Hit the Enter Key on your keyboard and this action will automatically take you to the B150 cell and select it.
2. Select Multiple Cells
You can use Name Box to select multiple cells at once, instead of dragging your mouse through the range of cells you need. Let’s say you want to select all the Employees on your list. Just type the name “Employees” in the Name Box and hit enter to select the range of cells designated by that name.
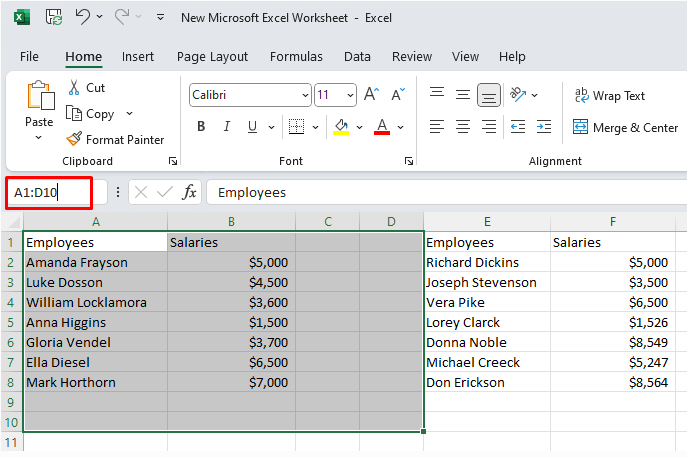
You can also quickly select a range of cells to which you didn’t give a name. Simply input the column and row designation of the range you need to be selected, and hit the Enter key. For example, you want to select all the cells from A1 to D10. Input A1:D10 into the Name Box to make the selection quickly.
Selecting a range of cells with the Name Box is especially useful if your worksheet contains empty cells. In that case, using the keyboard shortcut Shift + Ctrl + Right arrow will only select until it finds an empty cell. It’s the same with the Shift + Ctrl + Down arrow shortcut. It will stop selecting as soon as it hits the empty cell.
3. Quickly Select a Range of Cells From an Active Cell
Let’s say you want to select a range of cells starting from the active cell. An active cell is the cell you currently have selected.
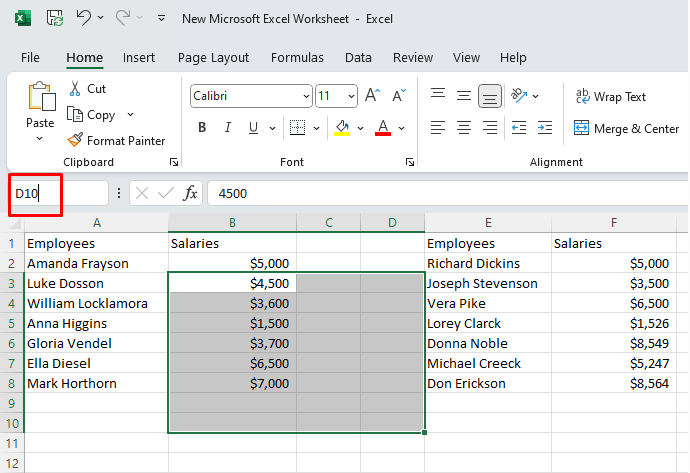
Let’s say it’s a B3 cell, and you want to make a selection to D10. In that case, you don’t have to type the whole reference for the range B3:D10. Instead type only the last cell you want selected, in this case, the D10. However, don’t press Enter. Rather use the keyboard macro Shift + Enter to select the range of cells.
4. Select Two Cells
If you want to quickly select two cells that are not next to each other, you can use the Name Box to do so quickly. You won’t need to scroll through your document to find the particular cell you need.
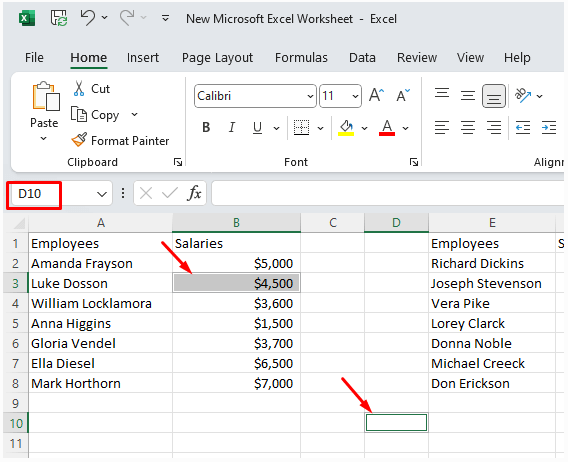
Let’s say you want to select B3 and D10. Select the B3 and type D10 in the Name Box. Then press Ctrl + Enter on your keyboard.
5. Select Multiple Ranges of Cells
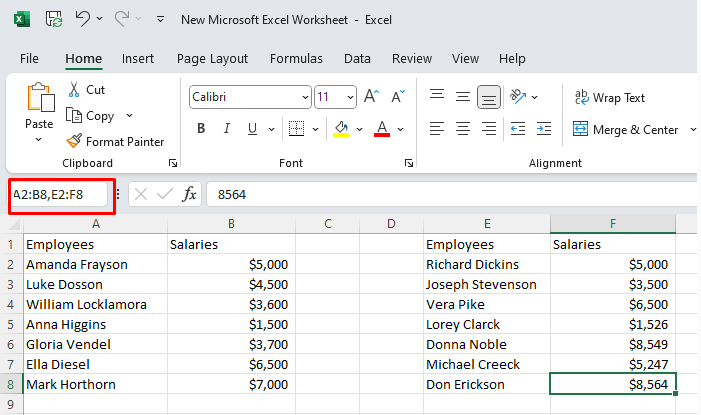
Selecting multiple ranges by using the Name Box is easy. All you need to do is type the designations of the ranges separated by a comma (,). After inputting the ranges, hit Enter on your keyboard to make a selection.
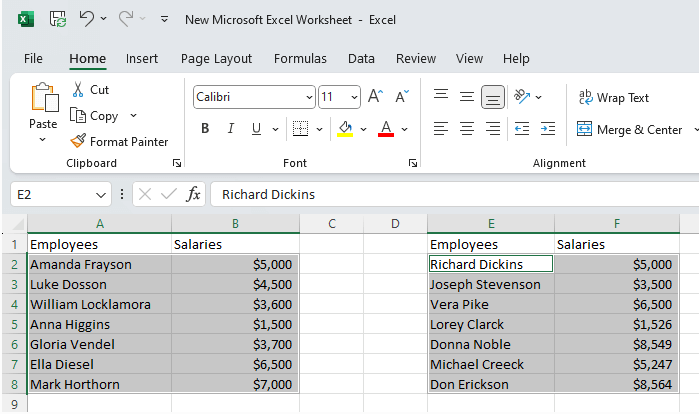
Let’s see it as an example. You want to make a selection of a range of cells between A2 and B8 as well as E2 and F8 to have all the employees and their salaries selected. Type A2:B8,E2:F8 in the Name Box.
Once you hit enter, you’ll get a selection of the two ranges of cells.
6. Select Entire Column or Row
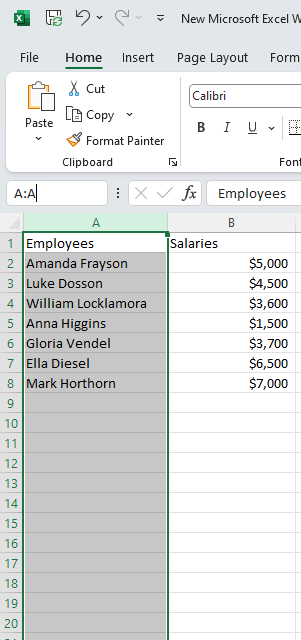
Selecting an entire column from the Name Box is easy. If you want to select the entire A column just type A:A in the name box and hit the Enter key to make a selection.
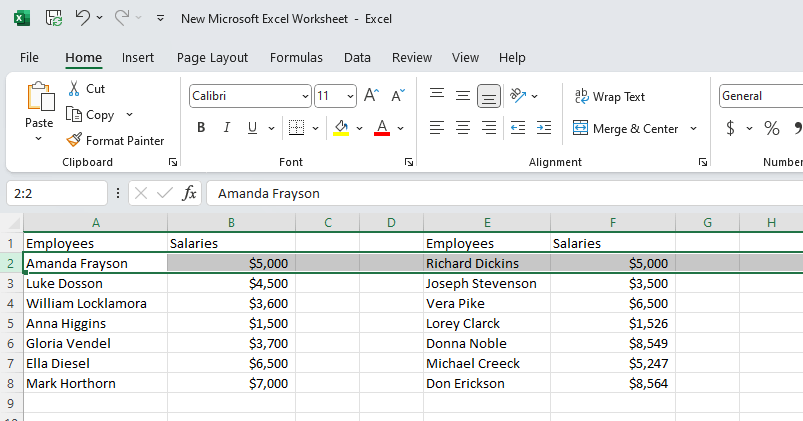
It’s the same with selecting an entire row. If you want to select the entire row 2 just type 2:2 and hit enter.
Excel Name Rules
There are certain rules you must follow when creating names in Excel. These rules are put in place so that the Excel program can easily deal with them. It needs to be able to recognize them and use the names in functions.
- The first character of a name must be a letter, underscore (_), or a backslash (\).
- All other characters in the name can be letters, numbers, periods, or underscore characters.
- It’s not allowed to use space characters.
- Your names are not allowed to look like cell addresses (R2D2, or C3P0)
- Because Excel uses C,c,R, and r characters as selection shortcuts, they can’t be used as names.
- Names are not case-sensitive. Excel will treat Employees and EMPLOYEES as if it’s the same name.
Using Name Manager in Excel
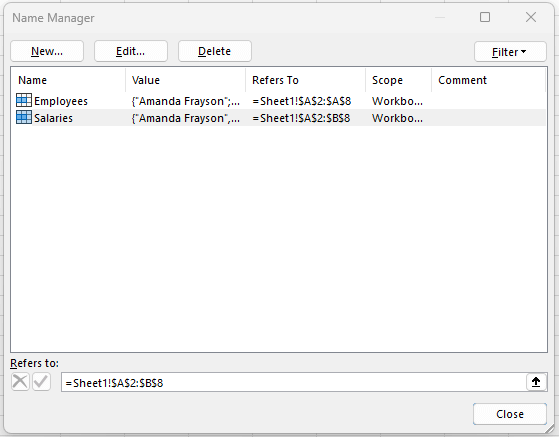
The Excel Name Manager is designed to manage names. You can use it to edit, find, filter, or delete existing names. You can also use it to create new ones. Accessing Name Manager is easy. You can find it in the Formulas tab on the ribbon, in the Define Name group.
Or you can use the keyboard shortcut Ctrl + F3 to quickly open it.
Once the Name Manager dialog box is open, you’ll see the list of all the existing names in the currently open worksheet.
1. Edit Names with Name Manager
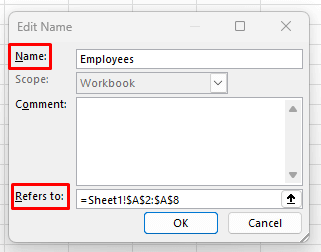
If you want to change the existing name with the Name Manager, simply select the name and click the Edit… button in the Name Manager dialog box. Here you can change not only the name but also the reference.
When you input the new name, select OK to finish the edit.
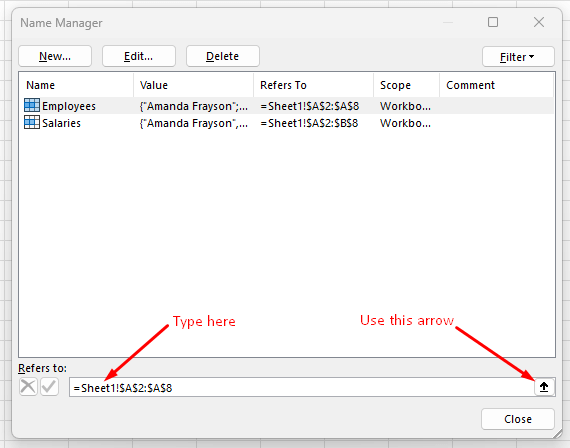
Note: to edit the reference you don’t need to enter the Edit dialog box. You can do it from the Name Manager dialog box by selecting the name you want to edit and typing a new reference directly into the Refers to box. Alternatively, you can use the arrow next to the Refers to box to find the desired range.
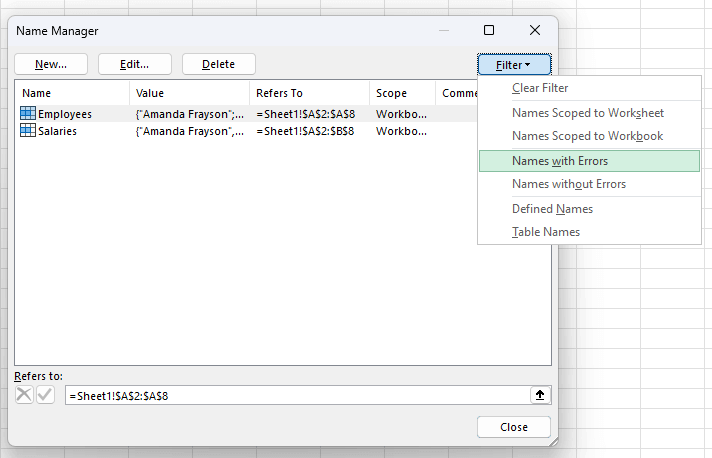
2. Filter Names with Name Manager
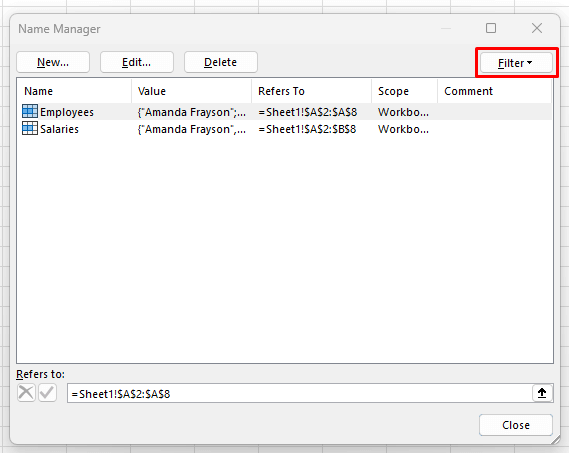
The Filter button in the Name Manager dialog box allows you to quickly find certain names by using filters. This is especially useful if your Name Manager contains a large list of names.
You can filter names in three categories:
- Names scoped to worksheet or workbook.
- Names with or without errors.
- Defined names or table names.
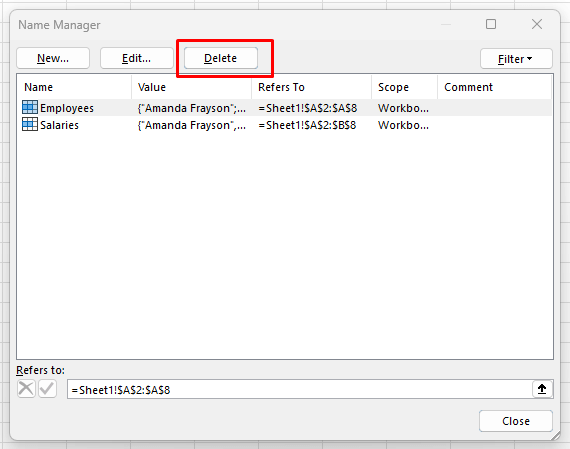
3. Deleting Names with Name Manager
Deleting names with Name Manager is very intuitive. Select the desired name and then select the Delete button.
You can also delete several names at once if you select multiple and then select the delete button. To select multiple names either click and drag your mouse or select one, then press and hold the Ctrl key on the keyboard and select other names you want to delete.
You can also select the names by using filters. If you want to delete all the names with errors, use the Names with Errors filter to select them before clicking the Delete button.
As you can see, the Name Box in Excel is a versatile tool that offers users a convenient way to navigate, select, and manage ranges, cells, and named ranges within their workbooks. Whether you’re a beginner just starting to explore the world of Excel or a seasoned user looking to enhance your skills, mastering the Name Box is a valuable asset that can greatly improve your productivity and effectiveness in spreadsheet tasks. So, next time you’re working in Excel, don’t overlook the power and convenience of the Name Box. It’s a small feature with big benefits.
Related Posts
Nicolae is a Jack of all trades technology writer with a focus on hardware, programming languages, and AI image-processing software. Over the last five years, he has ghostwritten numerous tech how-to guides and books on a variety of topics ranging from Linux to C# programming and game development. Nicolae loves everything that has to do with technology and his goal is to share his knowledge and experience with others. Read Nicolae’s Full Bio

