Are you finding your Wi-Fi slower and dropping connections lately? Chances are your Wi-Fi router is broadcasting on the same channel as someone else, or maybe several people.
Just like radio, Wi-Fi broadcasts use channels. Imagine two local radio stations, being on the same channel. How would that work? It doesn’t and that’s a good reason to check, and possibly change your Wi-Fi channel.
It’s not just other Wi-Fi routers to consider. Anything that emits a radio frequency can cause interference. Microwave ovens, cordless phones, even Bluetooth devices could be using the same channel.
Changing your Wi-Fi channel can mean better download speeds, less lag when gaming, and greater range. If you want to learn more about Wi-Fi channels, read on. If you just want to change the channel on your router, keep scrolling.
What is a Wi-Fi Channel?
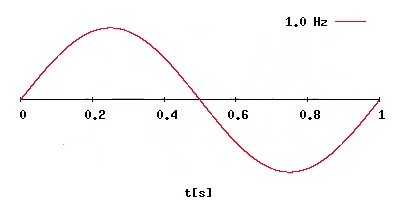
Wi-Fi routers broadcast at two different frequency bands: 2.4 GHz and 5 GHz. GHz means Gigahertz. A hertz is the unit to show cycles, or waves, per second. The Wi-Fi signal moves through the air as a wave. Giga means billion. The router broadcasts at 2.4 billion or 5 billion cycles per second.
Within those bands, the router broadcasts at slightly different frequencies. For 2.4 GHz, the frequencies can range from 2.400 GHz to 2.499 GHz. Each channel is 0.005GHz different from its closest neighbors. You’ll see this in some instructions below. In the 5GHz range, there’s a 0.010 GHz difference between neighboring channels.
Why, though? A lower frequency means the signal travels farther, but the quality isn’t as good. A higher frequency means good quality signal, but not as much range. By having both bands, you have greater Wi-Fi coverage and a better signal closer to the router.
When closer to the router, the device will jump to the 5 GHz frequency. When further away from the router and the quality of the 5 GHz frequency drops, the device will jump to the 2.4 GHz frequency so it can stay connected.
How Do I Know If I Should Change My Wi-Fi Channel?
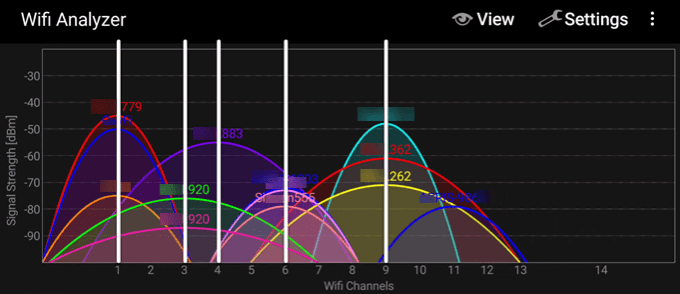
Don’t change your Wi-Fi channel for no reason. Let’s check and see if your Wi-Fi problems might be channel-related first. To do that, you’ll need a good Wi-Fi analyzer app. For this article, we’re using Wi-Fi Analyzer on Android.
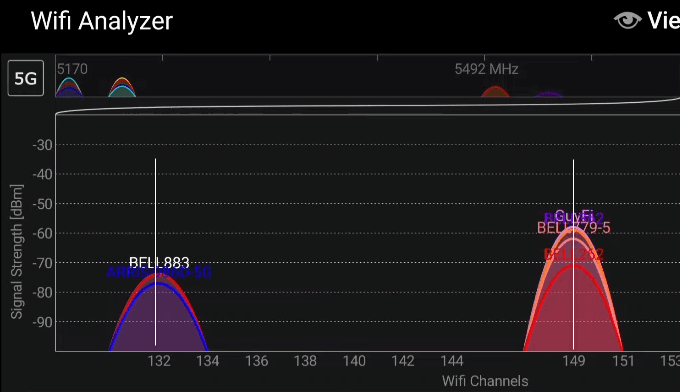
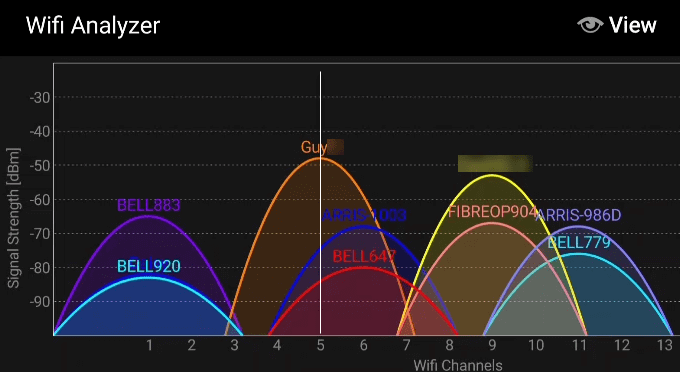
In the next two images, the white lines help us see what channels are being used. Each arc represents a Wi-Fi router. In the 2.4 GHz graph, channels 1, 6, 9, and 11 are being used. Each channel is being used by multiple routers. So no one on those channels is getting the best signal.
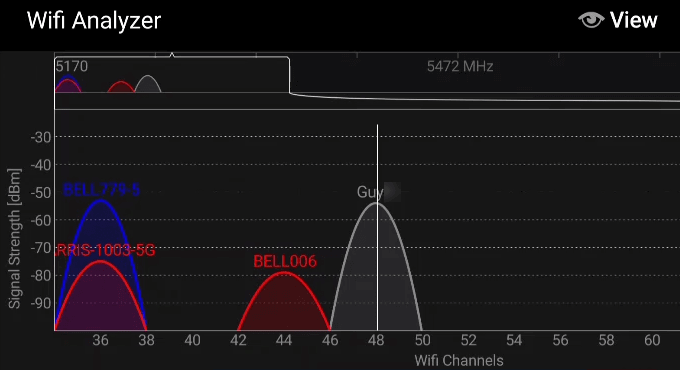
In the 5 GHz graph, there are multiple routers on channels 132 and 149. The one we want is in channel 149, sharing with 3 other routers.
So, yes, the Wi-Fi service could improve by changing the channels. Let’s do that.
How to Change Wi-Fi Channels on Routers
We’ll look at how to do this on several of the best Wi-Fi routers. First is Asus, then Linksys, then D-Link, and finally a Netgear Wi-Fi router. If you have a different router, that’s alright. The steps will be similar. Also keep in mind that if you have a router from the manufacturers listed here, the steps could still be different.
Change Channel on Asus Routers
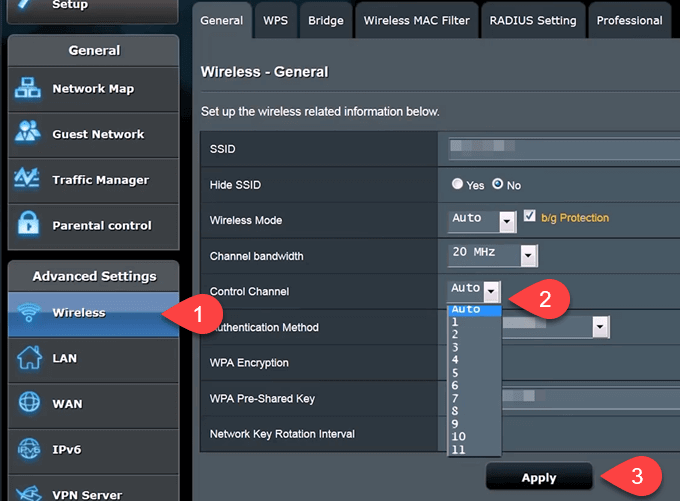
- Login to the router. Look for Advanced Settings on the left side and select Wireless.
- Find the Control Channel drop-down menu and select a different channel.
- Select Apply to commit the change.
Change Channel on Linksys Routers
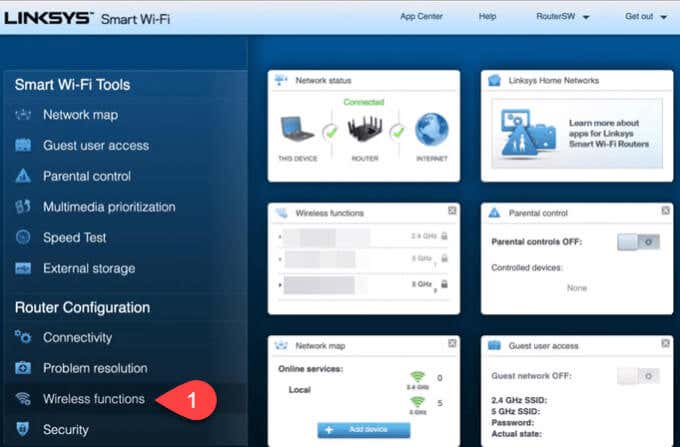
- Log in to the Linksys router. Look for Wireless functions and select that.
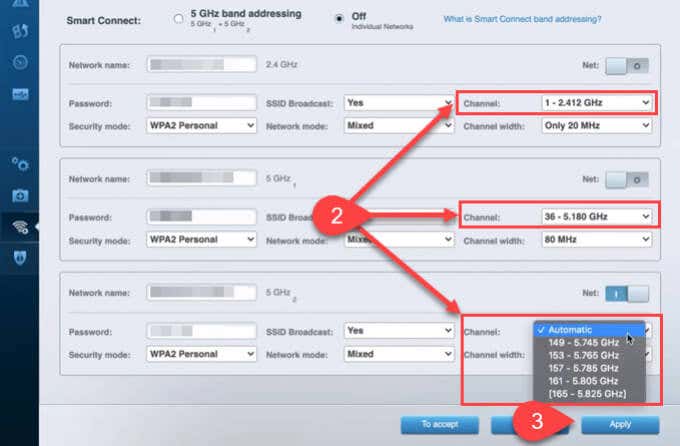
- Change the channel in any, or all, of these spots.
- Select Apply to commit the change.
Change Channel on D-Link Routers
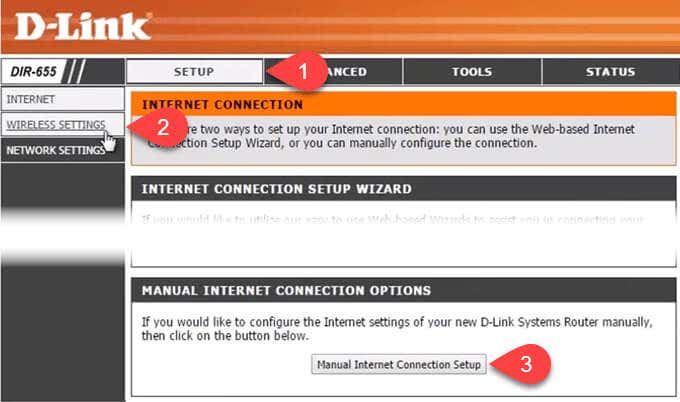
- Log in to the D-Link router. Select Setup.
- Select Wireless Settings.
- Scroll to the bottom and select Manual Internet Connection Setup.
- Scroll to the bottom of the new page and select Manual Wireless Network Setup.
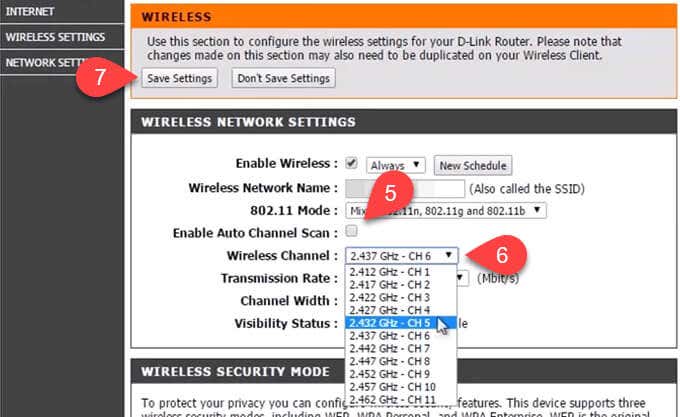
- If the Enable Auto Channel Scan box is checked, uncheck it.
- Select a channel in the Wireless Channel drop-down.
- Then select Save Settings to commit the change.
Change Channel on NetGear Routers
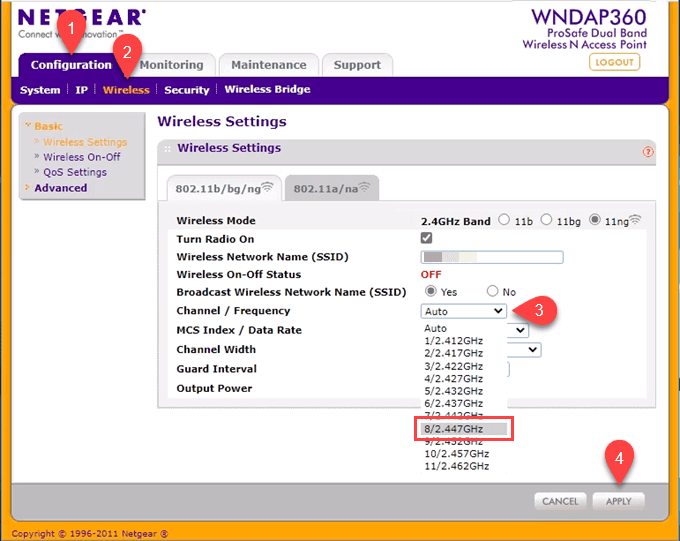
- Login to the router. It will open to the Configuration tab.
- Select the Wireless option.
- Look for the Channel / Frequency field. It’s probably set to Auto. Select a channel that no one near you is using.
- Select Apply to make the change stick.
That takes care of the 2.4GHz band, now to change the channel in the 5 GHz band. Select the 802.11a/na tab and do the same steps.
Confirm the Wi-Fi Channel Has Changed
Go back to the Wi-Fi Analyzer and confirm the changes. In the 2.4 GHz band, our router is now alone on channel 5.
On the 5 GHz band, we’re the only router on channel 48.
So, we have changed our channels and the Wi-Fi performance will be better… until someone jumps on our channels.
Related Posts
Guy has been published online and in print newspapers, nominated for writing awards, and cited in scholarly papers due to his ability to speak tech to anyone, but still prefers analog watches. Read Guy’s Full Bio
