You’re having a blast surfing the internet when a “No Internet, Secured” error message suddenly pops up. It’s a weird and cryptic message, but what’s clear is that your internet connection has stopped working.
Web pages won’t open, and you can’t download a thing! What’s going on? It’s much simpler than you think to fix the issue on a Windows 10 or 11 PC.
What Does “No Internet, Secured” Even Mean?
This error message can be somewhat confusing if you don’t know much about how your internet connection works. However, it makes perfect sense when you think about it.
You see, your computer isn’t directly connected to the internet. Instead, you have a device such as a network router passing information to the Wide Area Network (WAN). However, your computer is also networked to other devices the router serves inside your home. That’s known as the Local Area Network (LAN), and this network will keep working even if something goes wrong with your internet connection.
The “No Internet, Secured” status message simply means that while your connection to the Wi-Fi router is fine and adequately encrypted (“Secured”), you aren’t receiving any data. We need to determine why the internet connection is dead to solve this issue.
Check for Network Outage
The most common reason you may see this error is that your ISP’s internet connection is down. That’s not your fault, and it means there’s nothing wrong on your end. The easiest way to check for this is to see whether you have an internet connection through a different device on the same router.
If you can access the web through another device like your smartphone but not your Windows PC, you know the problem must be with your computer, not the internet connection.
Reset Your ISP Connection
If you’re using fiber or DSL, you can sometimes request a connection reset by the Internet Service Provider (ISP). How you do this depends on the ISP. You might have an app, a support email address, or a phone number. Whatever channel you use, contacting your ISP is a good first step to resolving problems with internet connectivity outages.
Verify Your Connection Status
If other devices but your computer can access the internet, verify that your computer is connected to the correct network. It’s a silly detail, but make sure you’re connected to the right Wi-Fi network before poking around for a fix.
You may have accidentally connected to a Wi-Fi network that doesn’t have an internet connection. Perhaps you have a GoPro that you left on or a mobile hotspot that doesn’t have a SIM card.
Disable Your VPN Connection or App
Virtual Private Networks (VPNs) can help you surf the internet more securely and privately. However, they can occasionally disrupt your device’s internet connection. If you have an active VPN app on your PC, turn it off and check if that stops the “No Internet, secured” error.
VPNs can also malfunction if they’re buggy or outdated. Therefore, we recommend updating your VPN app and keeping it up-to-date.
Reset Your Router (and Your Computer)
Before touching your Windows computer, unplug your router’s power and leave it unplugged for a few minutes. Afterward, reconnect the Wi-Fi router to the wall outlet and power it back on. This simple trick can clear the “No Internet, Secured” connection error in the Windows system tray or notification area.
While you’re at it, reboot your computer as well. It can’t hurt, and this also has a chance of resolving the issue without further effort.
Reset Your Computer’s Network Settings
Restoring your PC’s internet settings to factory default is another way to resolve the “No Internet, secured” error and other network-related issues.
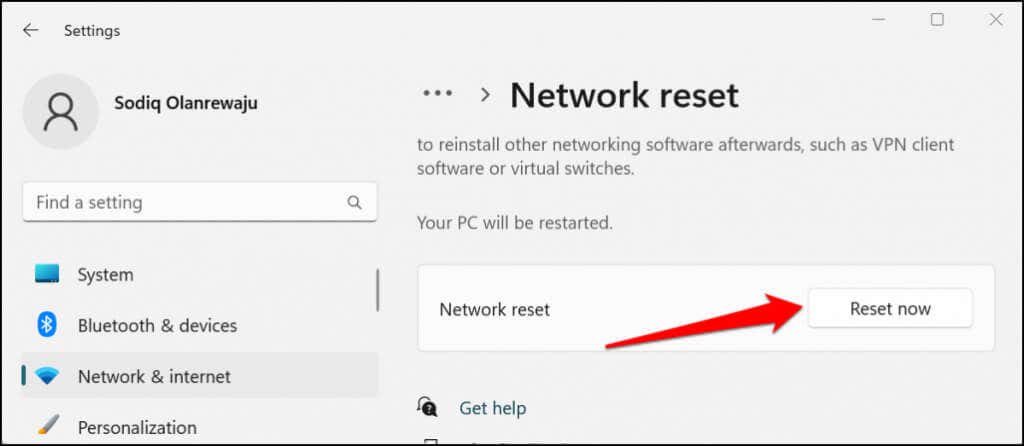
If your PC runs Windows 11, go to Settings > Network & Internet > Advanced network settings > Network reset and select Reset now.
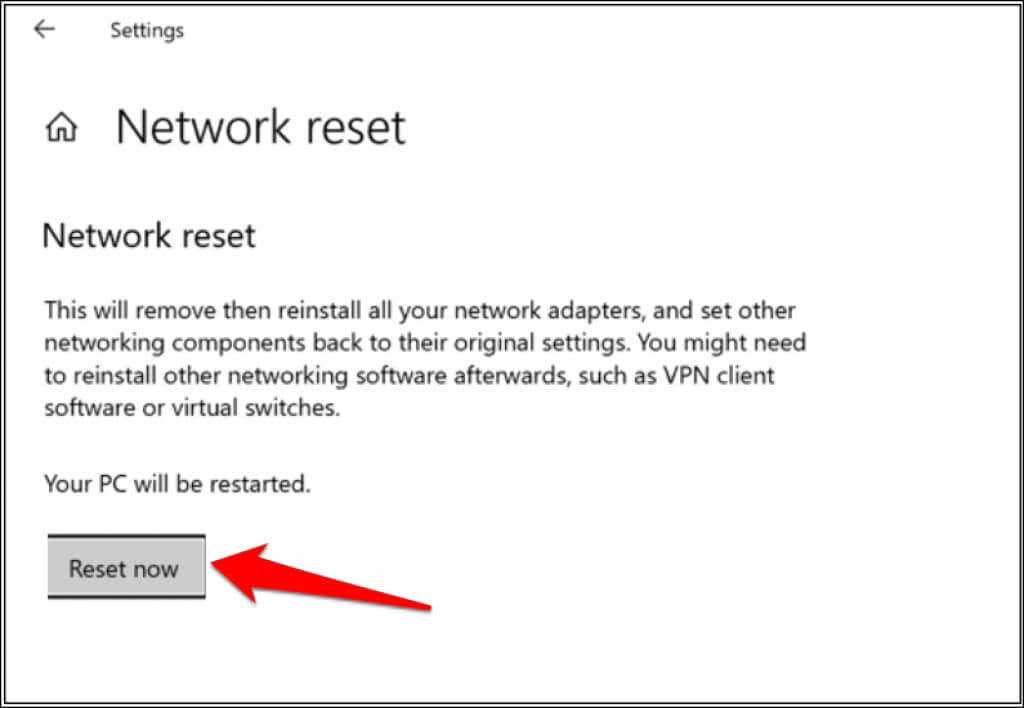
In Windows 10, head to Settings > Network & Internet > Status > Network reset and select Reset now.
Windows will reboot your computer after the network reset operation. Reconnect your PC to the Wi-Fi network and check if you can access the internet.
Switch From Wi-Fi to Ethernet
Since this error is specific to Wi-Fi connections, it might be a problem with your actual Wi-Fi hardware or software. Try connecting the Windows 10 or 11 computer to the router via Ethernet instead. If the internet connection starts working, it’s a sign that the problem is either with the Wi-Fi hardware, network drivers, or how the Wi-Fi has been configured on the computer or the router itself.
Run the Windows Network Troubleshooter
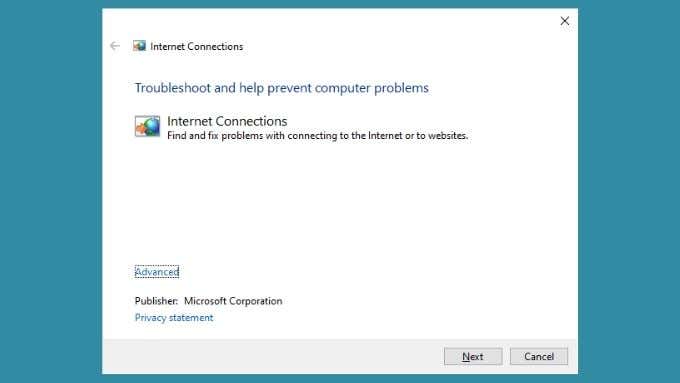
If there’s a misconfiguration problem on your Windows computer, one quick way to get to the bottom of it is by using Windows’ network troubleshooter.
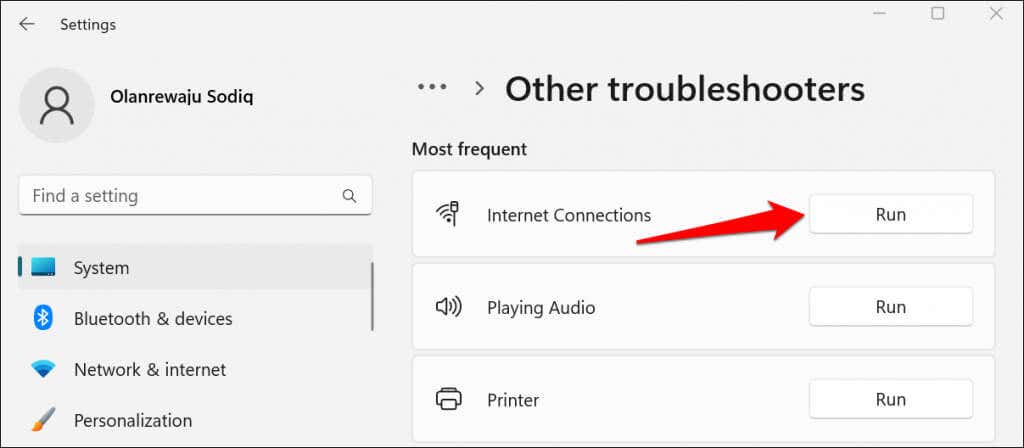
In Windows 11, head to Settings > System > Troubleshoot > Other troubleshooters and select Run next to “Internet Connections.”
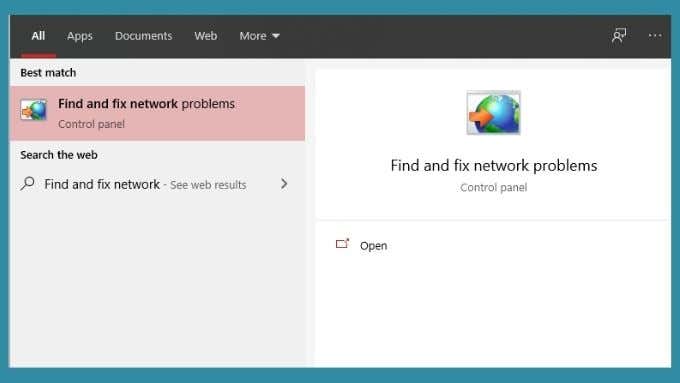
If your PC runs Windows 10, go to Settings > Network & Internet > Status > Change your network settings and select Network troubleshooter. You can also run the network troubleshooter through the Control Panel.
- Open the Start Menu
- Type and select Find and fix network problems in the search bar, and select Open.
- Select Next to run the troubleshooter.
The troubleshooter will show a report once it diagnoses your PC. If possible, it will tell you that problems were found and repaired. Hopefully, that will solve your internet connection issue. Alternatively, it may tell you what’s wrong but won’t be able to fix it. You should use that information to inform your troubleshooting efforts further.
Change Networking Settings
Although Microsoft doesn’t recommend disabling the Internet Protocol version 6 (IPv6), doing so could temporarily fix connection problems in Windows 10 and 11.
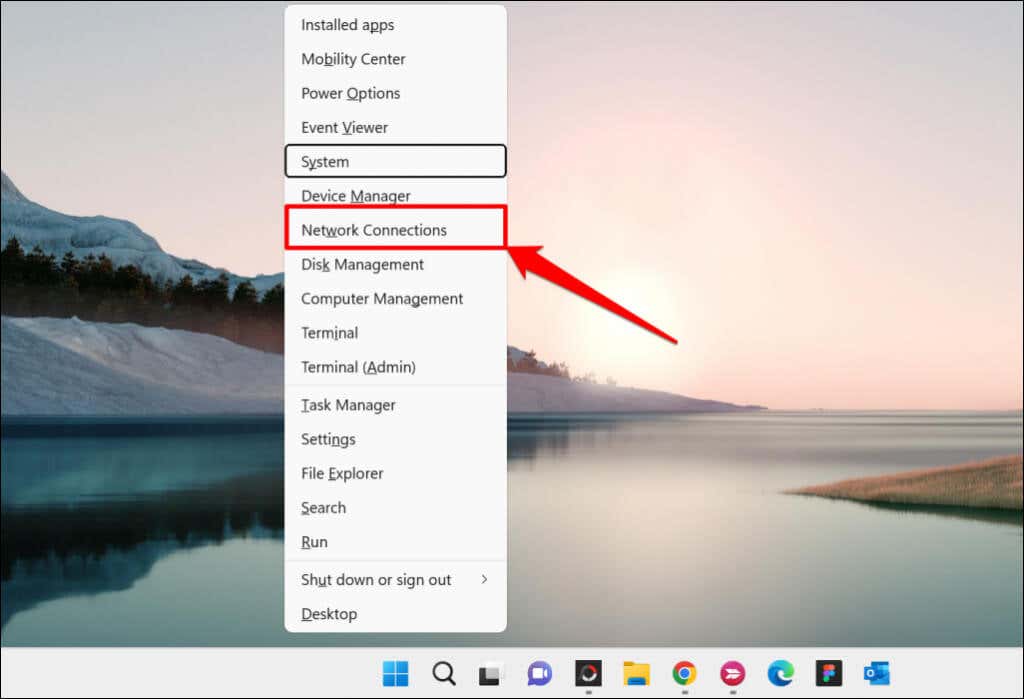
- Press Windows key + X and select Network Connections.
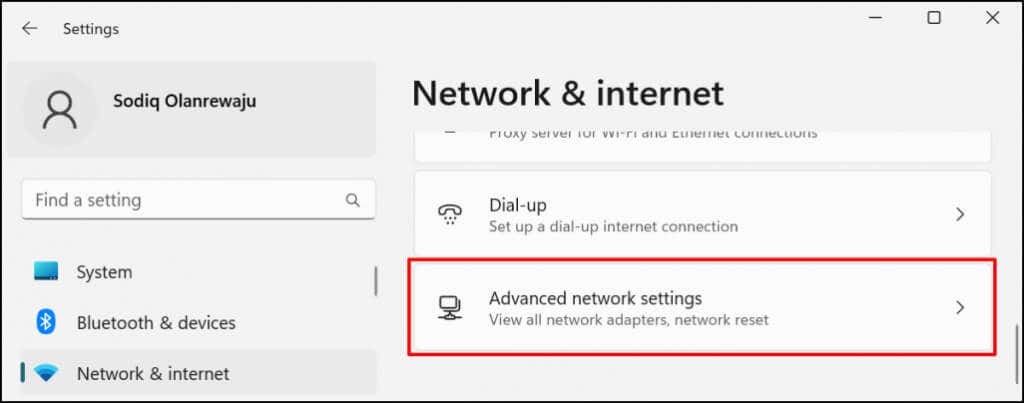
- Select Advanced network settings at the bottom of the page.
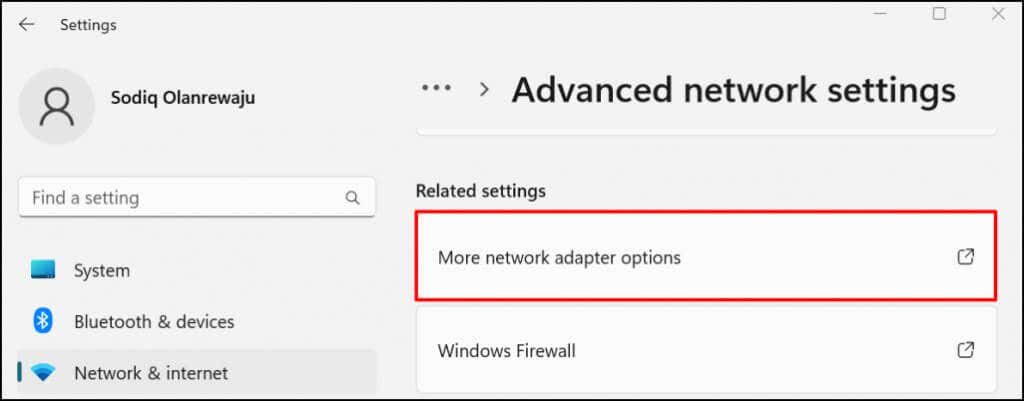
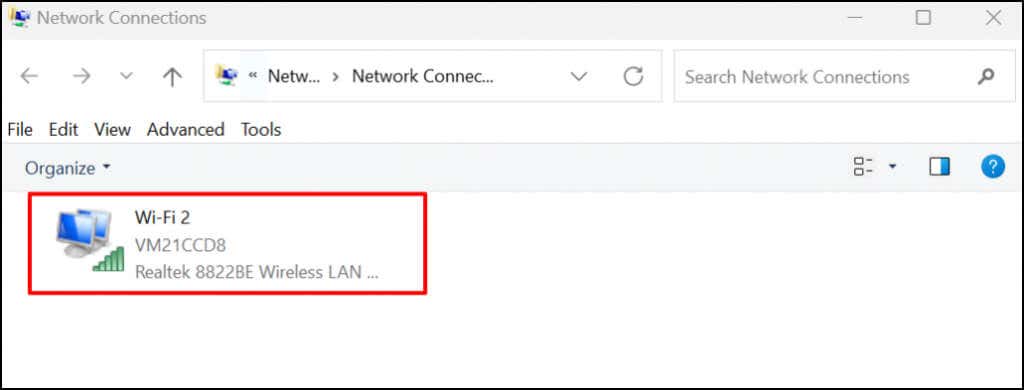
- Scroll to the “Related settings” section and select More network adapter options (or Change adapter options in Windows 10).
- Double-click the wireless network displaying the “No Internet, secured” error message.
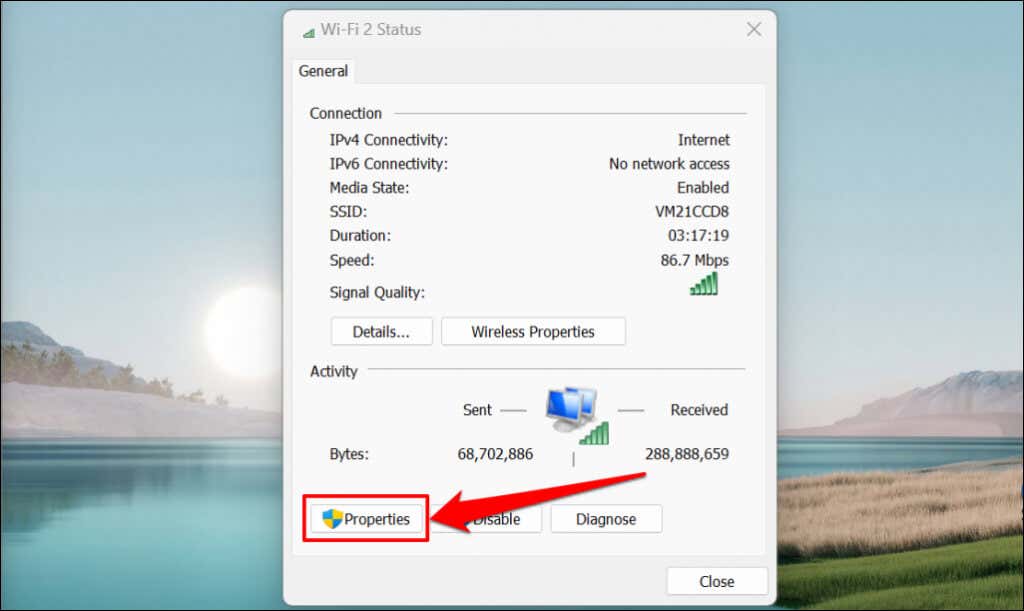
- Select Properties to open the wireless adapter settings.
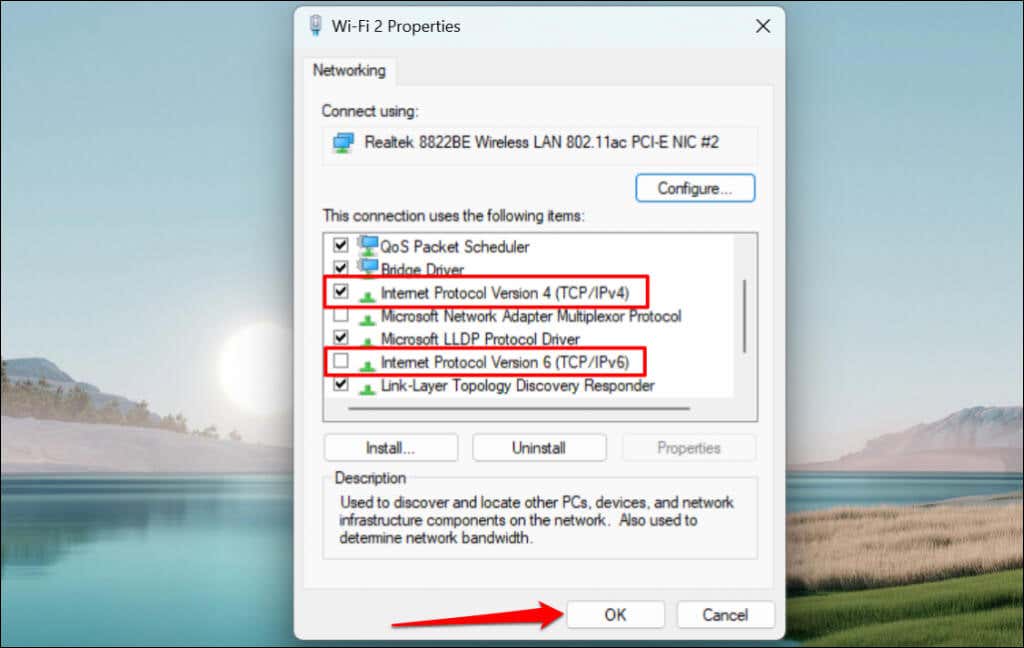
- Uncheck Internet Protocol Version 6 (TCP/IPv6) in the connection properties window. Leave the “Internet Protocol Version 4 (TCP/IPv4)” box checked and select OK to proceed.
Re-enable the IPv6 protocol if the error persists or other Windows components malfunction when you disable IPv6.
Refresh Your PC’s IP Configuration and Flush DNS Cache
IP address problems often cause this error, and a fast way to resolve it is to get the computer in question to release the IP address the router has assigned to it. Then your computer will simply ask the router for a new IP address, which hopefully doesn’t have any conflicts.
Refer to our tutorial on renewing or refreshing IP addresses in Windows for detailed instructions.
You should also flush your PC’s DNS cache using the IPconfig utility through the Windows Command Prompt or PowerShell. To flush your DNS cache, do this:
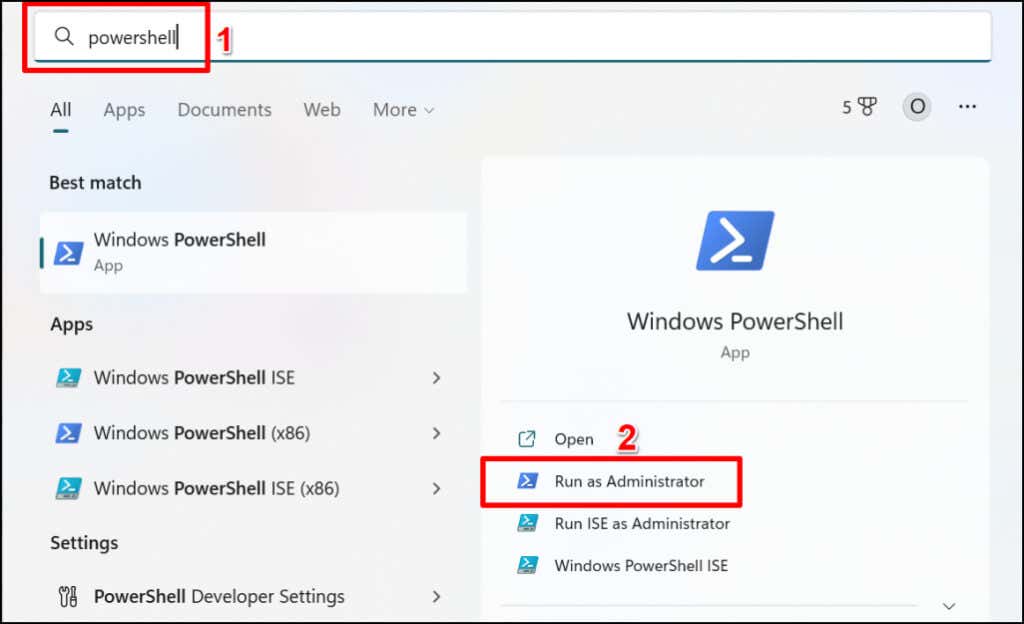
- Press your PC’s Windows key, type powershell in the search bar, and select Run as Administrator.
- Type or paste ipconfig /flushdns in the terminal and press Enter.
Close Windows Powershell when you see a “Successfully flushed the DNS Resolver Cache” success message. That should fix any IP-related problems and restore internet access to the Wi-Fi network.
Update Your Computer
Network-related errors in Windows crop up in older versions of the operating system. If you haven’t updated your computer in a long time, install the latest Windows version available for your computer.
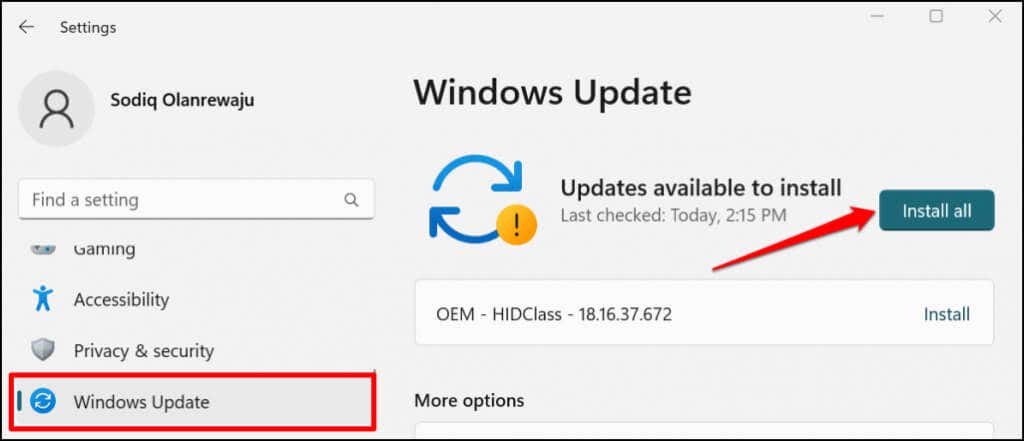
Go to Settings > Windows Update (or Updates & security in Windows 10) and select Check for updates or Install all.
Roll Back the Last Windows Update
Interestingly, a broken Windows update can also cause this error. It’s impossible to say whether this is just a case of buggy updates. Still, there’s no harm in rolling back the most recent Windows update to see if it makes any difference and fixes the error.
To undo the last Windows update, here’s what to do:
- Press Windows key + I to open the Windows Settings menu.
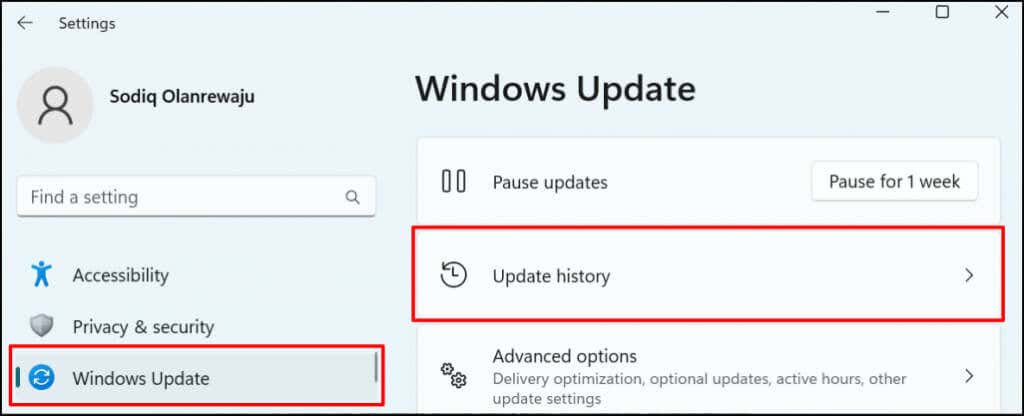
- Select Windows Update on the sidebar and choose Update history.
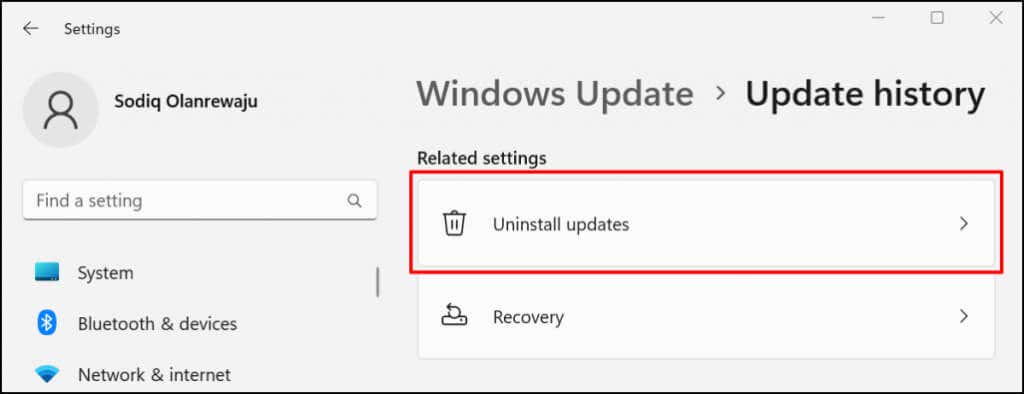
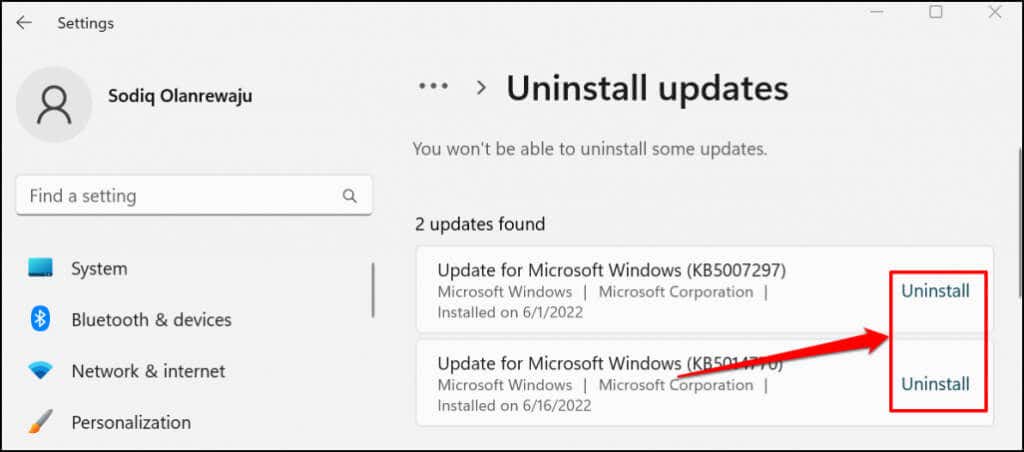
- Scroll to the “Related settings” section and select Uninstall updates.
- Locate the (latest) update that you suspect is responsible for the “No Internet, secured” error. Select Uninstall to delete the update and roll your PC back to the previous Windows version.
In Windows 10, go to Settings > Update & Security > Recovery > Go back to the previous version of Windows 10 and select Get Started.
If your last Windows update was somehow related to the error, it should all work again. Remember that Windows does not keep the updated recovery data indefinitely. So if it’s been a long time since your last update, you may not be able to roll the update back. That said, if the update wasn’t recent, it probably isn’t related to your problem.
Rolling Back Network Drivers
Windows might update your network drivers occasionally, which can occasionally cause issues. You can roll your Wi-Fi or Ethernet card’s driver back to a stable version that worked properly. Refer to our tutorial on rolling back drivers in Windows for step-by-step instructions.
Update or Reinstall Network Adapter Driver
Your computer might fail to connect to the internet if its network adapters are bug-ridden or outdated. Updating your computer’s network adapter might resolve the “No Internet Secured” error.
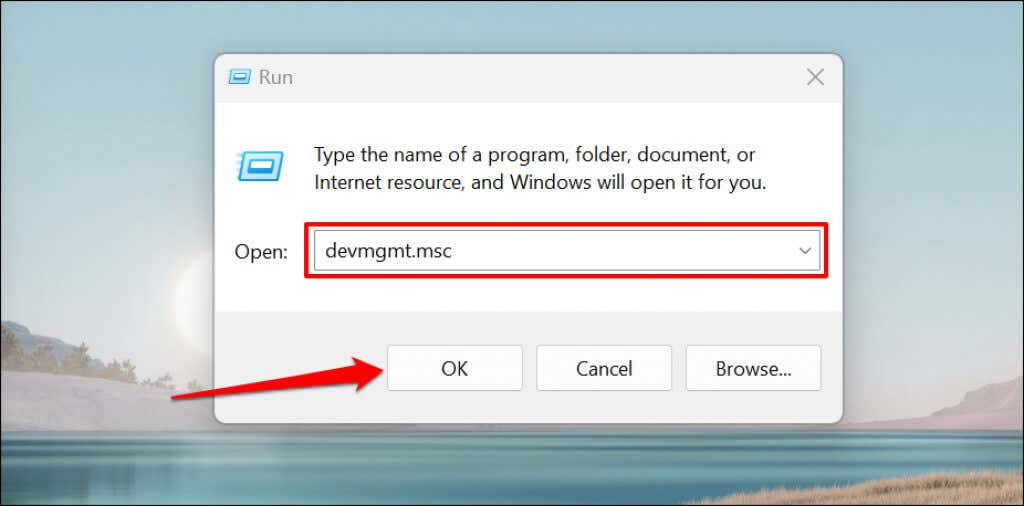
- Press the Windows key + R to open the Windows Run box.
- Type or paste devmgmt.msc in the Run box and select OK or press Enter. That will launch the Windows Device Manager.
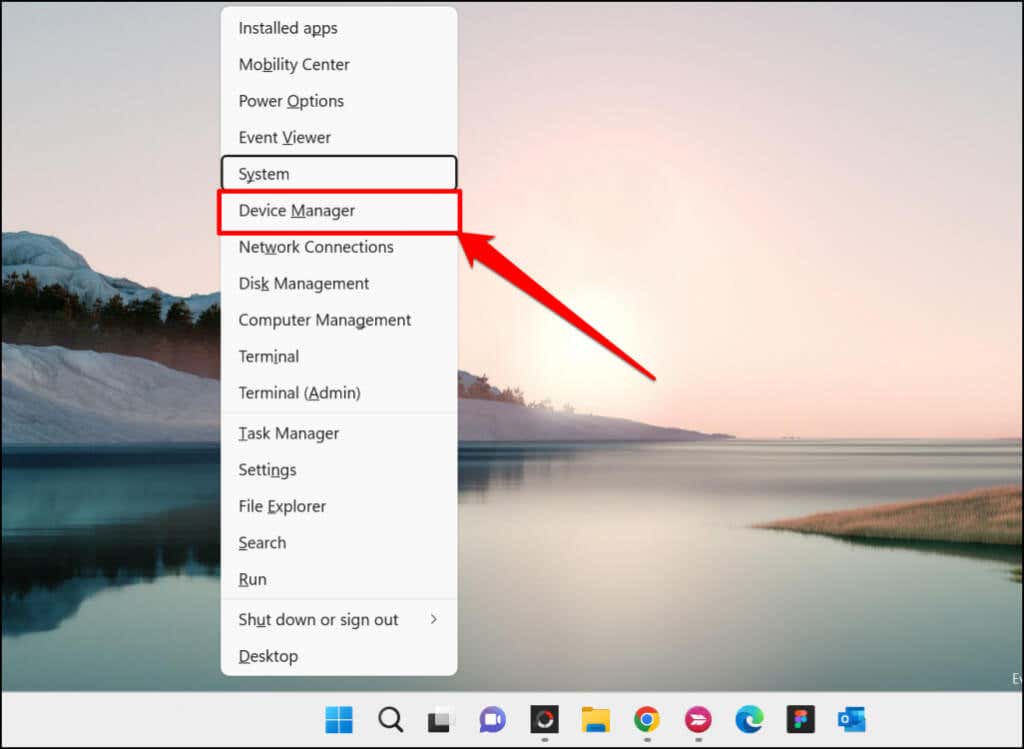
Alternatively, right-click the Windows icon on your PC’s taskbar and select Device Manager on the pop-up menu.
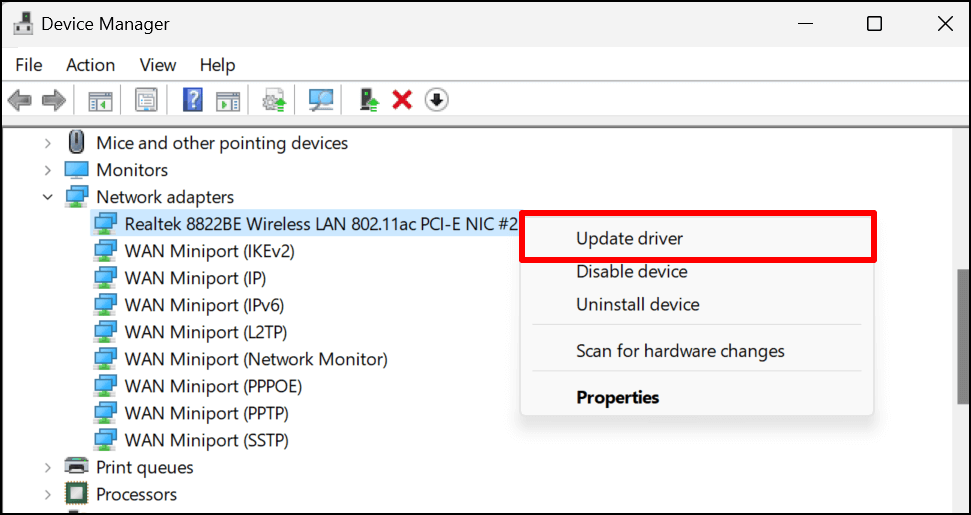
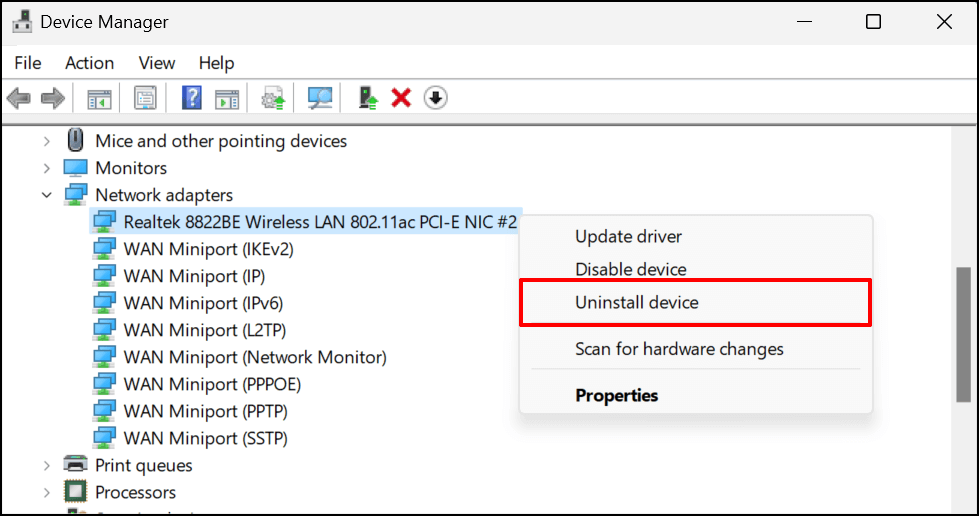
- Expand the Network adapters category, right-click your network adapter, and select Update driver.
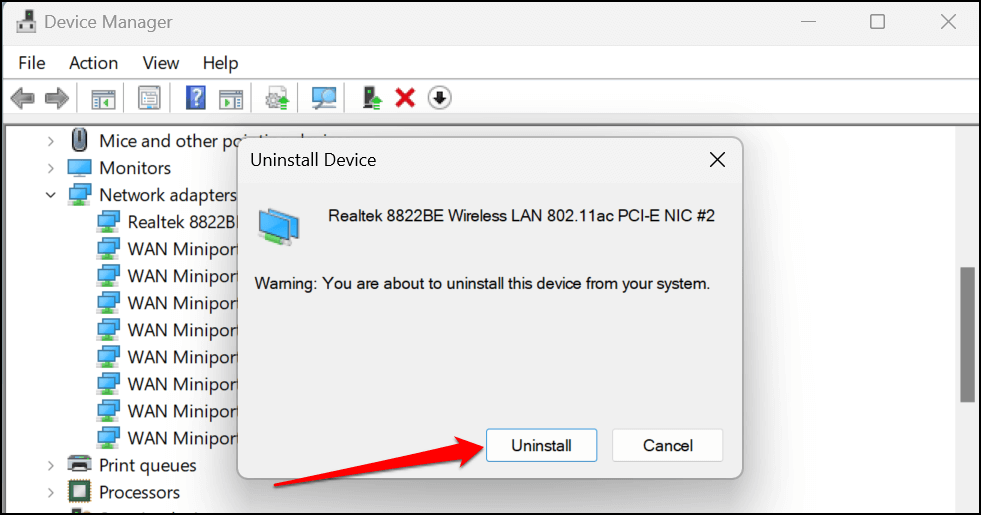
- If the problem persists, delete your PC’s network driver and reinstall a fresh copy of the driver. Right-click the adapter and select Uninstall device.
- Select Uninstall on the confirmation page.
Restart your computer when the uninstallation is complete. Windows will automatically (re)install the driver when your computer comes back on. Connect your PC to a Wi-Fi network and check if reinstalling the network driver resolved the problem.
Get More Help
Hopefully, the simple set of tips above will quickly have your internet connection up and running like normal. If you didn’t find the help you needed, refer to our tutorial on troubleshooting internet connectivity failures in Windows.
The tutorial covers other causes and troubleshooting fixes for complex network-related problems like IP address conflicts.
Related Posts
- Preparing for Windows 10 End of Support: Upgrading to Windows 11
- How to Fix a “This file does not have an app associated with it” Error on Windows
- How to Fix an Update Error 0x800705b4 on Windows
- How to Resolve “A JavaScript error occured in the main process” Error on Windows
- How to Fix the Network Discovery Is Turned Off Error on Windows
