
If you are just getting started with VBA, then you’ll want to start out studying our VBA guide for beginners. But if you’re a seasoned VBA expert and you’re looking for more advanced things you can do with VBA in Excel, then keep reading.
The ability to use VBA coding in Excel opens up a whole world of automation. You can automate calculations in Excel, pushbuttons, and even send email. There are more possibilities to automate your daily work with VBA than you may realize.
Advanced VBA Guide For Microsoft Excel
The main goal of writing VBA code in Excel is so that you can extract information from a spreadsheet, perform a variety of calculations on it, and then write the results back to the spreadsheet
The following are the most common uses of VBA in Excel.
- Import data and perform calculations
- Calculate results from a user pressing a button
- Email calculation results to someone
With these three examples, you should be able to write a variety of your own advanced Excel VBA code.
Importing Data and Performing Calculations
One of the most common things people use Excel for is performing calculations on data that exists outside of Excel. If you don’t use VBA, that means you have to manually import the data, run the calculations and output those values to another sheet or report.
With VBA, you can automate the entire process. For example, if you have a new CSV file downloaded into a directory on your computer every Monday, you can configure your VBA code to run when you first open your spreadsheet on Tuesday morning.
The following import code will run and import the CSV file into your Excel spreadsheet.
Dim ws As Worksheet, strFile As String

Set ws = ActiveWorkbook.Sheets("Sheet1")
Cells.ClearContents

strFile = “c:\temp\purchases.csv”

With ws.QueryTables.Add(Connection:="TEXT;" & strFile, Destination:=ws.Range("A1"))
     .TextFileParseType = xlDelimited
     .TextFileCommaDelimiter = True
     .Refresh
End With
Open the Excel VBA editing tool and select the Sheet1 object. From the object and method dropdown boxes, choose Worksheet and Activate. This will run the code every time you open the spreadsheet.
This will create a Sub Worksheet_Activate() function. Paste the code above into that function.

This sets the active worksheet to Sheet1, clears the sheet, connects to the file using the file path you defined with the strFile variable, and then the With loop cycles through every line in the file and places the data into the sheet starting at cell A1.
If you run this code, you’ll see that the CSV file data is imported into your blank spreadsheet, in Sheet1.

Importing is only the first step. Next, you want to create a new header for the column that will contain your calculation results. In this example, let’s say you want to calculate the 5% taxes paid on the sale of each item.
The order of actions your code should take is:
- Create new results column called taxes.
- Loop through the units sold column and calculate the sales tax.
- Write the calculate results to the appropriate row in the sheet.
The following code will accomplish all of these steps.
Dim LastRow As Long
Dim StartCell As Range
Dim rowCounter As Integer
Dim rng As Range, cell As Range
Dim fltTax As Double

Set StartCell = Range("A1")

'Find Last Row and Column
LastRow = ws.Cells(ws.Rows.Count, StartCell.Column).End(xlUp).Row
Set rng = ws.Range(ws.Cells(2, 4), ws.Cells(LastRow, 4))

rowCounter = 2
Cells(1, 5) = "taxes"

For Each cell In rng
     fltTax = cell.Value * 0.05
     Cells(rowCounter, 5) = fltTax
     rowCounter = rowCounter + 1
Next cell
This code finds the last row in your sheet of data, and then sets the range of cells (the column with the sales prices) according to the first and last row of data. Then the code loops through each of those cells, performs the tax calculation and writes the results into your new column (column 5).
Paste the above VBA code below the previous code, and run the script. You will see the results show up in column E.

Now, every time you open your Excel worksheet, it’ll automatically go out and get the freshest copy of data from the CSV file. Then, it will perform the calculations and write the results to the sheet. You don’t have to do anything manually anymore!
Calculate Results From Button Press
If you’d rather have more direct control over when calculations run, rather than running automatically when the sheet opens, you can use a control button instead.
Control buttons are useful if you want to control which calculations are used. For example, in this same case as above, what if you want to use a 5% tax rate for one region, and a 7% tax rate for another?
You could allow the same CSV import code to run automatically, but leave the tax calculation code to run when you press the appropriate button.
Using the same spreadsheet as above, select the Developer tab, and select Insert from the Controls group in the ribbon. Select the push button ActiveX Control from the dropdown menu.

Draw the pushbutton onto any part of the sheet away from where any data will go.

Right-click the push button, and select Properties. In the Properties window, change the Caption to what you’d like to display to the user. In this case it might be Calculate 5% Tax.

You’ll see this text reflected on the push button itself. Close the properties window, and double-click the pushbutton itself. This will open the code editor window, and your cursor will be inside the function that will run when the user presses the pushbutton.
Paste the tax calculation code from the section above into this function, keeping the tax rate multiplier at 0.05. Remember to include the following 2 lines to define the active sheet.
Dim ws As Worksheet, strFile As String

Set ws = ActiveWorkbook.Sheets("Sheet1")
Now, repeat the process again, creating a second push button. Make the caption Calculate 7% Tax.

Double-click that button and paste the same code, but make the tax multiplier 0.07.
Now, depending which button you press, the taxes column will be calculated accordingly.

Once you’re done, you’ll have both push buttons on your sheet. Each of them will initiate a different tax calculation and will write different results into the result column.
To text this, select the Developer menu, and select Design Mode form the Controls group in the ribbon to disable Design Mode. This will activate the push buttons.
Try selecting each push button to see how the “taxes” result column changes.
Email Calculation Results to Someone
What if you want to send the results on the spreadsheet to someone via email?

You could create another button called Email Sheet to Boss using the same procedure above. The code for this button will involve using the Excel CDO object to configure SMTP email settings, and emailing the results in a user-readable format.
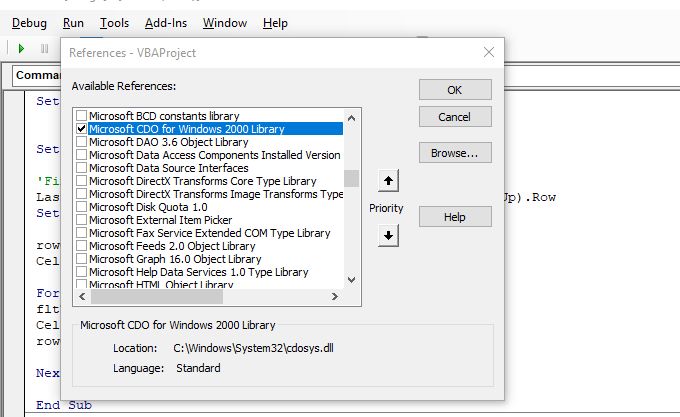
To enable this feature, you need to select Tools and References. Scroll down to Microsoft CDO for Windows 2000 Library, enable it, and select OK.
There are three main sections to the code you need to create to send out an email and embed spreadsheet results.
The first is setting up variables to hold the subject, To and From addresses, and the email body.
Dim CDO_Mail As Object
Dim CDO_Config As Object
Dim SMTP_Config As Variant
Dim strSubject As String
Dim strFrom As String
Dim strTo As String
Dim strCc As String
Dim strBcc As String
Dim strBody As String
Dim LastRow As Long
Dim StartCell As Range
Dim rowCounter As Integer
Dim rng As Range, cell As Range
Dim fltTax As Double
Set ws = ActiveWorkbook.Sheets("Sheet1")
strSubject = "Taxes Paid This Quarter"
strFrom = "MyEmail@gmail.com"
strTo = "BossEmail@gmail.com"
strCc = ""
strBcc = ""
strBody = "The following is the breakdown of taxes paid on sales this quarter."
Of course, the body needs to be dynamic depending on what results are in the sheet, so here you’ll need to add a loop that goes through the range, extracts the data, and writes a line at a time to the body.
Set StartCell = Range("A1")

'Find Last Row and Column
LastRow = ws.Cells(ws.Rows.Count, StartCell.Column).End(xlUp).Row
Set rng = ws.Range(ws.Cells(2, 4), ws.Cells(LastRow, 4))

rowCounter = 2
strBody = strBody & vbCrLf

For Each cell In rng
     strBody = strBody & vbCrLf
     strBody = strBody & "We sold " & Cells(rowCounter, 3).Value & " of " & Cells(rowCounter, 1).Value _
     & " for " & Cells(rowCounter, 4).Value & " and paid taxes of " & Cells(rowCounter, 5).Value & "."
     rowCounter = rowCounter + 1
Next cell
The next section involves setting up the SMTP settings so that you can send email through your SMTP server. If you use Gmail, this is typically your Gmail email address, your Gmail password, and the Gmail SMTP server (smtp.gmail.com).
Set CDO_Mail = CreateObject("CDO.Message")
On Error GoTo Error_Handling
Set CDO_Config = CreateObject("CDO.Configuration")
CDO_Config.Load -1
Set SMTP_Config = CDO_Config.Fields

With SMTP_Config
.Item("http://schemas.microsoft.com/cdo/configuration/sendusing") = 2
.Item("http://schemas.microsoft.com/cdo/configuration/smtpserver") = "smtp.gmail.com"
.Item("http://schemas.microsoft.com/cdo/configuration/smtpauthenticate") = 1
.Item("http://schemas.microsoft.com/cdo/configuration/sendusername") = "email@website.com"
.Item("http://schemas.microsoft.com/cdo/configuration/sendpassword") = "password"
.Item("http://schemas.microsoft.com/cdo/configuration/smtpserverport") = 465
.Item("http://schemas.microsoft.com/cdo/configuration/smtpusessl") = True
 .Update
End With

With CDO_Mail
     Set .Configuration = CDO_Config
End With
Replace email@website.com and password with your own account details.
Finally, to initiate the email send, insert the following code.
CDO_Mail.Subject = strSubject
CDO_Mail.From = strFrom
CDO_Mail.To = strTo
CDO_Mail.TextBody = strBody
CDO_Mail.CC = strCc
CDO_Mail.BCC = strBcc
CDO_Mail.Send

Error_Handling:
If Err.Description <> "" Then MsgBox Err.Description
Note: If you see a transport error when trying to run this code, it’s likely because your Google account is blocking “less secure apps” from running. You’ll need to visit the less secure apps settings page and turn this feature ON.
After that’s enabled, your email will be sent. This is what it looks like to the person who receives your automatically generated results email.

As you can see there is a lot you can actually automate with Excel VBA. Try playing around with the code snippets you’ve learned about in this article and create your own unique VBA automations.