Do you want to make changes to your Excel workbook or worksheet, but find that they’re locked or protected? If so, you might need to unprotect them first. This will allow you to edit the content, structure, and formatting of your spreadsheet.
But how do you unprotect an Excel worksheet or workbook? And what happens if you don’t know the password? If you’re unsure how to proceed with unlocking your data in a protected Excel file, follow the steps below.
Unprotecting a Workbook vs. Unprotecting a Worksheet in Excel
Before we start, let’s clarify the difference between unprotecting a workbook and unprotecting a worksheet. A workbook is used to describe an entire Excel file. A worksheet, however, is used to describe the individual sheets in your Excel spreadsheet—the tabs of data you’ll see at the bottom of the window.
Unprotecting a workbook means that you can make structural changes to the workbook as a whole, such as adding, deleting, hiding, or renaming worksheets. You can also change the workbook properties and settings in your Excel spreadsheet by removing the protection from it.
In contrast, unprotecting a worksheet means that you can modify the data and formatting of the worksheet, such as changing the content of a cell, inserting or deleting rows and columns, applying or removing filters, and so on. Other worksheets might remain protected.
There are differences in the type of protection available. Encrypting an Excel file prevents anyone from viewing it without knowing the password. If you simply protect the workbook or worksheets, you’ll still be able to read the data and open the file, but you may need additional passwords to make changes or remove that protection.
How to Remove Excel File Encryption
The first barrier to unprotecting an Excel worksheet or workbook is to remove encryption from the file. Encryption prevents you from opening modern Excel files without first knowing the encryption password.
To do this, you’ll need to have the password for the workbook that was used to encrypt the file. If you don’t have it, you’ll need to try a third-party Excel password removal tool to unlock your file. Make sure to back up your file before you try this.
To remove Excel file encryption, follow these steps.
- Open your encrypted Excel workbook. When prompted, insert the correct password.
- Next, press File > Info.
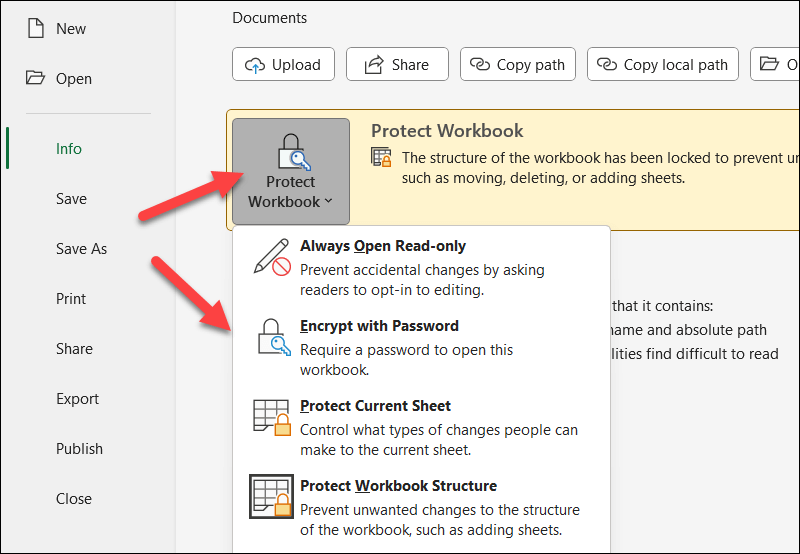
- Select the Protect Workbook icon.
- From the drop-down menu, select the Encrypt with password option.
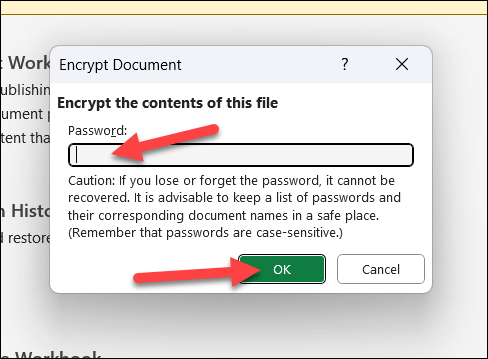
- In the Encrypt Document pop-up box, remove the existing password and press OK.
- If the password was accepted, press Save to save the file without the password.
Once you’ve removed file encryption, you should be able to unlock the workbook or individual sheets from the Data menu.
How to Unprotect an Excel Workbook
An Excel workbook can be protected with or without password protection. If you want to unprotect an Excel workbook, follow these steps.
- Open the workbook that you want to unprotect with Microsoft Excel.
- In the Review tab, press Protect Workbook in the Protect section to change its status. If the workbook is currently protected, the icon will appear in an active state with a gray background and border.
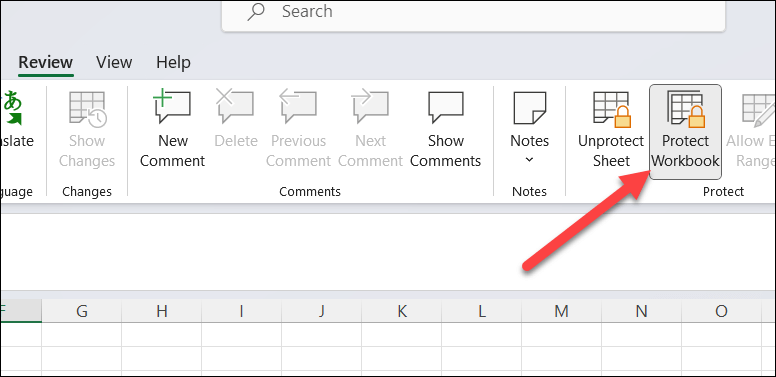
- If the workbook doesn’t have a password, pressing the Protect Workbook button will change its status immediately—the icon’s status will change to match other icons on the ribbon bar.
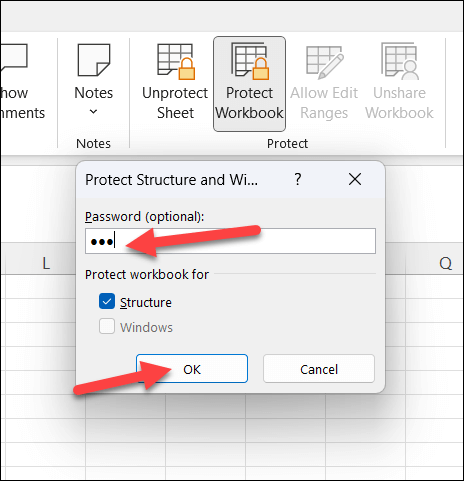
- If the workbook is protected with a password, you’ll see a pop-up box asking you to enter the workbook password. Type it in and click OK to remove it, then type it in again to confirm. This will allow you to make structural changes to the workbook.
As with encrypted Excel files, if you don’t know the password, you’ll have to use a third-party password recovery tool to unlock a password-protected Excel spreadsheet file. If you plan on doing this, make sure you save a copy of your file first, just to protect yourself from potential data loss or corruption.
How to Unprotect an Excel Worksheet
You can also protect individual Excel worksheets from being created, edited, or deleted. This includes the ability to protect them with or without passwords.
It’s best to make these changes in an unprotected workbook. Otherwise, you may find it difficult to unlock certain functionality (such as the ability to add or delete worksheets). However, even in a locked workbook, you may still be able to remove sheet protection, but only if the XLSX file isn’t encrypted.
If you want to unprotect an Excel worksheet, follow these steps.
- Open the workbook that contains the worksheet that you want to unlock.
- From the Review tab, press the Unprotect Sheet button in the Protect section.
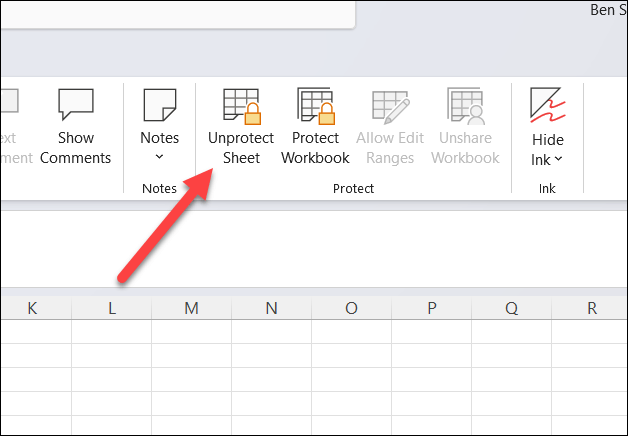
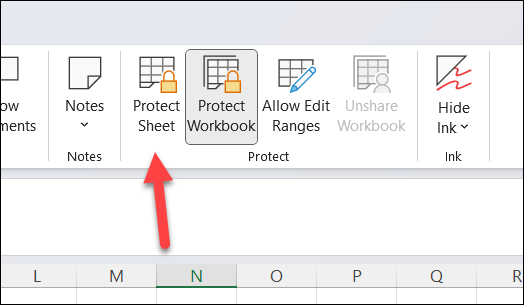
- If the worksheet doesn’t have a password, the Unprotect Sheet icon will immediately change its name to Protect Sheet. This confirms that the sheet is unprotected.
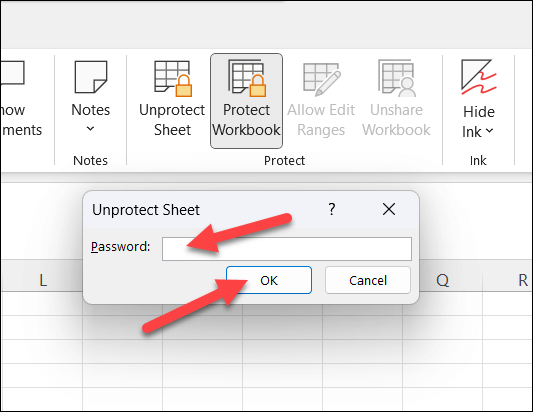
- If the worksheet is protected with a password, you’ll be prompted to insert the worksheet password. If you know the password, type it and press OK. If it’s accepted, the worksheet will be unprotected and you can begin to modify it.
As with other methods, unlocking the sheet without knowing the password is tricky. You’ll need to try and source the password from somebody else or use a third-party tool like Passware Excel key to remove it for you.
Protecting Your Excel Data
Unprotecting an Excel worksheet or workbook will allow you to make changes to your spreadsheet. As long as you have the password, the process is simple. Without it, you’ll need to try a third-party tool to remove the password instead, unless you can source it from the original file owner or creator.
Looking for easier ways to lock down some of your Excel worksheets? You can lock cells in Excel to make it harder for others to make changes to certain cell ranges. You could also try sharing an Excel file as read-only to limit unnecessary changes.
Related Posts
Ben Stockton is a freelance technology writer based in the United Kingdom. In a past life, Ben was a college lecturer in the UK, training teens and adults. Since leaving the classroom, Ben has taken his teaching experience and applied it to writing tech how-to guides and tutorials, specialising in Linux, Windows, and Android. He has a degree in History and a postgraduate qualification in Computing. Read Ben’s Full Bio

