Ever lost a file on your PC and just can’t track it down? With the search tips in this article, you’ll be able to find specific files in Windows file explorer, even if you can’t remember the exact name or location.
The more information you know about the file you are looking for the better. You’ll be able to use search parameters like file size, created date, file type, and more by using the tips listed below.
For reference, before we begin, all of the tips listed in this article will be making use of the search function found at the top right of Windows file Explorer.
Hopefully by the time you’ve read all of the tips in this article, you’ll have found a solution to track down your files.
Also, check out my other post on searching Windows using third-party tools or via the command line. Also, in order for all the searches below to work faster, you should have search indexing enabled in Windows.
Locating Images using Parameters
First let’s take a look at the options you have available for tracking down specific images. Below we have a number of tips exclusive for images on your PC.
If you know the dimensions of the image, you can type in width: x, height: x. Simply replace ‘x’ with the exact dimensions.
If you don’t know the exact dimensions, but you know it’s within a certain limit, you can instead use the following search parameters:
- Width: >x for files over a specific width
- Width: <x for files under a specific width
- Height: >x for files over a specific height
- Height: <x for files under a specific height
Simply replace the ‘x’ with the resolution you are looking for. You can combine either of the height and width parameters together.
If you know the file type, you can also filter searches by file extension. For example, you can type ‘type: .png’ into the search bar to only show .png images.
So, with this in mind, if you know you created an image with a height of more than 1000 and a width of more than 800, and you know it is a .png file, you could perform a search like the image shown below.
General File Search Tips For Finding Files on Windows 10
Next, we’ll take a look at a number of general file search tips you can use for finding files on Windows 10. These tips will be useful for all files, including images, so you can even use them in conjunction with the image specific tips listed above.
For finding a specific file type, simply use the ‘type:’ command, followed by the file extension. For example, you can find .docx files by searching ‘type: .docx’.
You can also use the following commands to find specific file types, regardless of their file extension:
- Use ‘type: photos’ for all photo files
- Use ‘type: video’ for all video files
- Use ‘type: documents’ for Word docs, excel sheets, etc
- Use ‘type: music’ for audio files
- Use ‘type: text’ for text documents
- Use ‘type: favorites’ to find your favorited files
If you know part of the name of the file, you can use the ‘name:’ command, followed by any phrase, letters, or words. For example, you can use ‘name: resume’ to return all files with ‘resume’ in the file name.
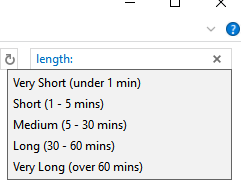
For a video exclusive command, you can use the search command ‘length:’ followed by one of the following words to find a video with a specific length:
- Very Short – under 1 minute
- Short – 1 to 5 minutes
- Medium – 5 to 30 minutes
- Long – 30 to 60 minutes
- Very Long – Over 60 minutes
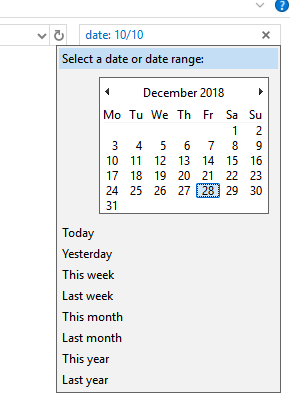
To find files by date, start by typing ‘date:’ into the search bar, followed by the date in day/month/year, or month/day/year, depending on your time and date settings.
When you first start typing in the date, you’ll get an option to use a calendar to search for a specific date, or you can use quick searches for today, yesterday, this week, last week, this month, last month, this year, and last year.
You can also use ‘<’ or ‘>’ to look for files made before or after specific dates, respectively. An example has been provided below.
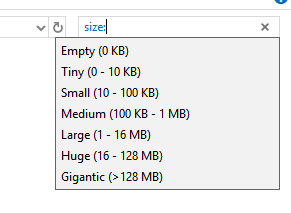
If you know the rough file size, you can use the ‘size:’ command to filter out results. You can use the following quick commands for certain sizes:
Using these commands is great for smaller files, but for files that are larger than 128MB, you should use a search range. For example, if you know that a file is between 200MB and 300MB, you can use the command: ‘size: 500MB – 800MB’. This will only show the files that are between that range.
Thanks for taking a look at our advanced Windows Explorer file search tips. Remember that you can combine any combination of these search filters in a single search.
If, for example, you are looking for a .png file that is over 1000 pixels wide and you know it was created before the 20th of February 2018, you can use this command: ‘type: .png, width: >1000, date: <20/02/2018’
There’s no limit to how many search parameters you can use in one search, so by combining multiple, you’ll save lots of time trying to locate the file. You can also exclude certain words from your search.
For example, if you are looking for a recipe document that you’ve saved that you know has the word recipe in it, but you don’t want a chicken recipe, you could use the command ‘recipe NOT chicken’.
This would return all files with the word recipe in the name but exclude all files with the word chicken in the name. For your particular search, just replace the words either side of the ‘NOT’ boolean.
Did the tips in this article prove to be useful? We hope they did. If you need any help using these search tips, let me know and I’ll be happy to offer some help. Enjoy!
Related Posts
- Preparing for Windows 10 End of Support: Upgrading to Windows 11
- How to Fix a “This file does not have an app associated with it” Error on Windows
- How to Fix an Update Error 0x800705b4 on Windows
- How to Resolve “A JavaScript error occured in the main process” Error on Windows
- How to Fix the Network Discovery Is Turned Off Error on Windows
Ollie stumbled upon writing online whilst participating in a mobile network forum back in 2011. Since then, he has developed an incredible passion for writing about all sorts of tech from smartphones, PC hardware, software, and everything in between. Read Ollie’s Full Bio


