Windows comes pre-installed with every PC but there are times when a USB version becomes invaluable. One is when you have trouble installing operating system updates the normal way (which happened to me last year). The second is if you make a living wiping and refurbishing used computers. Having a USB version of the latest Windows version makes reinstalling the system absurdly easy.

Obviously Windows is not free, so along with the USB installer, you will also need a valid legal license key. Obviously we can’t help you with that. But the installer? No problem. Read on.
Creating The Windows Installation USB Stick
Before we start, it is worth pointing out that whatever version of Windows you put on your USB stick will be the current version that Microsoft is offering. This means that any subsequent patches and updates will not be included as the USB stick will obviously not auto-update.

So once you have installed Windows using the USB method, you will need to check regularly to see if Windows has been updated. If so, you will have to delete the version on the stick and replace it with the new version. The whole process which I am about to describe doesn’t take very long so it’s not a big deal.
Wipe The USB Stick
The first step is to make sure the USB stick is completely blank. If you have just bought it, it will already be blank. But if it is a used stick, you need to format it. Doing so will wipe all of the contents. The stick needs at least 8GB of space for the installer to be built properly.
To format the stick, right-click on it in Windows Explorer and click “Format”.

In the box that comes up, click “Start” to begin the formatting process.
How long it takes depends on how used the stick is and how much data is already on it.

Download The “Media Creation Tool” From Microsoft

Next, head to the Microsoft website and download the “Media Creation Tool”. This is a portable app so no installation is necessary. Just download the file then double-click to get started.
Choose Your Installer Format
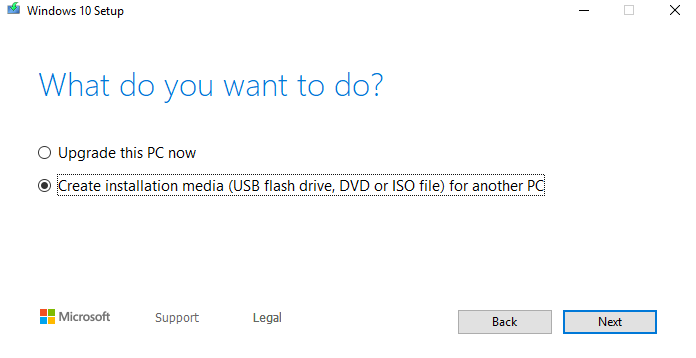
After scanning your computer to see what’s needed and asking you to pretend to have read the Terms & Conditions, the installer will now ask you what you want to do.

It has seen that I haven’t installed the latest patch yet so it has offered me that. But I want to make an installer USB so the second option is the one I want. You can also put Windows 10 on a DVD or ISO file, and I will be discussing ISO files in my next article. As for DVD’s, I view them as impractical and expensive for something like this.
Next it will ask you to choose the language, Windows edition and whether it’s 32 bit or 64 bit you require. It will put it to what it thinks are the “recommended options” but if you disagree with any of them, just untick the box and choose what you want.
But unless you have a very good reason and you know what you are doing, it is best to stick with the recommended options.

Remember, don’t choose a version of Windows that you don’t have a valid license key for!
Now confirm that you want a USB option and not an ISO file.

Click on the USB stick you want to install it on. If you don’t see it in the list, click the “refresh drive list” link.

Take extreme caution that you pick the right USB device. I almost chose my backup portable hard-disk which would have been a catastrophe.
Now Sit Back & Wait….
Your installer program will now start to be transferred to the USB stick. As the progress screen will say, you can continue to use your PC while you wait. But my experience was that the PC slowed down quite a bit when making the installer.

Either way, it took about 15 minutes for it to complete.

What The USB Stick Now Looks Like
Now when you click the USB stick in Windows Explorer, this is what you will see.

The only file you need to concern yourself with is the “setup.exe” file. When you click on that, it will open up a Windows installation window, after which you will be prompted for your license key.

Related Posts
- Preparing for Windows 10 End of Support: Upgrading to Windows 11
- How to Fix a “This file does not have an app associated with it” Error on Windows
- How to Fix an Update Error 0x800705b4 on Windows
- How to Resolve “A JavaScript error occured in the main process” Error on Windows
- How to Fix the Network Discovery Is Turned Off Error on Windows