If your Windows PC suffers a Blue Screen of Death (BSOD) error, it’s a sign that your PC has become unstable. Corrupt files, outdated drivers, failing hardware – they can all cause a BSOD error to appear. These often come with unusual error names, such as a “kernel mode heap corruption” BSOD.
A kernel mode heap corruption BSOD error, in particular, usually points to an issue with your graphics card drivers or hardware, or (less often) corrupt system files. If you’re finding it difficult to fix this particular BSOD error, you can troubleshoot the problem by following the steps below.
What Causes a Kernel Mode Heap Corruption BSOD in Windows 10?
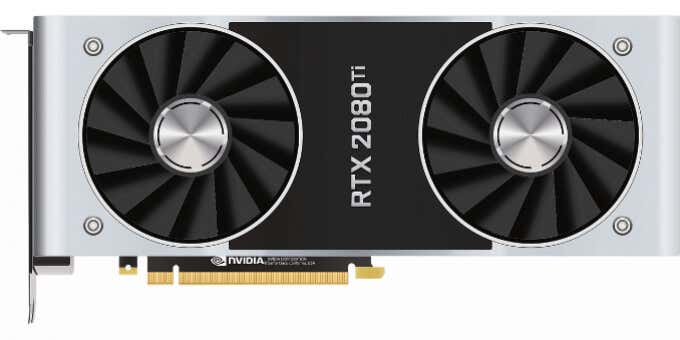
While other BSOD errors (such as a stop code critical process died BSOD) are fairly common and have a number of possible causes, a kernel mode heap corruption BSOD is a more specific error. In many cases, it’s usually reported after intensive usage of a graphics card or the integrated graphics chipset.
GPU usage on this level is typically caused by PC gaming, certain types of cryptocurrency mining, or by certain high-intensity scientific applications. While it remains uncommon, a kernel mode heap corruption BSOD error will prevent you from using your PC (although it shouldn’t cause a boot loop).
The cause of the error can usually be traced to an outdated, buggy, or otherwise corrupted graphics card driver. You can confirm this using the Event Viewer, and resolve it by switching to a newer driver, or rolling back to an older driver if the problem occurs after a recent update.
You should also make sure that you’ve installed a new graphics card correctly, as this could also cause a kernel mode heap corruption BSOD. A motherboard may come with different PCI-E slots with speeds or different standards (eg. PCI-E 3.0 vs 4.0) that your GPU may not support, or disable certain slots while another is in use.
You can also check that your system files aren’t corrupted using the SFC and DISM tools. If this doesn’t work, you may need to reset your Windows 10 installation and start again with a fresh configuration.
Of course, if your hardware is failing in some way, removing or replacing it may be the only way to ensure your PC becomes stable again. Whatever the cause, you should be able to resolve the issue in many cases by following the steps below.
Check the Event Viewer for Additional Information
If you’re unsure of the cause of a kernel mode heap corruption BSOD, it might be worth checking your PC’s error logs for more information. To do this, you’ll need to use the Event Viewer.
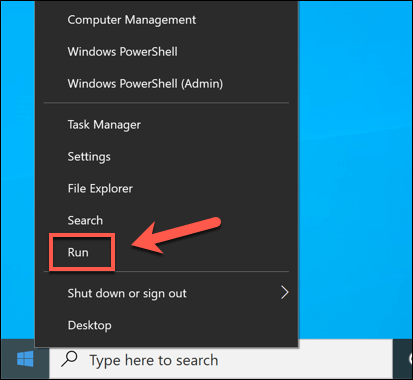
- To open the Event Viewer, right-click the Start menu and select the Run option.
- In the Run box, type eventvwr before selecting the OK button.
- This will open the Event Viewer window. In the left-hand panel, open the Windows Logs category, then begin by selecting one of the listed options (Application, Security, etc.) In the right-hand panel, search for logs reports listed as Error in the Level category. While not exclusively BSOD errors, BSOD errors will be reported with the Error category tag. You’ll need to search through each category to check for potential error reports.
- Once you’ve found a BSOD error listed in the Event Viewer, you can use it to determine what may have caused the problem (eg. a specific application or system driver). You may need to investigate it further (for instance, by searching for the event ID) using the information shown in the General and Details tabs immediately below the selected error.
You can also use other information, such as BSOD dump files, as part of the process of troubleshooting a kernel mode heap corruption BSOD error. While this may require additional research, it can help you to determine if the problem is software or hardware related.
Check for System and Driver Updates
Driver issues (whether it’s outdated, missing, or bug-ridden) are the most likely cause of a kernel mode heap corruption BSOD error. To resolve the issue, you’ll need to check for new driver updates. It’s also a good idea to ensure that Windows itself is fully up-to-date with the latest bug fixes installed.
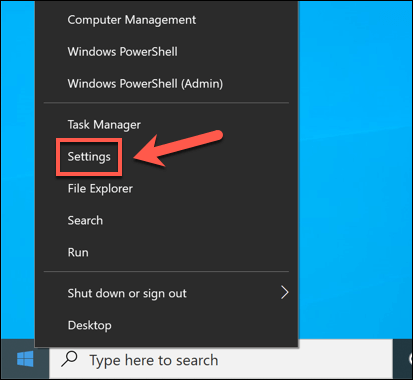
- To begin, you should check Windows Update for any available system and driver updates. To do this, right-click the Start menu and select Settings.
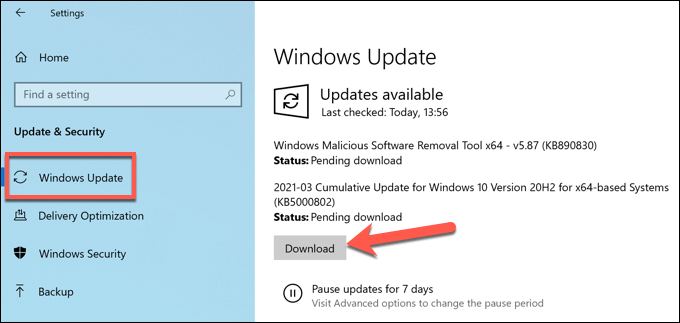
- In the Settings menu, select Update & Security > Windows Update. In the Windows Update menu, Windows will automatically begin to check for available updates (if it doesn’t, select the Check for Updates button). If updates are available for download, select the Download option.
Restart your PC once the updates are installed to ensure that the process is completed successfully. You’ll need to check the manufacturer website for newer graphics card drivers, especially if you’re using a recently released graphics card, as Microsoft releases new driver updates much later than a manufacturer will.
For instance, if you have an NVIDIA graphics card, you’ll need to visit the NVIDIA website and search for your model of graphics card, then download and install the latest available driver.
Roll Back to an Earlier Graphics Driver
While installing a new driver is usually a good way to resolve a kernel mode heap corruption BSOD, it can also be the cause of it. New drivers (especially from the manufacturer website) may come with unforeseen bugs that could stop your GPU from working correctly.
A good way to resolve this is to roll back the driver. Windows allows you to quickly switch back to the previous driver in the Device Manager. If your PC isn’t booting up correctly, you may need to restart Windows in Safe Mode to allow you to do this.
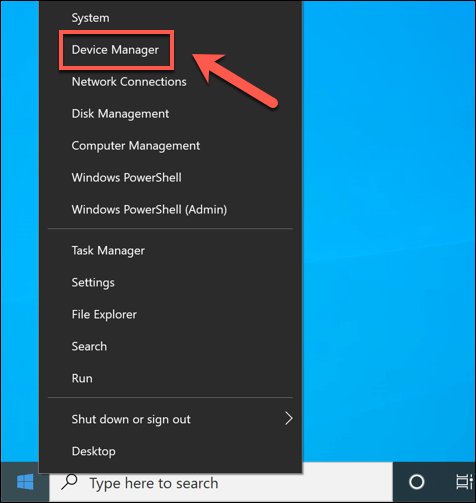
- To open Device Manager, right-click the Start menu and select Device Manager.
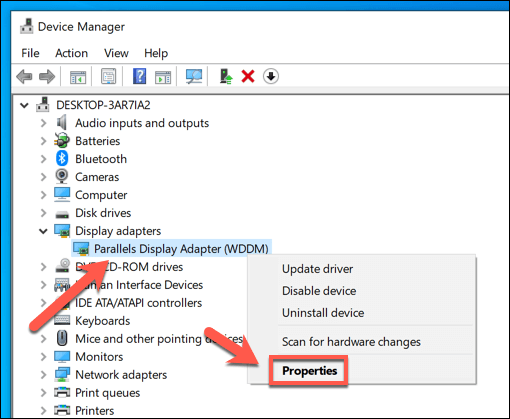
- In the Device Manager window, select the arrow next to the Display adapters option. You should find your graphics card or internal graphics chipset listed here. Right-click your GPU and select Properties.
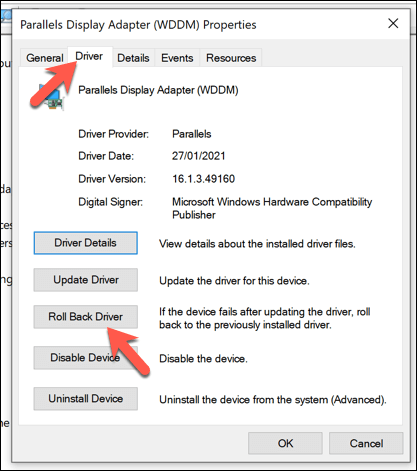
- In the Properties window, select the Driver tab, then select the Roll Back Driver option.
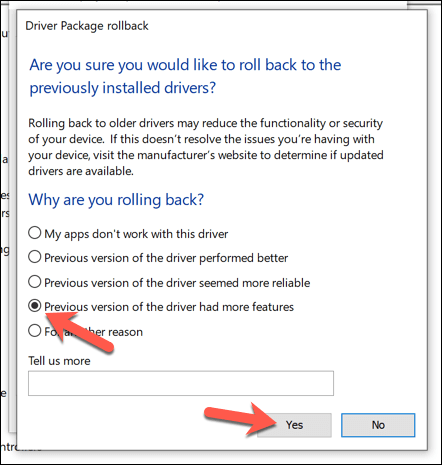
- In the Driver Package rollback window, you’ll need to explain why you’re rolling back the driver. Select one of the appropriate options, then select Yes to begin the process.
Run System File Checker and DISM in Windows PowerShell
Before you consider more drastic options, you may be able to restore your PC by running various system repair tools, such as the System File Checker and DISM tools, in Windows PowerShell.
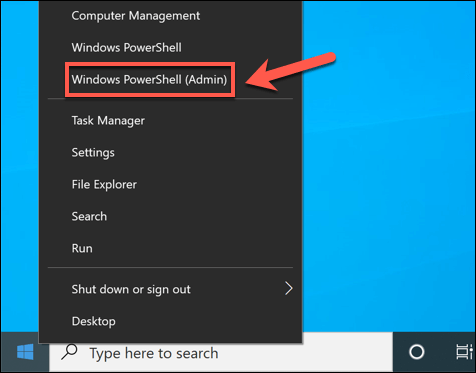
- To start, right-click the Start menu and select Windows PowerShell (Admin).
- In the new PowerShell window, type sfc /scannow to run the System File Checker. This will check for (and repair) any missing or corrupted system files. You can also type and run DISM /Online /Cleanup-Image /RestoreHealth afterwards to run a deeper scan of your system files and repair them.
- Allow time for both commands to successfully run. Once this is complete, restart your PC to ensure that the changes are fully applied to your PC.
Further Troubleshooting
The steps above should help to restore a kernel mode heap corruption BSOD in most cases. Unfortunately, if your PC remains unstable, it could point to deeper issues, such as a failing hardware. You’ll need to consider further steps, such as reinstalling Windows 10 or upgrading your hardware.
A good way to ensure your PC remains stable, however, is to perform regular maintenance. You can start by keeping Windows updated with the latest feature upgrades and bug fixes, checking for malware regularly, as well as making sure your PC remains cool by clearing out the case fans every few months.
Related Posts
- Preparing for Windows 10 End of Support: Upgrading to Windows 11
- How to Fix a “This file does not have an app associated with it” Error on Windows
- How to Fix an Update Error 0x800705b4 on Windows
- How to Resolve “A JavaScript error occured in the main process” Error on Windows
- How to Fix the Network Discovery Is Turned Off Error on Windows
