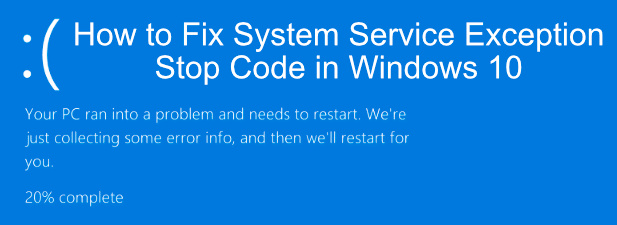
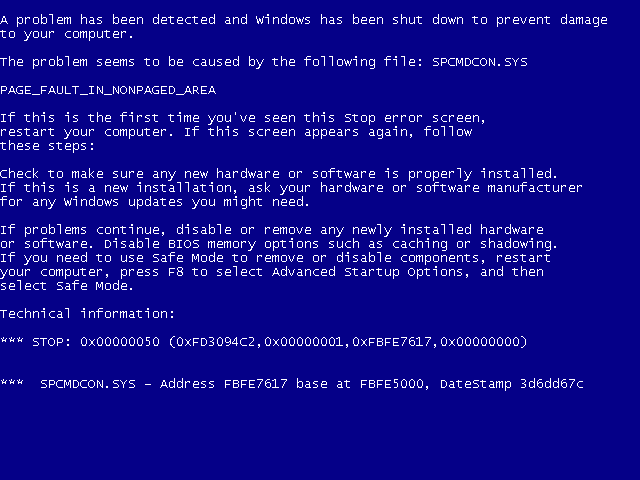
While uncommon, Blue Screen of Death (BSOD) errors do still occur in Windows 10. Unlike the wall of blue text that older Windows versions displayed when a system crashed, newer Windows BSODs are simpler and easier to troubleshoot. One common BSOD error that still occurs is a System Service Exception in Windows 10.
For most users that statement means nothing. Understanding what a BSOD System Service Exception error is should help you to troubleshoot and fix the problem. If you’re facing this kind of BSOD error on your Windows PC, here are some steps to help you understand, troubleshoot, and resolve the issue.
What Is A System Service Exception Error In Windows 10?
In Windows 10, a BSOD caused by a System Service Exception error (usually shown as SYSTEM_SERVICE_EXCEPTION) is unusually tricky to resolve. Unlike a Windows Stop Code Memory Management BSOD, this error has any number of potential causes.
Don’t be too surprised if this BSOD sounds familiar—this BSOD has existed in Windows for decades. While it sounds generic, the Microsoft technical explanation states that this BSOD is usually caused when a running process on your PC attempts to move from “non-privileged to privileged code.”
Windows, like all operating systems, has security levels in place for different system processes to ensure only the right code can run at the right times and by the right processes. When that fails for any reason, errors like this occur to stop the process from causing harm to your system. Unfortunately, there could be any number of causes behind this.
It could be a one-off error caused by a bug in Windows itself, or it could be caused by outdated drivers, corrupted system files, or a rogue app that tries to access and run protected Windows code. To help you solve the problem, here are a few fixes you can try.
Update Windows 10 and Installed System Drivers
The best fixes are sometimes the simplest, and for many users, a quick trip to the Windows Settings menu to update your PC could be all you need to fix the System Service Exception Error.
Microsoft regularly issues important fixes and improvements for Windows, especially for new hardware. This includes new driver updates for your different system components.
To update Windows, right-click the Windows Start menu button and click Settings. From here, press Update & Security to view the Windows Update menu, then press Download or Download and Install to begin downloading and installing any available system updates.
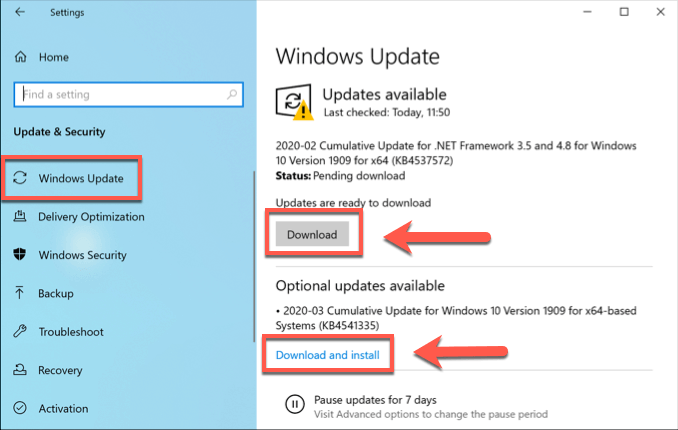
You may need to search online for additional driver updates, however. Graphics card manufacturers like NVIDIA, for instance, often have newer drivers available on their website than those offered through Windows Update.
Run the Windows Driver Verifier Tool
Protected system code can usually only be accessed by certain system processes or devices, which is why hardware drivers usually cause System Service Exception errors in Windows 10, as they’re among the pools of third-party apps that can do this.
Even new device drivers can cause this BSOD error, especially if you’ve installed brand new hardware. If you’re unsure whether your drivers are causing this BSOD to occur, you can run the Windows Driver Verifier tool to check.
This is a troubleshooting tool that is designed to stress test your system drivers. However, be warned—this is designed to find and recreate the very bugs that cause a Stop Code System Service Exception error in the first place, so don’t run this tool while you’re using your PC for anything critical.
It is essential that you backup your PC before you do this by first creating a new system restore point. The Driver Verifier is a development tool and is designed to cause BSODs when a driver can’t be verified or if a driver is corrupted. This could mean your PC becomes stuck in a BSOD loop caused by Driver Verifier itself.
This is an entirely normal and expected result when Driver Verifier detects an issue with your drivers. You’ll need to analyze your BSOD dump files next to identify the drivers causing your BSOD issues and replace them, then disable Driver Verifier in Safe Mode (or use your System Restore point) to fix the BSOD loop it causes.
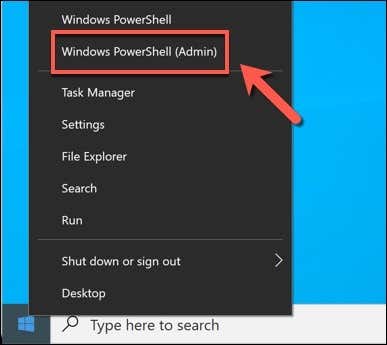
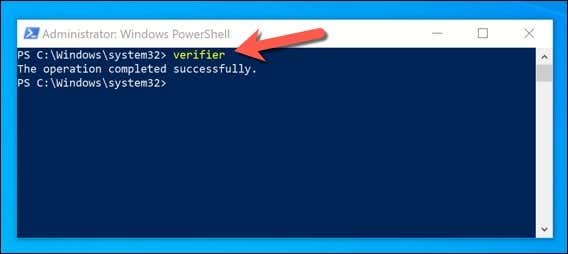
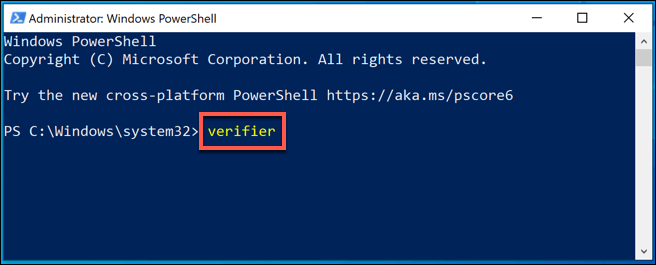
- Driver Verifier is included as a system file in your Windows System32 folder. To run it, right-click the Windows Start menu and click Windows PowerShell (Admin) to open an elevated PowerShell window, type verifier, then press enter. This will launch the Driver Verifier tool in a new window.
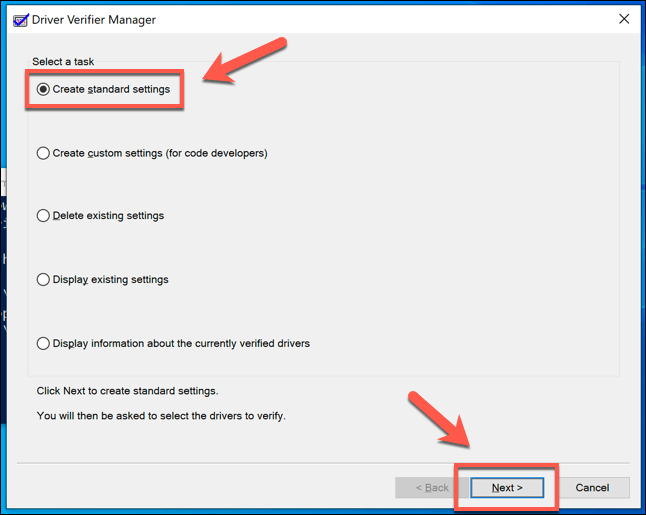
- Make sure that Create standard settings is selected, then click Next to proceed.
- To test all the drivers on your PC, select the Automatically select all drivers installed on this computer option and then press Finish. If you want to test a specific driver, choose Select driver names from a list instead, then press Next.
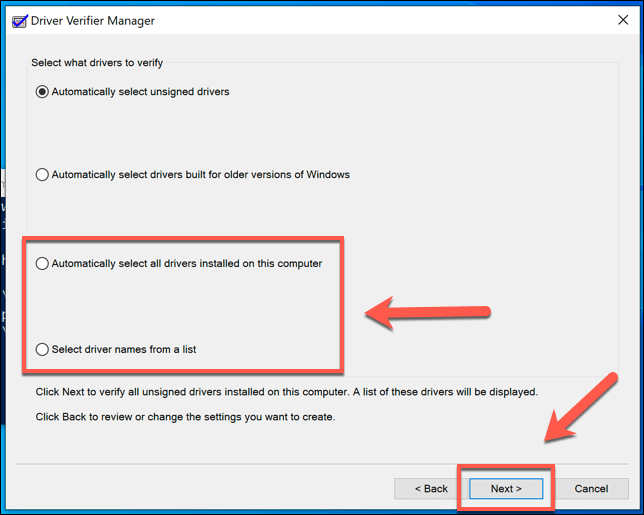
- If you chose the Select driver names from a list option, select the driver (or drivers) you wish to test at the next stage, then press Finish.
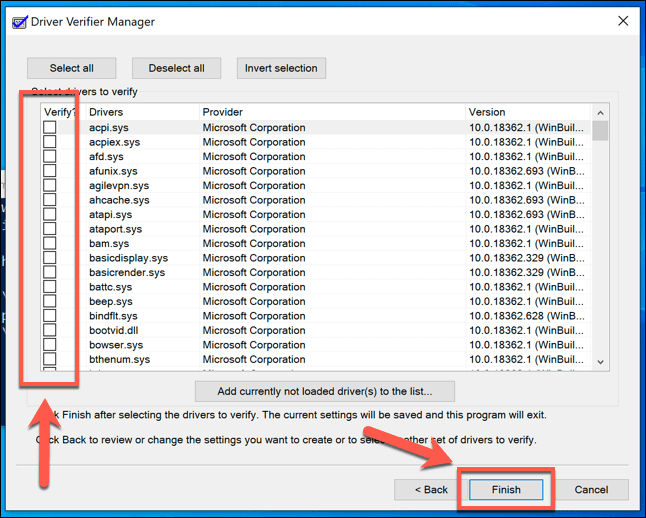
- The test process will begin once you press Finish—restart your PC to begin the test, then continue to use your PC. You’ll know if there’s a problem, as the Driver Verifier will deliberately cause a BSOD during its testing if it encounters an issue.
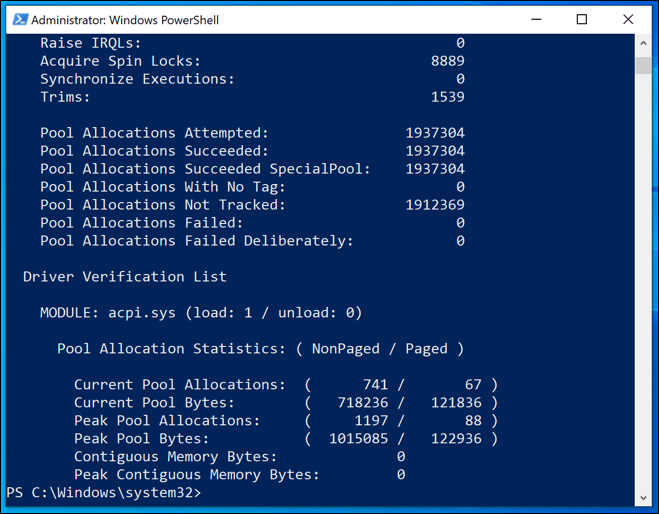
You can view test results and statistics by opening a new Windows PowerShell window (right-click the Start menu > Windows PowerShell (Admin)) and typing verifier /query before pressing enter.
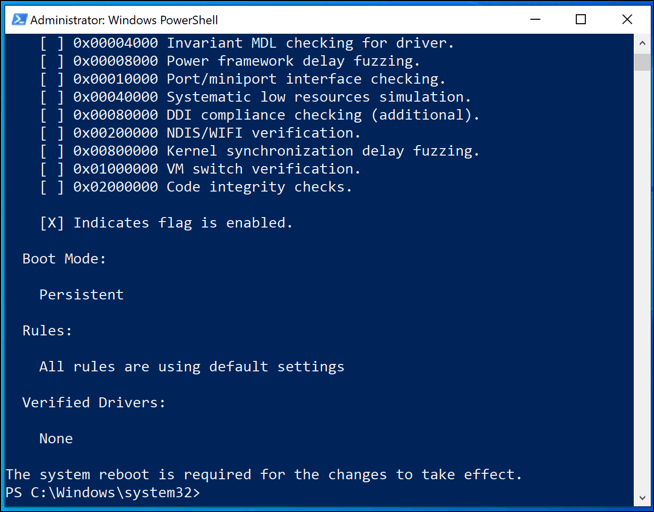
- To stop Driver Verifier from running its driver stress test, type verifier /reset at the PowerShell window and hit enter, then restart your PC.
Resolving a Driver Verifier BSOD Loop
As we’ve mentioned, the Driver Verifier may cause additional BSOD errors when it detects an issue, forcing you into a BSOD loop. This is to be expected, and you’ll need to check your BSOD dump logs for more information. In most cases, however, upgrading or replacing your drivers will resolve the problem.
However, you’ll need to boot into Safe Mode first, then switch Driver Verifier off and delete its settings to stop this BSOD loop occurring.
- To do this, restart into Safe Mode. If Windows isn’t booting up properly, you should be able to do this by interrupting the boot process at least twice. As soon as you see the Windows logo during the boot up process, hold down the power button on your PC to switch it off, then switch your PC back on. Repeat this at least twice to see the Automatic Repair options menu—select See advanced repair options > Troubleshoot > Advanced options > Startup Settings > Restart at this point.
- After your PC restarts, select 4 or F4 to boot into Safe Mode, or 5 or F5 to boot into Safe Mode with networking features enabled.
- Once Windows boots into Safe Mode, right-click the Start menu and select Windows PowerShell (Admin).
- In the new PowerShell window, type verifier to open the Driver Verifier tool.
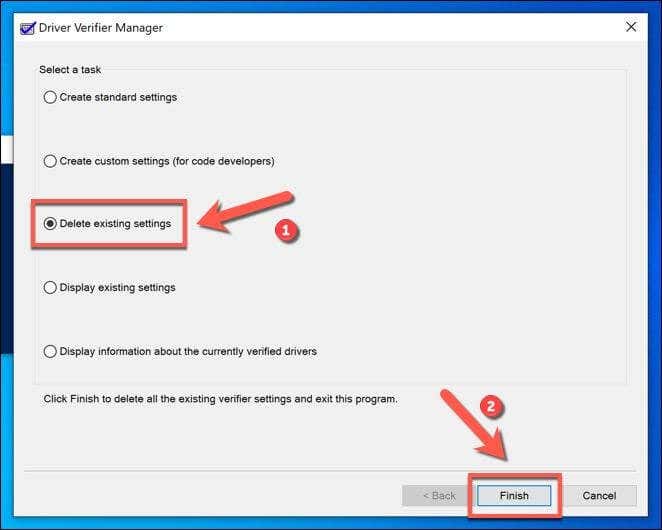
- Select Delete existing settings in the Driver Verifier Manager window, then select Finish. If your PC doesn’t automatically restart, restart it yourself at this point.
This should resolve any additional BSOD loops caused by the Driver Verifier. However, don’t forget that if Driver Verifier does cause a BSOD loop, it’s working as intended.
You’ll need to investigate your BSOD dump files for further information to identify the problematic driver (or drivers) causing your BSOD errors and update or remove them.
Restoring Your PC using System Restore
If disabling Driver Verifier in Safe Mode doesn’t resolve your BSOD loop, use the System Restore point you created before you started this process to reset your PC back to an earlier point. Otherwise, you’ll need to consider resetting Windows to factory settings as a last resort.
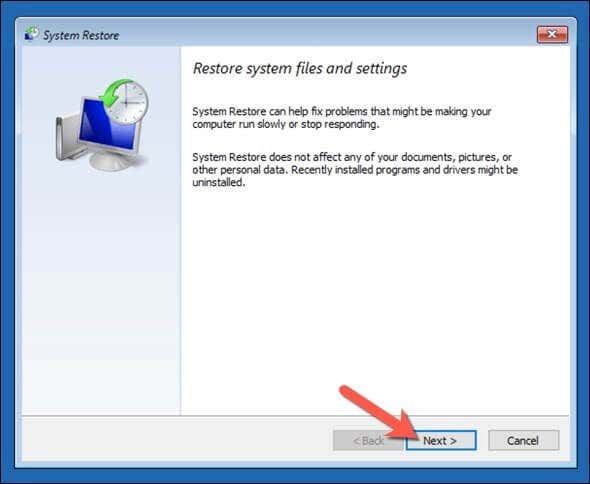
- You’ll need to boot into the Automatic Repair menu to do this. When you see the Windows logo during the boot up process, select and hold the power button to switch your PC off before stwitching it on again. Repeat this process at least twice to see the Automatic Repair options menu, then select See advanced repair options > Troubleshoot > Advanced options > System Restore to begin the restoration process.
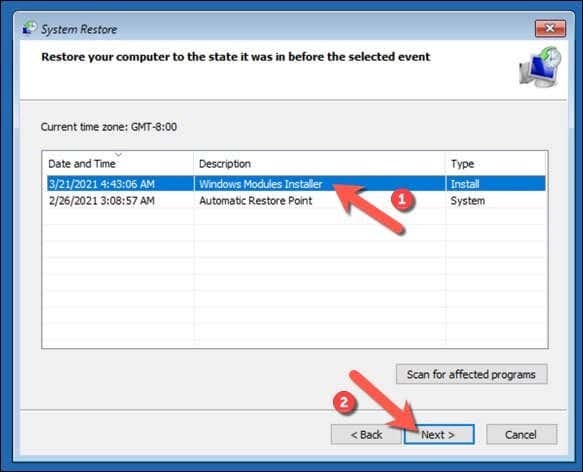
- Select an Administrator account on your PC from the list provided and sign in accordingly. Once you’ve done this, select Next to begin the System Restore process.
- Select the system restore point you created before you ran the Driver Verifier tool from the list provided, then select Next to continue.
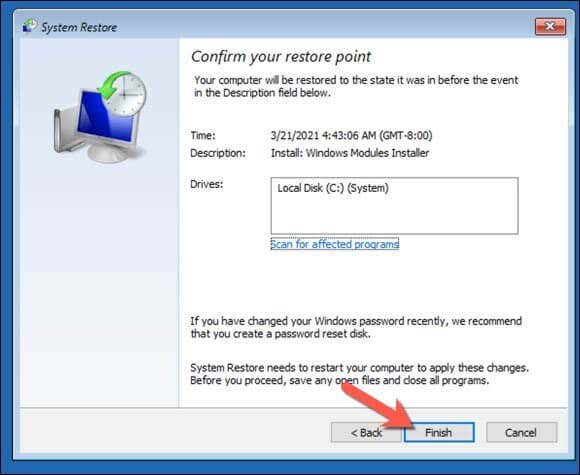
- Once you’re ready to restore your PC using this System Restore point, select Finish.
Windows will restore your PC to the point prior to running the Driver Verifier tool. This should stop the BSOD loop caused by the Driver Verifier, but it won’t fix the original BSOD issues. As we’ve advised, the Driver Verifier is a stress test tool that helps to identify whether your drivers are fit for purpose.
If the BSOD Verifier causes further BSODs, then you can assume that it has identified a driver that isn’t fit for purpose that could cause both BSODs. Check your BSOD dump logs for further information—once you’ve identified the rogue drivers, you’ll need to uninstall them or replace them with newer (or older) drivers.
This should help you to troubleshoot the cause of your driver BSOD issues, especially if you see a System Service Exception BSOD appear on your PC.
Run CHKDSK and SFC Tools
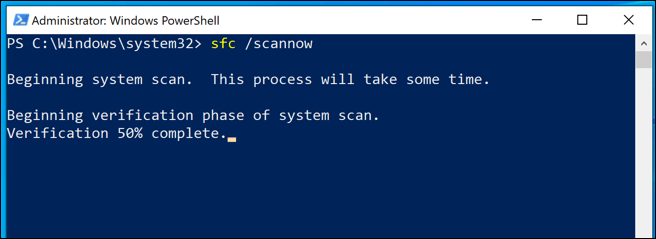
A problem with your drive or system files could cause a System Service Exception in Windows 10. You can run the chkdsk and sfc commands from an elevated command line or Windows PowerShell window to double-check if this is the case.
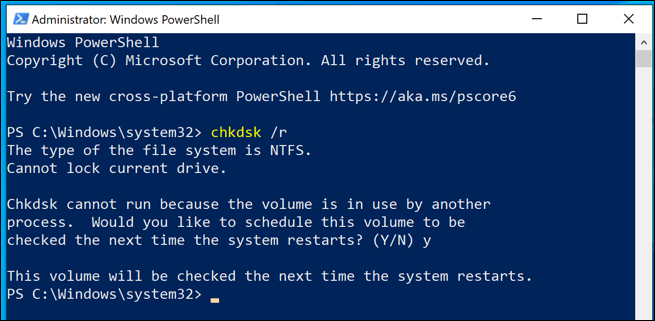
- To check your Windows system drive for errors, right-click the Start menu and click Windows PowerShell (Admin), type chkdsk /r and press enter.
Press the Y key to confirm you’d like to schedule a check of your file system when you next restart your PC. Once restarted, this tool should automatically fix any problems with your system drive that it detects.
- To check the integrity of your Windows files, type sfc /scannow from the PowerShell window. As with the chkdsk tool, this tool will automatically detect any missing system files and correct them, where possible.
Reset or Reinstall Windows 10
When all else fails, and if you’ve ruled out a problem with your hardware itself, then resetting Windows 10 to its default state (or wiping and reinstalling it entirely) may remove any conflicts causing this BSOD error.
Note: Once this process begins, there’s no turning back, so make sure you’ve backed up your PC first.
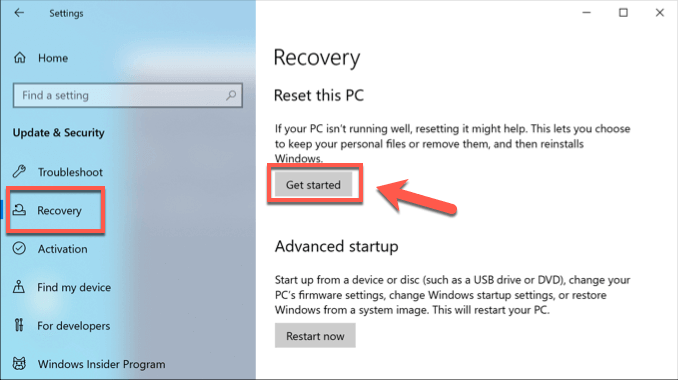
- To begin a full Windows reset, right-click the Start menu and click Settings. Once opened, press Update & Security > Recovery and press Get started to begin resetting your PC.
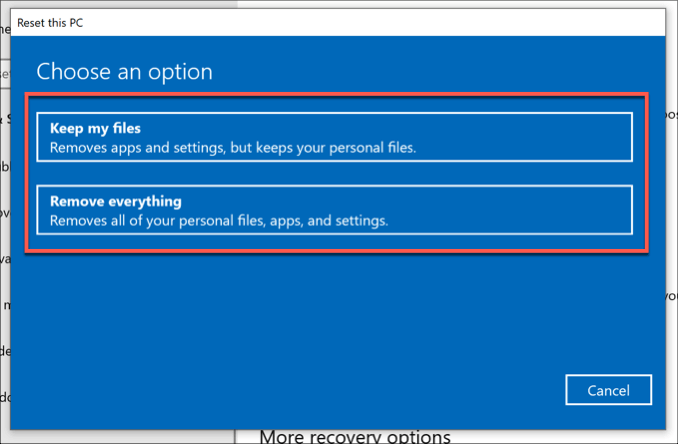
- You can choose to Keep my files to save your documents or click Remove everything to reset windows completely—click one of these options to begin.
Keep Windows 10 Updated to Prevent BSOD Errors
The steps we’ve listed above should help you troubleshoot the problem when a Stop Code System Service Exception BSOD appears on your PC. In many cases, keeping your system updated should stop BSODs from appearing, unless there’s a more serious hardware issue at fault.
If you have any other fixes for the system service exception error in Windows 10, we’d love to see them in the comments below.
Related Posts
- Preparing for Windows 10 End of Support: Upgrading to Windows 11
- How to Fix a “This file does not have an app associated with it” Error on Windows
- How to Fix an Update Error 0x800705b4 on Windows
- How to Resolve “A JavaScript error occured in the main process” Error on Windows
- How to Fix the Network Discovery Is Turned Off Error on Windows
Ben Stockton is a freelance technology writer based in the United Kingdom. In a past life, Ben was a college lecturer in the UK, training teens and adults. Since leaving the classroom, Ben has taken his teaching experience and applied it to writing tech how-to guides and tutorials, specialising in Linux, Windows, and Android. He has a degree in History and a postgraduate qualification in Computing. Read Ben’s Full Bio


