You need a functional camera on your Windows PC to record videos and make video calls. Although the built-in webcam on Windows devices is stable, you might run into using it in third-party applications. External webcams can also malfunction when you least expect.
We’ll help you understand why your Windows camera isn’t working and show you different ways to fix the problem.
Why Your Windows Camera Isn’t Working
The integrated camera on Windows computers won’t work when disabled or turned off. You might also encounter using your webcam in third-party applications if they don’t have camera access.
Expect your camera to malfunction if its driver gets corrupt or outdated. Malware infection, outdated operating systems, and app conflict or interference are other factors that can affect your computer’s camera.
Follow the troubleshooting steps below to get your Windows camera or external webcam working again.
1. Verify That Your Camera Is Connected
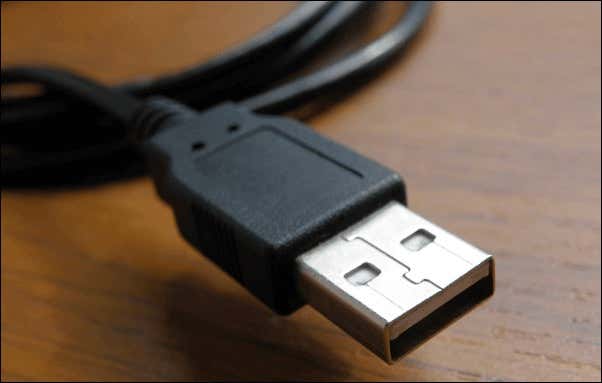
It’s essential to check your camera connection before trying software-related fixes. If using a USB camera, plug it into your PC’s USB port and ensure the connection is secure. Try switching the camera to a different USB port if it doesn’t work.
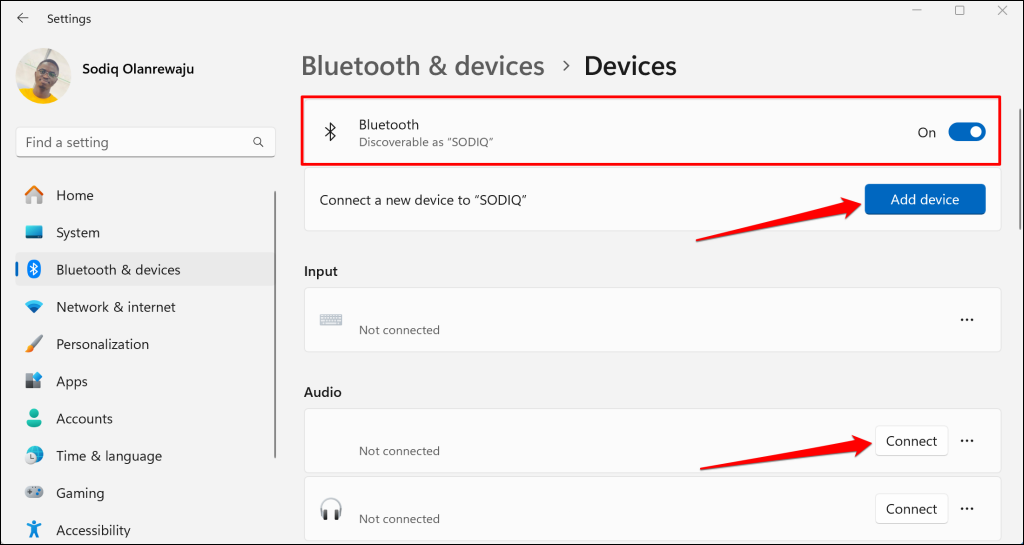
For wireless cameras, ensure your computer’s Bluetooth is turned on. You also want to ensure the camera is paired and connected to your computer via Bluetooth.
Head to Settings > Bluetooth & devices > Devices, turn on Bluetooth, and select Connect next to the camera.
If your camera isn’t on the list of paired devices, select Add device to connect it to your computer.
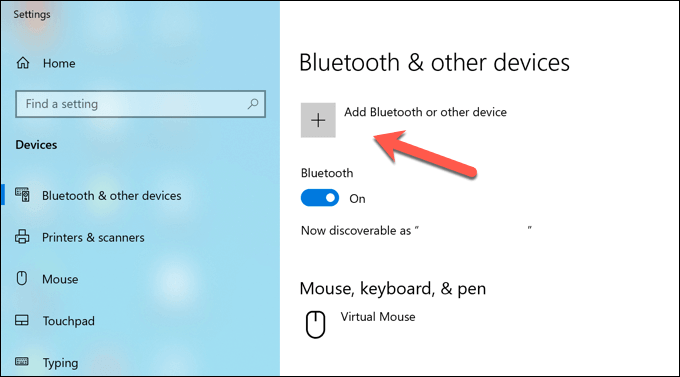
In Windows 10, head to Settings > Devices > Bluetooth & other devices, and select Add Bluetooth or other device to pair your wireless camera.
2. Enable Your Webcam or External Camera
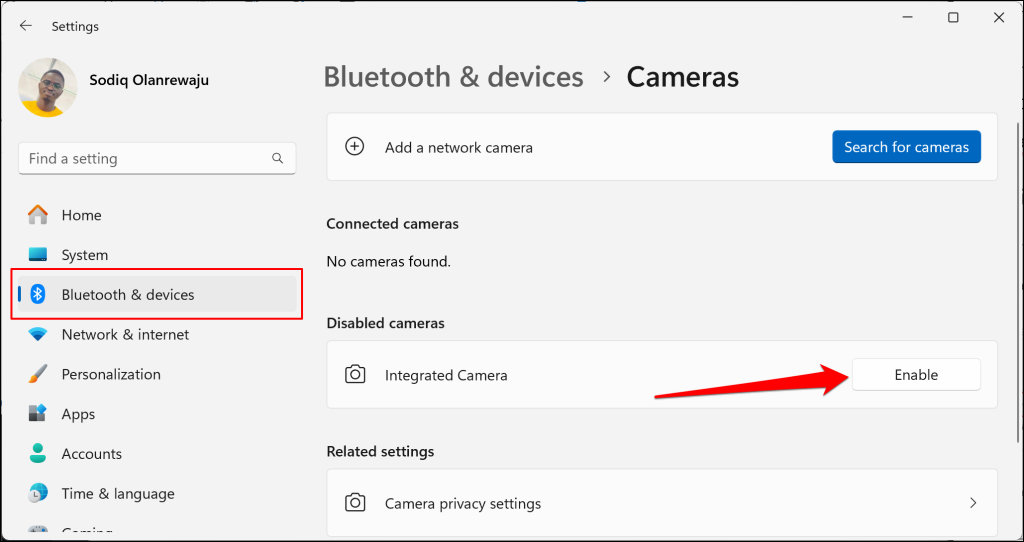
Your webcam won’t work in any app if it is disabled or turned off. Follow the steps below to turn on your webcam or any camera connected to your Windows PC.
Open the Settings app and select Bluetooth & devices on the sidebar. If your camera is disabled, select the Enable button to turn it back on.
3. Run the Windows Camera Troubleshooter
Windows has a built-in troubleshooting tool that automatically diagnoses and fixes camera problems. Connect your computer to the internet and follow the steps below.
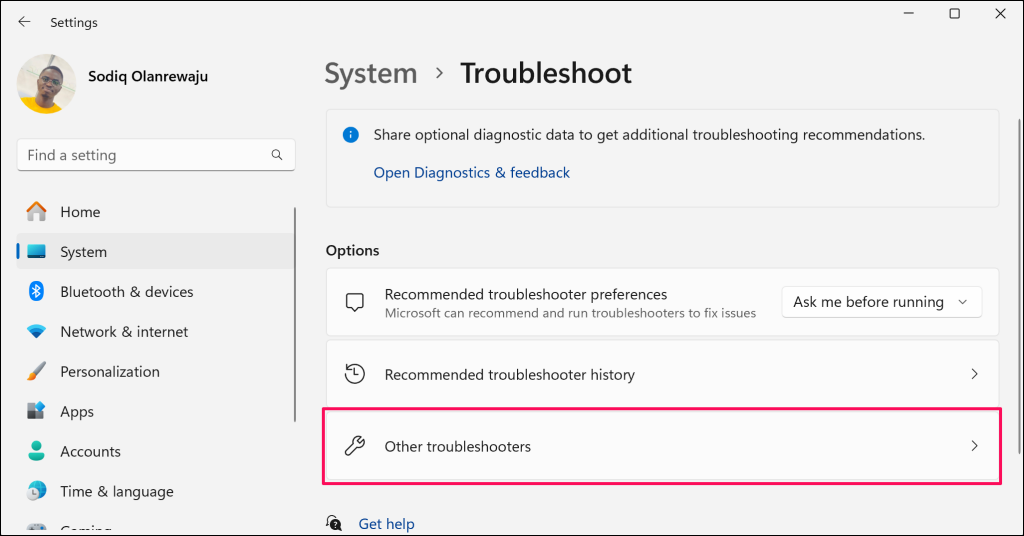
- Go to Settings > System > Troubleshoot and select Other troubleshooters.
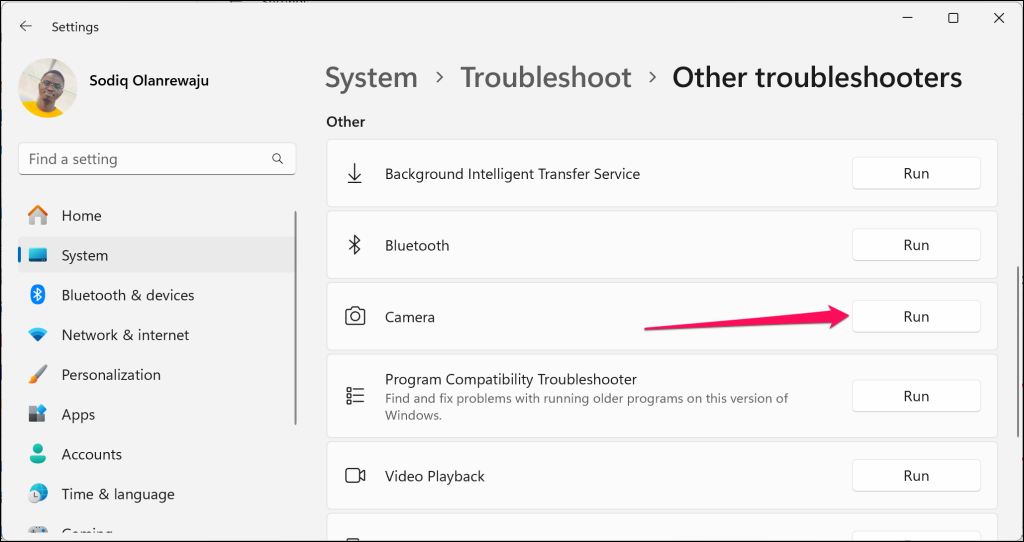
- Select the Run button next to “Camera.” That’ll launch the camera troubleshooter in the Get Help app.
- Select Yes to grant the troubleshooter permission to run diagnostic on your webcam or connected camera.
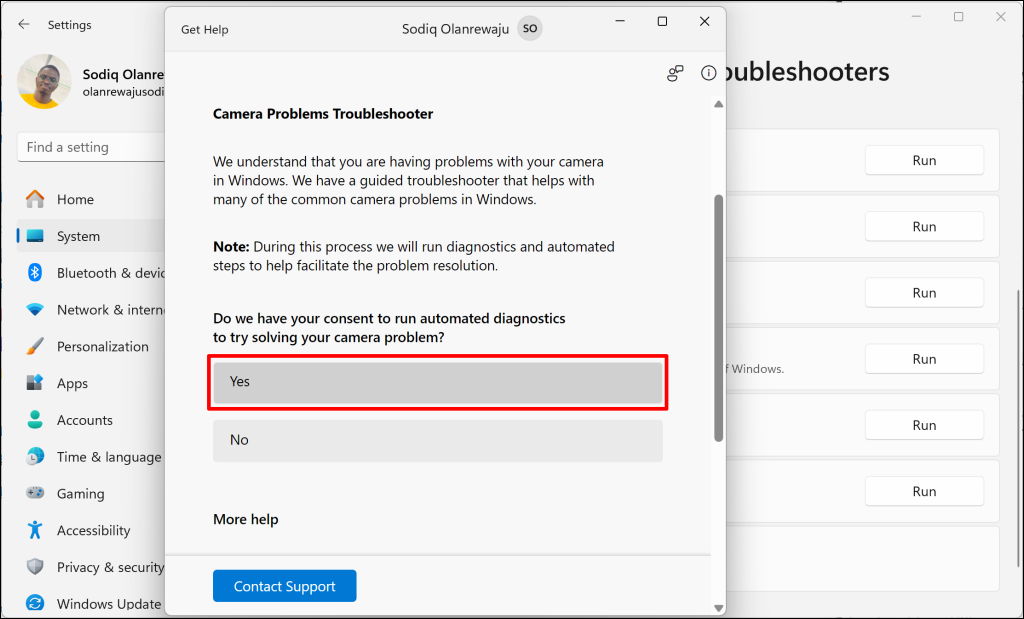
The troubleshooter will reset your PC’s camera services and run other diagnostic checks. Check if your camera works after the first diagnostic check.
- Return to the troubleshooter and select No on the “Did this solve your problem?” prompt if your camera issue persists.
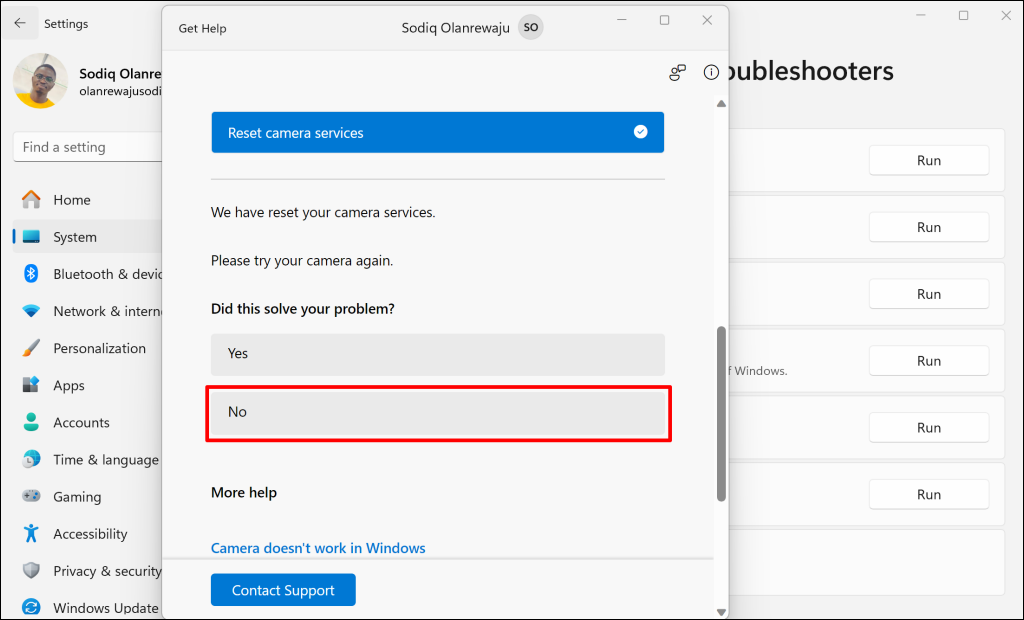
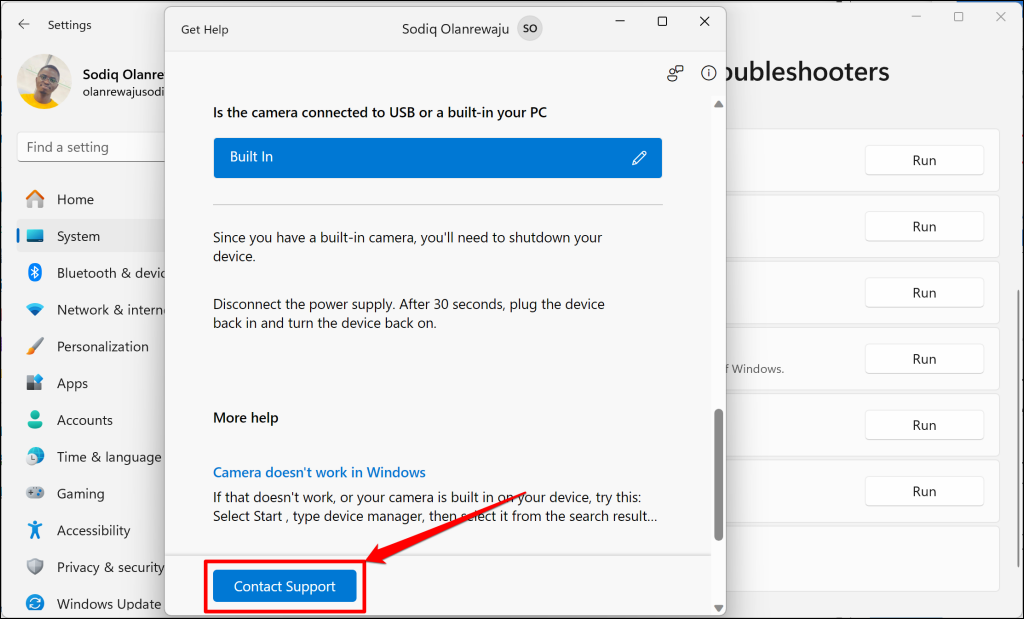
Wait for the troubleshooter to run further diagnostics, and try using your camera. Follow the prompts and answer follow-up questions correctly until your camera works again.
Try the troubleshooting fix in the next section or select the Contact Support button to get technical assistance.
4. Check Your Camera Lens
A common way to protect your privacy is to place a sticker or other obstacles over a camera lens (especially if you’re using a built-in camera on a laptop).
If you often cover your webcam, remember to take off the cover when you need to make video calls. Otherwise, your camera feed will keep showing a black screen.
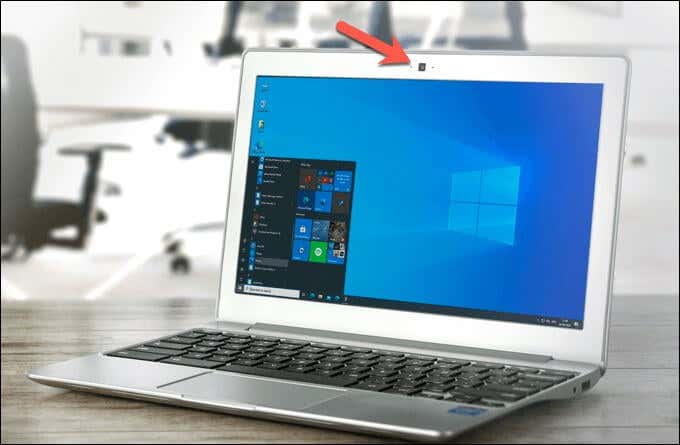
Check your computer’s webcam and remove any obstacle or sticker covering the lens. Wipe the lens with a clean and dry cloth to remove dust or dirt. Dampen the fabric to remove gunk or other stubborn/sticky material.
5. Allow Camera Access in Windows Privacy Settings
Turning off camera access for unneeded or suspicious applications is one way to protect your privacy. If your webcam doesn’t work in a specific application, it’s likely because the app doesn’t have camera access/permission.
Follow the steps below to check the application’s camera permission in your PC’s privacy settings menu.
Configure Camera Privacy Settings in Windows 11
- Head to Settings > Privacy & security > Camera and toggle on Camera access.
- Next, toggle on Let apps access your camera, expand the section, and toggle on Camera.
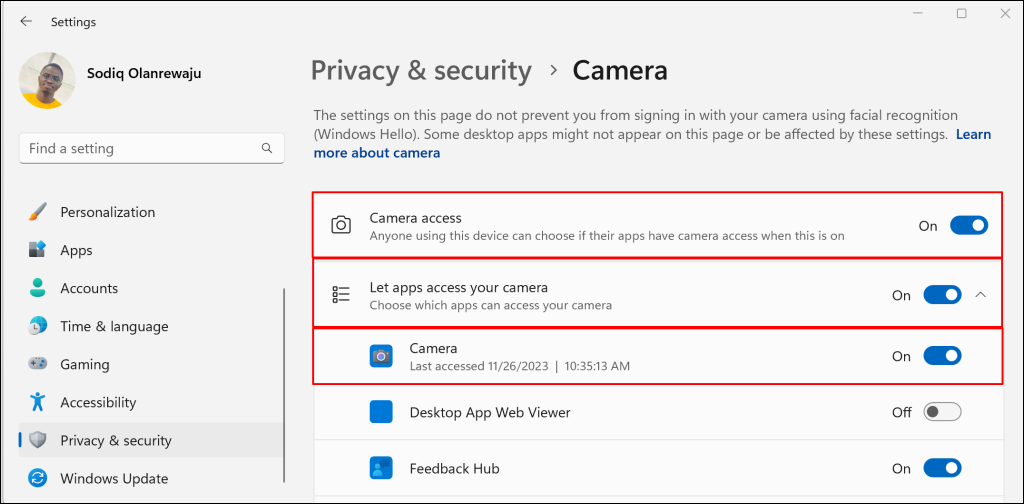
That’ll turn on camera access for your PC’s built-in webcam. Go through the list and toggle on camera access for the affected application(s).
Configure Camera Privacy Settings in Windows 10
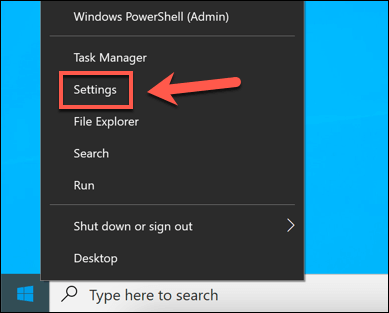
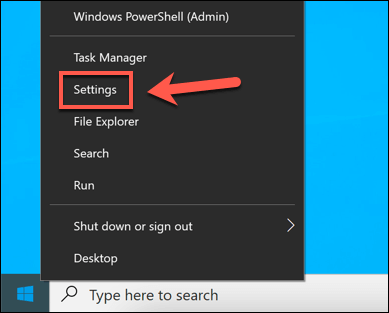
- To begin, right-click the Start menu and select the Settings option.
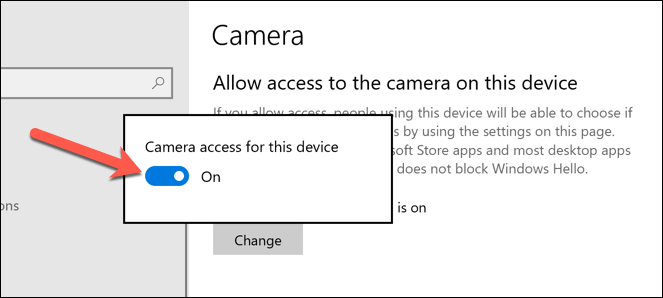
- Select Privacy > Camera, select the Change button and toggle on the Camera access for this device.
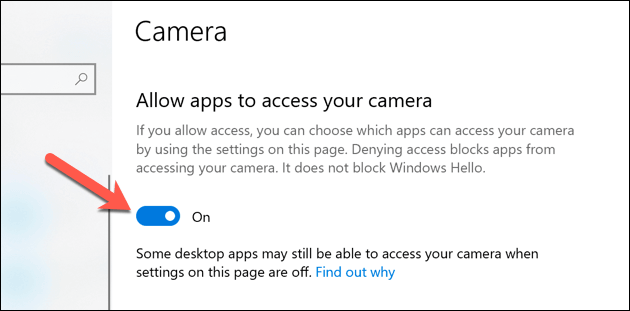
- You’ll also need to grant camera access to apps by turning on the Allow apps to access your camera option.
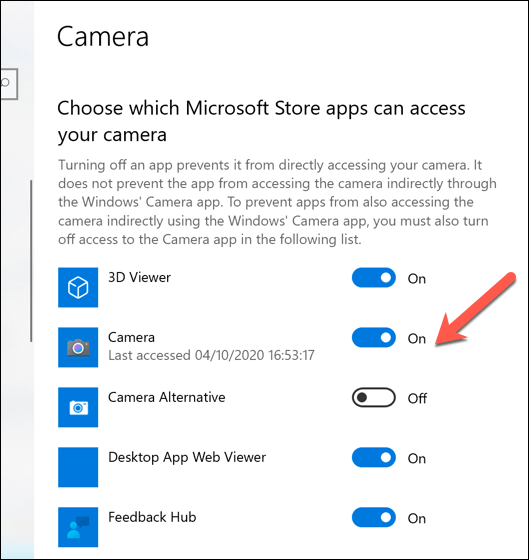
- To grant camera access to apps from the Microsoft Store, scroll down to the “Choose which Microsoft Store apps can access your camera” section. Select the slider next to a listed app to grant camera access.
- To grant standard desktop apps camera access, scroll down to the “Allow desktop apps to access your camera” section, then set the slider to On.
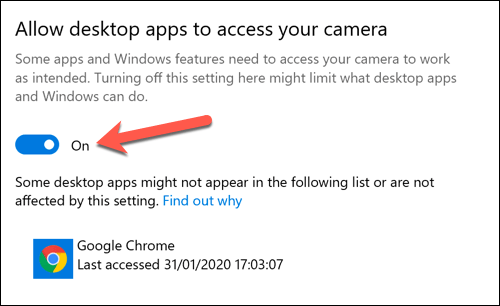
Certain apps, like your web browser, can also be configured to block camera access for extra privacy. You’ll need to enable camera access within your browser to allow specific websites to use your webcam.
6. Close Unneeded Camera Apps (or Try Alternatives)
You’d think your webcam should work in any application if it works in the Windows Camera app. That isn’t always the case. Unknown bugs and app conflicts sometimes prevent your webcam from working in third-party applications.
If two open apps attempt to use your webcam simultaneously, the camera feed may be inaccessible in one of the apps. Close unneeded applications and ensure that only one app uses your webcam.
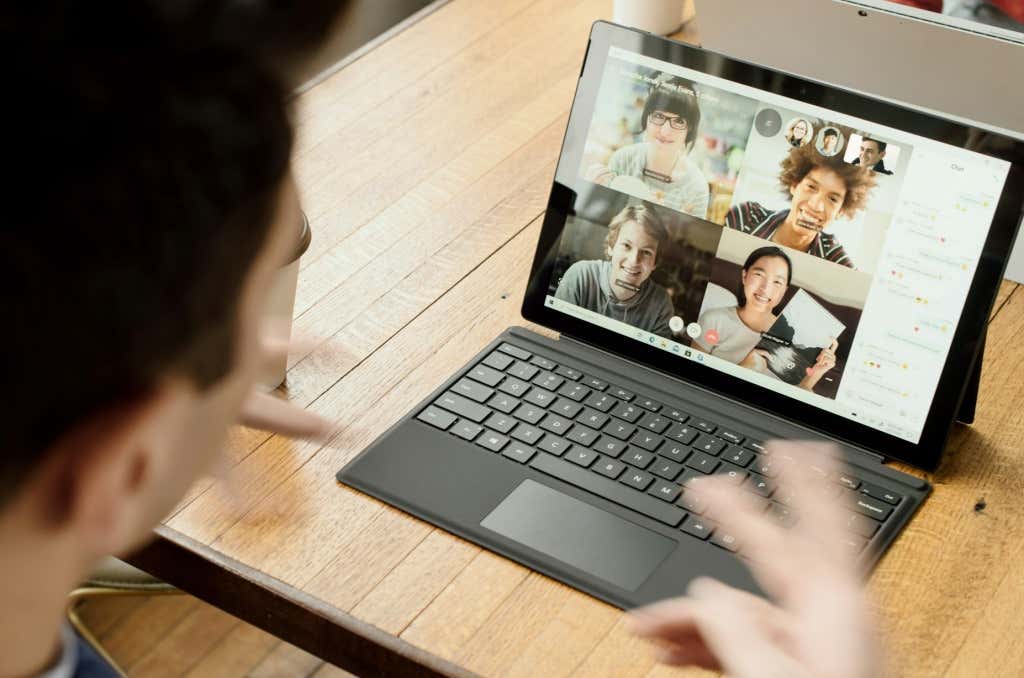
We recommend testing or accessing your webcam from different applications. That’ll help you determine if the issue stems from the affected application(s) or your computer.
For instance, if your webcam works in the Windows Camera app but not in a specific video calling app, that tells you the app is the problem.
Ensure that the application has camera access in your device’s privacy settings. You should also update the application to the latest version to fix software-related malfunctions.
7. Restart Your Camera Driver
If your Windows camera isn’t working, re-enabling its driver in Windows Device Manager can fix the issue.
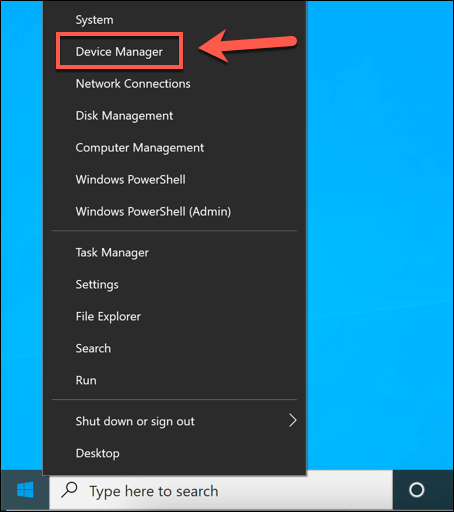
- Right-click the Start menu (or press the Windows key + X) and select Device Manager.
- Expand the Cameras category and find your built-in webcam driver. If you’re using a Bluetooth camera, you’ll find its driver listed under the Bluetooth category instead. Right-click the driver and select Properties.
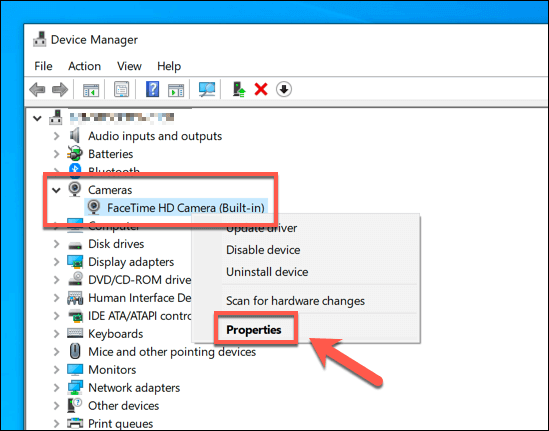
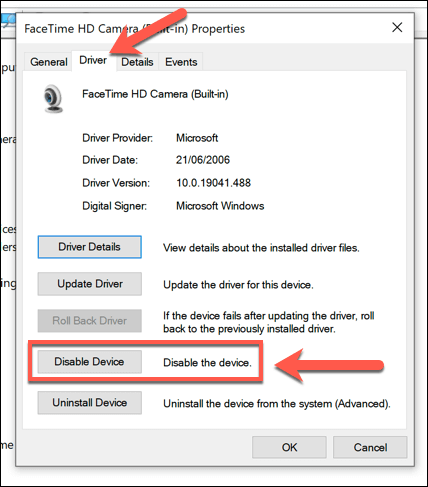
- Open the Driver tab, select Disable Device, and choose Yes on the confirmation pop-up.
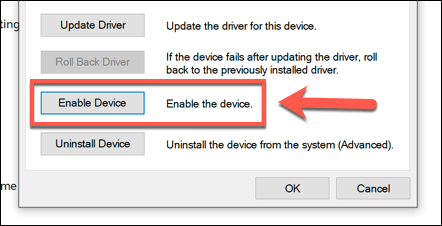
- Once disabled, select the Enable Device option in the same menu to re-enable your camera.
Open the Camera app or any video calling apps to check if your webcam or Bluetooth camera works.
8. Update or Reinstall Your Camera Driver
Your webcam or external camera might stop working if there’s a problem with its driver. Updating your camera driver to the latest version can fix bugs causing it to malfunction.
Removing and reinstalling the driver can also get the camera working correctly again. Connect your PC to the internet and follow the steps below to update or reinstall your camera driver.
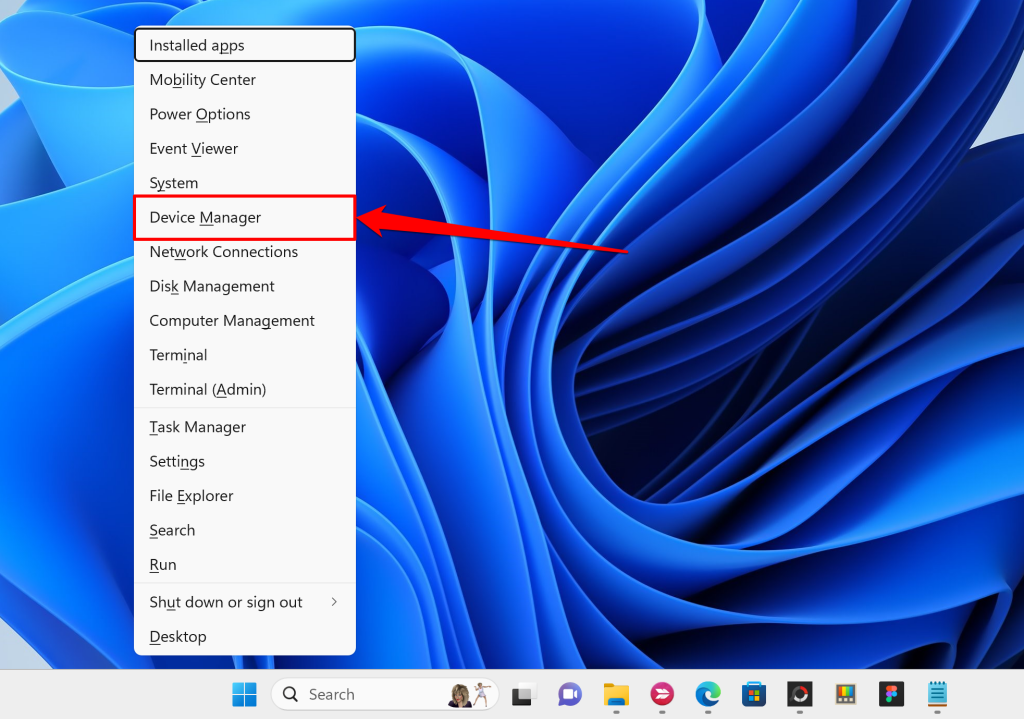
- Press the Windows key + X and select Device Manager in the Quick Access menu.
- Expand the “Cameras” category, right-click your webcam driver, and select Update driver.
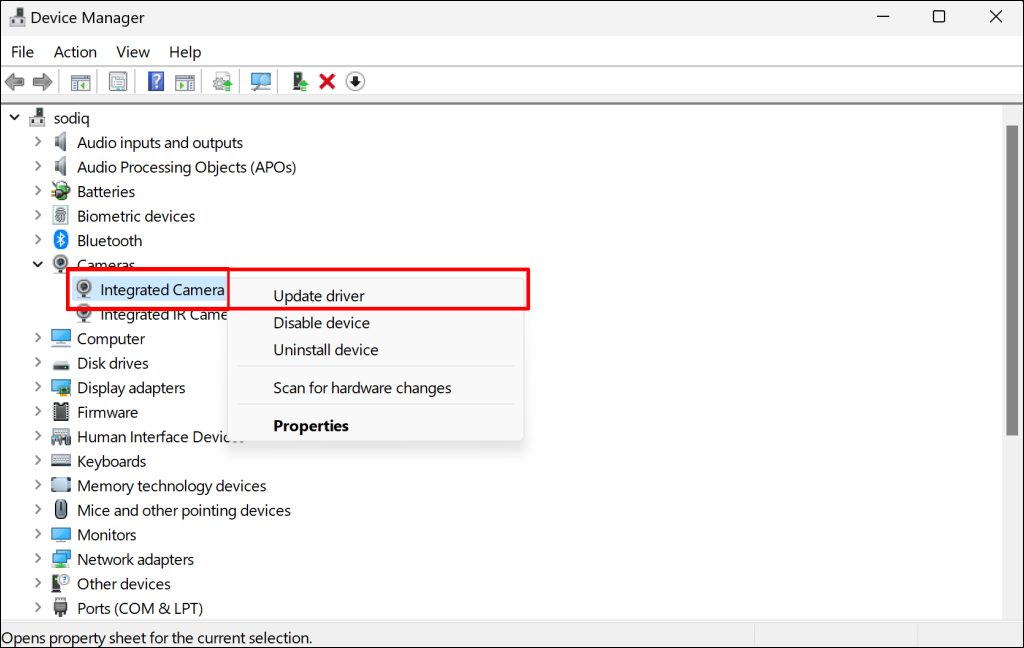
If you’re using a wireless webcam, expand the Bluetooth category, right-click your webcam, and select Update driver.
- Select Search automatically for drivers.
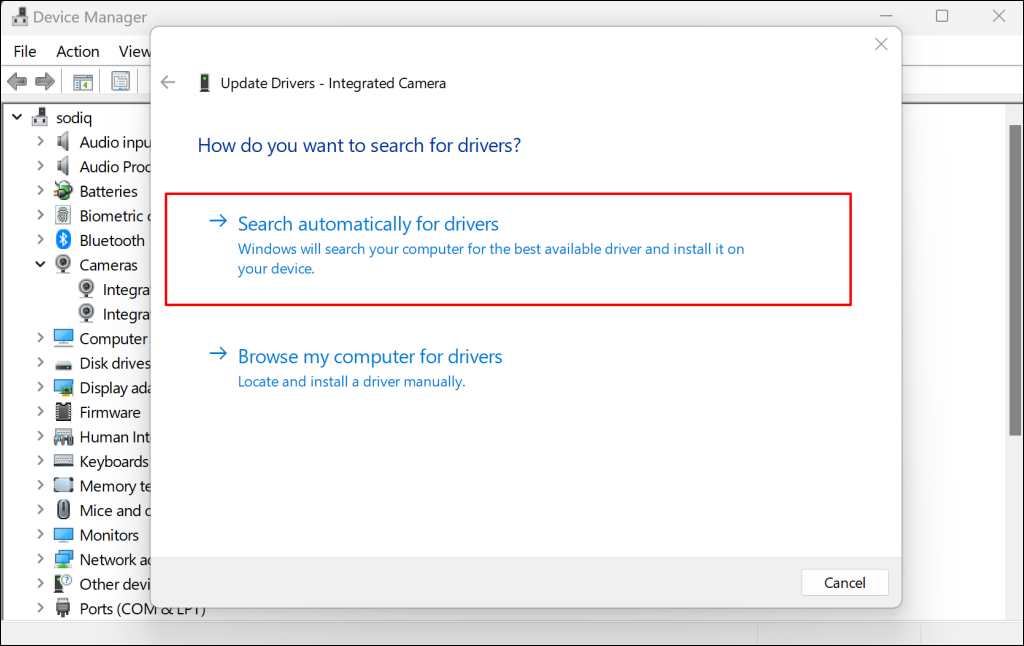
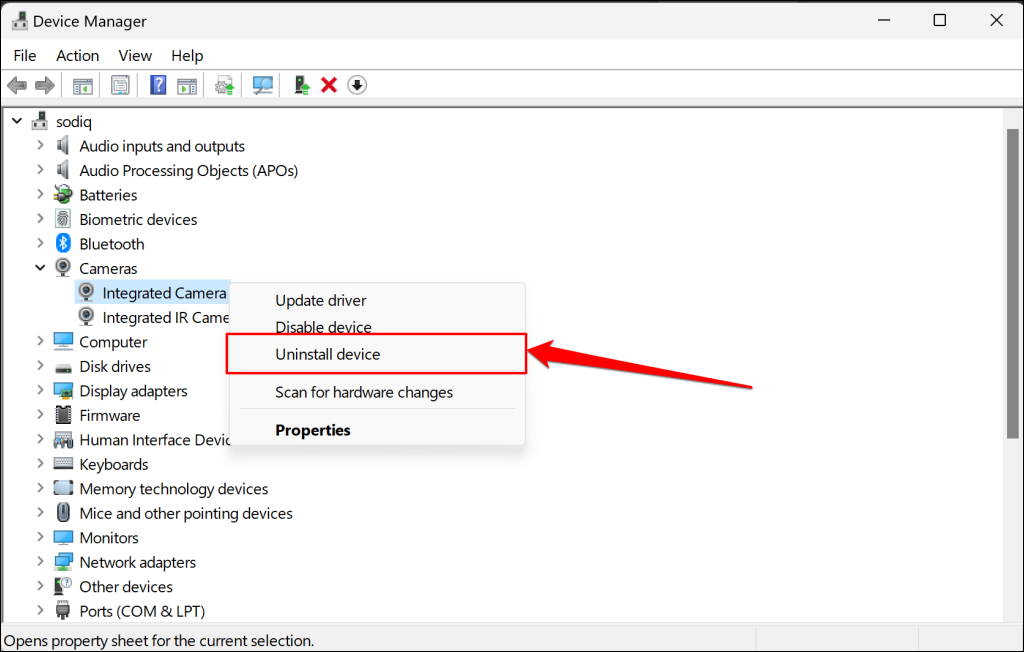
Uninstall the driver from your computer (see step #4) if the camera still doesn’t work. Windows will automatically reinstall the driver when you restart your computer.
- Right-click the camera driver and select Uninstall device.
- Select Uninstall on the confirmation window to proceed.
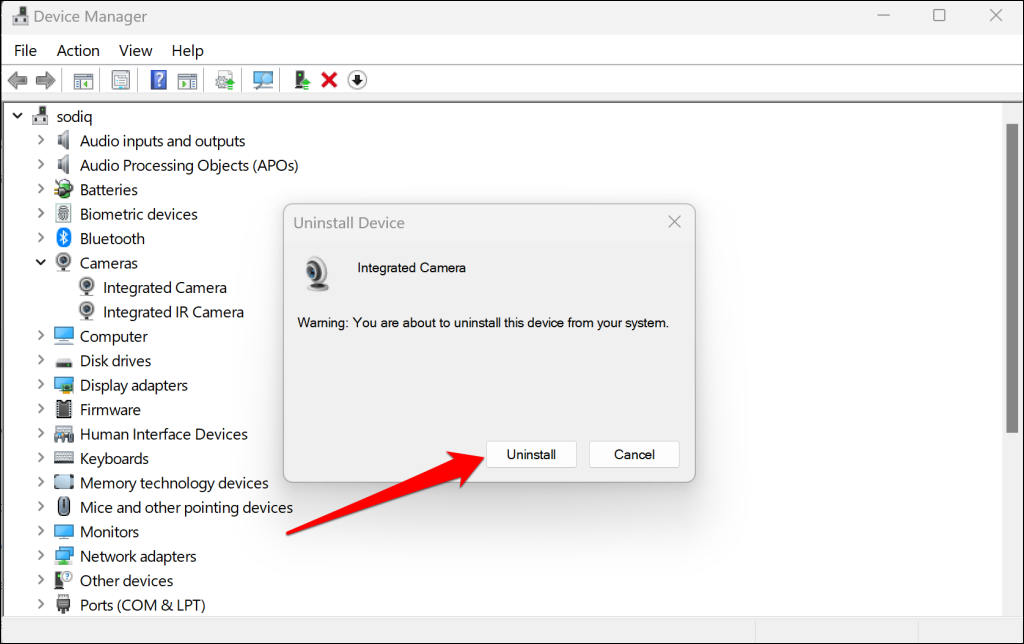
Reboot your computer and check if your webcam or external camera works as expected. Update your computer’s operating system if the issue persists.
9. Install Windows Updates
Updating your computer can resolve camera failure caused by software bugs. Microsoft regularly releases Windows updates that introduce new features and bug fixes. These updates sometimes include driver updates for hardware components like webcam.
Install Windows Updates in Windows 11
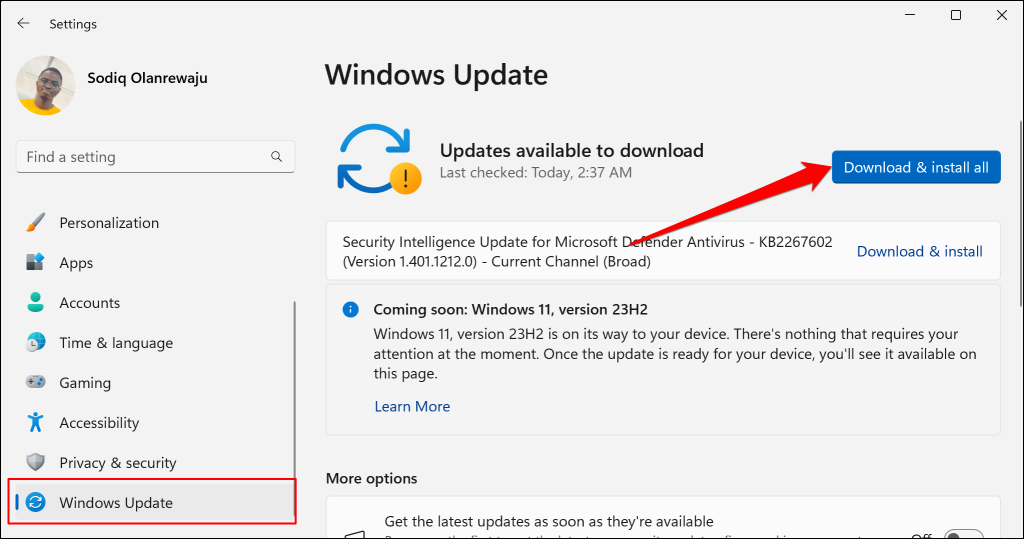
Open the Settings app, select Windows Update on the sidebar, and select Check for updates or Download and install.
Install Windows Updates in Windows 10
- Right-click the Start menu and select Settings.
- Next, head to Update & Security > Windows Update and select Check for Updates or Download and install.
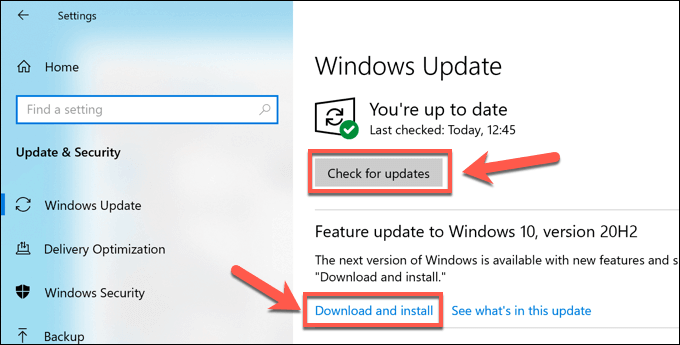
Windows will scan and download software and driver updates available for your PC. If your device is new, supported drivers may not be available through the Windows Update system. If so, download the camera driver update from your PC manufacturer’s website instead.
Fix Windows Camera Issues
These troubleshooting recommendations should resolve camera issues in Windows. We also recommend running a malware scan using Microsoft Security (Windows Defender) or reputable third-party antivirus software. Contact Microsoft Surface or visit a repair shop if the problem persists.
Related Posts
Ben Stockton is a freelance technology writer based in the United Kingdom. In a past life, Ben was a college lecturer in the UK, training teens and adults. Since leaving the classroom, Ben has taken his teaching experience and applied it to writing tech how-to guides and tutorials, specialising in Linux, Windows, and Android. He has a degree in History and a postgraduate qualification in Computing. Read Ben’s Full Bio
