Wi-Fi is the lifeblood of modern computers, but sometimes the option to connect to Wi-Fi doesn’t show up in Windows 11(or Windows 10!). This makes it impossible to connect to the internet or LAN resources without a cable.
Here are some of the most likely tips to fix Wi-Fi problems and get you back online in no time, starting with the best universal troubleshooting tip of all.
1. Reboot Your PC
That’s right, just restart your computer. In many cases, any wireless network weirdness mysteriously goes away after a reboot.
2. Is Airplane Mode On?
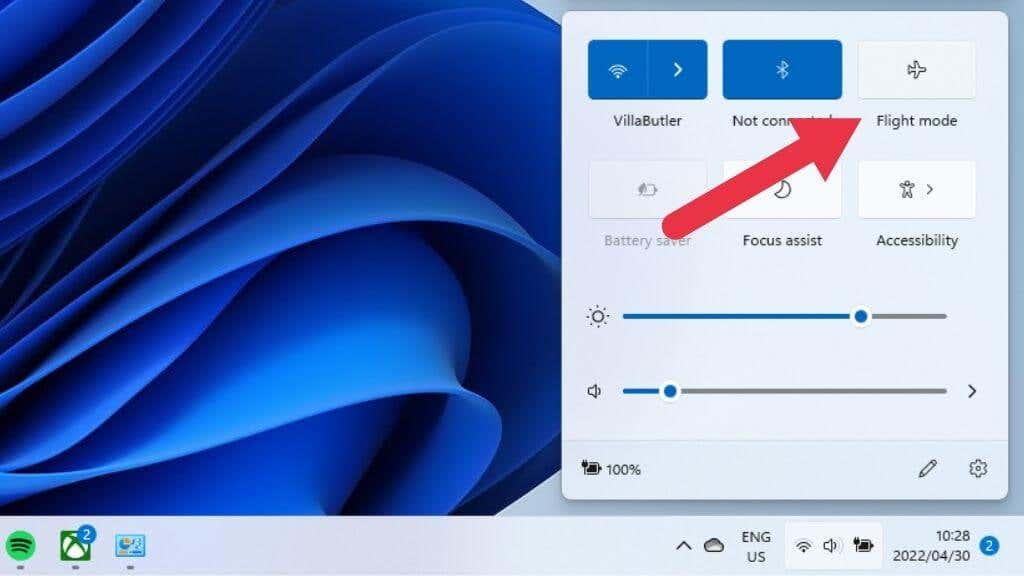
Windows 11 has an Airplane or “flight” mode setting which turns off every radio-transmission device on your computer. That includes Wi-Fi and Bluetooth, so it’s worth checking that you haven’t accidentally toggled the computer into Airplane mode.
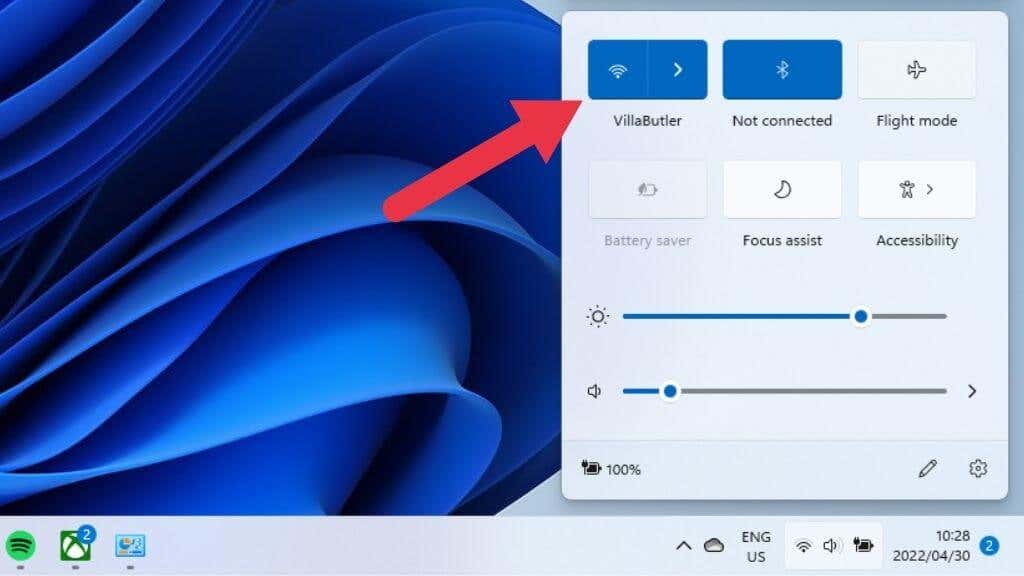
You can press Windows + A or left-click on the speaker in the notification area.
The Flight mode button should not be lit up. If it is, click or tap on it once.
3. Run the Network Troubleshooter
Windows 11 has a number of built-in troubleshooters that automate the detection and repair of common issues without resorting to the Command Prompt. You can use the Network Troubleshooter like this:
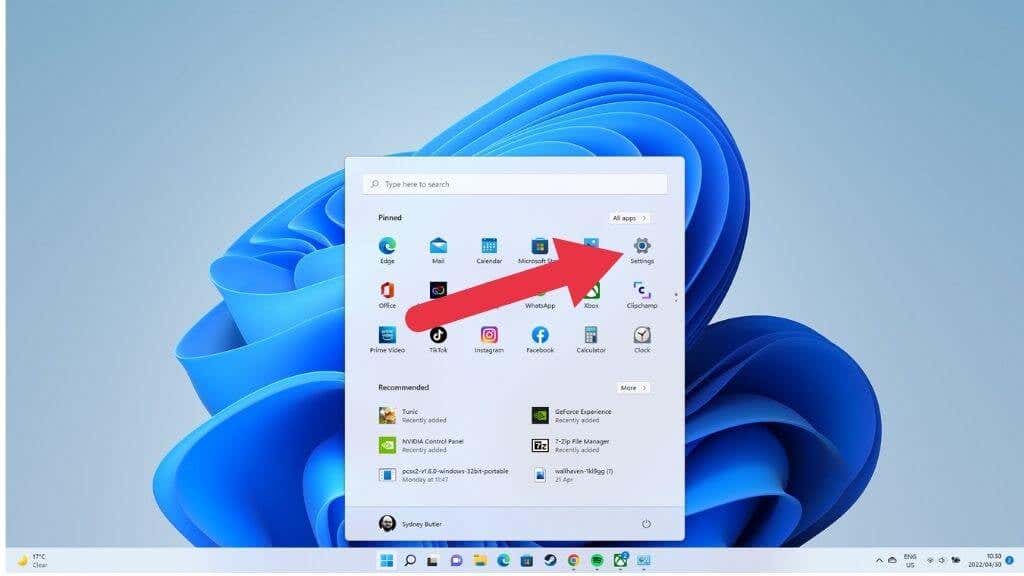
- Open the Start Menu.
- Select the Settings Cog to open Settings.
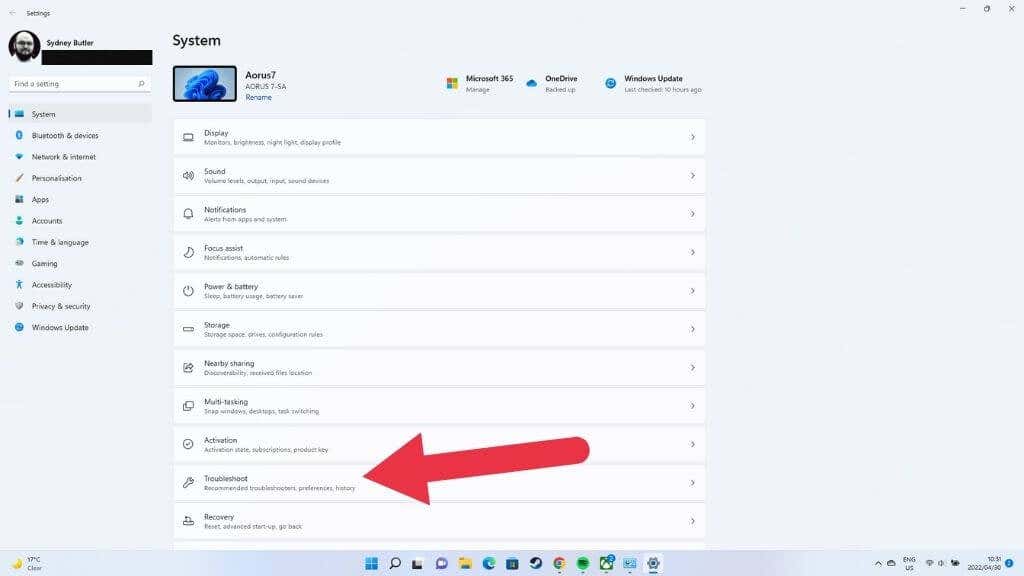
- Open System.
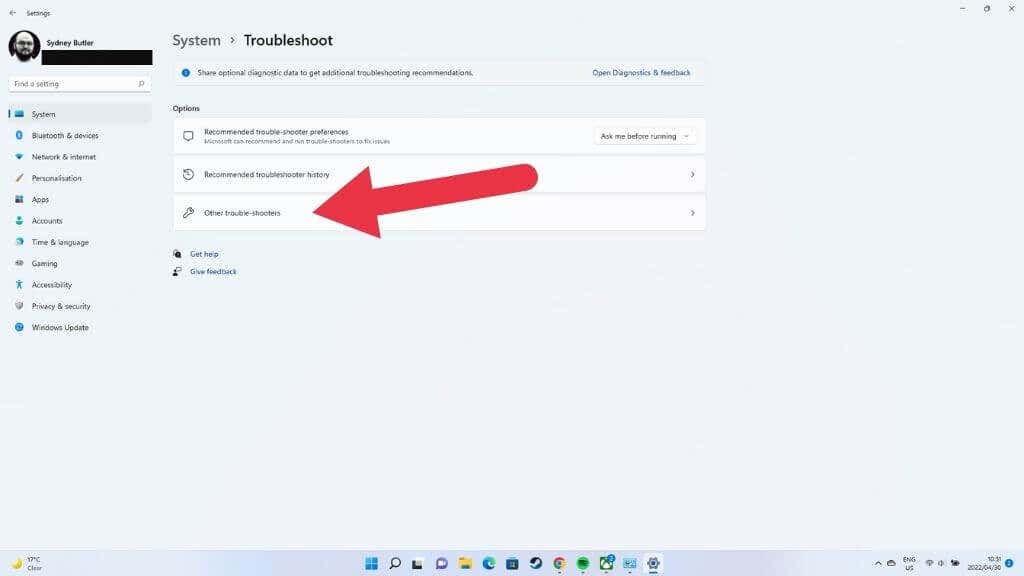
- Open Troubleshoot.
- Next select Other Troubleshooters.
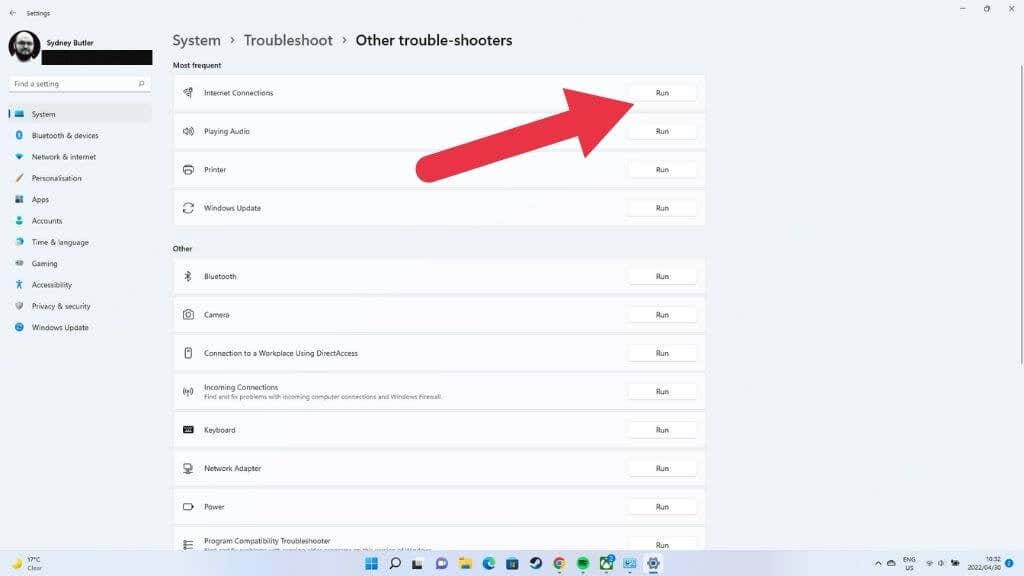
- Select Run next to Internet Connections.
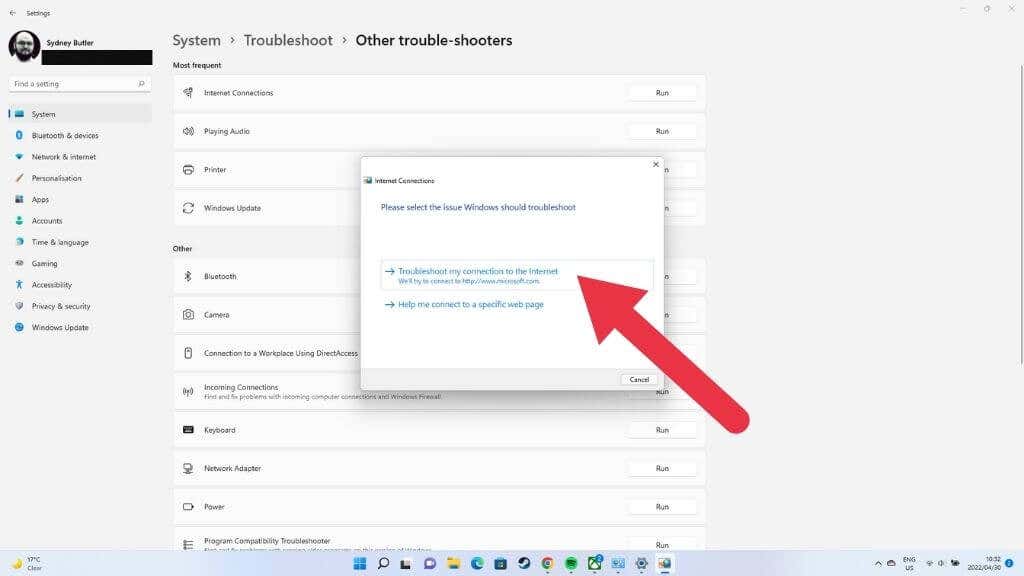
Now select the option to troubleshoot your internet connection and follow the on-screen instructions.
It will let you know of any issues it finds and whether it could fix them.
4. Boot Into Safe Mode (or Use Ethernet)
Some troubleshooting steps may require an internet connection or perhaps you need to get on the internet now and fix the Wi-Fi later. There are two ways to accomplish this.
First, you can boot Windows 11 into Safe Mode. No third-party apps are loaded at startup in this mode, and Windows falls back on a generic network adapter driver. If your Wi-Fi works in Safe Mode, there’s a good chance your issues are driver-related, and you may need to update drivers. Head over to How to Start Windows 11 in Safe Mode for specific instructions.
Your second option is to switch over to an Ethernet connection. Run an Ethernet cable from the nearest outlet to your Windows 11 PC.
5. Ensure Wi-Fi Is Enabled
Is your Wi-Fi toggled on in the first place? There are a number of ways it could be toggled off. First, in Windows 11 itself, you can select the quick settings button in the notification area. This will reveal the Wi-Fi toggle switch in Windows. Toggle it on and see if things go back to normal.
If you’re using a laptop, then you’ll either have a hardware switch on the side of the computer or a keyboard shortcut for Wi-Fi functionality. If Wi-Fi is disabled at the BIOS level, Windows can’t use the hardware.
You’ll have to check your laptop’s manual for the button’s location if any. Keyboard Wi-Fi toggles are usually operated by holding the Fn key and then pressing the corresponding key with a Wi-Fi icon on it.
6. Enable Your Wi-Fi Connection
Your Wi-Fi connection may be disabled in Windows 11 itself for some reason. Here’s how to check for and fix the issue:
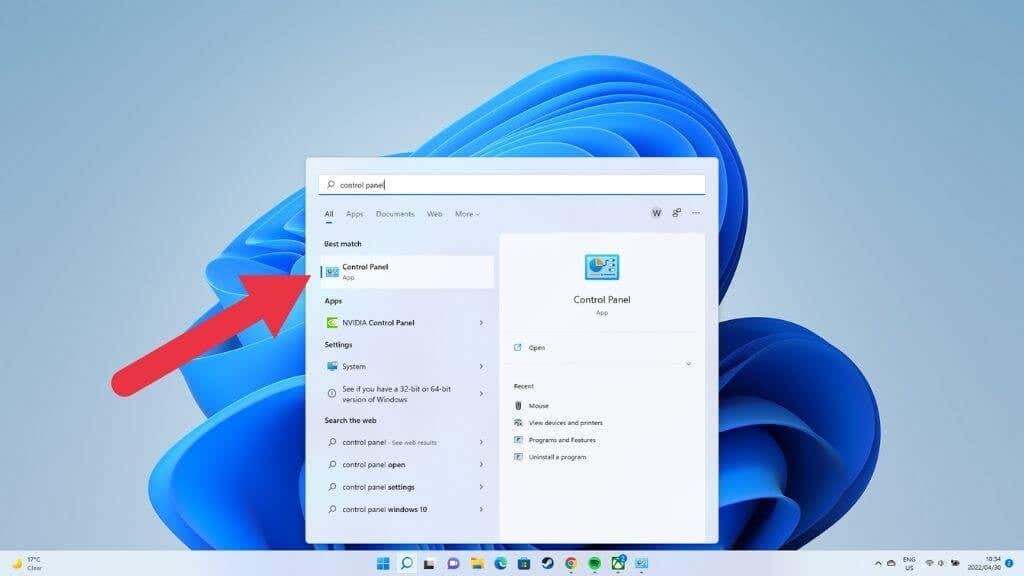
- Open the Start Menu with the Windows key.
- Type Control Panel and then press Enter.
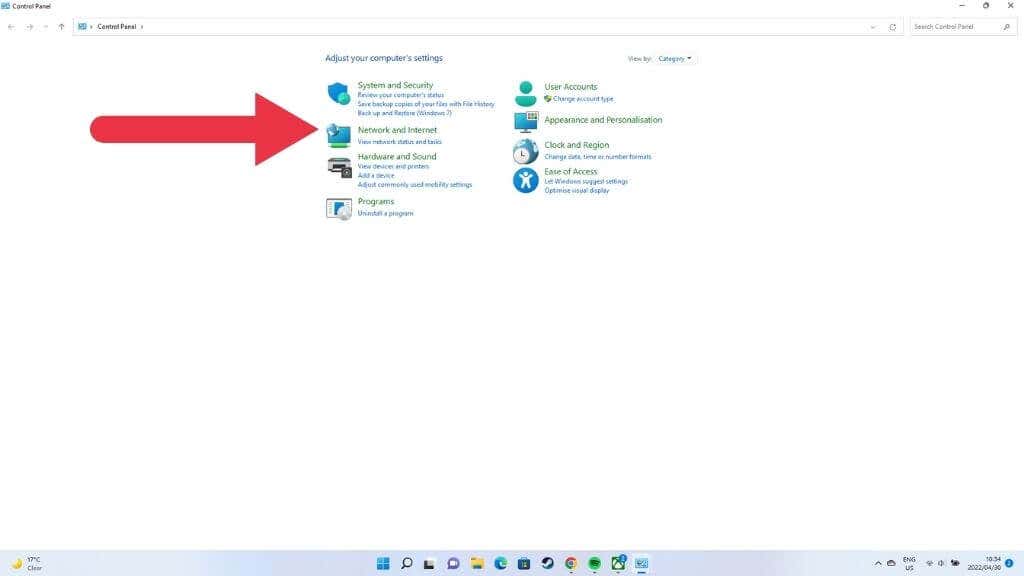
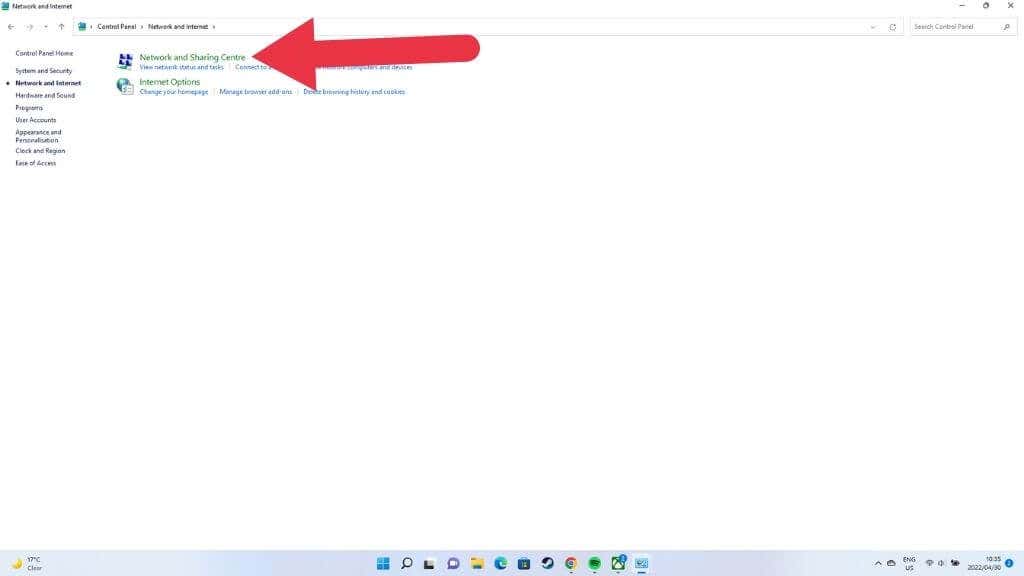
- Go to Network and Internet > Network and Sharing Center.
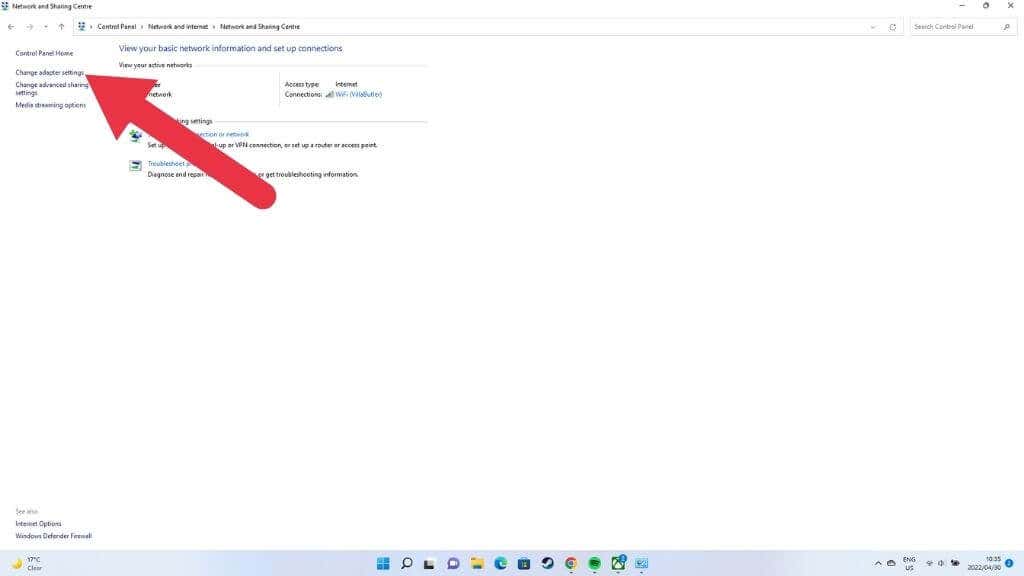
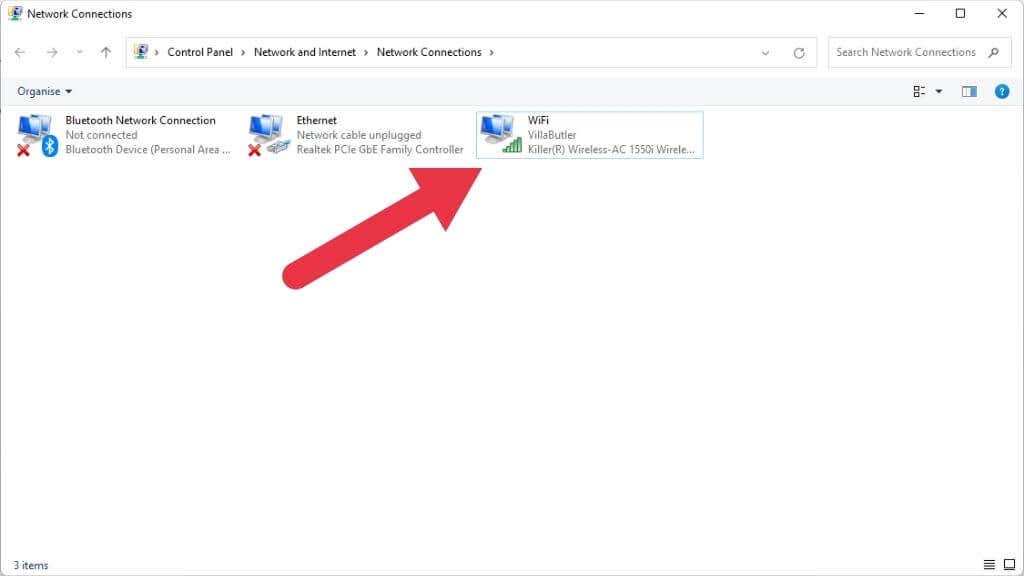
- Select Change adapter settings.
Here you’ll see all of your network connections and connected modems.
Look for a Wi-Fi connection listed for the correct network adapter. In most systems, there will be only one. If it’s grayed out and labeled “Disabled,” simply right-click on it and select Enable.
7. Check if Your Wi-Fi Adapter Is Plugged In
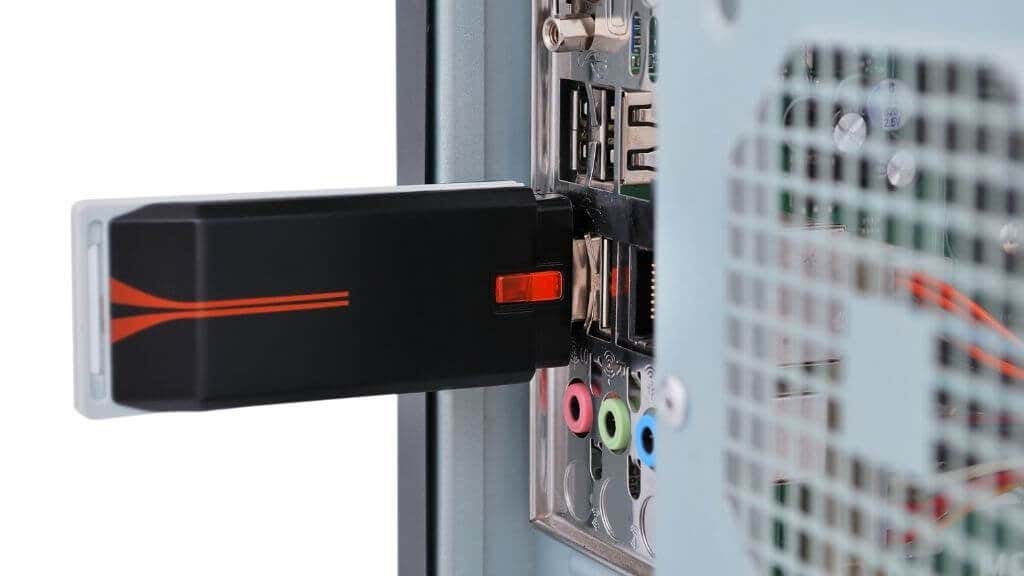
If you’re using a USB-based WiFi adapter, which is likely if you’re on a desktop system, make sure it’s plugged in correctly.
You may also want to try it on a different computer to ensure it still works. Try using a different USB port as well. In case there’s something amiss with the port itself.
8. Check Your Network Adapter in Device Manager
The Device Manager application shows you a list of all the hardware in your computer and whether they work correctly or not.
- Open the Start Menu.
- Type Device Manager.
- Open Device Manager from the search results.
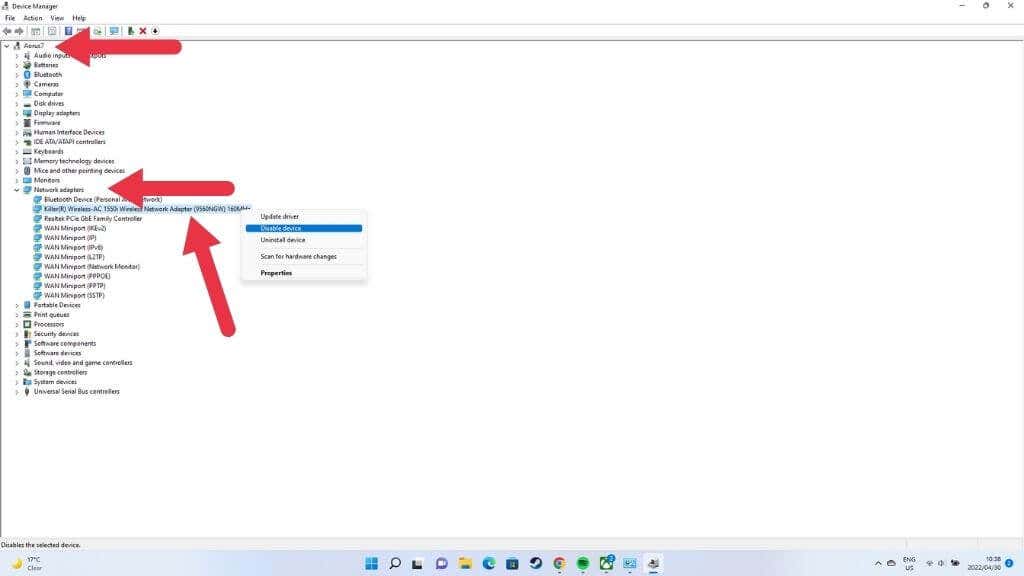
You may have to double-click the computer category to expand it.
Search for the network adapters section, and expand that to see all of your network adapters.
Look for your Wi-Fi adapter in the list of network adapters and check whether it has a warning icon on it, such as a yellow exclamation mark. Right-click on the adapter and check its properties for specific error messages.
If the adapter is completely absent from the device manager, it indicates a hardware-level issue or why the adapter isn’t being detected. If the adapter works in Safe Mode only, it may be related to software or drivers.
If the adapter has a red cross through its icon, right-click on it and select Enable. If that’s not possible, you can uninstall devices by right-clicking on them and selecting uninstall. Then reboot your computer to detect the hardware again.
9. Update, Roll Back or Reinstall Your Wi-Fi Drivers
Most often, your Wi-Fi stops working because the hardware driver has gone wrong. You’ll either have to download and install the latest driver from the manufacturer’s website, use driver roll-back in the adapter’s properties under device manager, or uninstall the driver completely and reinstall the newest version or the last version that worked.
10. Use the “Reset Network” Function
While resetting or reinstalling Windows is an effective way to solve most problems, it’s a bit overkill for something minor like wonky Wi-Fi. Luckily you can reset only the network settings:
- Open the Start Menu.
- Select the Settings Cog to open the Settings app.
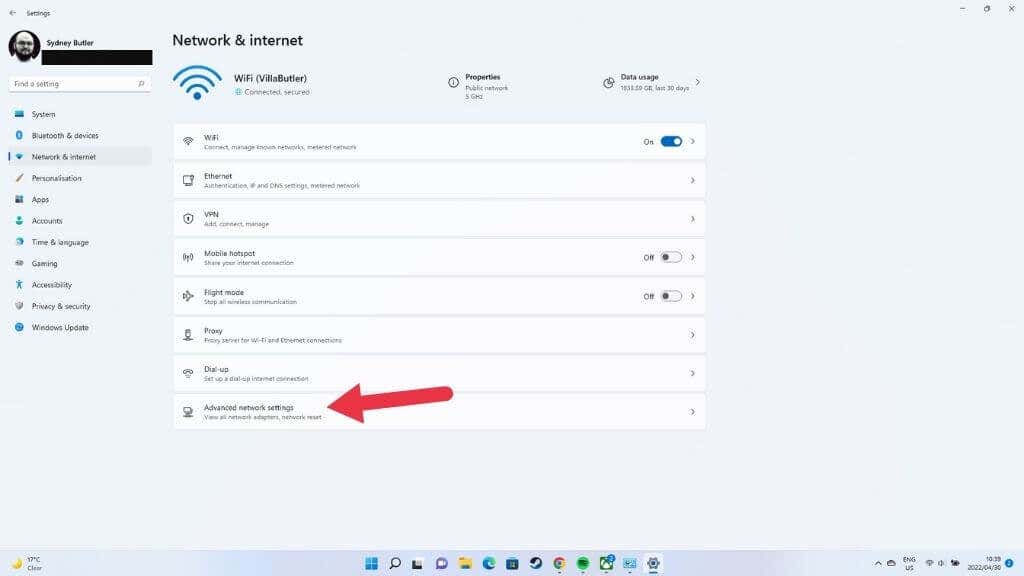
- Choose Network and Internet.
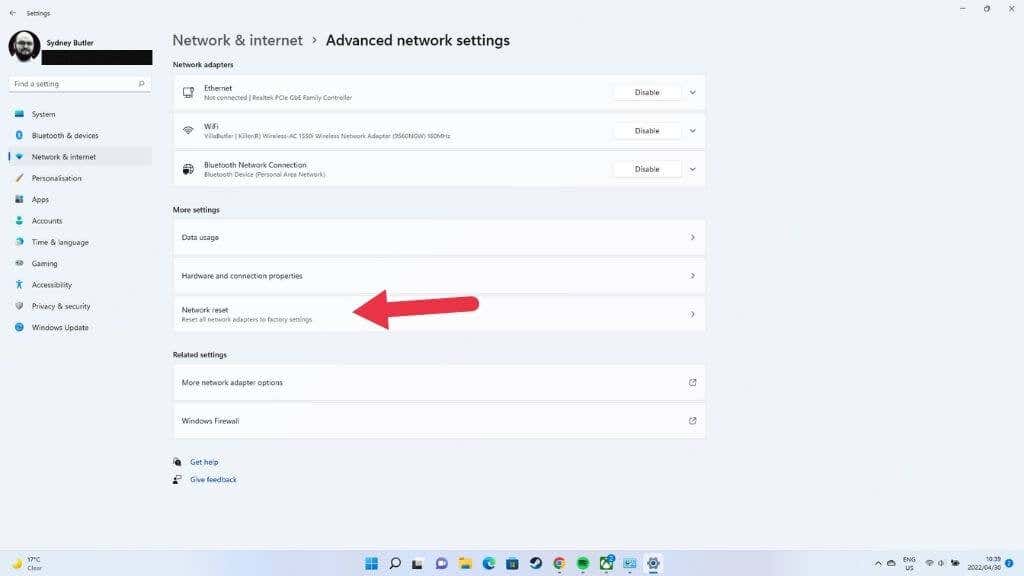
- Now choose Advanced network settings.
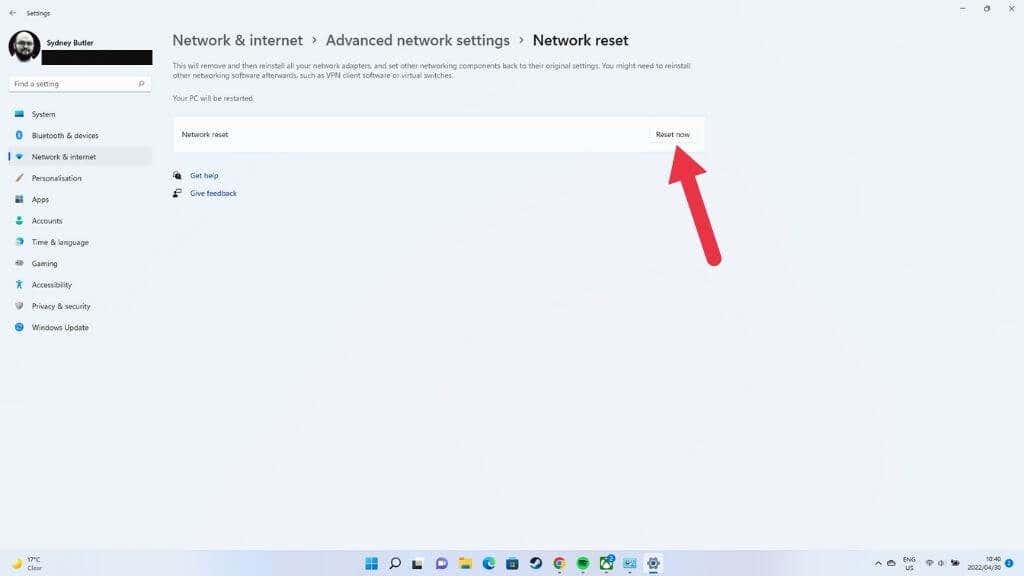
- Finally, choose Network reset and then reset now.
This will reset all of your network and adapter settings. Restart your computer to make sure the reset has taken effect. If you have any special network configurations, such as a VPN connection, proxy server, or custom DNS settings, you’ll have to set them up again.
11. If a Specific Wi-Fi Network Isn’t Showing Up
There’s a chance you’ve found this article when you were searching for reasons why a specific Wi-Fi option isn’t showing up even though others do. The easiest fix here is to reset the router and your computer for good measure.
You can also log in to the router’s settings page and make sure that “broadcast SSID” is switched on so that the network is visible.
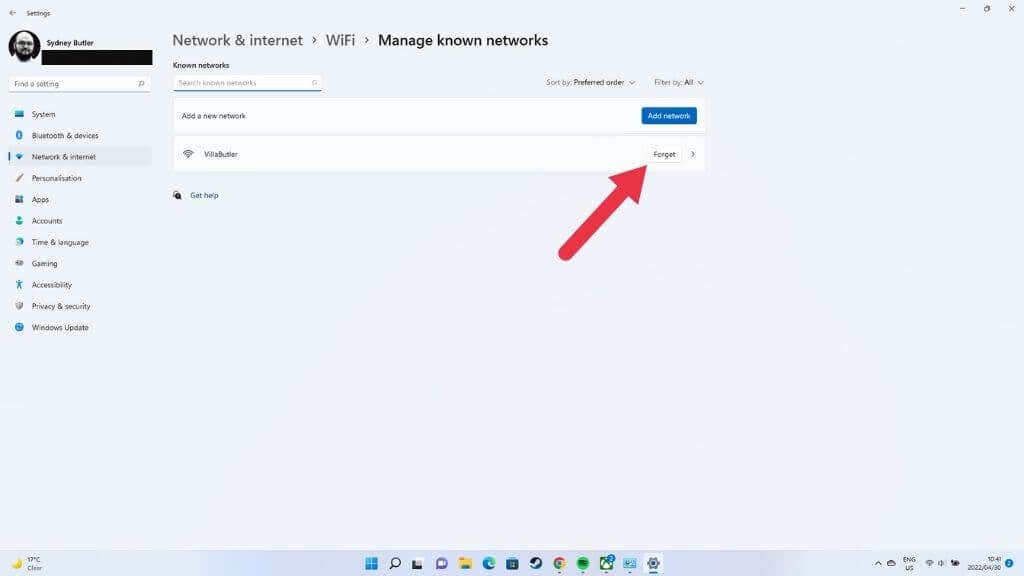
If the network is showing up, but you can’t connect to it, try forgetting it:
- Open the Start Menu.
- Select the Settings Cog.
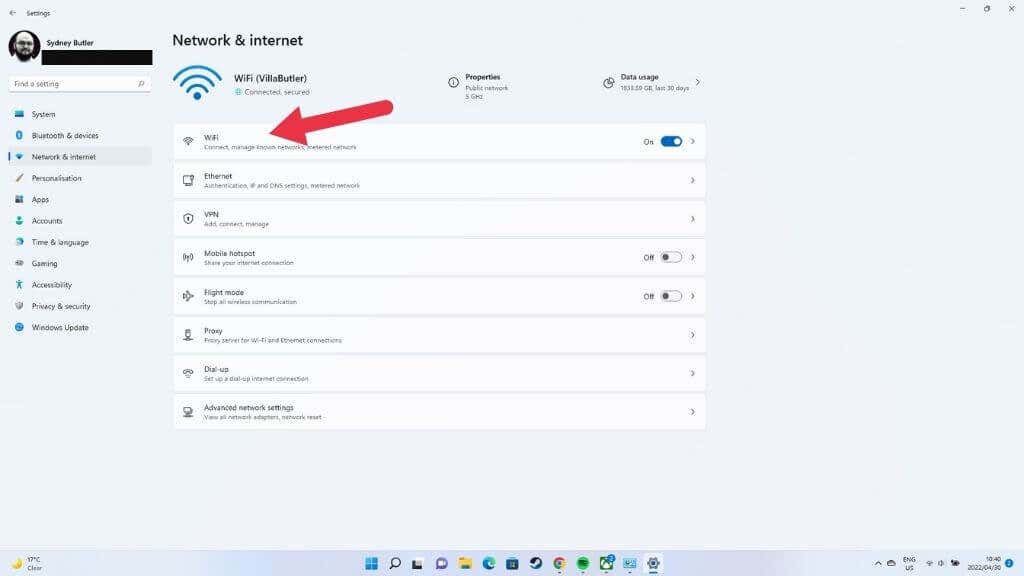
- Choose Network & Internet, then choose Wi-Fi.
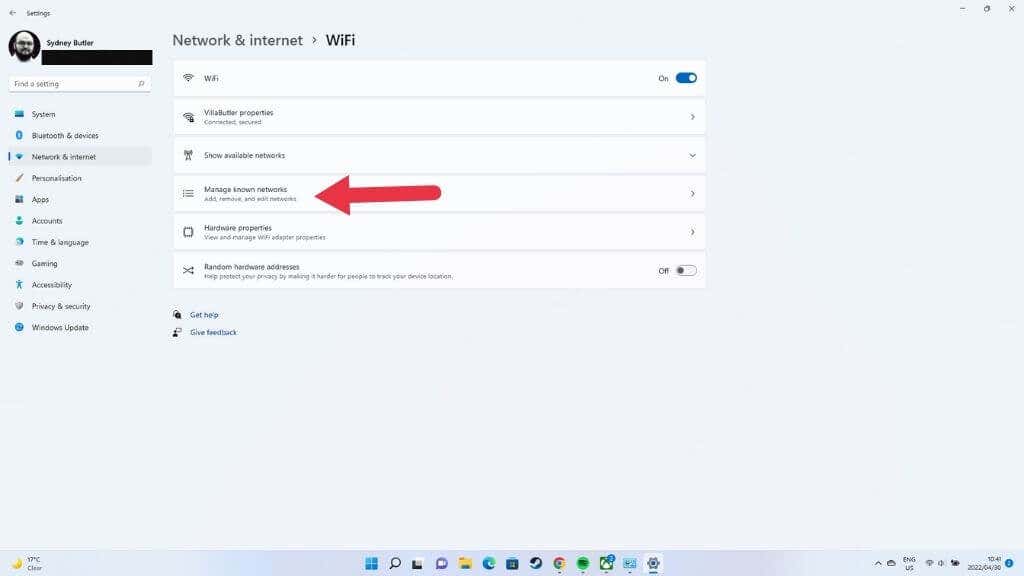
- Select Manage known networks.
- Choose the Wi-Fi network, and then choose Forget.
You’ll have to re-enter the password for the network, but in many cases where network settings have become corrupted or changed, forgetting the network will solve the problem.
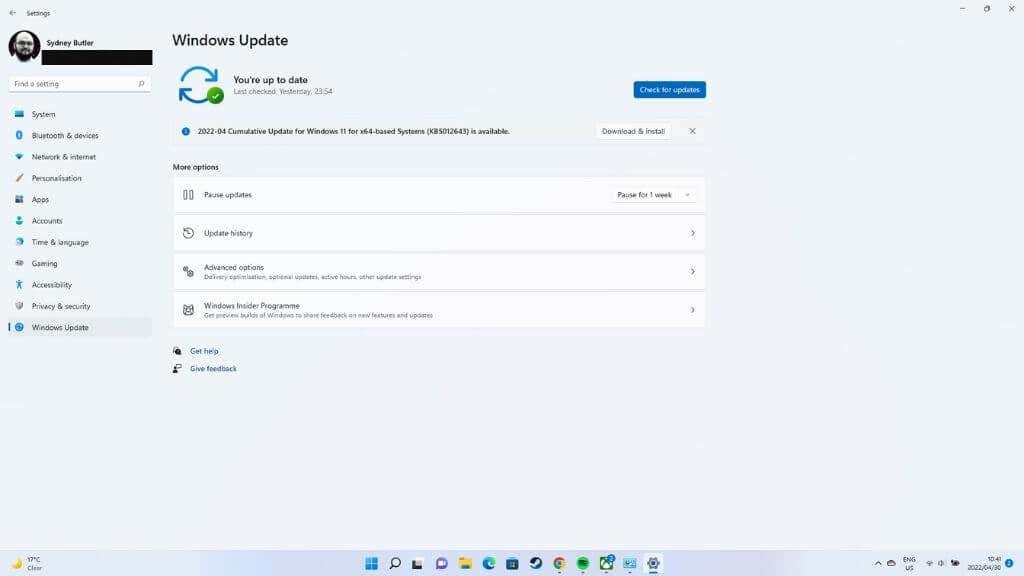
12. Update Windows
Microsoft regularly updates Windows 11 with new features, bug fixes, and performance enhancements. Unfortunately, there are so many computers out in the world that inevitably some computers will develop problems thanks to a Windows update.
If your Wi-Fi issues started after a recent update, check the web for any indication that other users are also experiencing this issue. If it looks like the problem is related to an update, check out How to Uninstall and Reinstall Windows Updates. Then remove that update and check for updates that resolve the issue.
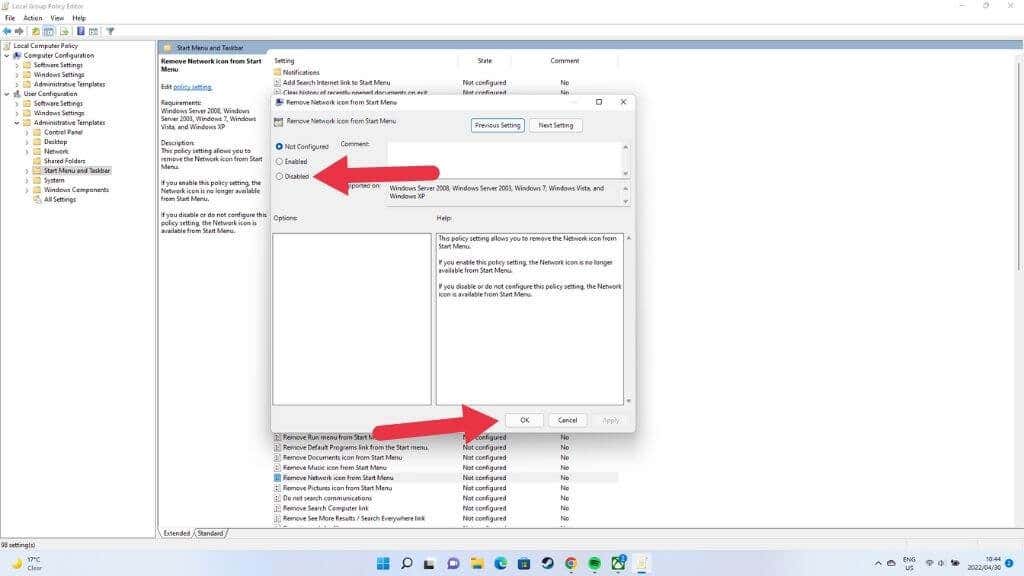
13. Enable the Wi-Fi Icon in the Group Policy Editor
If you’re using Windows 11 Pro and your Wi-Fi icon is missing altogether, it might be that a setting in the editor has changed. If your computer is administered by someone in the company you work for, you’ll need to ask them to check. Then again, if you have access to an IT department you should ask them to fix your Wi-Fi issue in the first place!
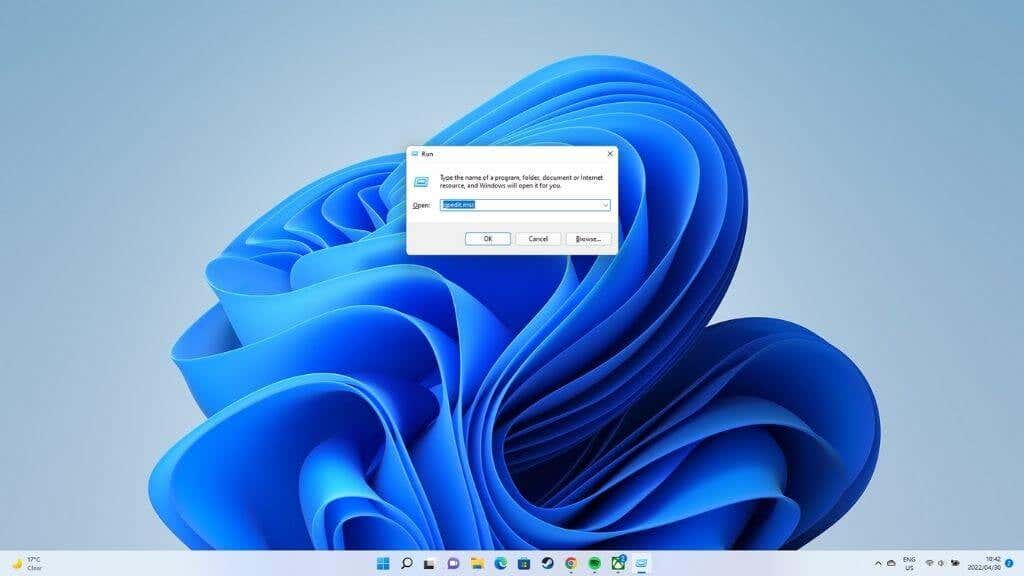
- Press Windows + R to open the Run dialog box.
- Type gpedit.msc and press Enter.
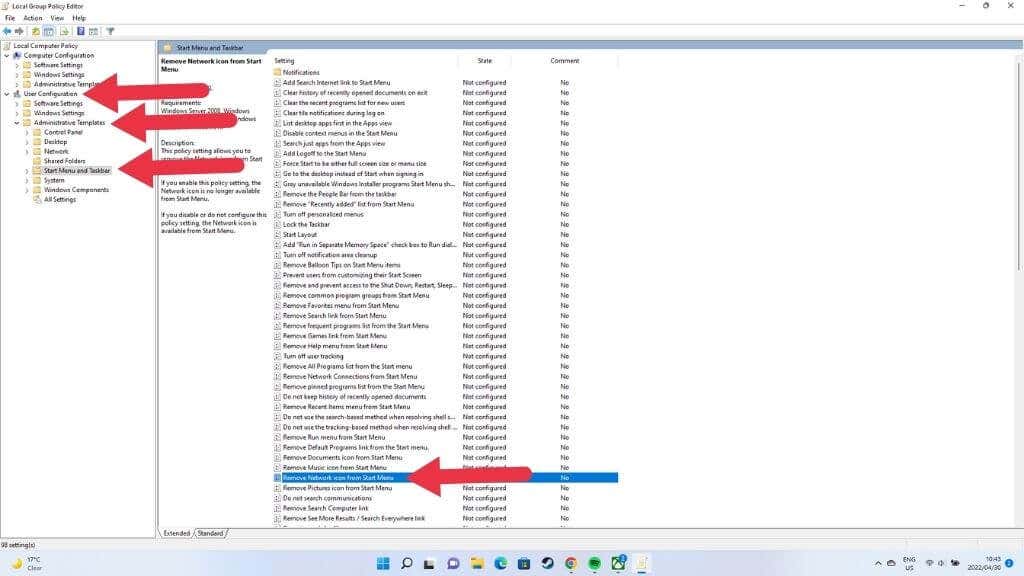
- In the Group Policy Editor, go to User Configuration.
- Now select Administrative Templates -> Start Menu and Taskbar.
- Look for Remove the networking icon and open it.
- Select Disabled in the top left of the Window, if it wasn’t disabled already.
- Select OK and restart your computer.
If this Policy was already disabled, don’t change or save anything else in the Group Policy Editor, just close it and try a different solution.
No More Wireless Worries.
This is a long list of fixes, but you should have a working wireless connection again unless something genuinely odd has gone wrong with your Wi-Fi. To make that Wi-Fi connection even better, check out 10 Ways To Boost a Weak WiFi Signal.
Related Posts
Sydney Butler is a social scientist and technology fanatic who tries to understand how people and technology coexist. He has two decades of experience as a freelance computer technician and more than a decade as a technologies researcher and instructor. Sydney has been a professional technology writer for more than five years and covers topics such as VR, Gaming, Cyber security and Transhumanism. Read Sydney’s Full Bio
