Do you see an “An error occurred while loading the troubleshooter” message while trying to launch a troubleshooter on your PC? Chances are your recently installed Windows update is causing the problem. We’ll show you how to fix that as well as other items to resolve the issue on your Windows 11 or Windows 10 PC. Let’s get started.
There are various reasons your troubleshooter doesn’t launch. Some causes are that the required Windows services aren’t running, your system has corrupted files, a virus or malware has infected your PC, and more.
Run Troubleshooter From the Settings App
When you have issues launching your troubleshooter from anywhere else, use the Windows’ Settings app to run your troubleshooter. This is the best fix to use when your tool refuses to launch from other places on your computer.
On Windows 11
- Open Settings by pressing Windows + I.
- Select System in the left sidebar.
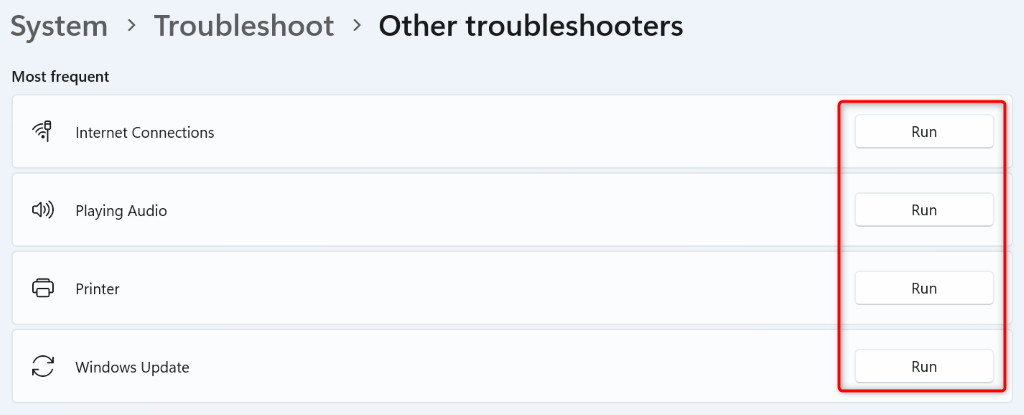
- Choose Troubleshoot > Other troubleshooters on the right pane.
- Select Run next to the troubleshooter you want to launch.
On Windows 10
- Press Windows + I to open Settings on your PC.
- Select Update & Security in Settings.
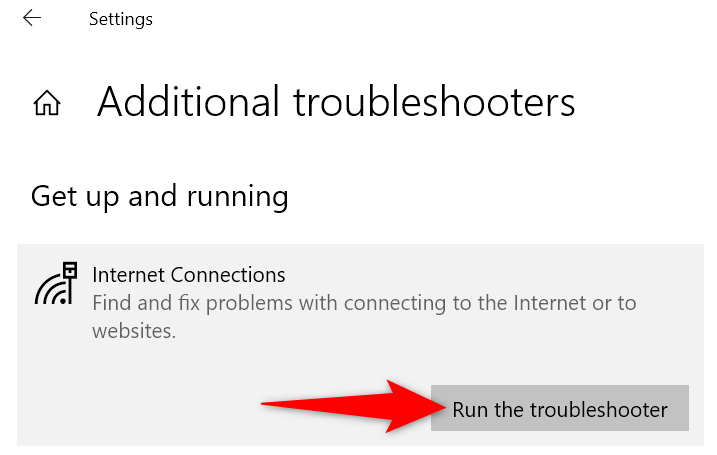
- Choose Troubleshoot in the left sidebar and Additional troubleshooters on the right pane.
- Select a troubleshooter and choose Run the troubleshooter.
Restart Required Windows Services
One reason your troubleshooter doesn’t launch is that the Windows services that that tool requires aren’t running. In this case, start those services manually, and your issue will be resolved.
- Open the Run dialog box by pressing Windows + R.
- Type the following command in Run and press Enter:
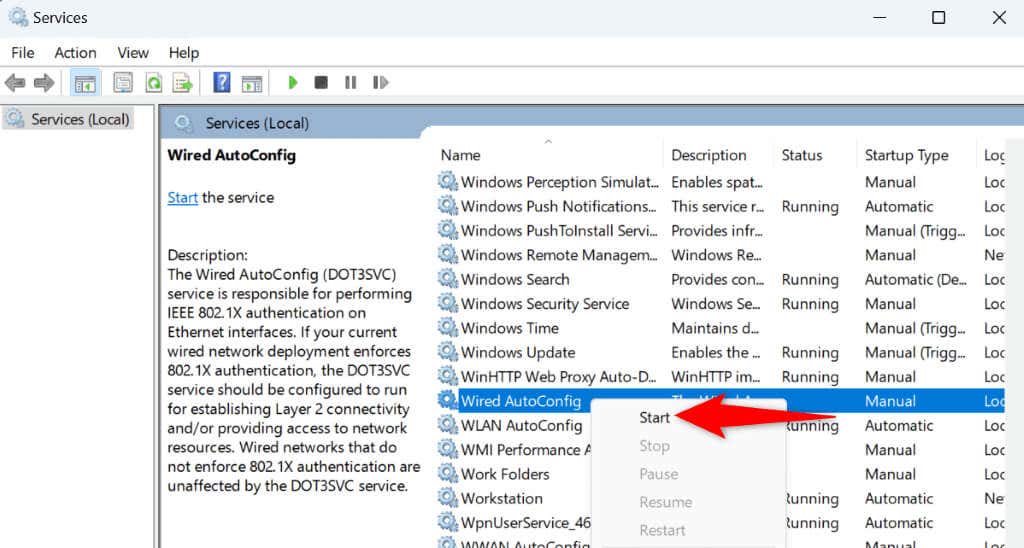
services.msc - Find a service named Wired AutoConfig, right-click the service, and choose Start (select Restart if the service is already running).
- Right-click each service listed below and choose Start or Restart, depending on the service’s current state:
Cryptographic Services
Background Intelligent Transfer Service
Windows Installer
Windows Update - Close the Services window and run your troubleshooter.
Fix Windows’ Corrupted System Files
The built-in troubleshooters are part of the Windows operating system. If your system’s core files are corrupted, your troubleshooters will have issues launching. That may be why you can’t access your troubleshooter on your PC.
In this case, you can use Windows’ built-in SFC (System File Checker) tool to find and fix broken files on your machine. This tool runs from Command Prompt and detects and replaces the faulty system files, fixing your system-related issues.
- Open the Start menu, find Command Prompt, and select Run as administrator.
- Choose Yes in the User Account Control prompt.
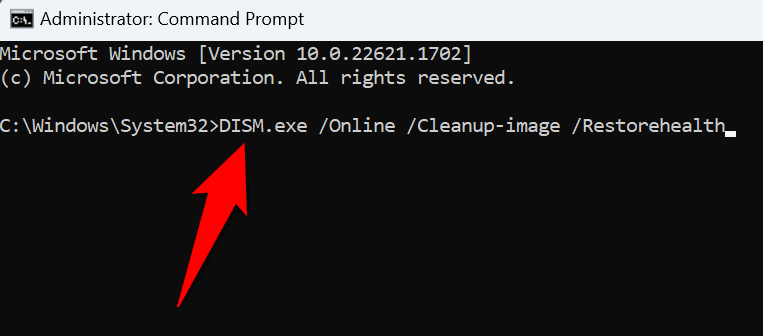
- Type the following on the CMD window and press Enter. This command downloads the required content to fix your corrupted files.
DISM.exe /Online /Cleanup-image /Restorehealth
- Run the following command to start checking and fixing your PC’s broken files: sfc /scannow
- Reboot your PC when you’ve fixed the faulty files.
Scan Your PC for Viruses and Malware
Viruses and malware can cause your PC to behave in unexpected ways. Your PC may be infected with such an item, leading to an “An error occurred while loading the troubleshooter” error message.
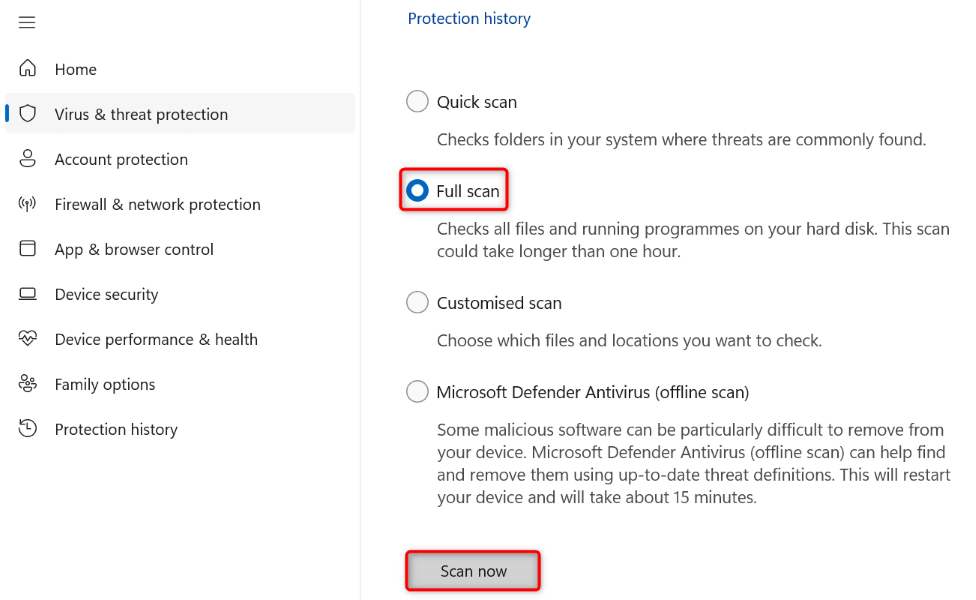
In this case, run a full virus and malware scan to find and remove all the threats from your PC. Your troubleshooter issue will then likely be fixed.
If you use Microsoft Defender Antivirus, the following steps show you how to run a full scan with this tool:
- Open the Start menu, find Windows Security, and launch the app.
- Select Virus & threat protection in the app.
- Choose Scan options on the following page.
- Select Full scan and choose Scan now at the bottom.
- Let the antivirus find and remove all the threats from your machine.
- Launch your troubleshooter tool.
Run Your Troubleshooter in Windows’ Safe Mode
One reason you can’t launch your troubleshooter is that a third-party app installed on your PC is causing interference. You can verify that by booting your PC in safe mode and trying to launch your troubleshooter tool.
On Windows 11
- Open Settings by right-clicking Start and choosing Settings.
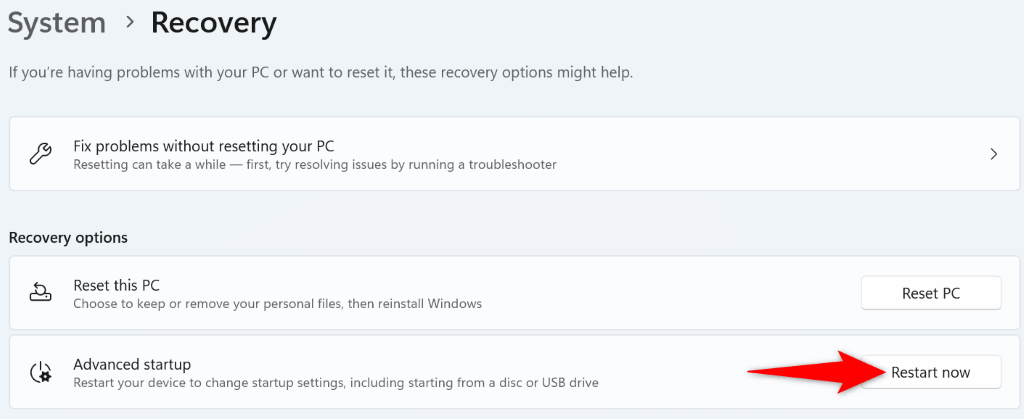
- Select System in the left sidebar and choose Recovery on the right pane.
- Select Restart now next to Advanced startup.
- Choose Restart now in the open prompt.
- Navigate to Troubleshoot > Advanced options > Startup Settings > Restart.
- Press 4 to boot your PC in safe mode.
- Try to launch your troubleshooter.
On Windows 10
- Open Settings using Windows + I.
- Select Update & Security in Settings.
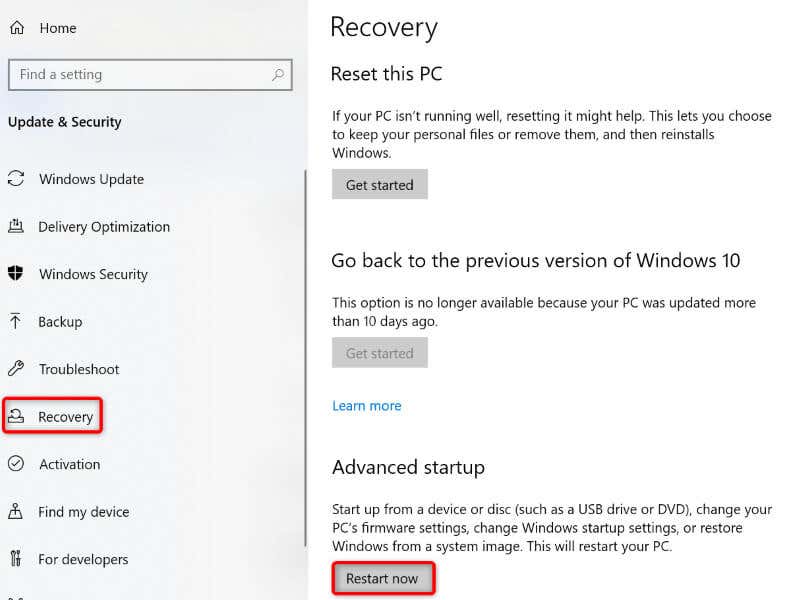
- Choose Recovery in the left sidebar.
- Select Restart now under Advanced startup on the right.
- Head into Troubleshoot > Advanced options > Startup Settings > Restart.
- Press 4 on your keyboard to launch safe mode.
- Open your troubleshooter in safe mode.
Uninstall the Recently Installed Windows Update
If your troubleshooter still doesn’t open, and your issue started after you updated Windows, your recent update might be the culprit. In this case, roll back that update and see if that resolves your issue.
- Open the Start menu, find Control Panel, and launch the utility.
- Select Uninstall a program.
- Choose View installed updates in the left sidebar.
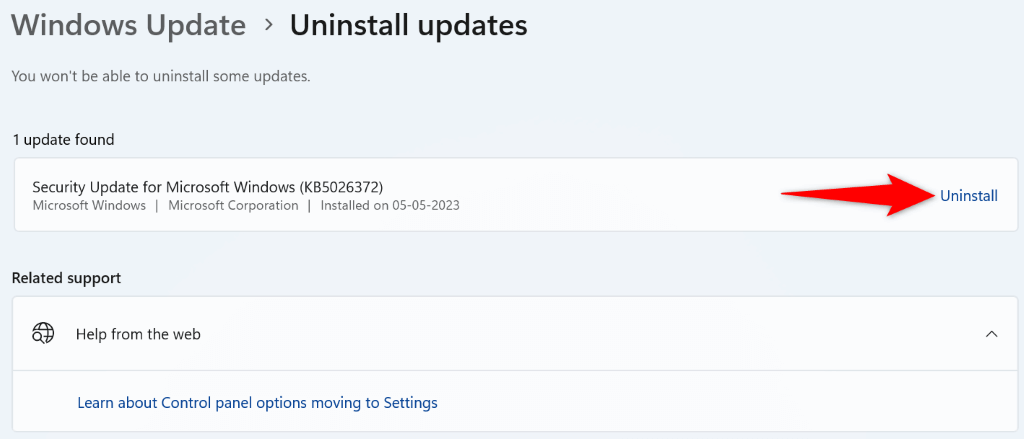
- Select Uninstall next to the most recent Windows update.
- Choose Uninstall in the prompt.
- Reboot your PC and run your troubleshooter.
Restore Your Windows System
If you started getting an “An error occurred while loading the troubleshooter” message after making certain changes to your PC, roll back those changes and see if that fixes your problem. You can do this using the System Restore utility on your PC.
- Open Start, find Recovery, and select the item.
- Choose Open System Restore on the following page.
- Select Next on the tool’s first screen.
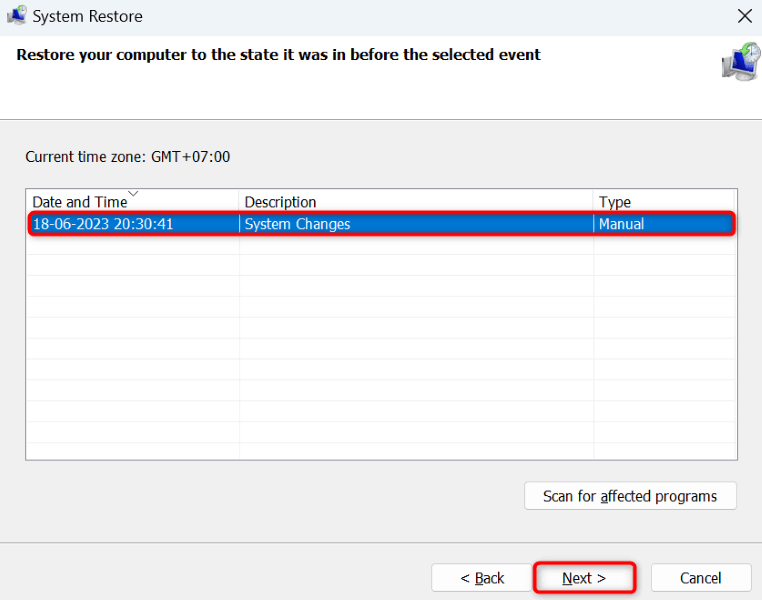
- Choose the most recent restore point on the list and select Next.
- Choose Finish to begin restoring your PC.
Reset Your Windows PC
If your troubleshooter launch issue remains unresolved, your last resort is to reset your Windows PC to the factory settings. Doing so erases all your custom settings, some of which may be causing the issue.
Note that you get to keep your personal files while resetting your PC. However, you’ll lose your installed apps.
On Windows 11
- Open Settings by pressing Windows + I.
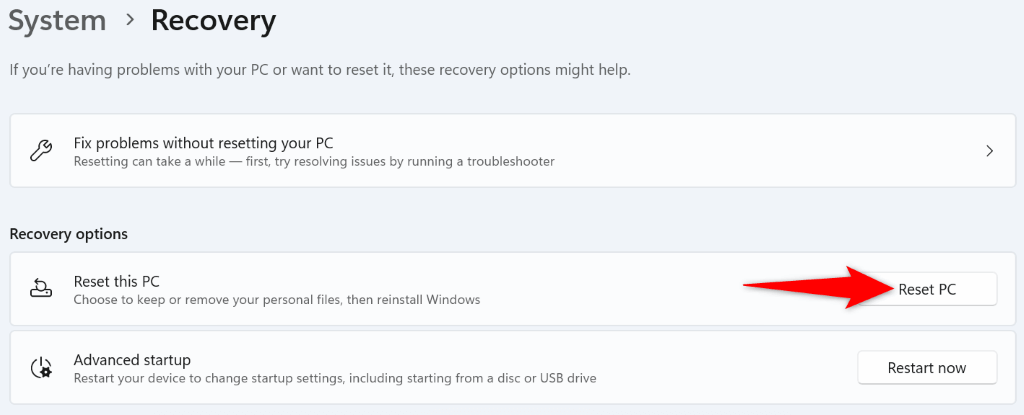
- Select System in the left sidebar and Recovery on the right pane.
- Choose Reset PC next to Reset this PC.
- Select Keep my files so Windows preserves your personal data.
- Follow the on-screen reset instructions.
- Launch the troubleshooter when you’ve reset your PC.
On Windows 10
- Press Windows + I to open Settings.
- Choose Update & Security in Settings.
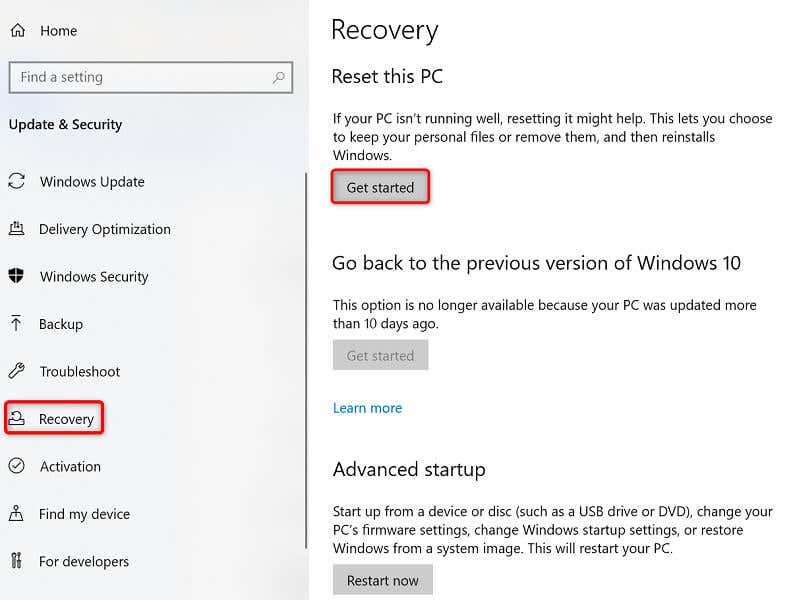
- Select Recovery on the left and Get started under Reset this PC on the right.
- Select Keep my files so Windows doesn’t delete your personal files.
- Follow the on-screen instructions to reset your PC.
- Launch your troubleshooter when your PC is reset.
Fix Broken Troubleshooters on Your Windows 11 or 10 PC
It’s common for features to break down on Windows PCs, and it’s relatively easy in most cases to fix those items. If you run into an issue where your troubleshooter won’t launch no matter how many times you try, the fixes outlined above will help you out.
Once you’ve followed the above methods, you’ll find that all your troubleshooter tools launch just fine, producing no error messages. Enjoy!
Related Posts
Mahesh has been obsessed with technology since he got his first gadget a decade or so ago. Over the last few years, he’s written a number of tech articles on various online publications including but not limited to MakeTechEasier and Android AppStorm. Read Mahesh’s Full Bio
