If you’ve received a 0x80070002 error while installing a Windows update, there are ways to get around this problem. This issue occurs for various reasons, including incorrect date and time settings and a faulty Windows Update feature. We’ll show you how to resolve the problem on your Windows 11 or Windows 10 PC.
Other reasons you get the above error are that your internet connection isn’t working, the downloaded update files are corrupted, Windows’ system files are damaged, a third-party app is causing interference, and more.
Check Your PC’s Date and Time Settings
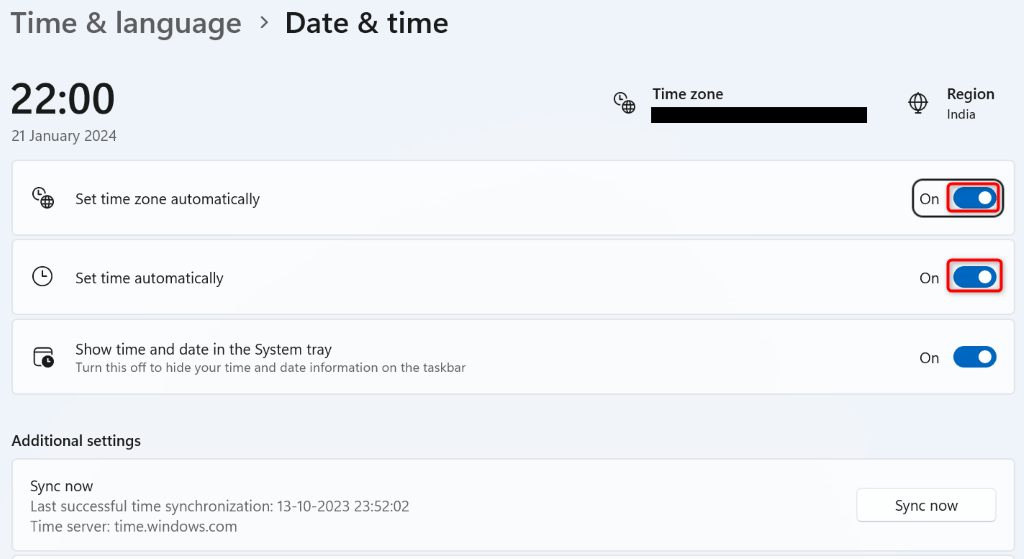
Sometimes, Windows fails to install an update because your PC’s date and time settings are incorrect. In this case, make your PC use the automatic date and time settings. Here’s how.
- Right-click the clock in the bottom-right corner and select Adjust date and time (Windows 11) or Adjust date/time (Windows 10).
- Turn on both Set time automatically and Set time zone automatically options.
Restart the Windows Update Services
It’s possible a background service related to Windows Update feature isn’t running as expected, causing the updates to fail to install. In this case, restart the services related to Windows Update and see if that resolves your problem.
- Open the Run dialog box by pressing Windows + R.
- Type the following command in the box and press Enter:
services.msc - Find and right-click the service named Windows Update and select Restart.
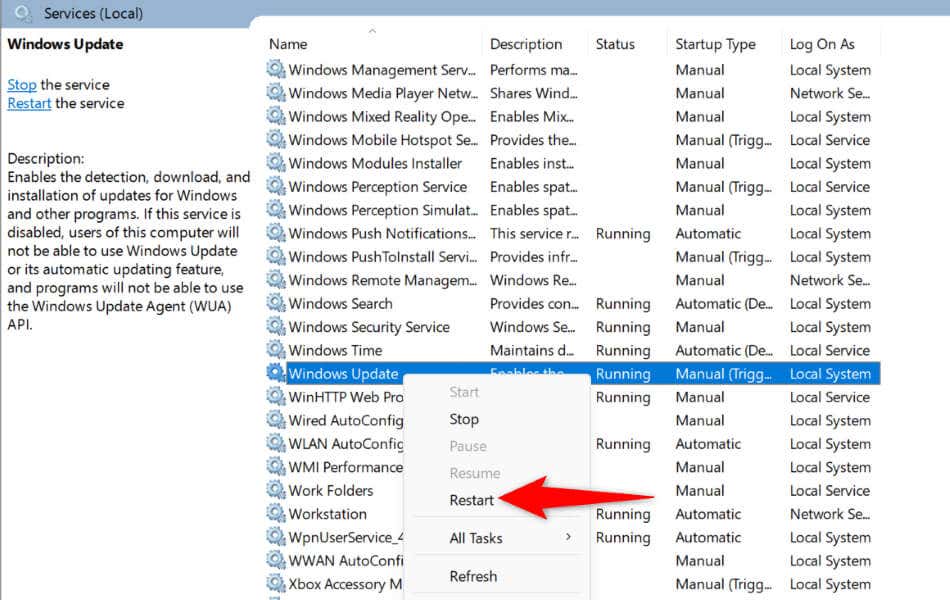
- Right-click the Background Intelligent Transfer Service service and choose Restart.
- Close the Services window and update your PC.
Restart Your Windows PC
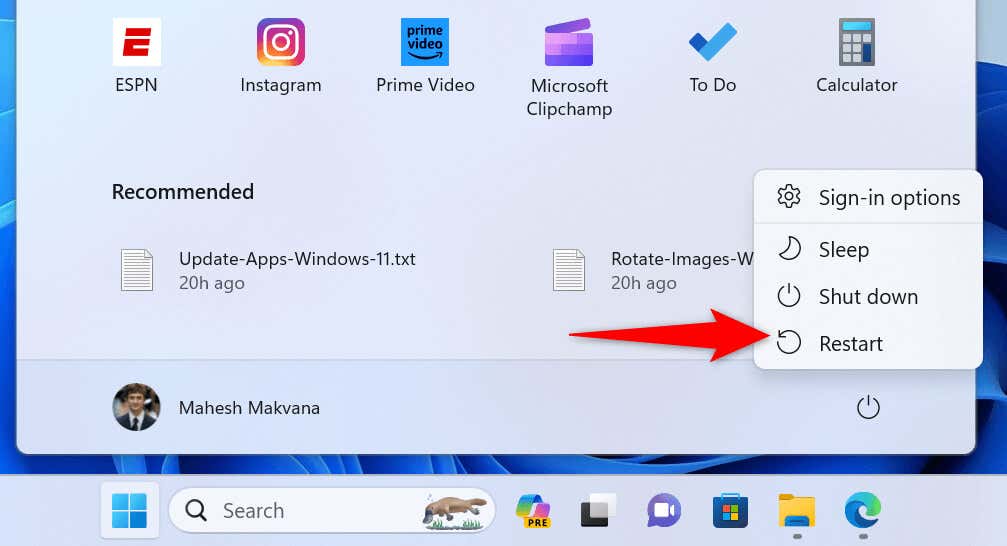
If restarting services didn’t fix your issue, give your Windows PC a reboot and see if that resolves the problem. Turning your system off and back on helps fix many minor glitches.
- Open the Start menu by selecting the menu icon or pressing the Windows key.
- Select the Power icon in the menu.
- Choose Restart.
Run the Network Troubleshooter
If your internet connection isn’t working, that might be why Windows can’t install the available updates. In this case, restart your router and see if that fixes the issue. If the issue persists, use your PC’s built-in Network Adapter troubleshooter to find and fix network issues on your PC.
On Windows 11
- Launch Settings by pressing Windows + I.
- Select System in the left sidebar and Troubleshoot on the right pane.
- Choose Other troubleshooters on the following page.
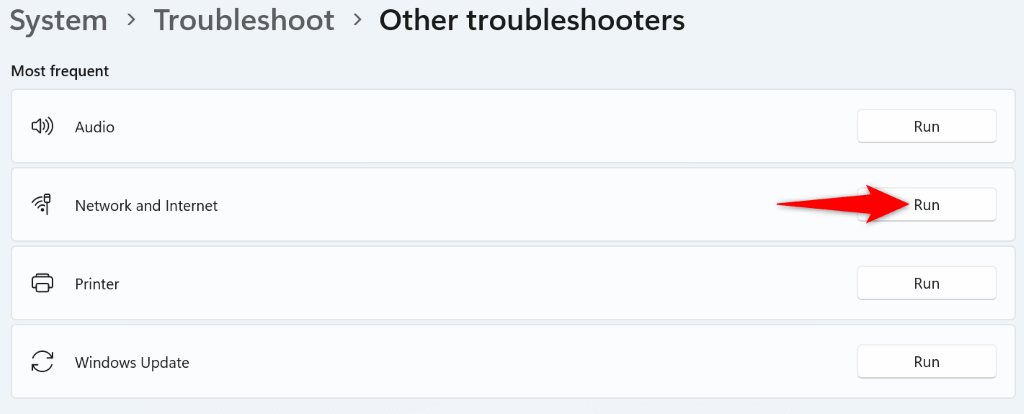
- Select Run next to Network and Internet to launch the troubleshooting tool.
- Wait for the tool to find and fix network problems.
On Windows 10
- Open Settings using Windows + I.
- Select Update & Security > Troubleshoot in Settings.
- Select Additional troubleshooters on the right pane.
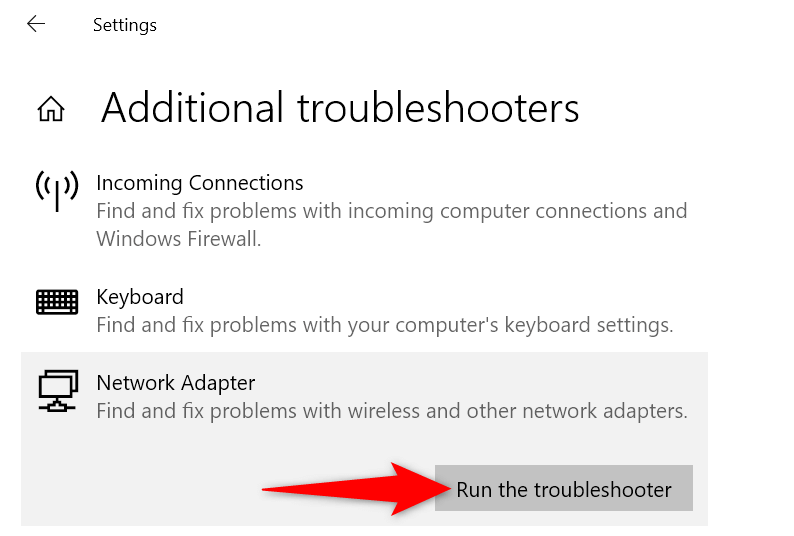
- Choose Network Adapter and select Run the troubleshooter.
- Follow the on-screen instructions to fix your network issues.
Use the Windows Update Troubleshooter
Both Windows 11 and Windows 10 include a Windows Update troubleshooter that you can use to find and fix any issues related to your system updates. This tool finds the issues on its own and helps you fix those problems.
On Windows 11
- Right-click the Start menu icon and select Settings.
- Navigate to System > Troubleshoot > Other troubleshooters in Settings.
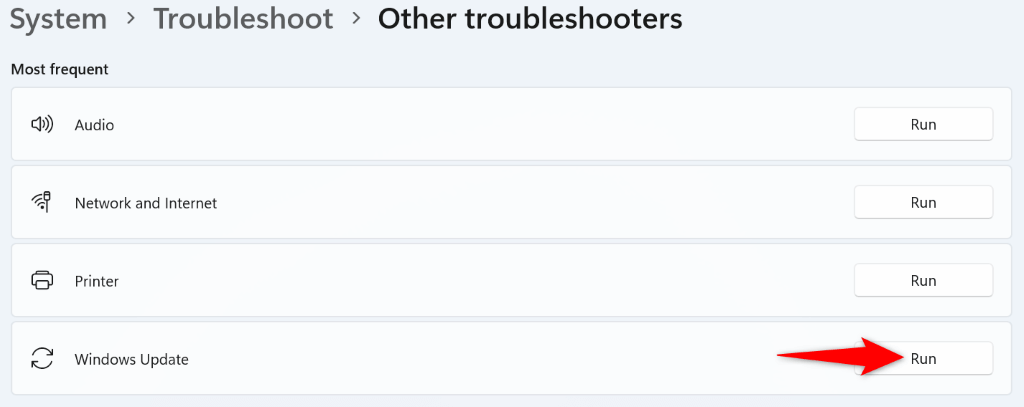
- Select Run next to Windows Update to launch the troubleshooter.
- Follow the on-screen instructions in the tool.
On Windows 10
- Access Settings by right-clicking the Start menu icon and choosing Settings.
- Navigate to Update & Security > Troubleshoot > Additional troubleshooters in Settings.
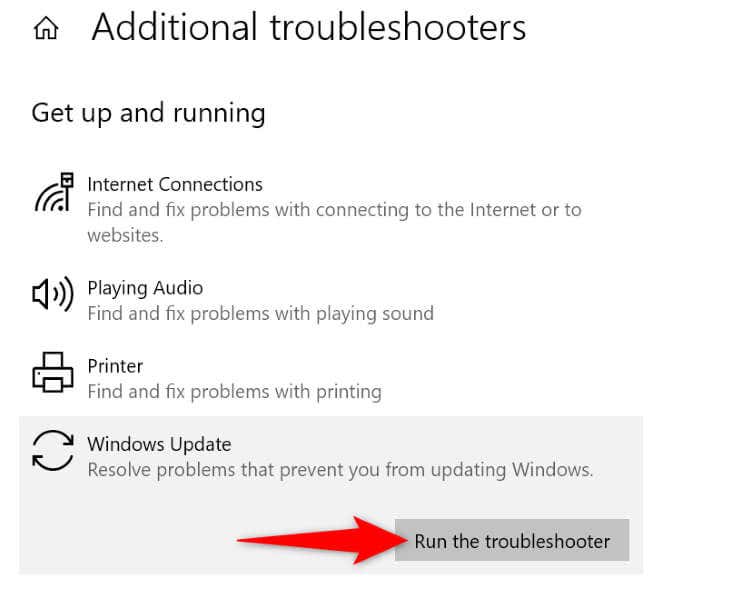
- Select Windows Update and choose Run the troubleshooter.
- Follow the on-screen instructions in the troubleshooter.
Delete the Windows Update Cache
Windows downloads the update files and then installs those files on your system. The downloaded update files may be corrupted, causing the updates to fail to install. In this case, clear that download cache and allow Windows to re-download the available updates.
- Open Run by pressing Windows + R.
- Type the following command in Run and press Enter:
services.msc - Find Windows Update on the list, right-click the service, and select Stop. Keep the Services window open.
- Open Run again using Windows + R, type the following path, and press Enter:
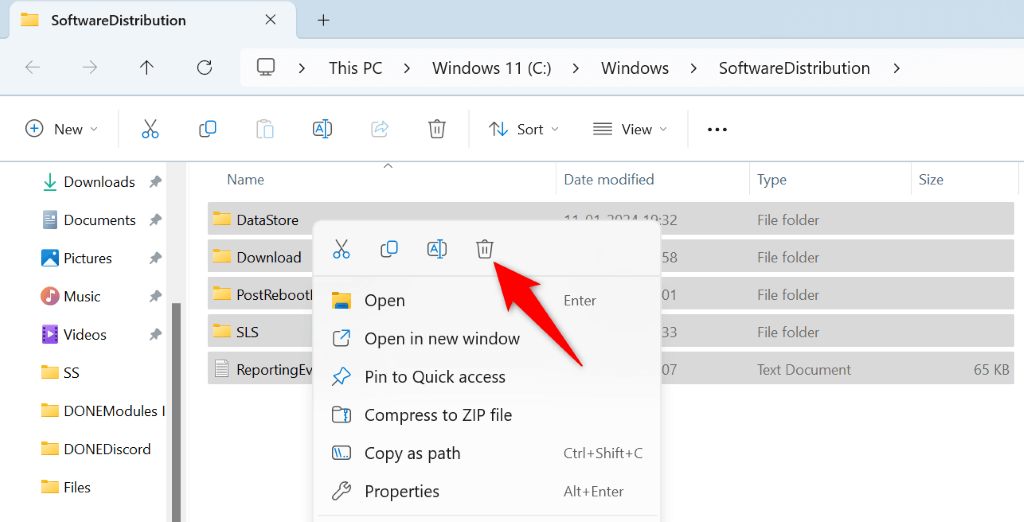
C:\Windows\SoftwareDistribution\ - Press Ctrl + A to select all files in the folder.
- Right-click a selected file and choose Delete (a trash can icon).
- Empty the Recycle Bin so the files are gone for good.
- Return to the Services window, right-click Windows Update, and select Start.
- Try to update your PC.
Repair Windows’ System Files
When Windows’ system files become damaged, you experience issues using various system features, including Windows Update. In this case, use the System File Checker (SFC) tool to find and fix the corrupted core files on your computer.
The SFC tool automatically finds the faulty files and replaces those files with working ones.
- Open Run by pressing Windows + R, type CMD, and press Ctrl + Shift + Enter.
- Select Yes in the User Account Control Prompt.
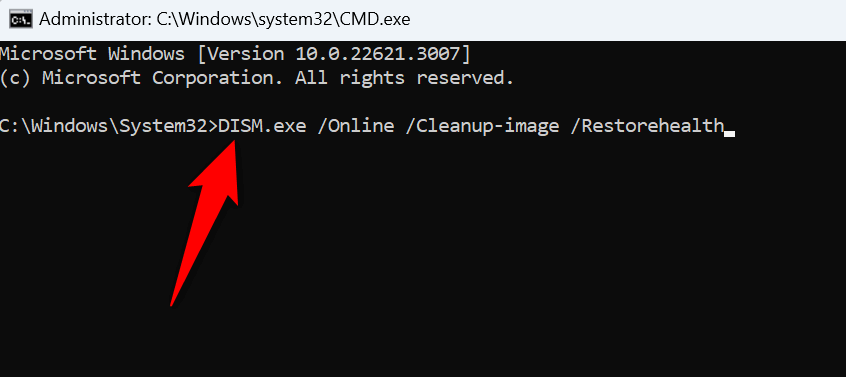
- Type the following command on the CMD window and press Enter:
DISM.exe /Online /Cleanup-image /Restorehealth
- Run the following command to start fixing your system’s damaged files:
sfc /scannow - Update your PC.
Clean Boot Windows and Install the Update
If a third-party app is causing interference, clean boot your Windows PC and then install the update. Clean booting your system isolates any third-party items, allowing you to check if those items are the culprit.
- Open Run by pressing Windows + R, type the following command, and press Enter:
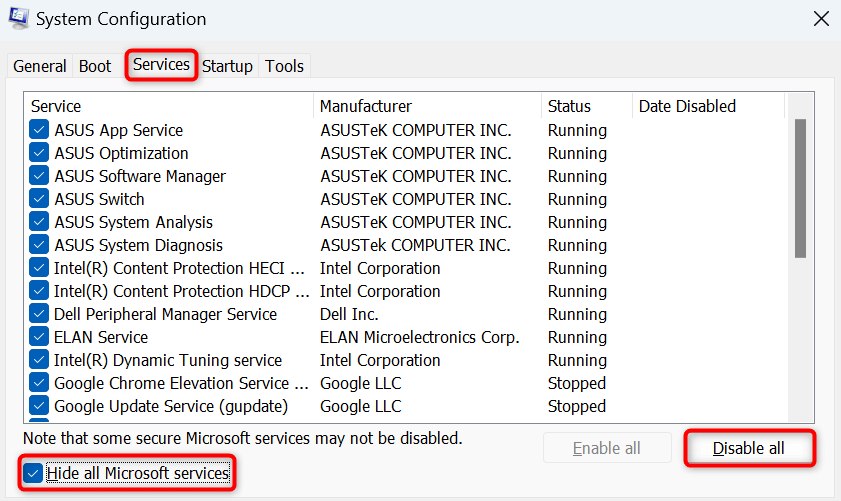
msconfig - Access the Services tab on the open window, enable the Hide all Microsoft services option, and choose Disable all.
- Open the Startup tab and select Open Task Manager.
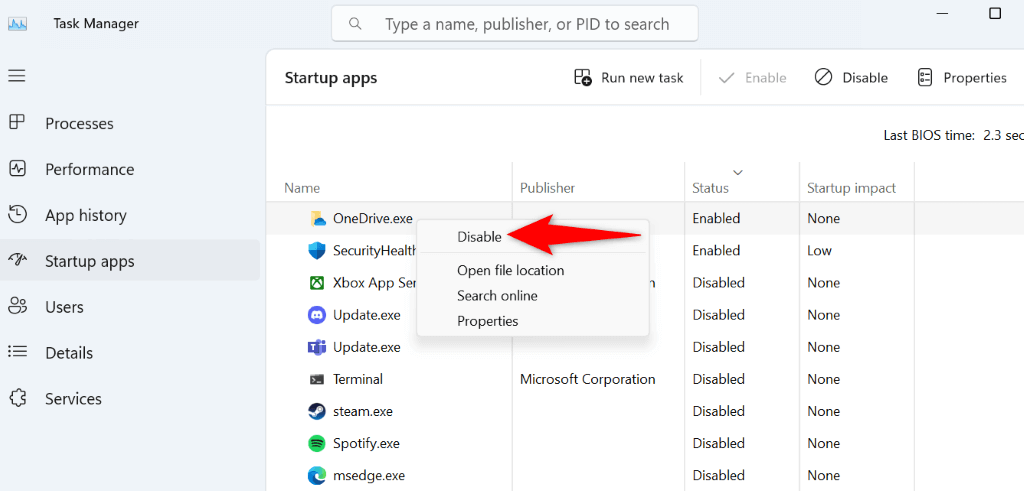
- Right-click each app whose Status column displays Enabled and choose Disable. This prevents the installed apps from automatically running.
- Close Task Manager, return to the System Configuration window, and select OK.
- Restart your PC.
- Try to update your system.
If your PC updates successfully in clean boot mode, you’ve likely installed malicious apps on your system. Remove those apps from Settings > Apps > Installed apps on Windows 11 and Settings > Apps on Windows 10.
Manually Download and Install the Update
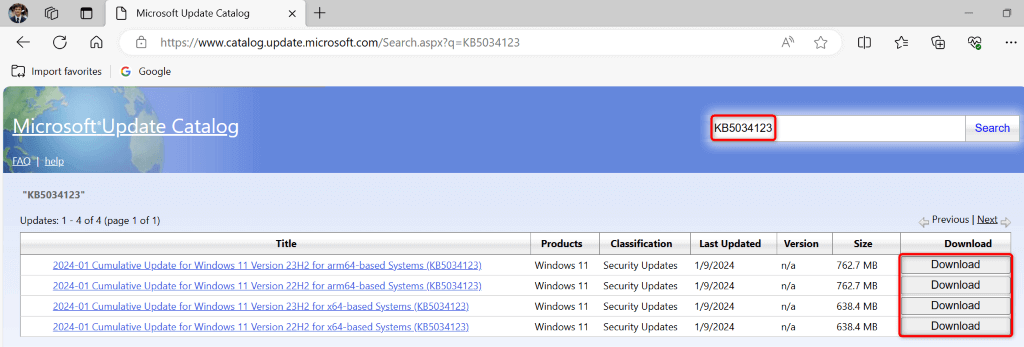
If a specific update fails to install, you can manually download and install that update on your system. Microsoft has an online update repository from where you can download any update you want for your machine.
- Find the faulty update name from Settings > Windows Update on Windows 11 and Settings > Update & Security > Windows Update on Windows 10. The update name should start with KB.
- Launch a web browser and head to the Microsoft Update Catalog site.
- Select the search box on the site, type the faulty update’s name, and press Enter.
- Select Download next to your update and save the update to your PC.
- Run the downloaded file to install the update.
- Restart your PC after installing the update.
Fix the Error Preventing You From Installing Windows Updates
It’s crucial to keep your Windows PC up to date. If your updates fail to install and you get an error 0x80070002, the guide above is all you need to fix the problem. The guide covers solutions to fix the very items that can cause your update problem, allowing you to install all the available updates without a hiccup on your PC. Enjoy!