

“Apps open then close immediately” in Windows 11 or Windows 10 can leave you locked out of Microsoft Store apps, Settings, or desktop programs. Corrupted app data is the usual cause, but damaged system files and incorrect permissions can produce the same symptom.
Fix #1: Restart Windows and install updates
A full restart clears stuck app processes. Installing pending Windows and app updates addresses known crashes.
- Open Start > Power.
- Select Restart.
- Open Settings after Windows restarts.
- Select Windows Update in Windows 11, or Update & Security > Windows Update in Windows 10.
- Select Check for updates.
- Install every available update.
- Restart Windows if prompted.
- Open Microsoft Store.
- Select Library.
- Select Get updates.

Windows Update should report that you’re up to date. Test the affected app again.
Fix #2: Repair or reset the app
The Repair option replaces damaged app components without deleting your data. Reset clears the app’s data, so you’ll need to sign in again.
- Press
Windows + Ito open Settings. - Open Apps > Installed apps in Windows 11.
- In Windows 10, open Apps > Apps & features instead.
- Find the app that closes after opening.
- Select the three-dot menu beside it in Windows 11, or select the app in Windows 10.
- Select Advanced options.
- Select Repair.
A checkmark should appear beside Repair when Windows finishes. Open the app and test it.
If the app still closes:
- Return to its Advanced options page.
- Select Reset.
- Select Reset again to confirm.
The app should return to its default state. This option isn’t available for every desktop program; use Fix #9 if you don’t see it.
Fix #3: Run the Windows Store Apps troubleshooter
Use this fix when Microsoft Store or an app installed through it closes immediately.
- Open Settings > System > Troubleshoot > Other troubleshooters in Windows 11.
- Find Windows Store Apps and select Run.
- In Windows 10, open Settings > Update & Security > Troubleshoot > Additional troubleshooters.
- Select Windows Store Apps and choose Run the troubleshooter.
- Apply each recommended repair.
- Restart Windows when the troubleshooter finishes.
You should see a list of detected problems and their repair status. Test the app after restarting.
Fix #4: Reset the Microsoft Store cache
A damaged Store cache can affect Microsoft Store and several Store apps at once. wsreset.exe clears that cache without uninstalling your apps.
- Close Microsoft Store.
- Press
Windows + Rto open Run. - Type
wsreset.exe. - Press Enter.
A blank Command Prompt window may appear temporarily. It should close automatically, and Microsoft Store should open afterward.
Fix #5: Re-register Microsoft Store
Re-registering reconnects the Store package to Windows. Use this after wsreset.exe fails.
- Right-click Start.
- Select Terminal (Admin) or Windows PowerShell (Admin).
- Select Yes in the User Account Control dialog.
- Enter this command:
Get-AppxPackage *Microsoft.WindowsStore* |
  Foreach {
    Add-AppxPackage -DisableDevelopmentMode -Register "$($_.InstallLocation)\AppXManifest.xml"
}- Press Enter.
- Wait for the command prompt to return.
- Restart Windows.
PowerShell may show progress briefly. Microsoft Store should remain open when you launch it after the restart.
Fix #6: Repair All Application Packages permissions
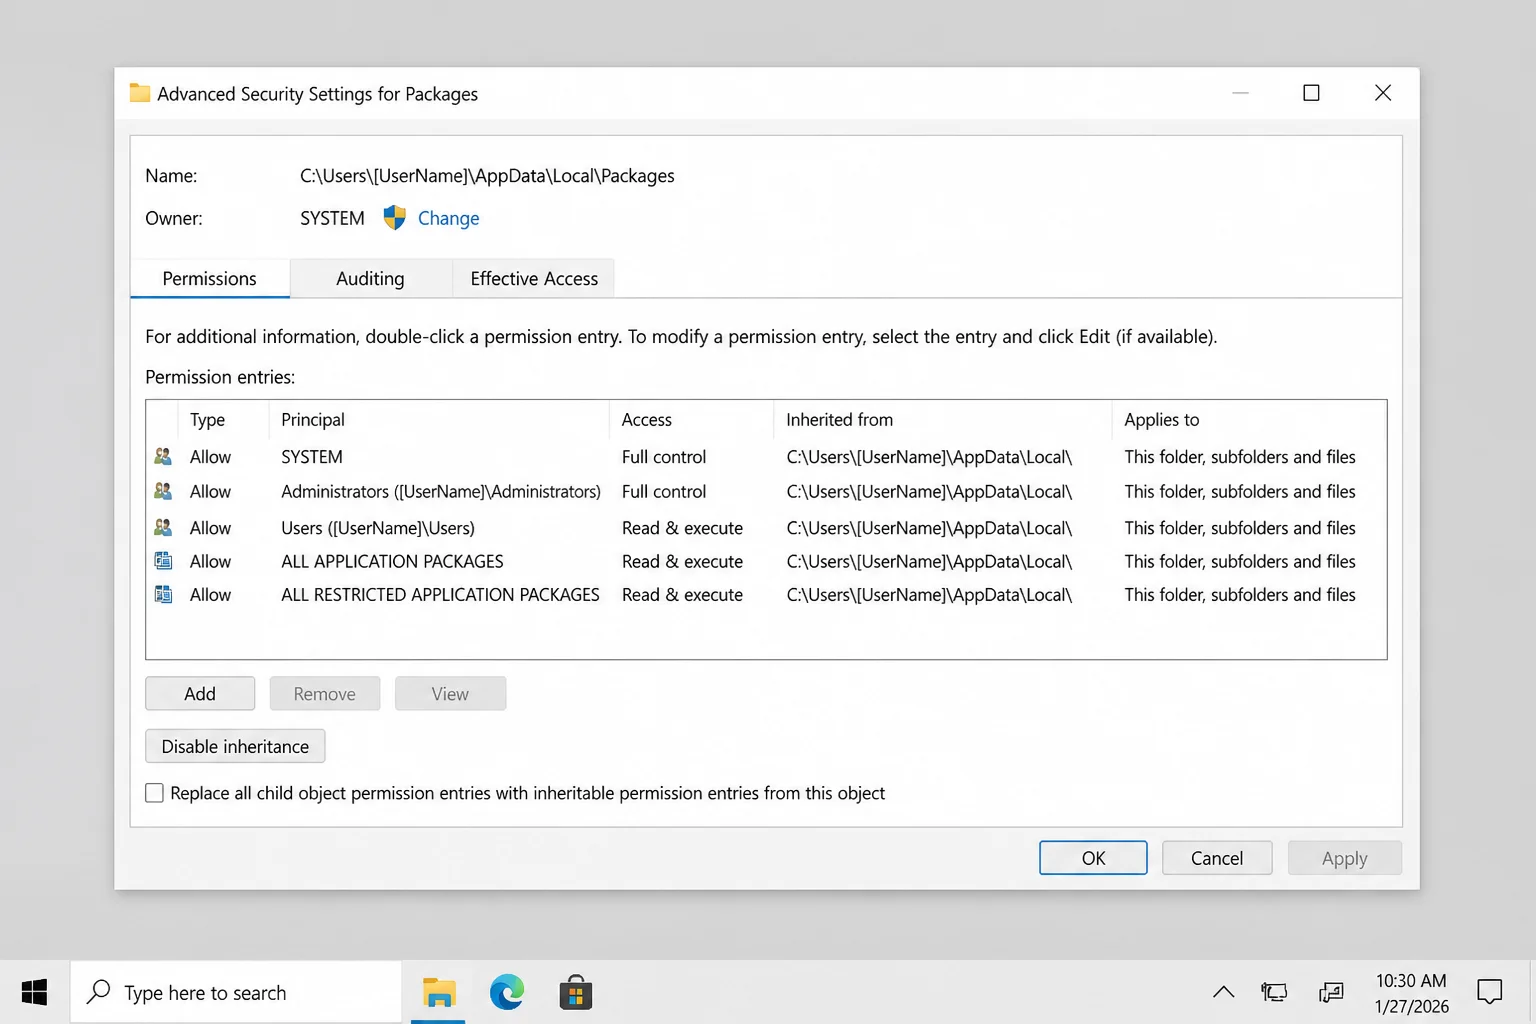
Microsoft Store apps run under the built-in All Application Packages security group. If that group loses access to your app package folder, apps can appear briefly and then close.
Changing permissions carries some risk. Create a restore point first, and don’t apply blanket permission changes to C:\Windows, C:\Program Files, or the entire C: drive.
- Press
Windows + R. - Enter
%localappdata%. - Press Enter.
- Right-click the Packages folder.
- Select Properties.
- Open the Security tab.
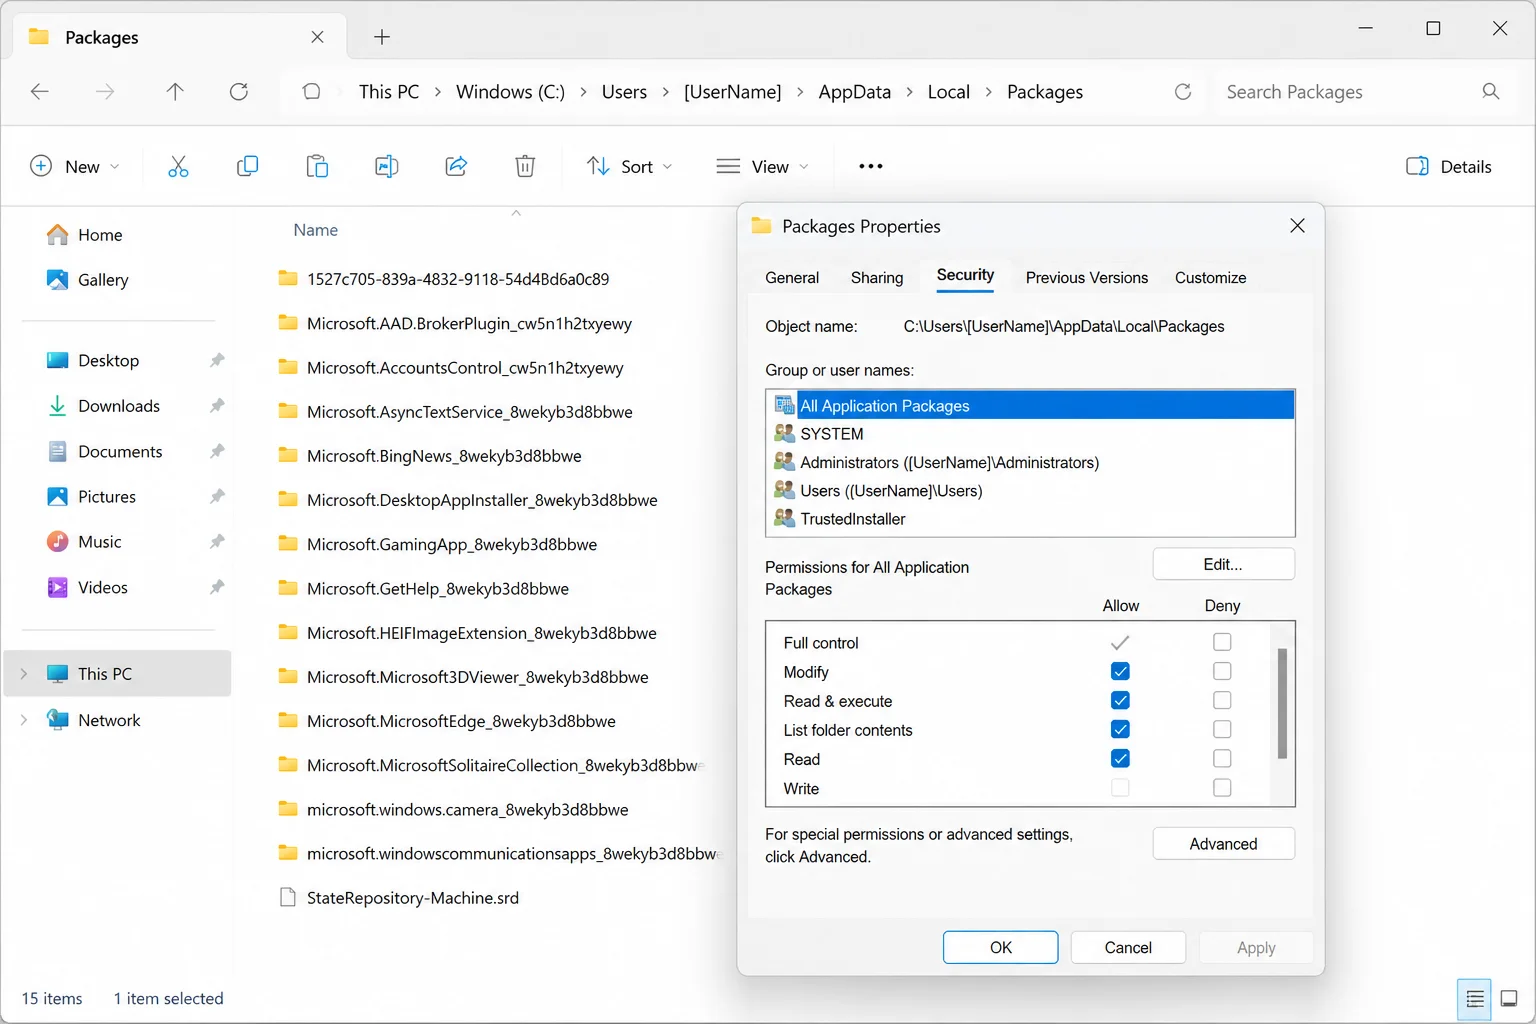
- Check whether All Application Packages appears under Group or user names.
- Select Advanced if the group is missing or lacks access.
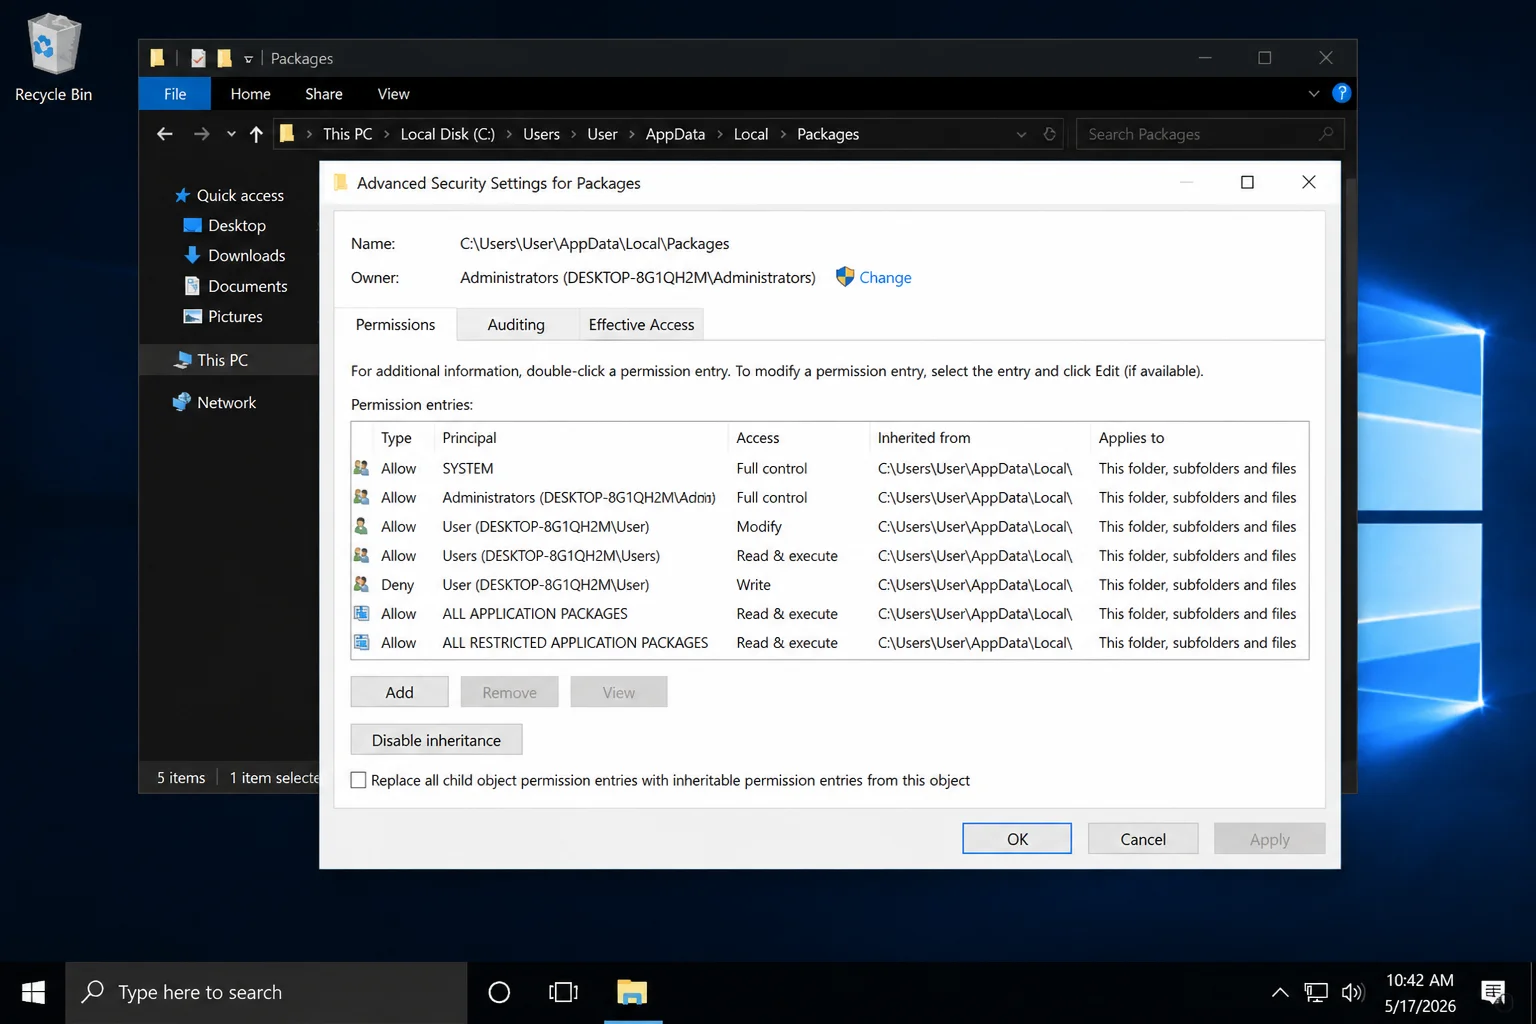
- Select Change permissions if that option appears.
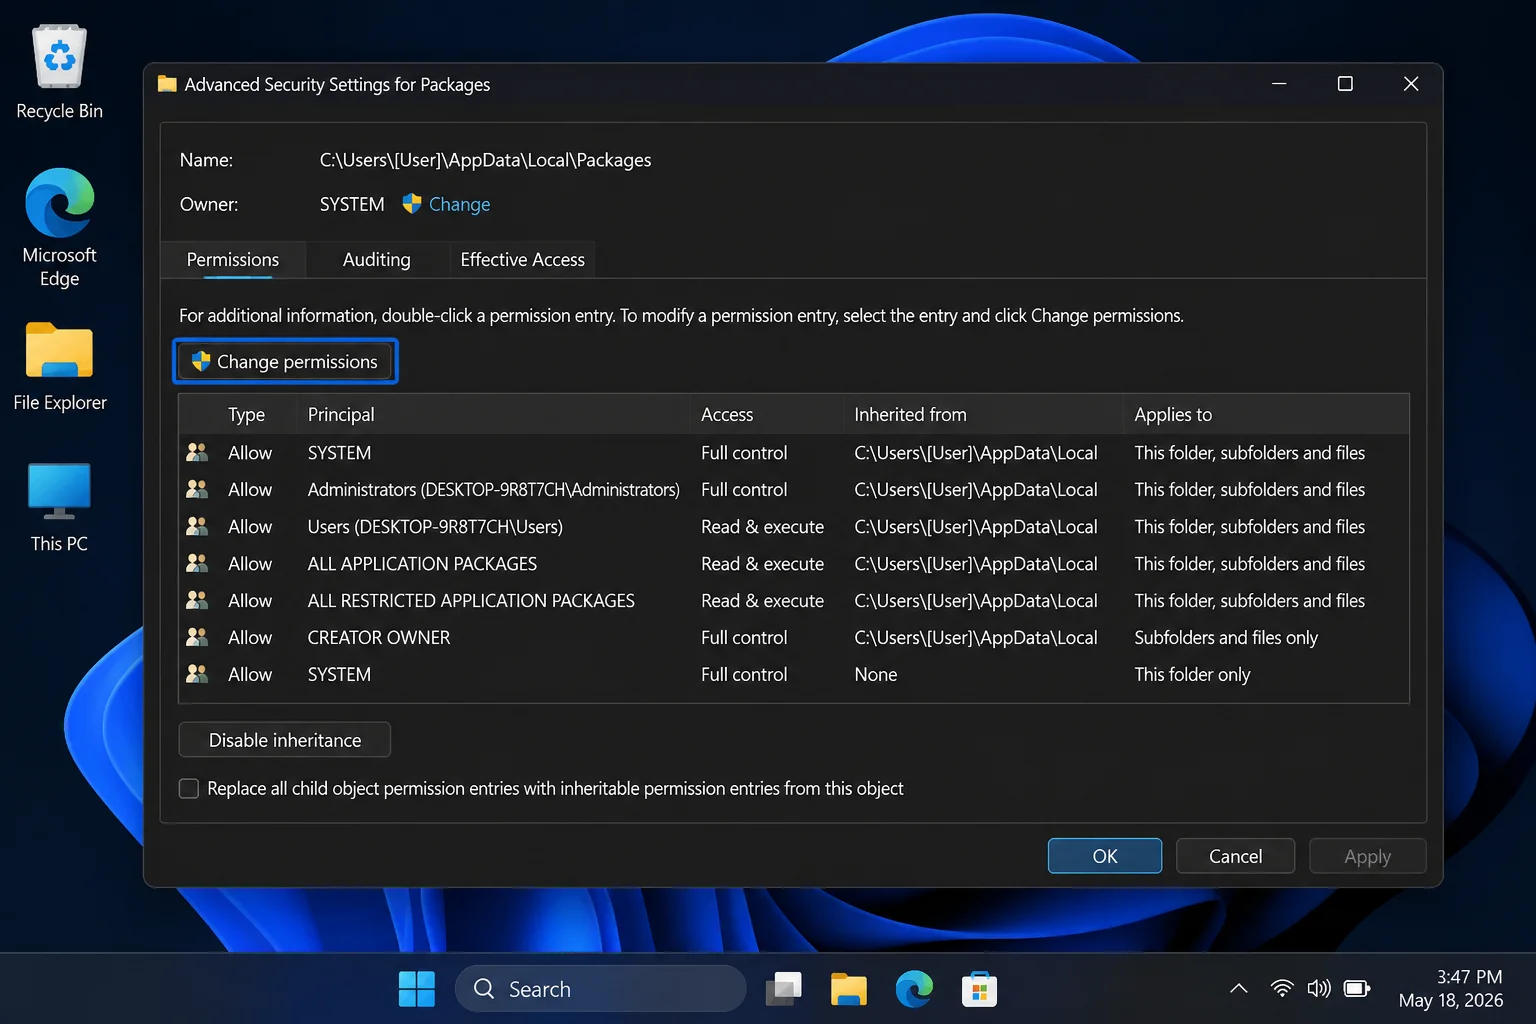
- Select Add.
- Choose Select a principal.
- Enter
ALL APPLICATION PACKAGESin the object-name field. - Select Check Names.
- Select OK.
- Set Type to Allow.
- Set Applies to to This folder, subfolders and files.
- Allow the access shown for the group, including reading and running app-package files.
- Select OK.
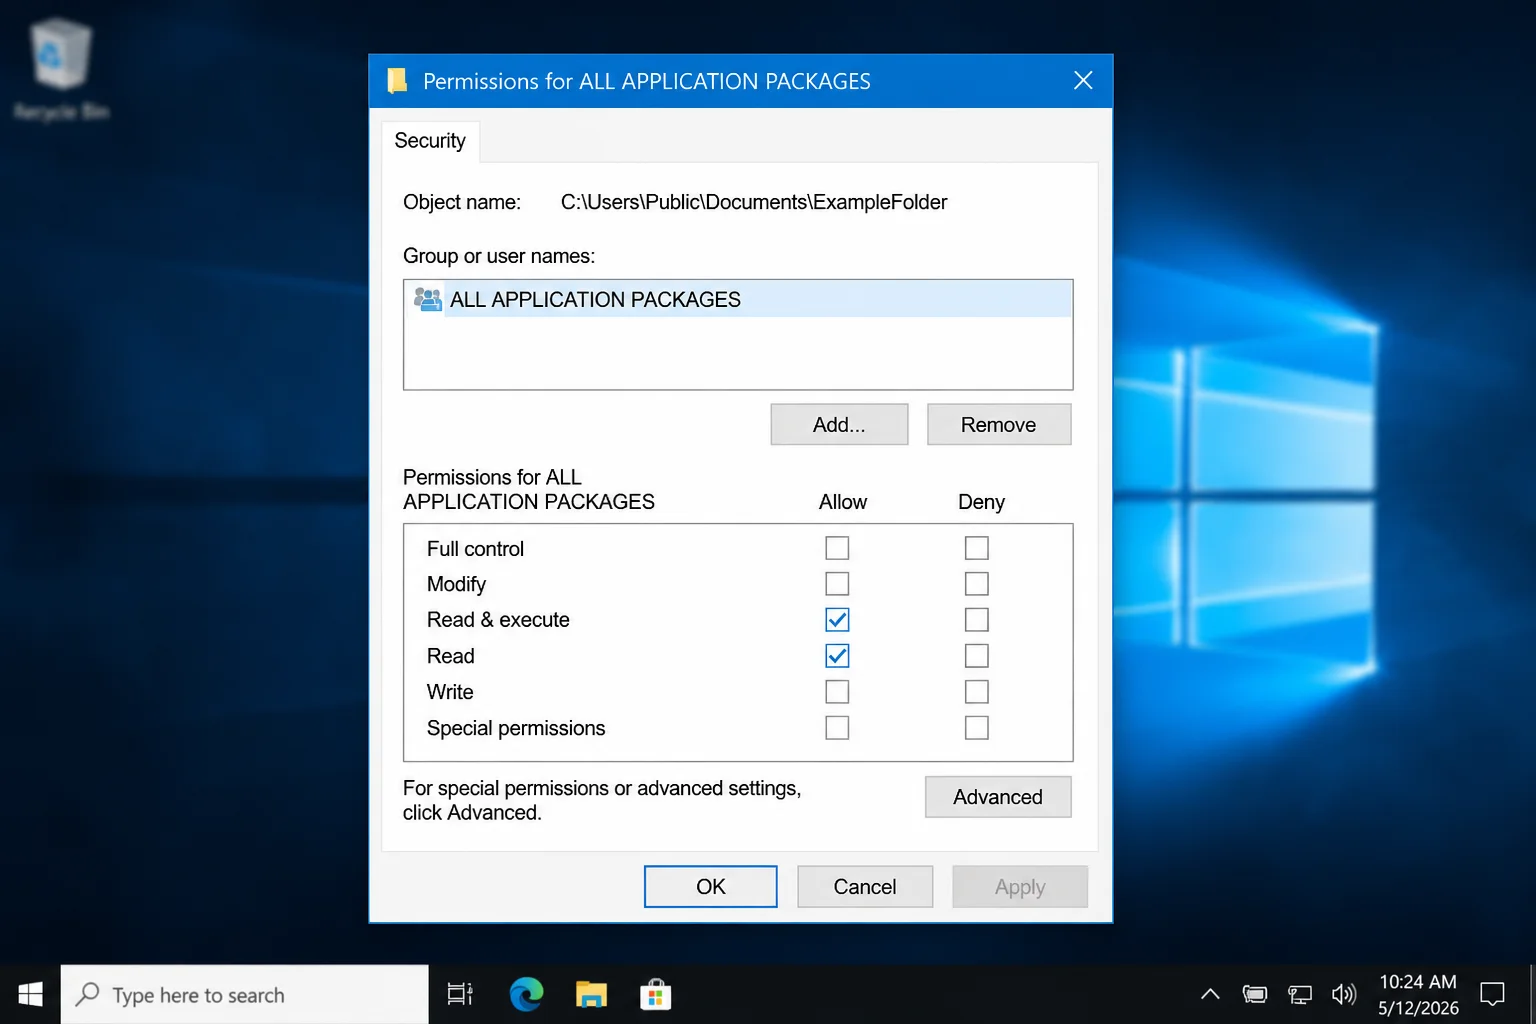
- Review the permissions before applying them.
- Leave Replace all child object permission entries with inheritable permission entries from this object cleared unless you’re repairing inheritance you know was changed.
- Select Apply.
- Restart Windows.
The All Application Packages group should now appear on the folder’s Security tab. If Windows rejects the change or reports access errors, stop instead of taking ownership of system folders.
Fix #7: Restore HKEY_USERS read permission
Try this only when Store apps began failing after a permission change, user-folder move, or disk clone. Back up the registry before editing it.
- Press
Windows + R. - Type
regedit. - Press Enter.
- Select Yes in the User Account Control dialog.
- Right-click HKEY_USERS.
- Select Permissions.
- Select All Application Packages.
- Confirm that Allow is selected for Read.
- If the group is missing, select Add.
- Enter
ALL APPLICATION PACKAGES. - Select Check Names.
- Select OK.
- Allow Read permission.
- Select Apply.
- Select OK.
- Close Registry Editor.
- Restart Windows.
Apps should now be able to read the required user registry data. Don’t grant Full Control or copy permissions across other registry hives.
Fix #8: Repair Windows system files
If several unrelated apps close after opening, Windows itself may have damaged components. Run DISM first so System File Checker has a healthy component source.
- Right-click Start.
- Select Terminal (Admin).
- Select Yes in the User Account Control dialog.
- Run:
DISM /Online /Cleanup-Image /RestoreHealth- Wait until DISM reaches 100%.
- Run:
sfc /scannow- Wait for the scan to finish.
- Restart Windows.
DISM should report that the restore operation completed successfully. SFC will tell you whether it found and repaired corrupted files.
Fix #9: Repair the affected desktop program
Traditional desktop programs don’t use Microsoft Store’s Repair and Reset controls consistently. Repair or reinstall the program through Settings instead.
- Open Settings > Apps > Installed apps in Windows 11.
- In Windows 10, open Settings > Apps > Apps & features.
- Select the affected program.
- Choose Modify if available.
- Select the program’s Repair option.
- Restart Windows after the repair finishes.
- Uninstall and reinstall the program if no repair option exists.
The program should launch without closing. If games or graphics-heavy programs still crash, install the current graphics driver supplied by your PC or GPU manufacturer.
Fix #10: Check the Settings app policy
Use this fix only if Settings opens then closes immediately. The Local Group Policy Editor is available on Windows Pro, Enterprise, and Education editions.
- Press
Windows + R. - Type
gpedit.msc. - Press Enter.
- Open User Configuration > Administrative Templates > Control Panel.
- Double-click Prohibit access to Control Panel and PC settings.
- Select Disabled.
- Select Apply.
- Select OK.
- Restart Windows.
Settings should remain open after you sign back in. On a work-managed PC, contact your administrator because the domain may reapply this policy.
Fix #11: Use a clean boot to find software conflicts
A clean boot temporarily disables non-Microsoft services and startup programs. If the app works afterward, re-enable items in small groups until the conflict returns.
- Press
Windows + R. - Type
msconfig. - Press Enter.
- Open the Services tab.
- Select Hide all Microsoft services.
- Select Disable all.
- Open the Startup tab.
- Select Open Task Manager.
- Disable each enabled startup app.
- Restart Windows.
- Test the affected app.
If the app stays open, a disabled service or startup program caused the crash. Re-enable the items gradually, restarting between tests, then uninstall or update the conflicting software.
Check Event Viewer for Event ID 5961
Event Viewer can confirm an app activation failure, but it doesn’t prove that permissions caused it. Check it when Store apps still close after the earlier fixes.
- Right-click Start.
- Select Event Viewer.
- Expand Applications and Services Logs > Microsoft > Windows.
- Open the available app-activation or TWinUI operational log.
- Select Find in the Actions pane.
- Enter
5961. - Select Find Next.
- Double-click a matching event.
A matching entry may contain output similar to this:
Log Name: Microsoft-Windows-TWinUI/Operational
Source: Microsoft-Windows-Immersive-Shell
Event ID: 5961
Level: Error
Description:
Activation of the app for the Windows.Launch contract failed with error: The app didn't start.
The event confirms that Windows couldn’t activate the app. Use its timestamp to ensure it matches your latest launch attempt.
When the fixes don’t work
Test the app from a new local Windows account. If it works there, your original user profile is damaged. If apps close under every account after SFC, DISM, and a clean boot, use Settings > System > Recovery in Windows 11 or Settings > Update & Security > Recovery in Windows 10 to review Windows recovery options.
Conclusion
Fix #2, repairing or resetting the affected app, usually solves apps opening and closing immediately. Repeated failures across unrelated programs point to damaged Windows files, a broken user profile, or failing storage rather than one bad app. You can also try to fix missing Windows default apps or fix a freezing Windows 10. For more information on troubleshooting Windows issues, visit Help Desk Geek. If you’re experiencing problems with Microsoft Store apps, you can try to fix problems with apps from Microsoft Store or fix problems that block programs from being installed or removed. Additionally, you can try to clear the TPM chip in Windows 11 or pause, defer, or disable Windows updates to resolve any issues related to Windows updates.