Getting a “0x8019019a” error while using your email account with the Mail app on Windows 10 or Windows 11? Chances are you’re using your email account’s main password instead of the app-specific one. Here’s how to fix the problem.
Other reasons you can’t use the Mail app and get the above error are that the Mail app or your Windows operating system has a bug, Mail app’s core files are corrupt, your system files are unusable, and more.
Update Your Mail App to the Latest Version
One way to resolve an app’s issues is by updating the app to the latest version. You may be using an outdated Mail app version, which is causing the above error. You can fix that by bringing the app up to date.
You should keep your apps up to date regardless of whether you experience any issues or not.
- Open the Start menu, find Microsoft Store, and launch the app.
- Select Library in the left pane.
- Choose Get updates at the top-right corner to find available app updates.

- Select Update next to Mail and Calendar on the app list.
- Close Microsoft Store and launch the Mail app.
Update Windows to Fix the Error Code 0x8019019a
Your Windows operating system may be experiencing an issue, causing the Mail app to display a “0x8019019a” error. You can resolve many issues with your system by simply updating the system to the latest version.
Updating Windows brings many bug fixes as well as possibly new features, resolving your PC issues and enhancing your overall experience with your computer.
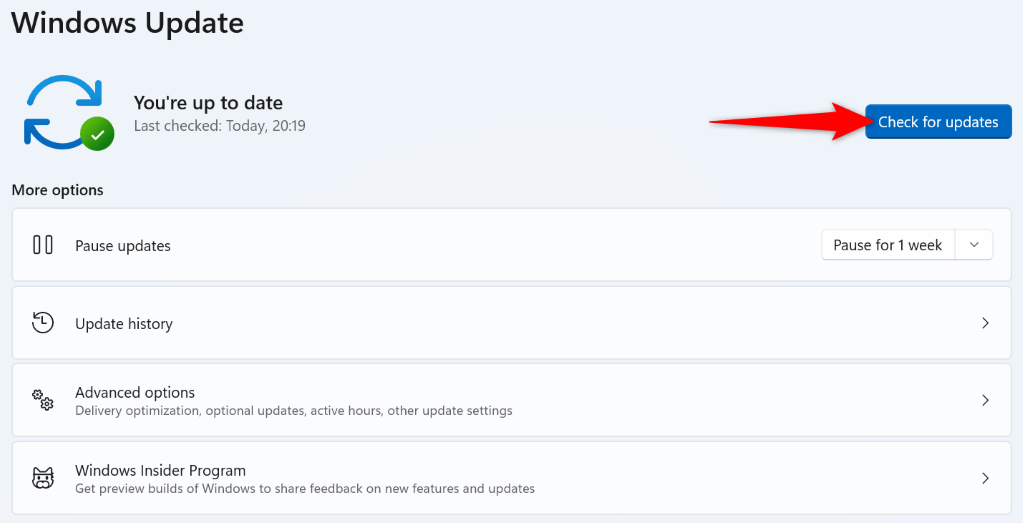
- Open Windows Settings using Windows + I.
- Select Windows Update in the left sidebar.
- Choose the Check for updates button on the right pane.
- Download and install the available updates.
- Reboot your PC and launch the Mail app.
Re-Add Your Yahoo Mail or Another Email Account in the Mail App
If you’ve had no luck fixing the “0x8019019a” error using the above methods, remove and re-add your email account in the app to possibly resolve your problem. This time around, use an app-specific password to re-add your email account in the app.
Since the above error usually appears while using a Yahoo mail account, we’ll show you how to generate an app-specific password with this email provider.
Step 1: Remove Your Email Account From the Mail App
You won’t lose your emails when you remove your email account, as your emails are synched with your email provider’s online servers.
- Open the Mail app on your PC.
- Select the gear icon in the bottom-left corner.
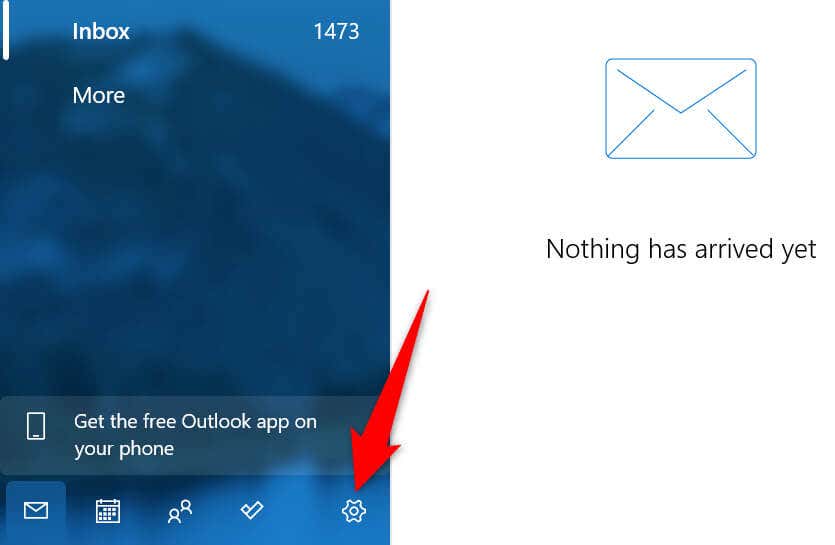
- Choose Manage accounts in the open menu.
- Select your email account on the list.
- Choose Delete account from this device.
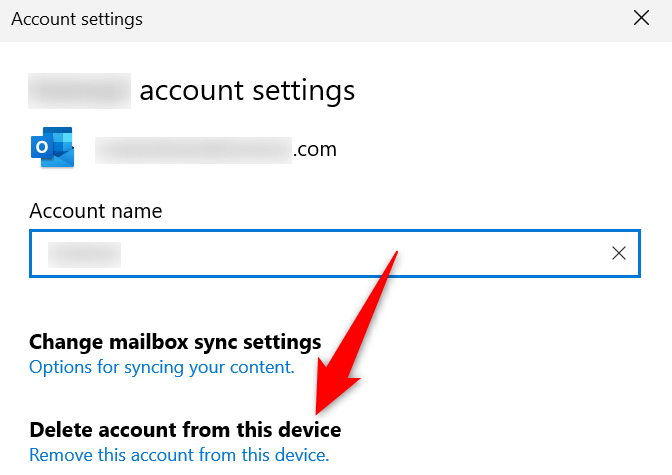
- Select Delete at the bottom of the window to confirm your choice.
- Quit the Mail app when you’ve removed your account.
Step 2: Generate an App Password
You’ll use an app-specific password instead of the main email password while re-adding your email account to the Mail app. The following shows you how to generate such a password in a Yahoo email account.
- Open the Yahoo Account site in your web browser and sign in to your account.
- Select Account security in the left sidebar and Generate app password on the right pane.
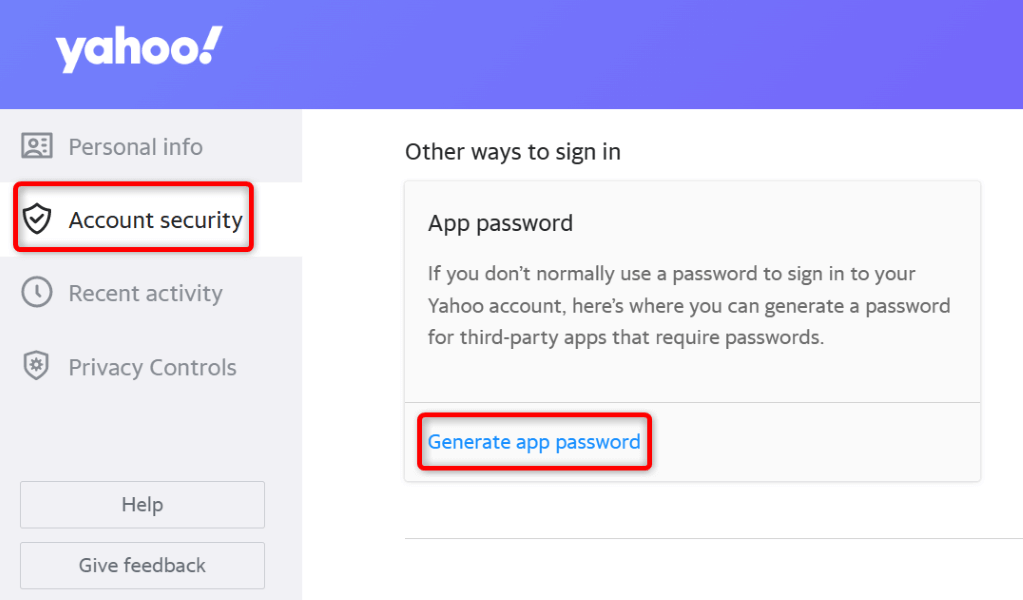
- Select Get started on the open window.
- Enter your app’s name in the text field and choose Generate password. You can enter any name in the field, but it’s a good idea to use a descriptive name.
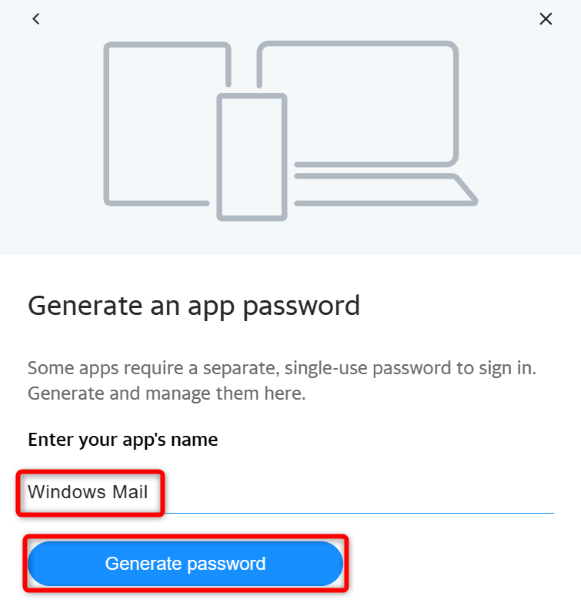
- Note the displayed password, as you’ll use this password to re-add your account in the Mail app.
Step 3: Add Your Email Account in the Mail App
With your email account’s username and password ready, follow these steps to add your account back in your Mail app:
- Open the Mail app on your PC.
- Select the gear icon in the bottom-left corner and choose Manage accounts > Add account in the menu.
- Select Other account on the open window.
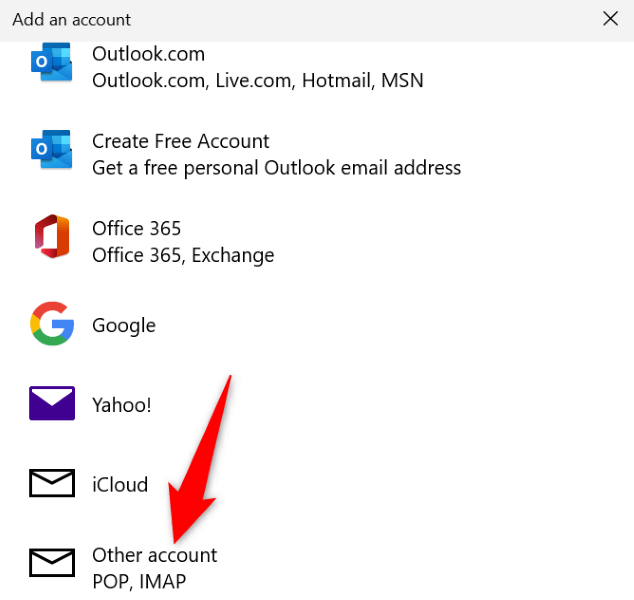
- Enter your email address, name, and password and select Sign in.
- Follow the on-screen instructions to finish adding your account in the app.
Reset the Windows Mail App
If the Mail app error “0x8019019a” still troubles you, the app may be experiencing technical issues. In this case, you can use Windows’ built-in repair option to try to repair the application. If that fails, reset the app, which clears all the app files.
- Open Windows Settings by pressing Windows + I.
- Select Apps in the left sidebar and Apps & features on the right pane.
- Find the Mail and Calendar app, select the three dots next to the app, and choose Advanced options.
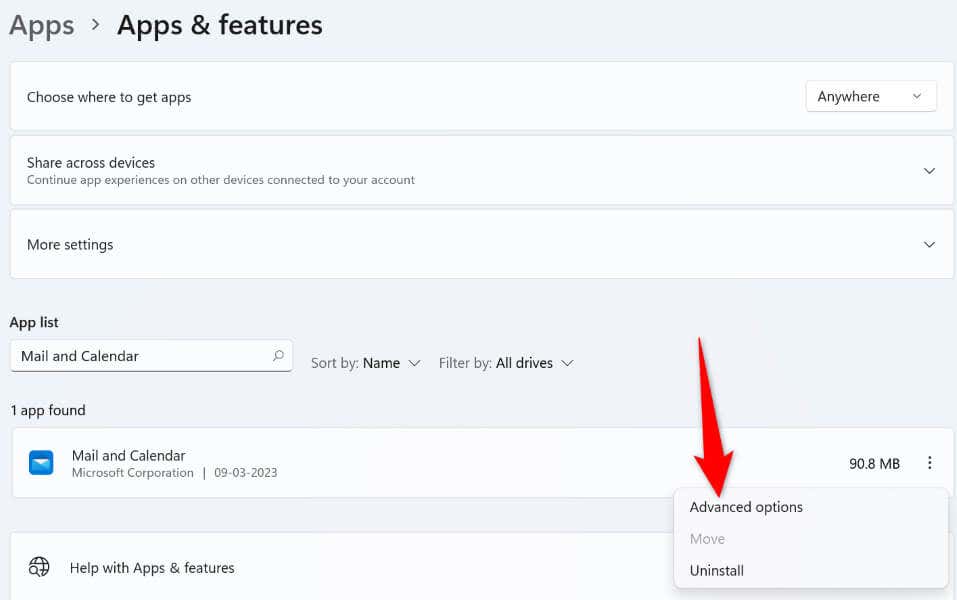
- Select Repair in the Reset section on the following page.
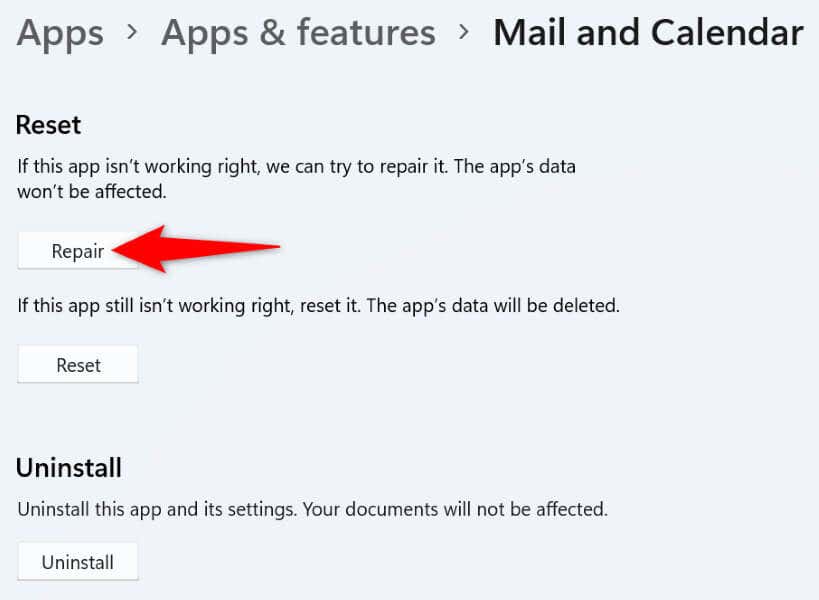
- If your Mail app issue persists, select the Reset button to reset the app.
Fix Windows’ Corrupt Files
One reason Mail displays a “0x8019019a” error is that your core system files are corrupt. This happens when a virus infects your system, or a malicious app alters your core Windows files.
In this case, you can use Windows’ built-in SFC (System File Checker) tool to find and fix all the corrupt files on your PC.
- Open Start, find Command Prompt, and select Run as administrator.
- Choose Yes in the User Account Control prompt.
- Type the following command in the CMD window and press Enter. This command can take a while to finish executing, so be patient.
DISM.exe /Online /Cleanup-image /Restorehealth
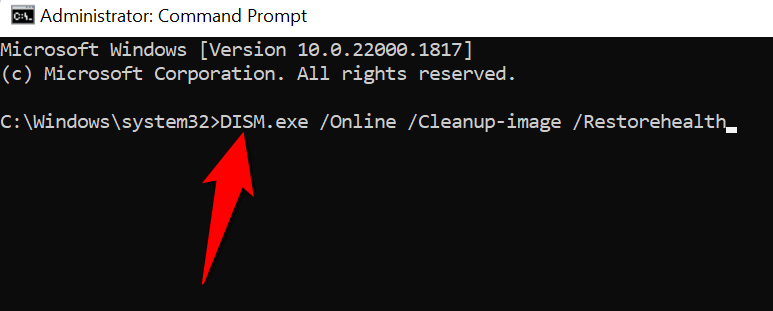
- Run the following command to fix your faulty files:
sfc /scannow - Open the Mail app when you’ve fixed your system’s bad files.
Remove and Reinstall Your Windows 10 Mail App
If your “0x8019019a” Mail app error hasn’t gone away yet, you can remove and reinstall the entire app to resolve your problem. Doing so deletes all of the app’s existing files and brings working new files, fixing issues with any problematic items.
- Press Windows + I to open Windows Settings.
- Select Apps in the left sidebar and Apps & features on the right pane.
- Select the three dots next to Mail and Calendar and choose Uninstall.
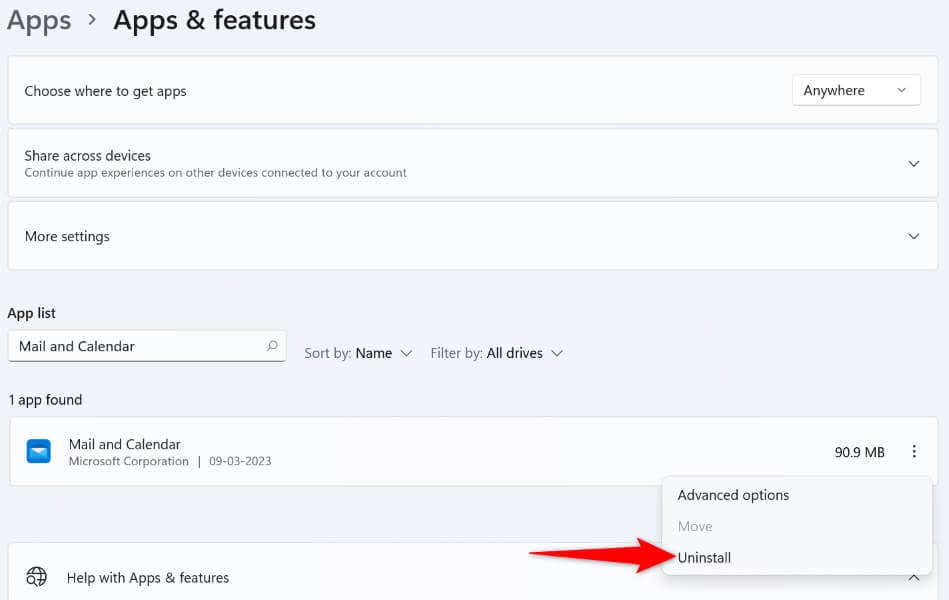
- Select Uninstall in the prompt.
- Launch Microsoft Store, find Mail and Calendar, select the app, and choose Get.
- Launch the newly-installed Mail app on your PC.
Resolve Mail App’s Errors Using Various Ways
When the Mail app displays a “0x8019019a” error, don’t panic. Instead, use the methods outlined above, and your issue will be fixed. You’ll then be back to your usual emailing sessions without any issues.
Good luck and happy emailing!
Related Posts
- Preparing for Windows 10 End of Support: Upgrading to Windows 11
- How to Fix a “This file does not have an app associated with it” Error on Windows
- How to Fix an Update Error 0x800705b4 on Windows
- How to Resolve “A JavaScript error occured in the main process” Error on Windows
- How to Fix the Network Discovery Is Turned Off Error on Windows
