
“You need authorization from TrustedInstaller in order to perform this action” – this error appears when you try to delete, rename, or edit a system-protected file in Windows 10 or 11. You’ll need to take ownership of the file and grant yourself Full Control before Windows will let you touch it.
⚠️ Before you start: Only use this method to remove malware or virus files that have embedded themselves in protected directories, or old Windows installation folders you’re certain are safe to remove. Do not use it to delete core system components like Windows Defender or anything inside System32 that will corrupt your OS. You also need an Administrator account to proceed.
Fix #1: Take Ownership and Delete the File Manually
This is the standard method that works on Windows 10 and Windows 11.
Step 1: Open the file’s Advanced Security Settings
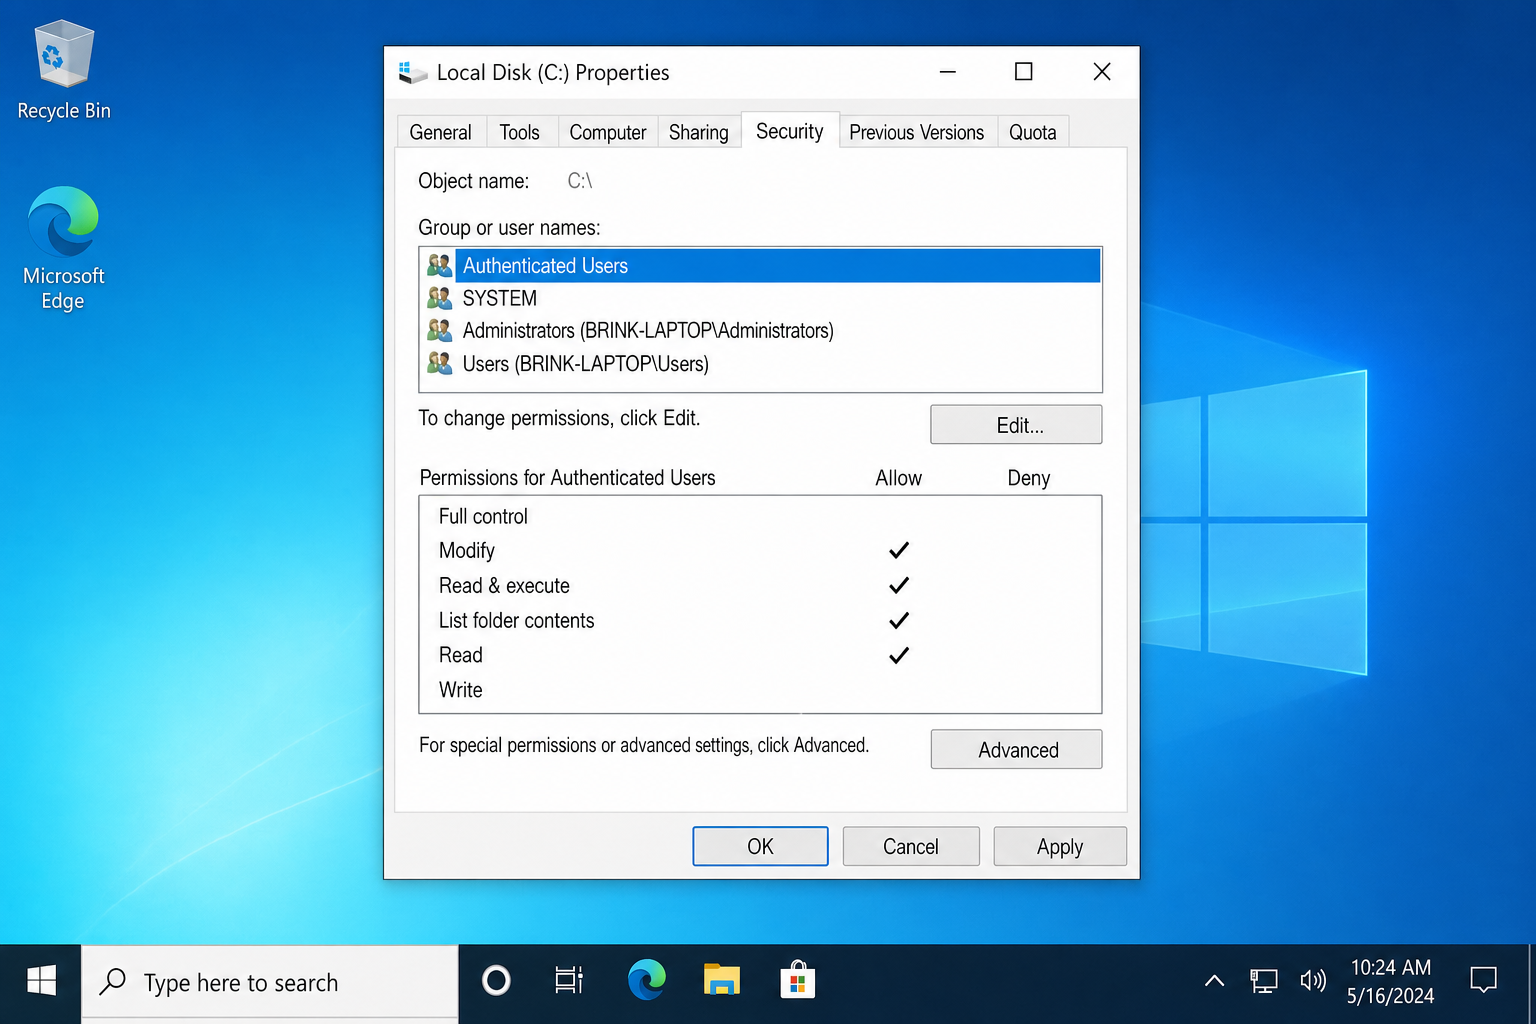
- Right-click the protected file or folder and select Properties.
- Click the Security tab, then click Advanced at the bottom.
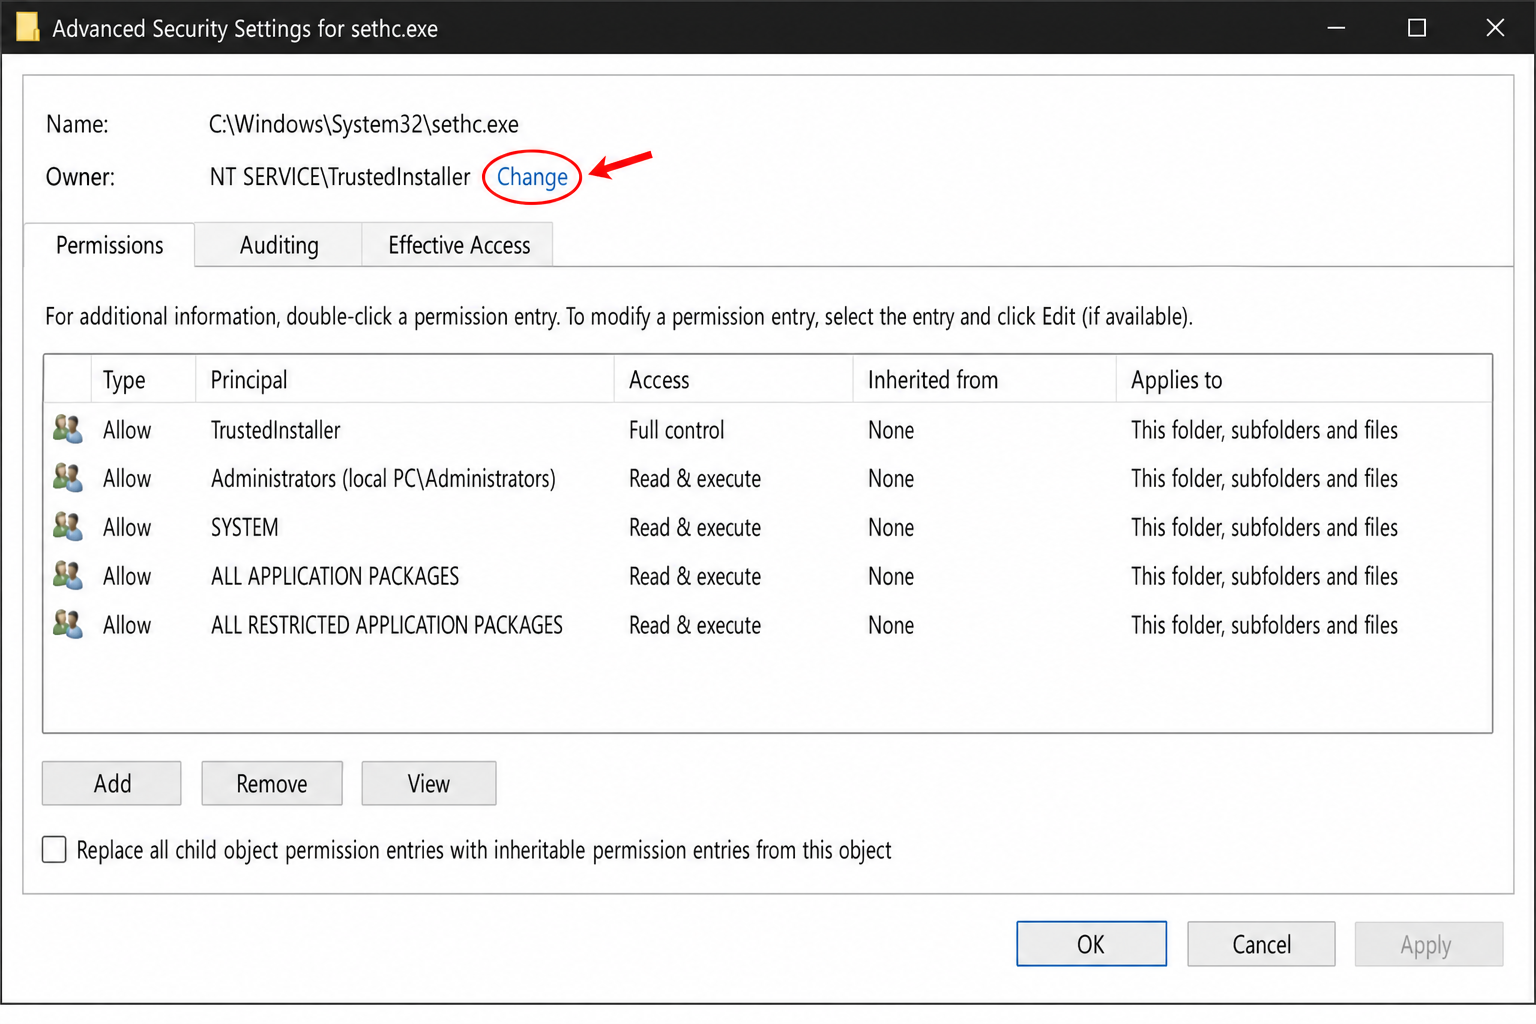
The Advanced Security Settings window opens. At the top, you’ll see the current owner listed as NT SERVICE\TrustedInstaller.
Step 2: Take ownership of the file
- Click the Change link next to the owner name.
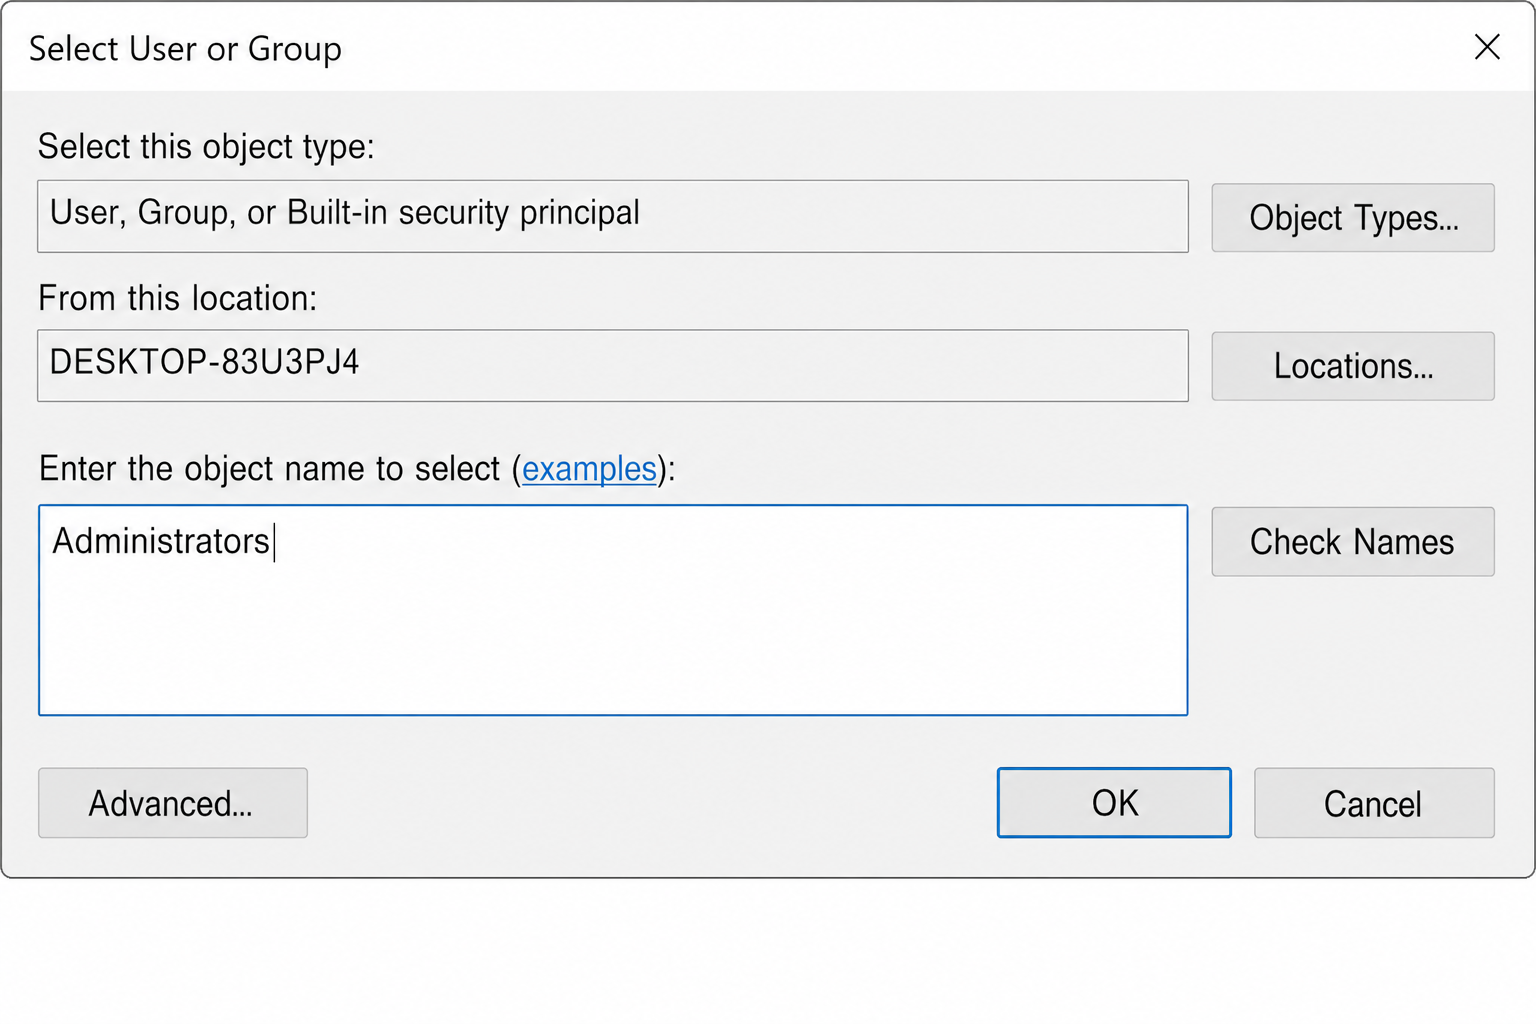
- In the Select User or Group dialog, type
Administratorsand click Check Names. Windows will resolve it to your local Administrators group. - Click OK.
- If you’re targeting a folder that contains subfolders, check Replace owner on subcontainers and objects before clicking Apply.
- Click Apply, then OK.
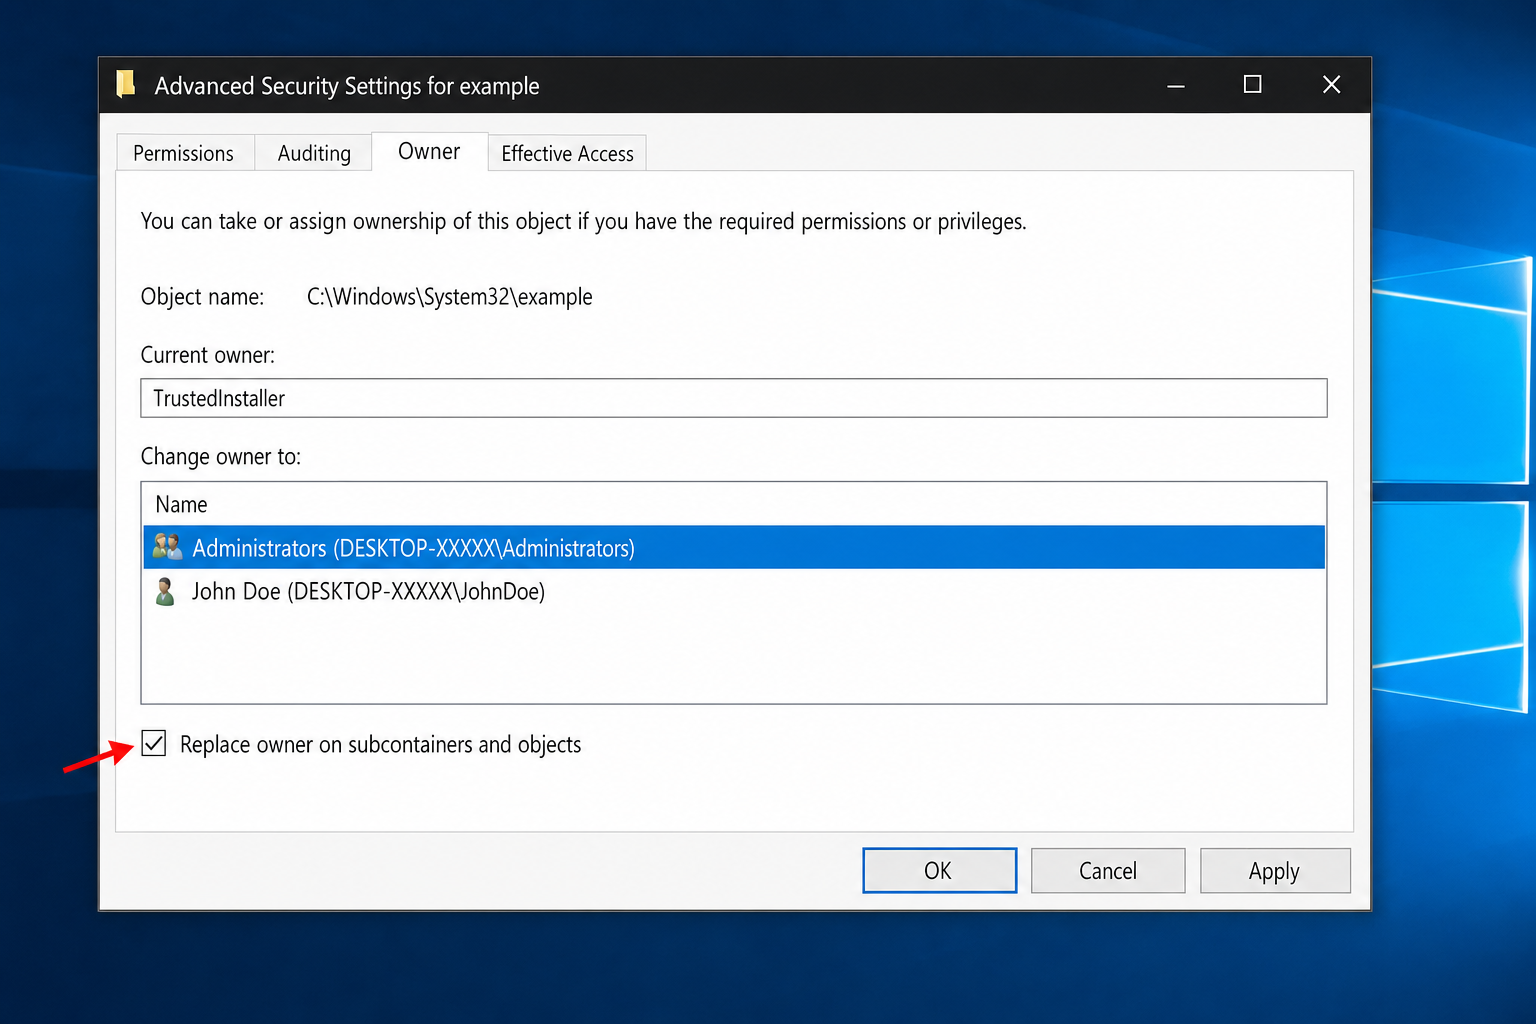
The owner field should now show Administrators (or your account name).
Step 3: Grant yourself Full Control
- Close the Advanced Security Settings window and click OK to close Properties.
- Right-click the file or folder again and select Properties.
- Click the Security tab, then click Edit.
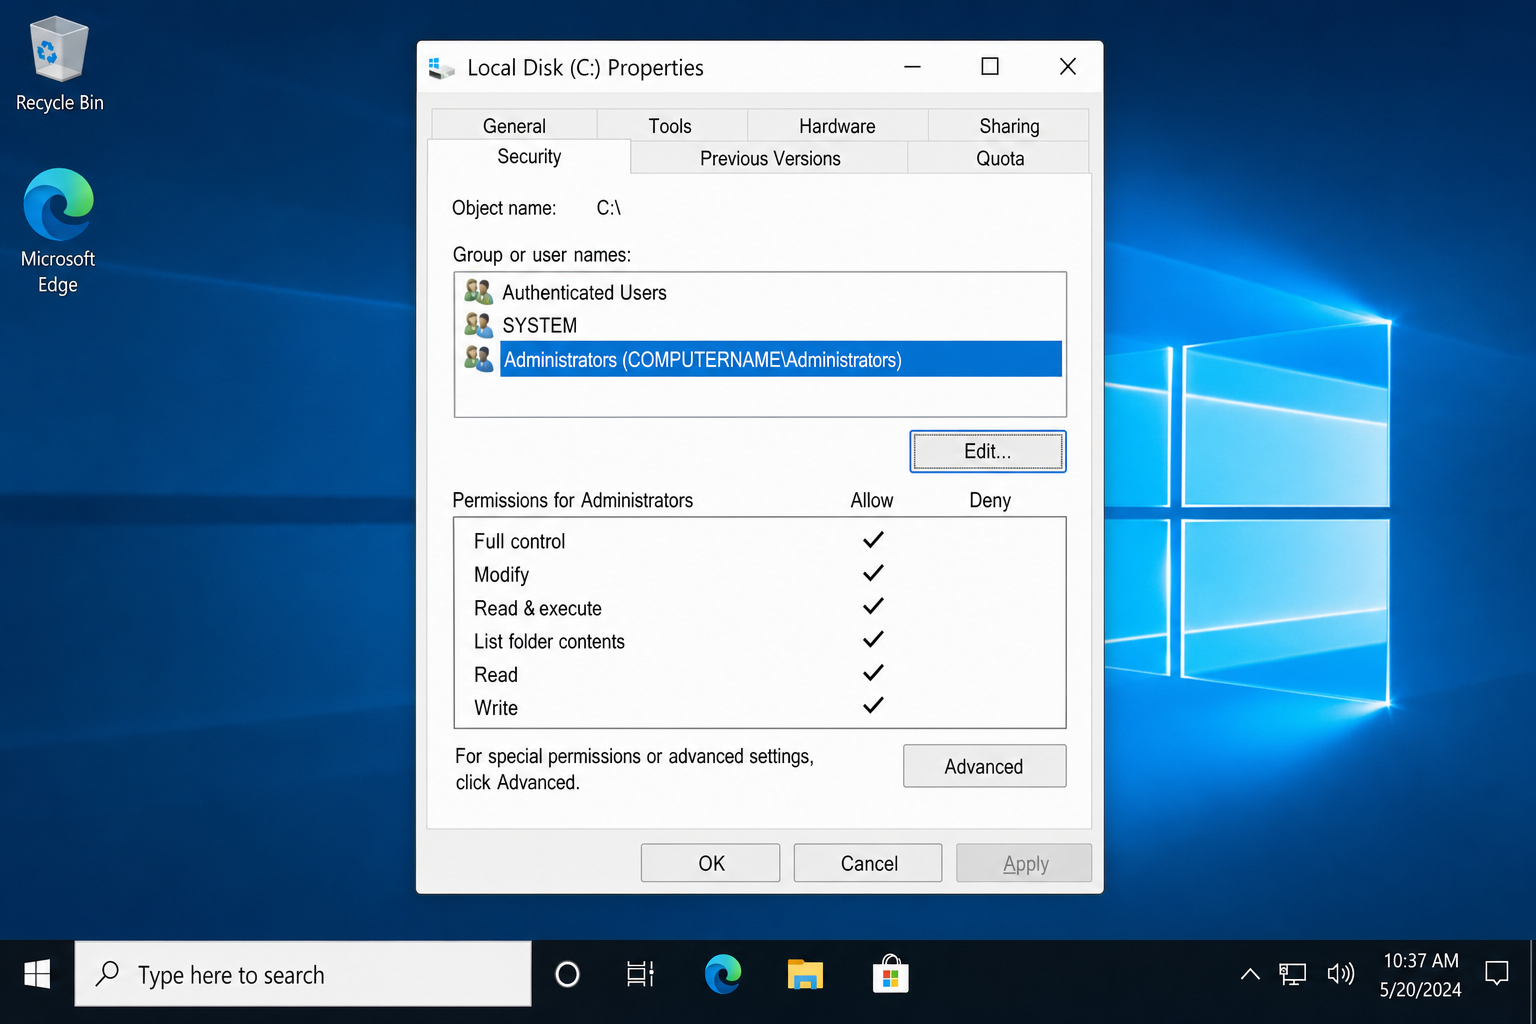
- In the Group or user names list, select Administrators. If it’s not listed, click Add, type
Administrators, click Check Names, and click OK. - In the Permissions for Administrators section, check the box next to Full Control. All other permission boxes will check automatically.
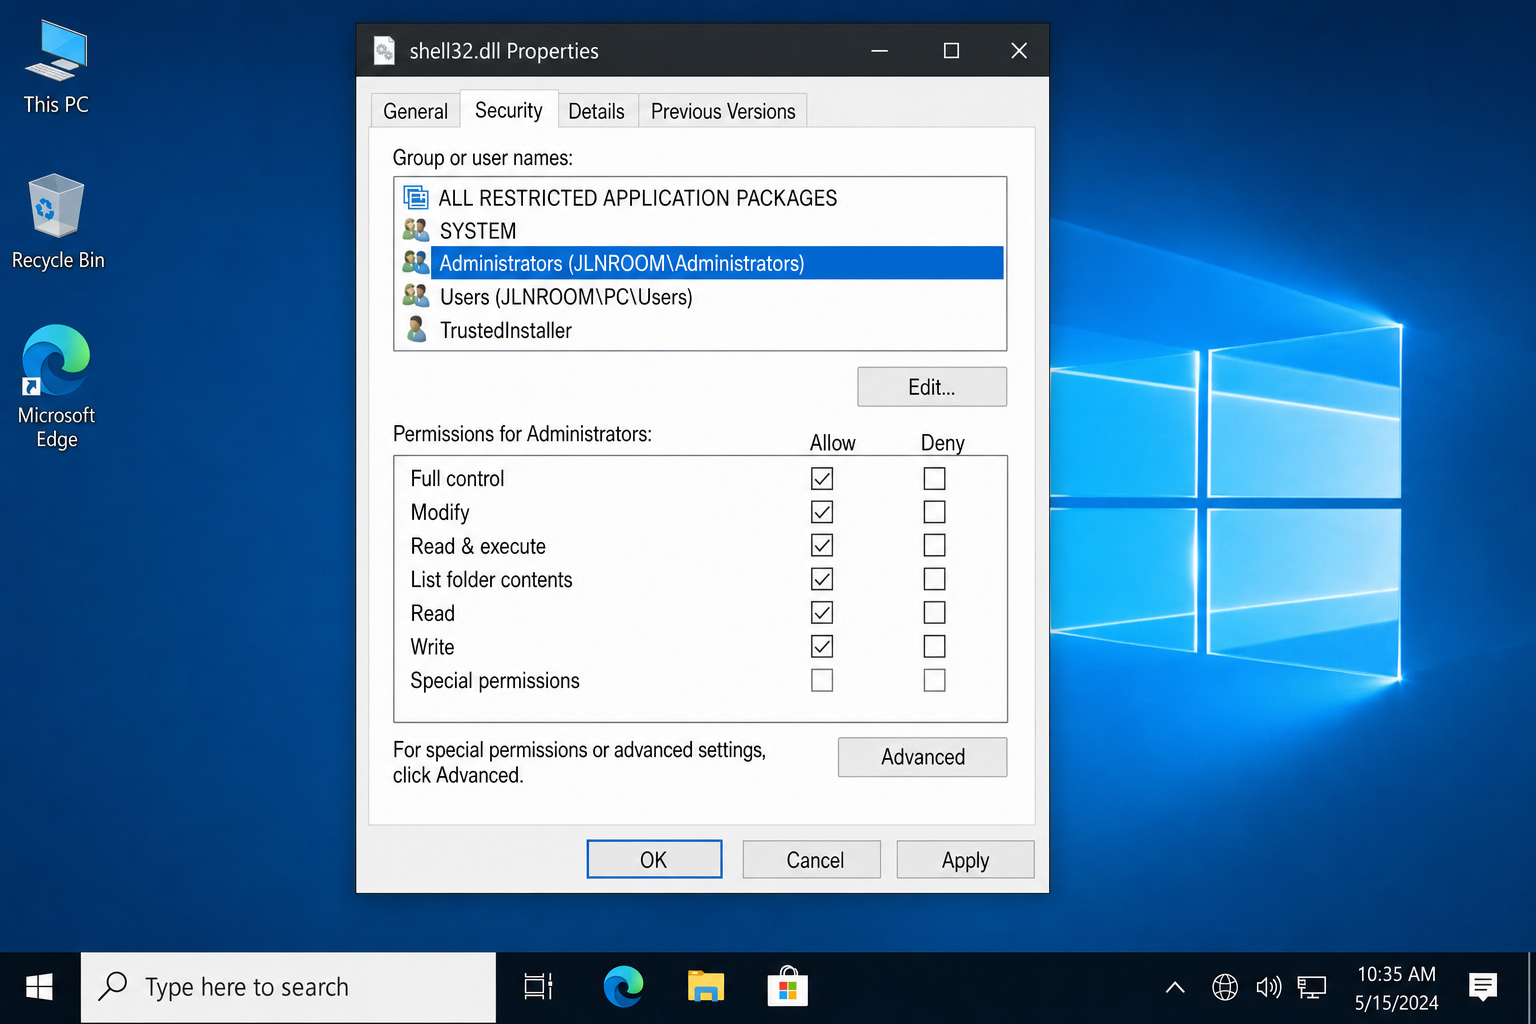
- Click Apply, then OK, then OK again to close Properties.
You can now delete, rename, or edit the file normally. Right-click it and select Delete, no more TrustedInstaller error.
For folders with subfolders: propagate permissions to child objects
If you’re deleting an entire folder tree and the error keeps appearing on nested files, you need to push the permissions down to all child objects.
- Right-click the folder and select Properties > Security > Advanced.
- Click Change permissions at the bottom of the window.
- Select Administrators in the list and check Replace all child object permission entries with inheritable permission entries from this object.
- Click Apply and confirm the warning prompt.
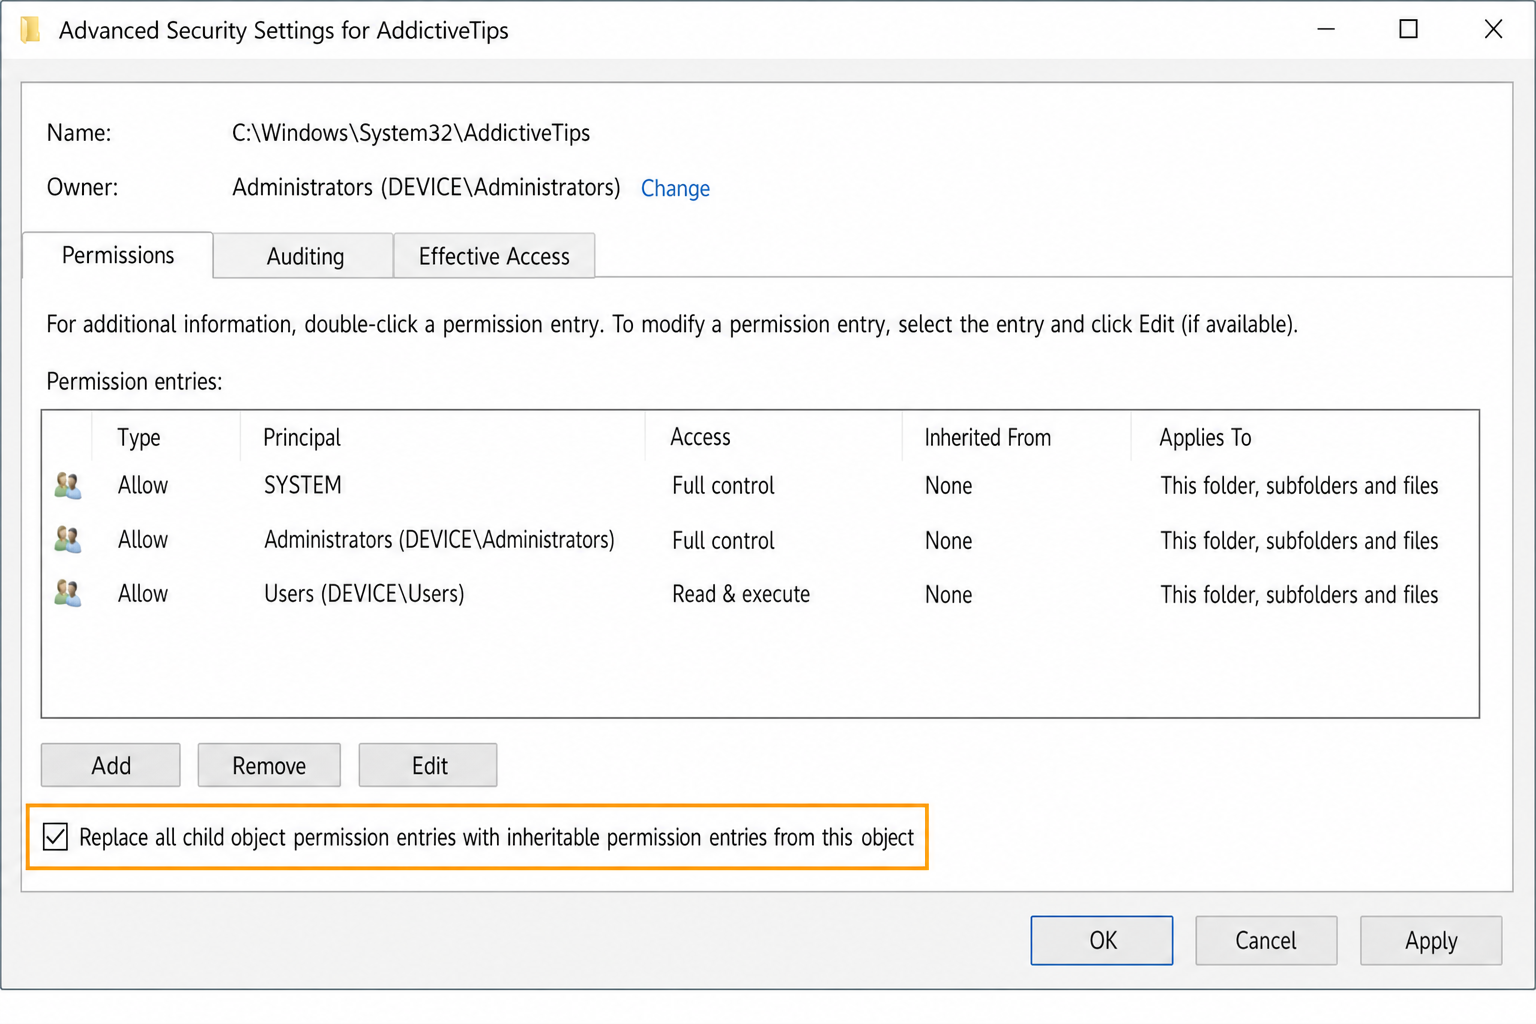
This pushes Full Control down to every file and subfolder in one pass, so you won’t hit the same error on nested items.
Fix #2: Add “Take Ownership” to Your Right-Click Menu (Registry Tweak)
If you do this regularly, for instance, cleaning up malware remnants – navigating through Properties → Security → Advanced every time gets old fast. You can add a Take Ownership option directly to your right-click context menu via a registry modification.
- Press
Windows + R, typeregedit, and press Enter. Click Yes at the UAC prompt. - Navigate to:
HKEY_CLASSES_ROOT\*\shell - Right-click shell, select New > Key, and name it
TakeOwnership. - With TakeOwnership selected, double-click the (Default) value in the right pane and set its data to
Take Ownership. - Right-click TakeOwnership, create another new key named
command. - Select command, double-click (Default), and set the value to:
cmd.exe /c takeown /f "%1" && icacls "%1" /grant administrators:F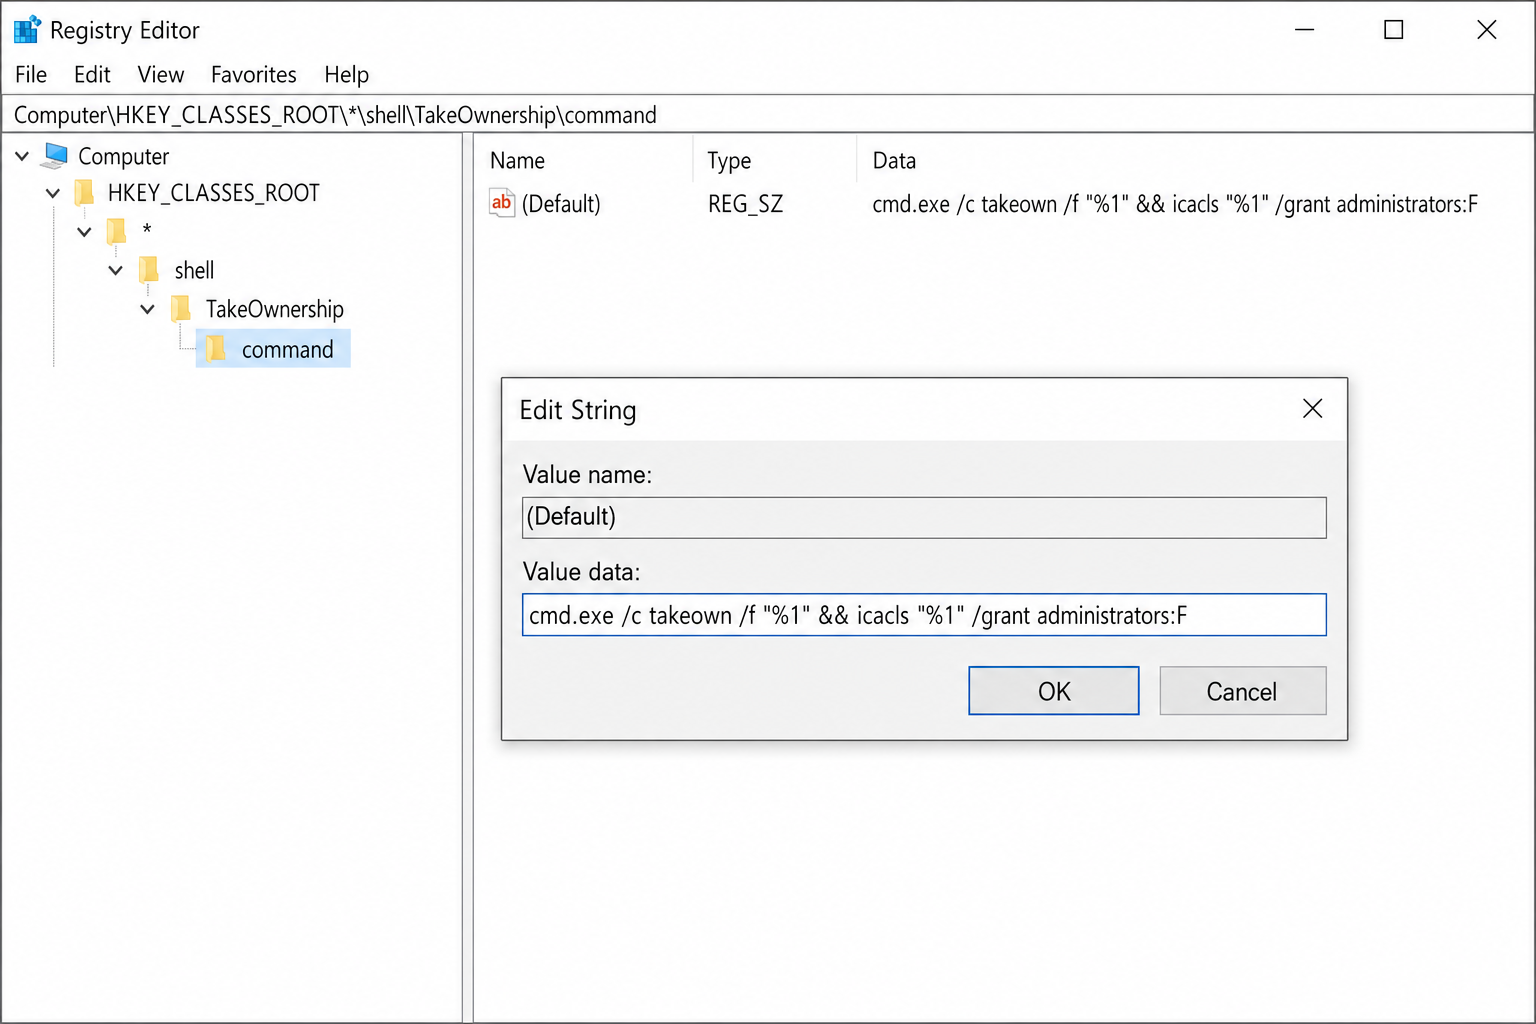
- Close Registry Editor. Right-click any protected file and you’ll now see Take Ownership in the context menu.
Clicking it runs both takeown and icacls in sequence, transferring ownership and granting Full Control in one step. After it completes, delete the file normally.
Note: This registry tweak applies to files only (
HKEY_CLASSES_ROOT\*). To add the same option for folders, repeat the same steps underHKEY_CLASSES_ROOT\Directory\shell.
When These Fixes Don’t Work
If you’ve taken ownership and granted Full Control but the file still won’t delete, the file may be locked by a running process. Press Ctrl + Shift + Esc to open Task Manager, find any process associated with the file, end it, and try deleting again. If the file reappears after deletion, that’s a strong sign of active malware — run a full scan with Windows Defender or Malwarebytes before going further.
Conclusion
Fix #1 (the manual ownership transfer) handles this for the vast majority of cases. The registry tweak in Fix #2 is worth setting up if you find yourself doing this more than once as it cuts the whole process down to a single right-click. If a file keeps reappearing after you delete it, stop and run a malware scan first; the TrustedInstaller error is just the symptom, not the real problem.