
The error “Windows cannot connect to this network” appears when you click your Wi-Fi network and Windows fails to complete the connection, usually after a password change, a Windows Update, or a driver glitch that corrupts the stored network profile.
Before You Begin
Make sure you have:
- Your Wi-Fi password handy (you’ll need it after forgetting the network)
- Administrator access on the Windows 11 PC
- Windows 11 fully updated (check in Settings > Windows Update)
- Physical access to your router in case a router restart is needed
| Requirement | Details |
|---|---|
| OS | Windows 11 23H2, 24H2, or 25H2 (latest April 2026 patches recommended) |
| Account type | Local Administrator or Microsoft Account with admin rights |
| Time needed | 5–30 minutes depending on which fix works |
Fix #1: Forget the Network and Reconnect
This is the fastest fix and resolves the error in the majority of cases. A corrupted network profile is the most common cause, and forgetting the network wipes that profile so Windows builds a clean one.
- Click the Wi-Fi icon in the taskbar system tray (bottom-right corner).
- Click the arrow (>) next to your Wi-Fi network name to expand it.
- Click Forget.
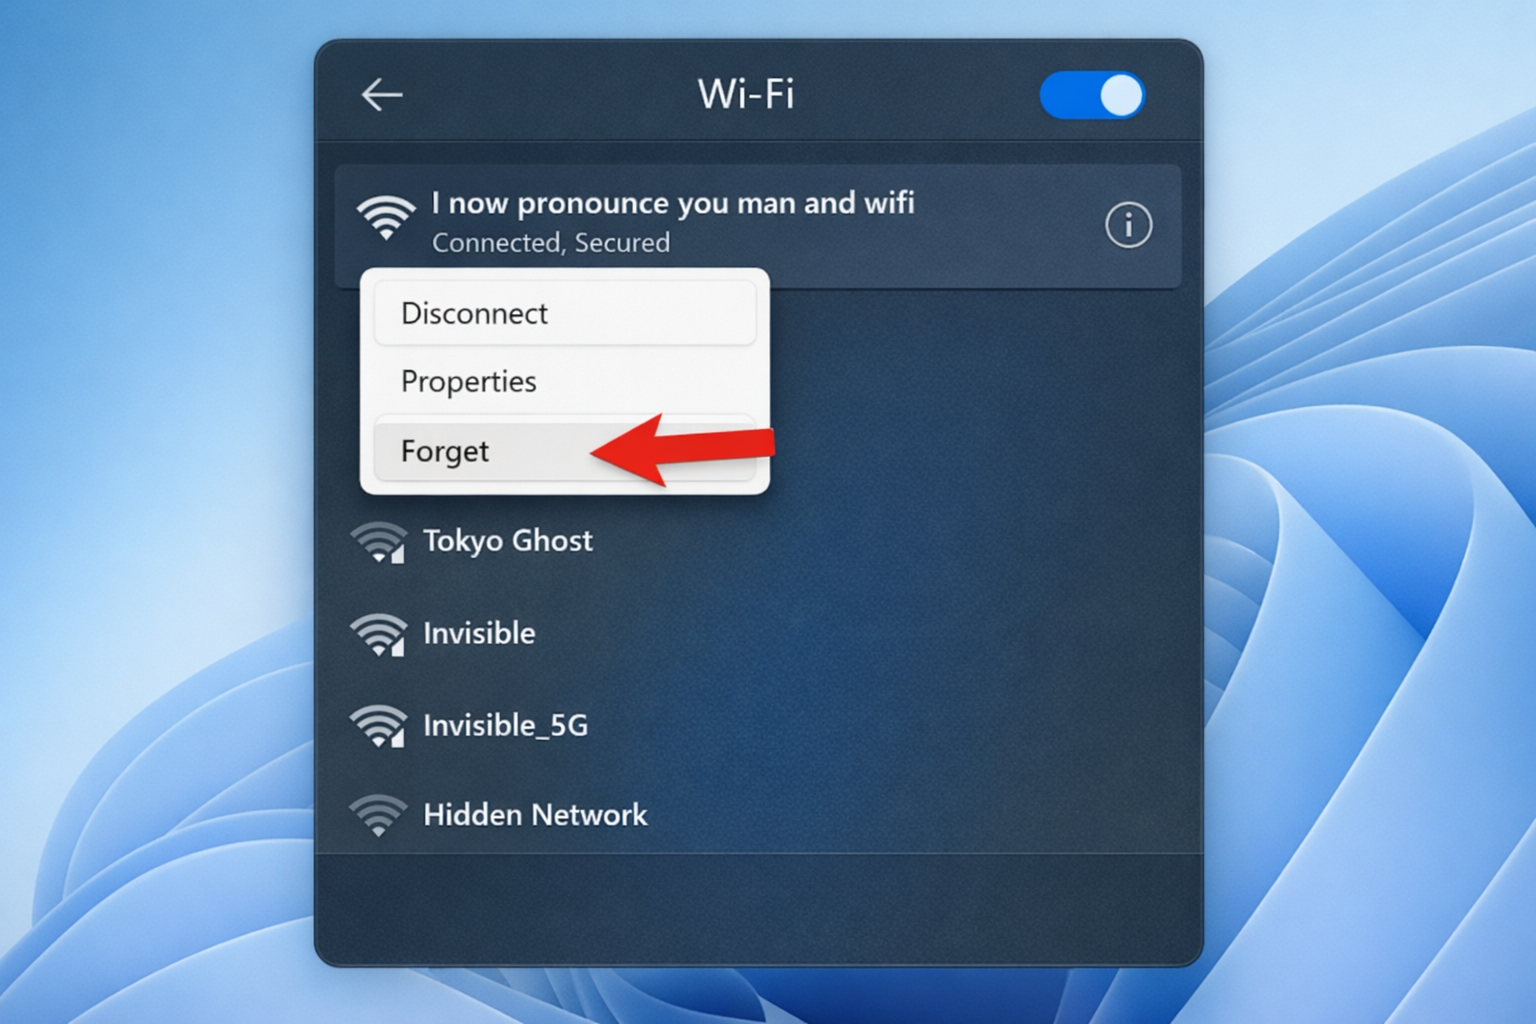
- Wait five seconds, then click your network name again.
- Enter your Wi-Fi password when prompted and click Connect.
Expected result: Windows connects normally and shows “Connected, secured” under the network name.
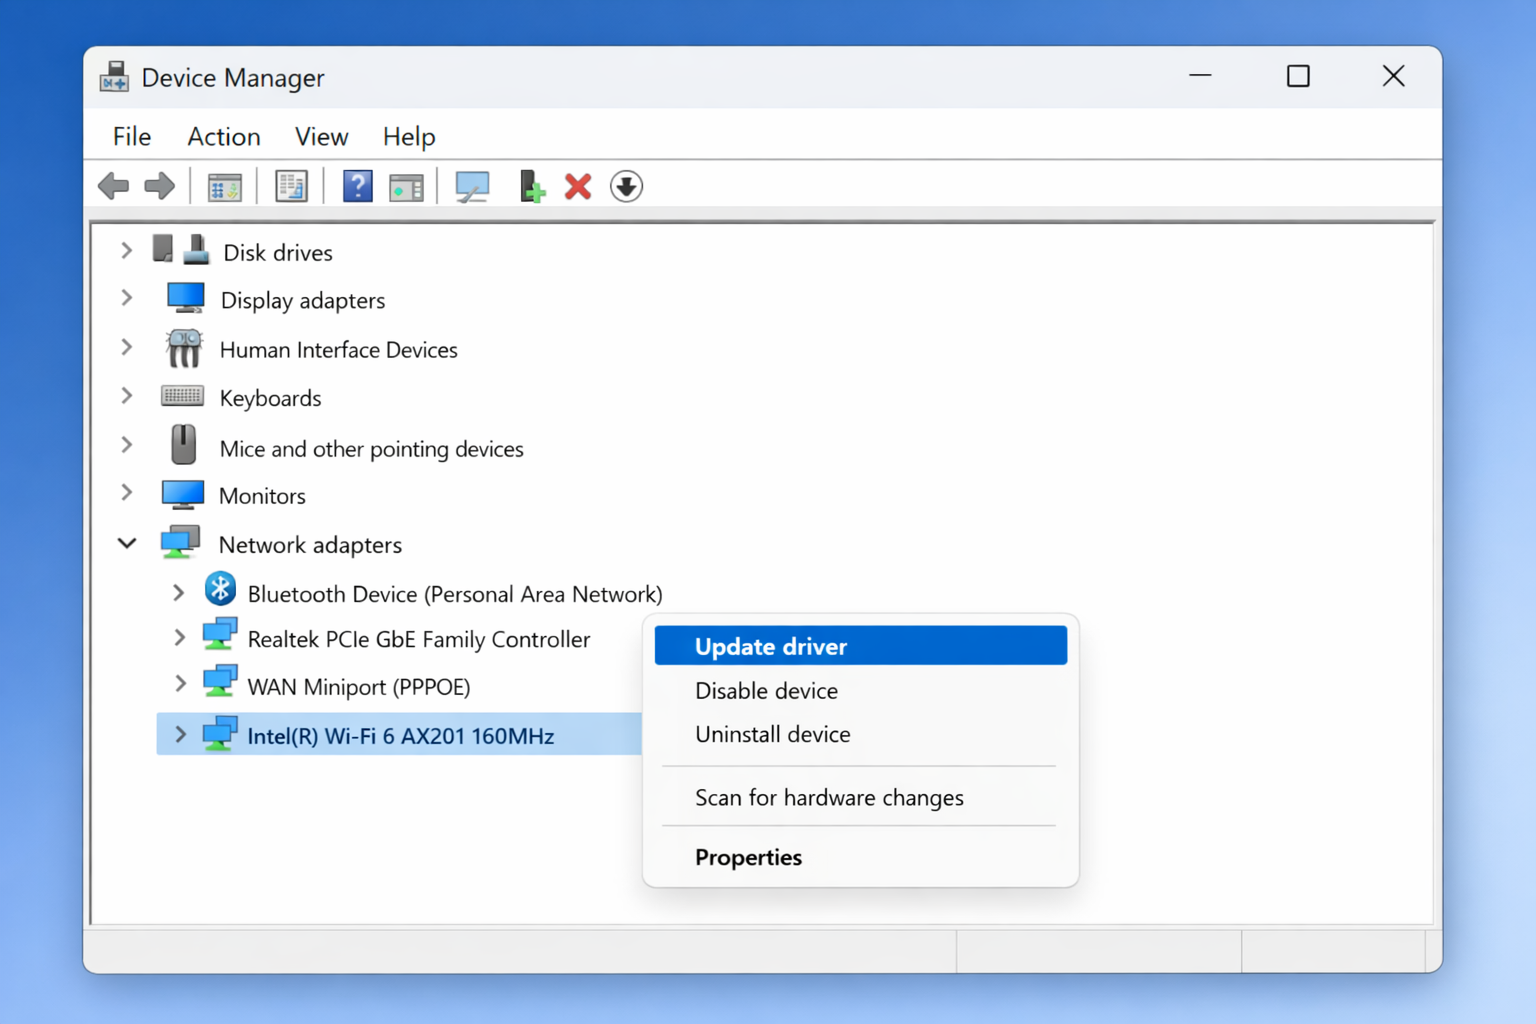
Fix #2: Disable and Re-enable the Wi-Fi Adapter
Toggling the adapter forces Windows to reinitialize the driver and clear any stuck state without requiring a full reboot.
- Right-click the Start button and select Device Manager.
- Expand Network adapters.
- Right-click your wireless adapter (usually labeled with the manufacturer name, e.g., “Intel Wi-Fi 6E AX211”) and select Disable device.
- Click Yes to confirm.
- Wait 10 seconds.
- Right-click the same adapter and select Enable device.
- Try connecting to your network again.
Fix #3: Run the Network Troubleshooter
Windows 11’s built-in troubleshooter catches common configuration problems automatically and can apply fixes without any manual steps.
- Open Settings > System > Troubleshoot.
- Click Other troubleshooters.
- Find Internet Connections and click Run.
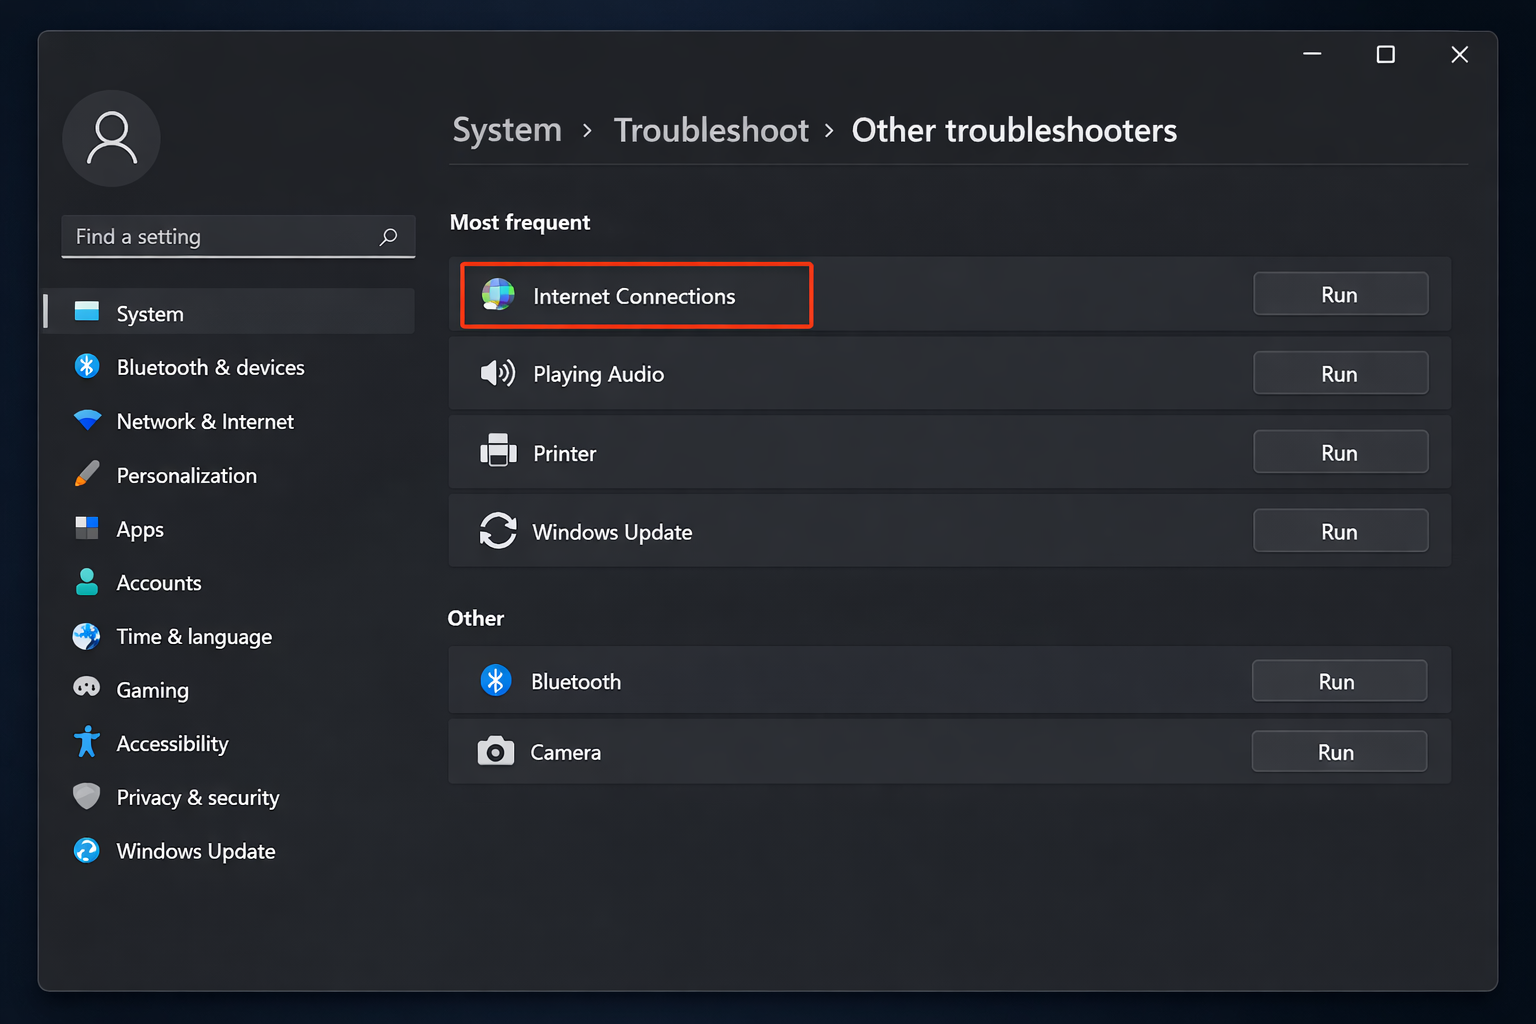
- Follow the on-screen prompts and apply any recommended fixes.
- Restart your PC if the troubleshooter asks you to.
Expected result: The troubleshooter either fixes the issue automatically or tells you exactly what it found, giving you a useful starting point for the next fix.
Fix #4: Flush DNS and Reset TCP/IP
Stale DNS cache entries or a corrupted TCP/IP stack can block connections even when the network profile is fine. These commands reset both cleanly.
- Click Start, type
cmd, right-click Command Prompt, and select Run as administrator. - Run each of the following commands one at a time, pressing Enter after each:
netsh winsock resetnetsh int ip resetipconfig /releaseipconfig /flushdnsipconfig /renewipconfig /registerdns- Close Command Prompt and restart your PC.
- After reboot, try connecting to the network.
Expected result: Windows obtains a fresh IP address and connects normally. If you see “Access is denied” on any command, confirm you opened Command Prompt as administrator (step 1).
Fix #5: Change the Network Profile to Private
Windows sometimes blocks full connectivity when a network is classified as Public. Switching it to Private can resolve authentication issues with certain routers.
- Connect to the network (even if it shows the error, proceed — you may have partial connectivity).
- Open Settings > Network & internet > Wi-Fi.
- Click your connected network name.
- Under Network profile type, select Private network.
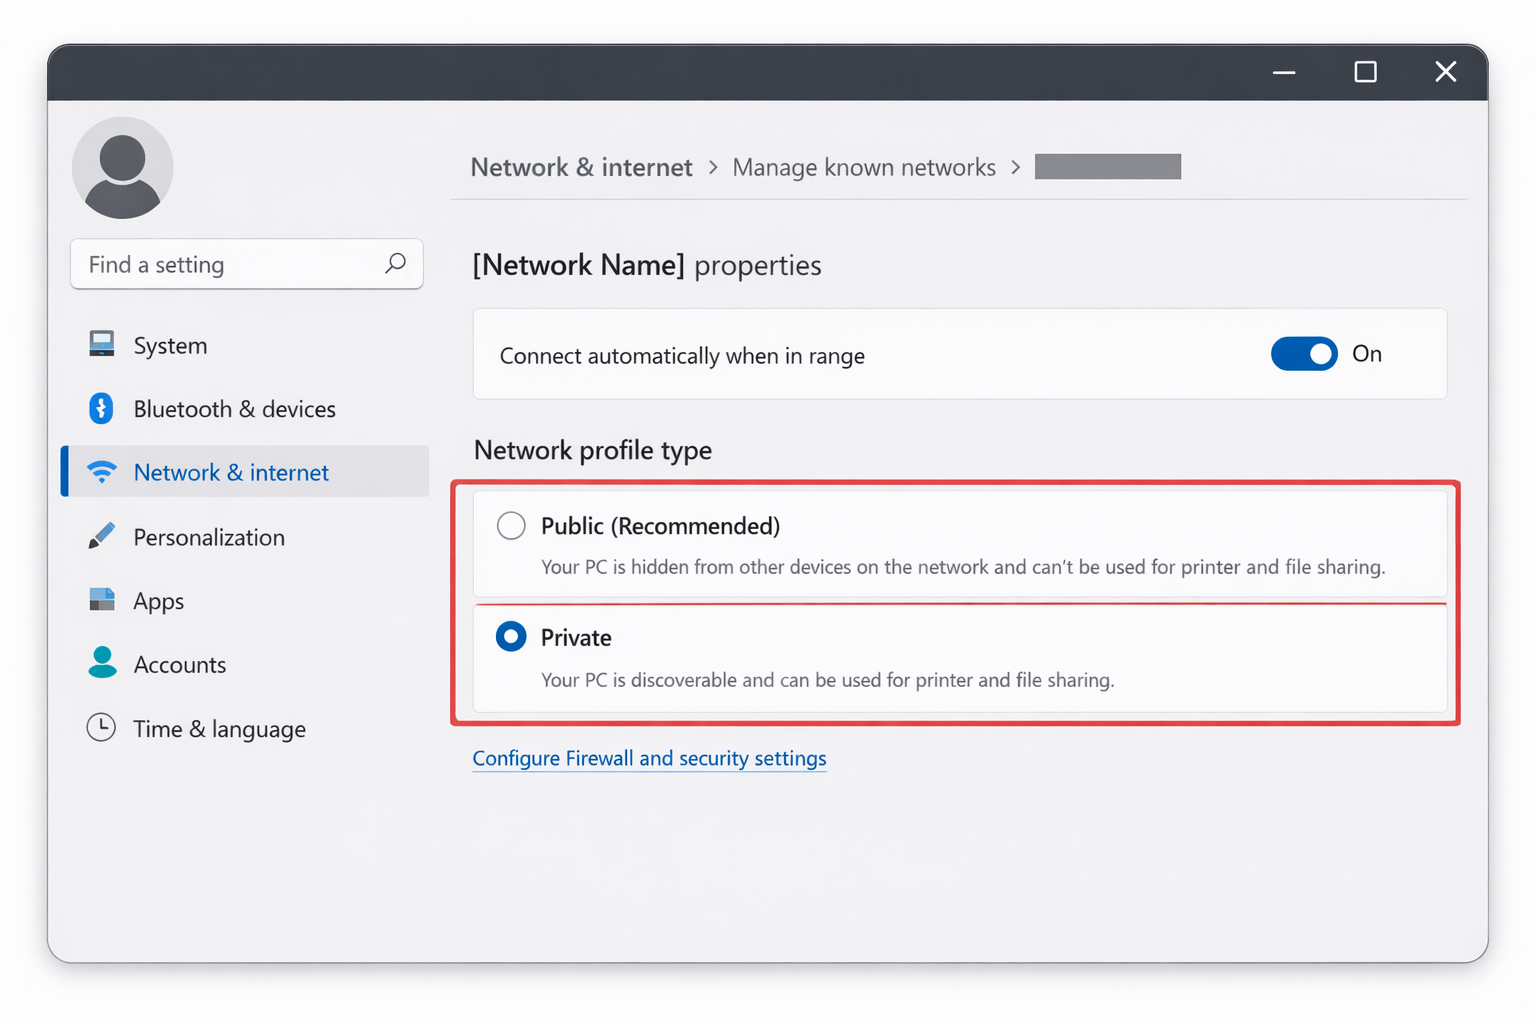
- Disconnect from the network and reconnect.
Fix #6: Update or Roll Back the Wi-Fi Driver
A bad driver update is a frequent culprit after Windows Update runs. You can try both directions — updating to get a newer fix, or rolling back to escape a broken one.
Update the driver
- Right-click Start > Device Manager.
- Expand Network adapters.
- Right-click your wireless adapter and select Update driver.
- Choose Search automatically for drivers.
- Install any available update and restart.
Roll back the driver
- Right-click your wireless adapter in Device Manager and select Properties.
- Click the Driver tab.
- Click Roll Back Driver (if the button is grayed out, there is no previous driver to roll back to).
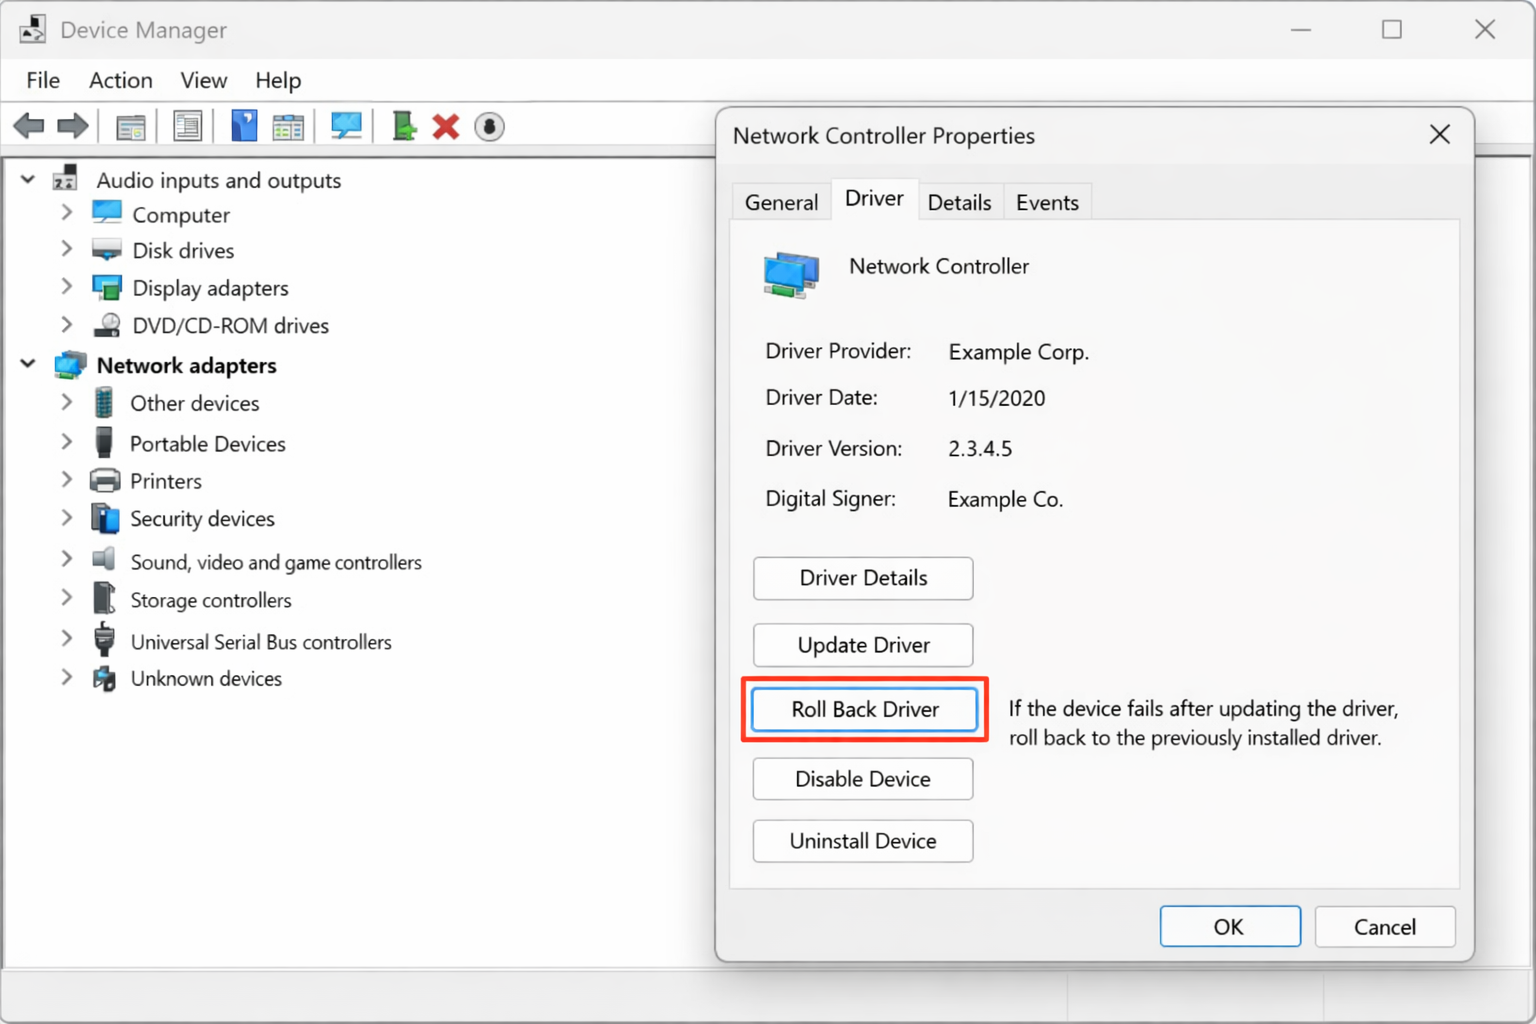
- Select a reason when prompted and click Yes.
- Restart your PC and try reconnecting.
Fix #7: Disable IPv6 on the Wi-Fi Adapter
Some routers and ISPs have IPv6 misconfigurations that cause Windows to fail the network handshake. Disabling IPv6 on the adapter forces Windows to use IPv4 only.
- Open Settings > Network & internet > Advanced network settings.
- Click More adapter options — or press
Win + R, typencpa.cpl, and press Enter. - Right-click your Wi-Fi adapter and select Properties.
- In the list, find Internet Protocol Version 6 (TCP/IPv6) and uncheck its checkbox.
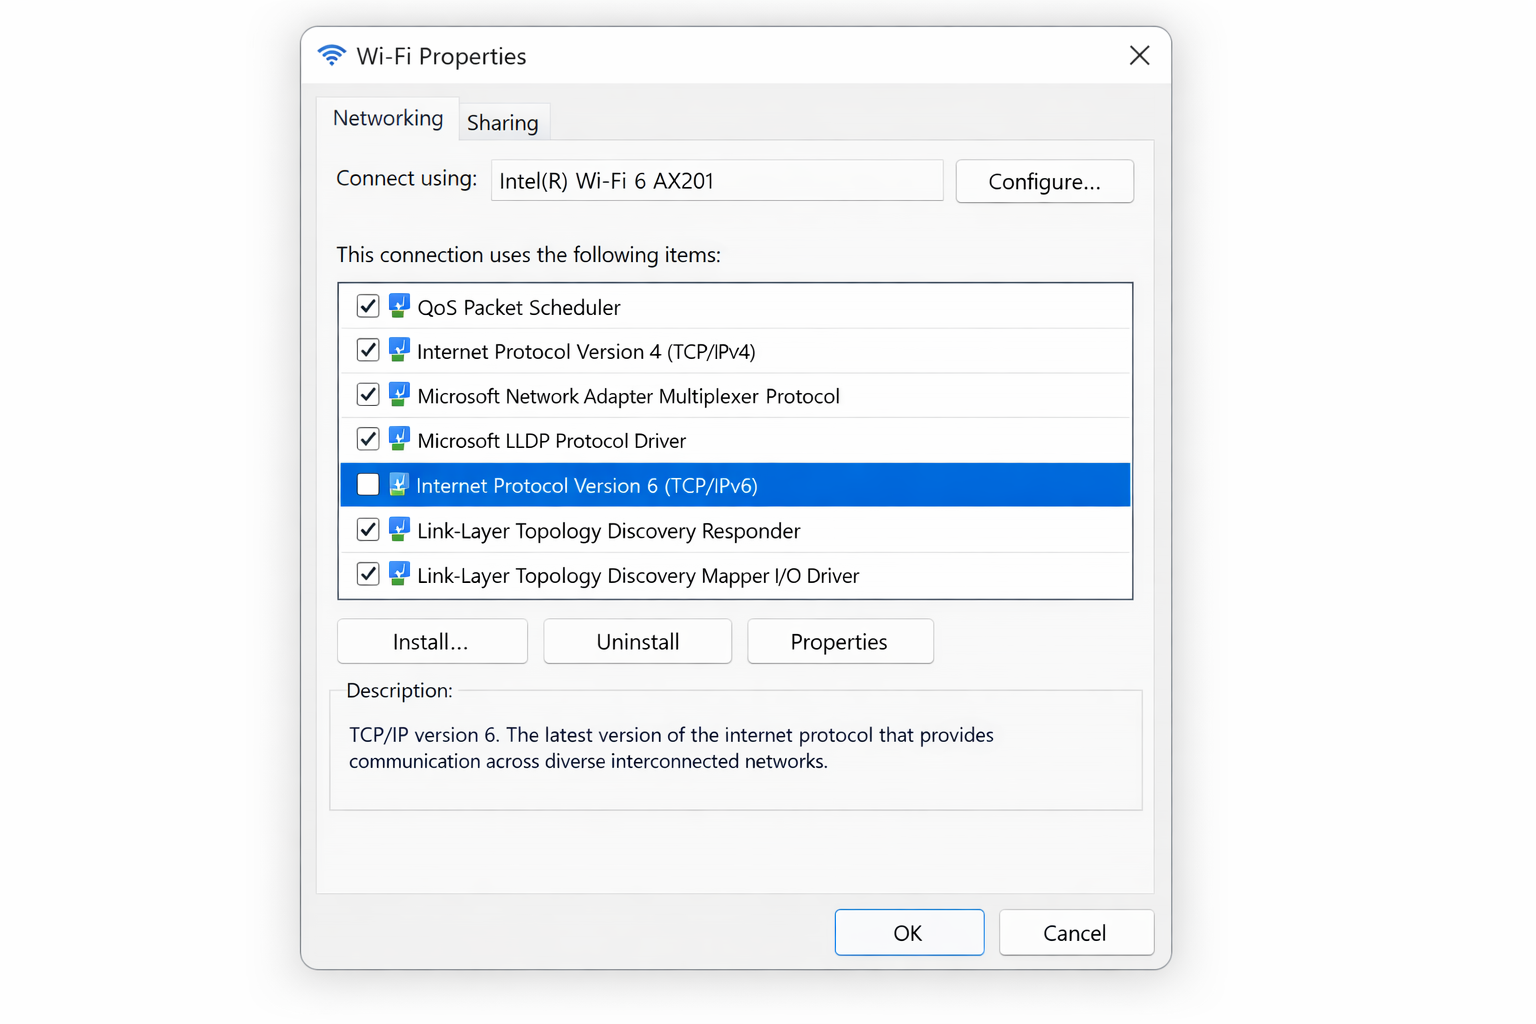
- Click OK.
- Disconnect and reconnect to the network.
Note: If this fixes the issue, the problem is with your router’s IPv6 configuration. You can leave IPv6 disabled, or log into your router admin page and disable IPv6 there instead to fix it at the source.
Fix #8: Set a Manual DNS Server
Automatic DNS assignment can sometimes fail. Pointing Windows to a reliable public DNS server bypasses the problem entirely.
- Press
Win + R, typencpa.cpl, and press Enter. - Right-click your Wi-Fi adapter and select Properties.
- Double-click Internet Protocol Version 4 (TCP/IPv4).
- Select Use the following DNS server addresses.
- Enter the following:
– Preferred DNS server: 8.8.8.8
– Alternate DNS server: 8.8.4.4
- Click OK, then OK again.
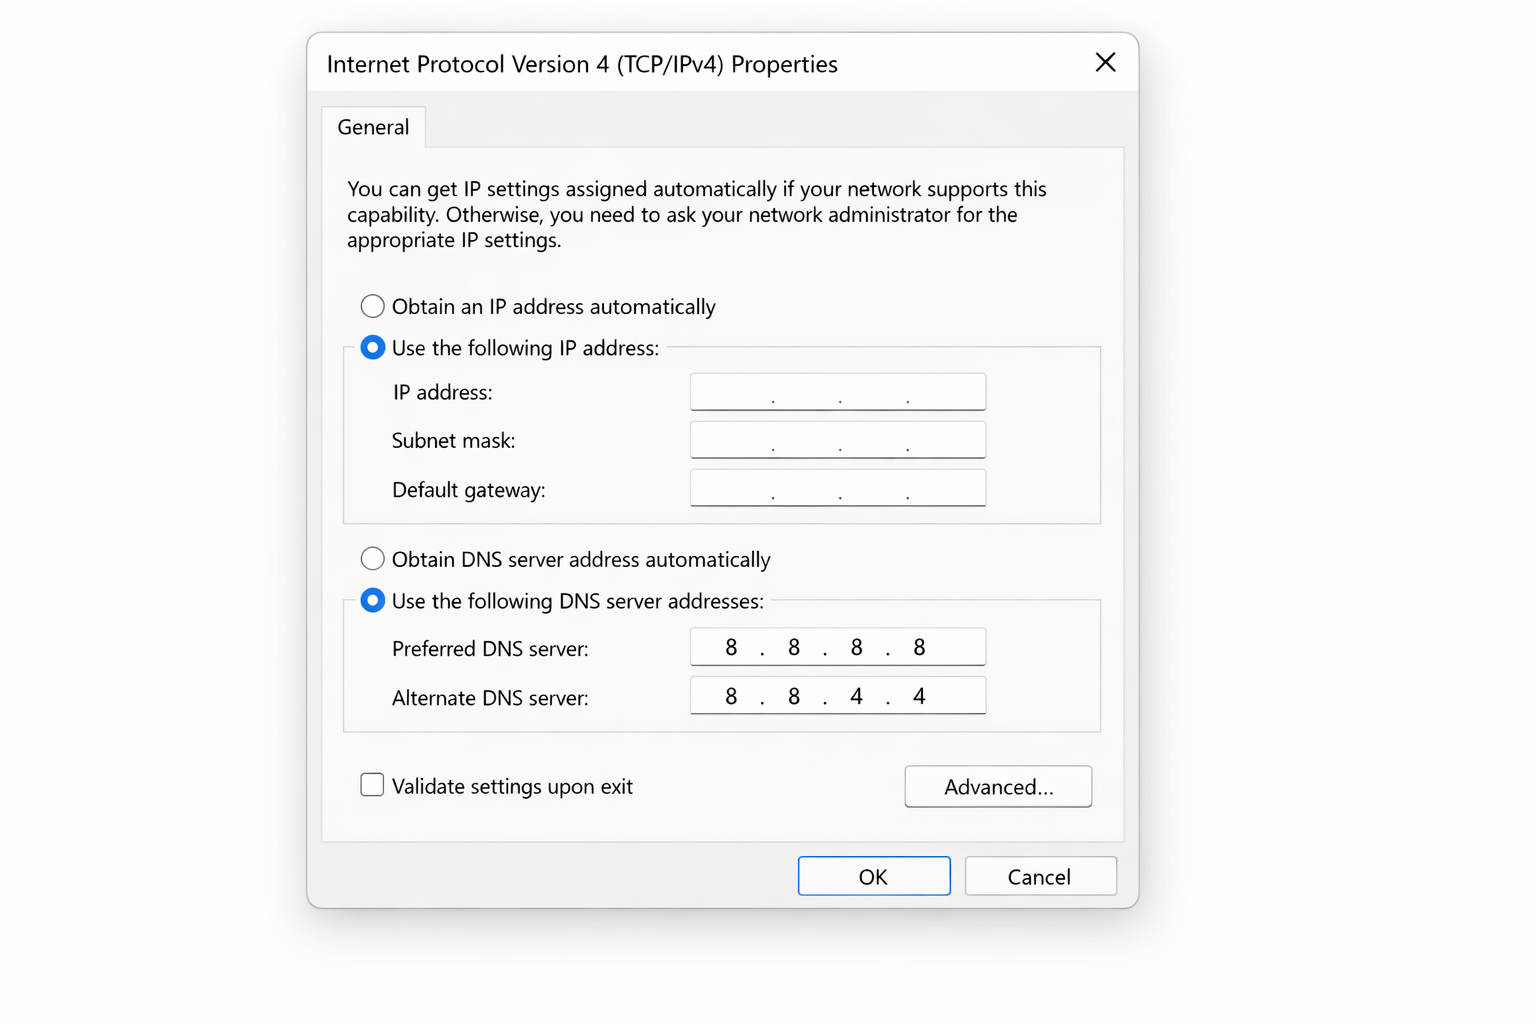
- Reconnect to the network.
Fix #9: Reset Network Settings Completely
This is the nuclear option! It removes all network adapters and resets all networking components back to defaults. Use it when every other fix has failed.
- Open Settings > Network & internet > Advanced network settings.
- Scroll down and click Network reset.
- Read the warning (all saved Wi-Fi passwords and VPN configurations will be deleted).
- Click Reset now.
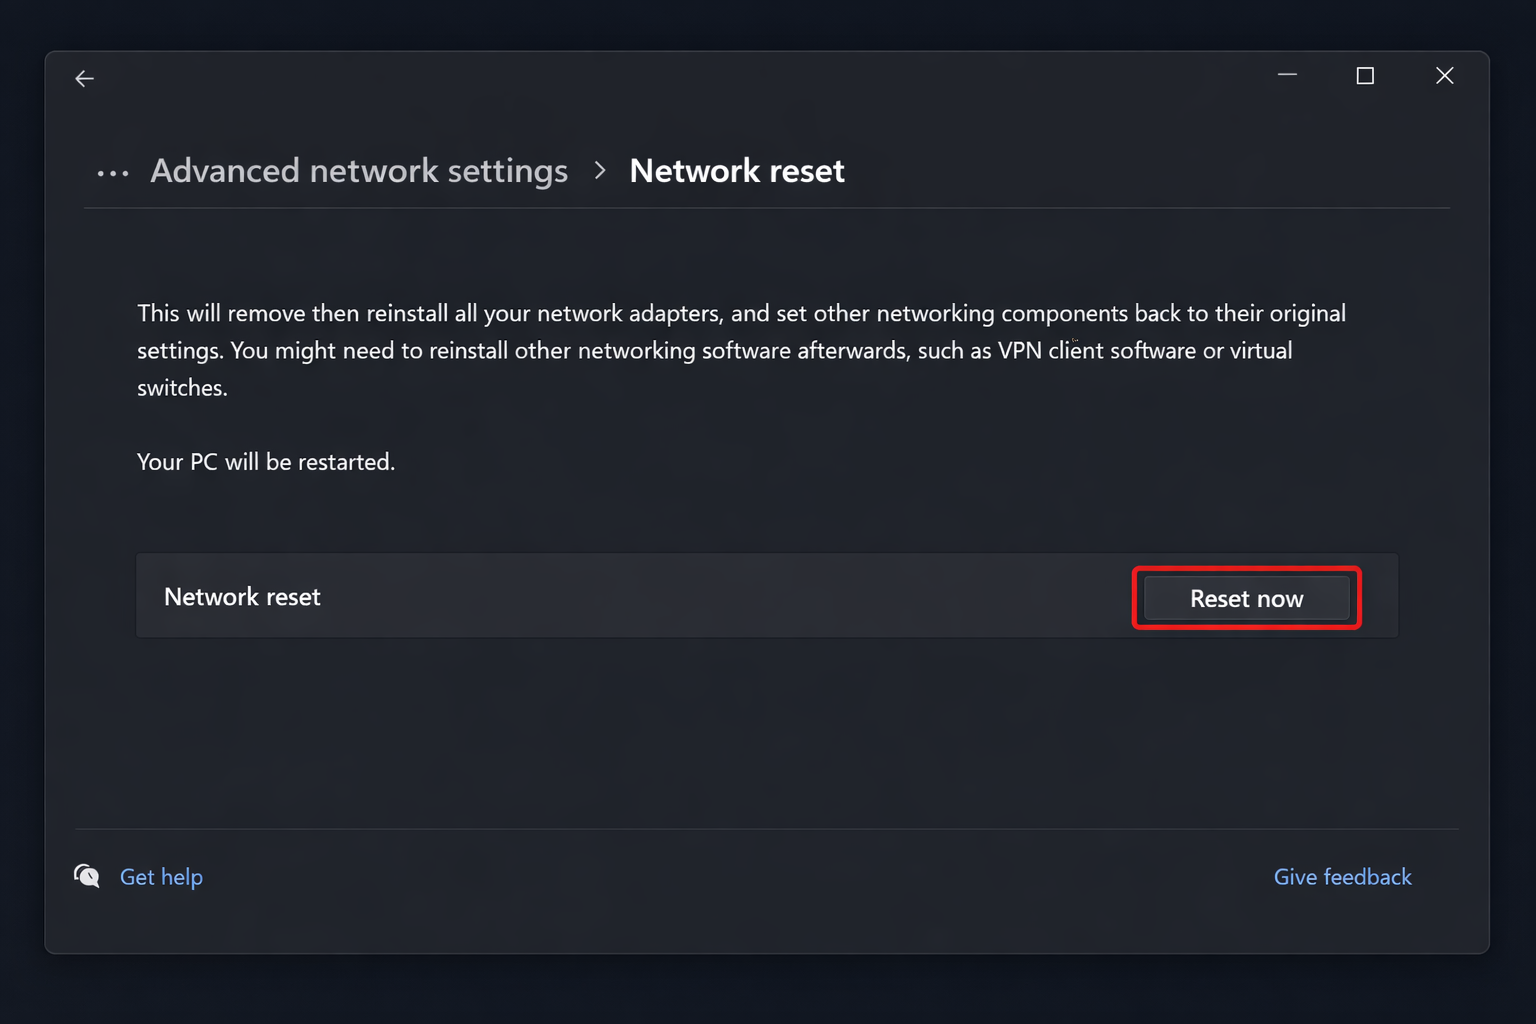
- Click Yes to confirm.
- Windows will restart automatically in five minutes (or immediately after you click Restart now).
- After reboot, reconnect to your Wi-Fi network and re-enter the password.
Tips and Troubleshooting
The error comes back after every restart
Your network profile is being corrupted repeatedly. Open Device Manager, right-click your wireless adapter, select Uninstall device, check Delete the driver software for this device, and restart. Windows will reinstall the driver fresh on reboot.
“Roll Back Driver” is grayed out
There is only one driver version installed. Download the latest driver directly from your laptop manufacturer’s support page (Dell, HP, Lenovo, ASUS, etc.) or from Intel/Qualcomm/Broadcom’s site, then run the installer manually.
The error only appears on one specific network
The problem is almost certainly a corrupted profile for that network. Use Fix #1 (Forget and Reconnect) as it is the targeted solution for single-network failures.
Nothing works and you see a yellow triangle on the adapter in Device Manager
A yellow exclamation mark means a hardware or driver fault. Try a full driver uninstall (described above). If the triangle persists after reinstalling the driver, the Wi-Fi adapter may be failing, then consider a USB Wi-Fi adapter as a temporary workaround while you investigate further.
Ethernet works but Wi-Fi doesn’t
This confirms the issue is isolated to the wireless adapter or its driver. Focus on Fixes #6 and #9, and check whether your router’s 2.4 GHz and 5 GHz bands both fail or just one.
Error appeared after the April 2026 Patch Tuesday update (KB5083769)
The April 2026 cumulative update includes changes to Settings and File Explorer that may indirectly affect networking behavior on some systems. If the error started after installing KB5083769, try rolling back the update via Settings > Windows Update > Update history > Uninstall updates, or check Microsoft’s known issues page for your Windows 11 version for any posted workarounds.
Wrapping Up
Forgetting the network (Fix #1) clears this error for most people within 30 seconds so try that first before anything else. If the error keeps coming back after reboots, a driver reinstall (Fix #6) is usually the permanent solution.
Persistent failures that survive a full network reset are worth investigating as potential hardware issues or, less commonly, signs of malware interfering with network components before running a full scan with Windows Defender. First run sfc /scannow in an elevated Command Prompt to repair any corrupted system files that could be contributing to the problem.