Microsoft Outlook’s 0x8004010f error usually appears when you’re trying to send or receive an email. The error prevents you from performing your intended action. If the issue doesn’t go away on its own, and you have difficulties using your email client, we have a few solutions to help you out.
Some reasons Outlook fails to send and receive emails and displays the above error are that the app’s user profile is corrupted, the data file is damaged, your computer’s antivirus or firewall is interfering with the app, and more.
1. Repair the Damaged Outlook Data File
When you get a “0x8004010F: Outlook data file cannot be accessed” error, the first fix to apply is to try to repair the damaged Outlook data file. This file being faulty is probably why you’ve received the above error. Fixing the file should resolve your problem.
Outlook includes a data file repair tool that you can use to automatically repair your current account’s data file.
- Open Outlook on your computer.
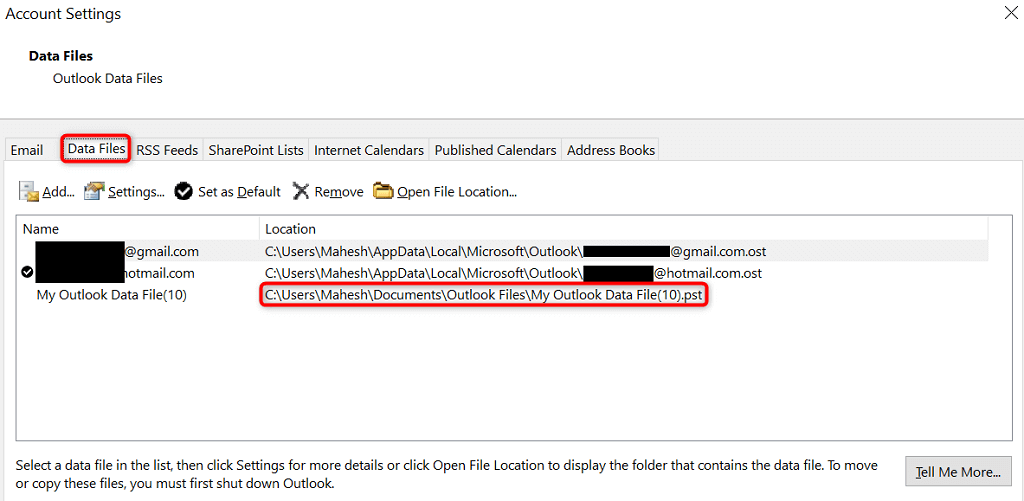
- Select File in the top-left corner and choose Account Settings > Account Settings.
- Open the Data Files tab and note your data file’s location.
- Quit Outlook.
- Open the Start menu, find Outlook, and select Open file location.
- Right-click Outlook again and select Open file location.
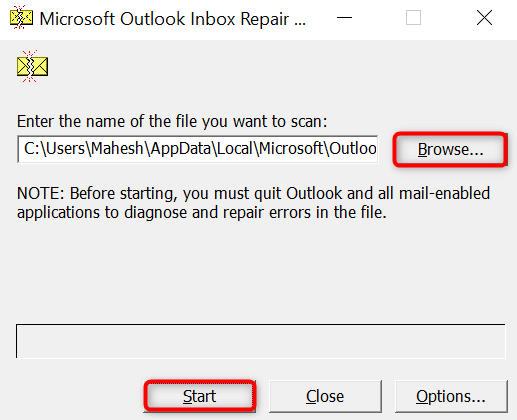
- Find and run the file named SCANPST.exe in the open folder.
- Select Browse in the open tool, navigate to the path you noted above, and select your data file.
- Choose Start in the tool to begin repairing the data file.
- Launch Outlook when you’ve fixed the file.
2. Create and Use a New Outlook Profile
If fixing the data file didn’t resolve your problem, your current Outlook user profile might be corrupted. This is the most common reason you get a 0x8004010f error in the app. In this case, you can create and use a new profile in Outlook to fix your issue.
You don’t lose your emails as Outlook re-syncs your account items when you add your account. Here is the three-step procedure on how to do that.
Step 1: Find the Current Outlook Data File Location
- Open Outlook and navigate to File > Account Settings > Account Settings.
- Access the Data Files tab and note your data file’s path.
Step 2: Create a New Outlook Profile
- Open the Start menu, find Control Panel, and launch the utility.
- Select User Accounts in Control Panel.
- Choose Mail (Microsoft Outlook) on the following page.
- Select Show Profiles to view the available profiles.
- Select Add on the following screen to make a new profile.
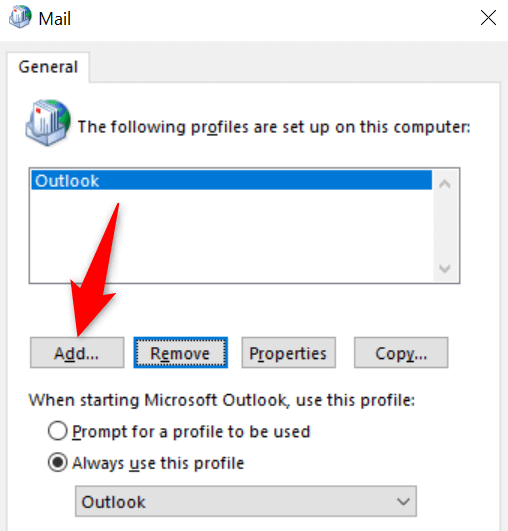
- Type a name for your new profile and select OK. You can use any name for your profile.
- Select Manual setup or additional server types on the open window.
- Specify your email account details.
- Select Browse in the Deliver new messages to section and choose your Outlook data file.
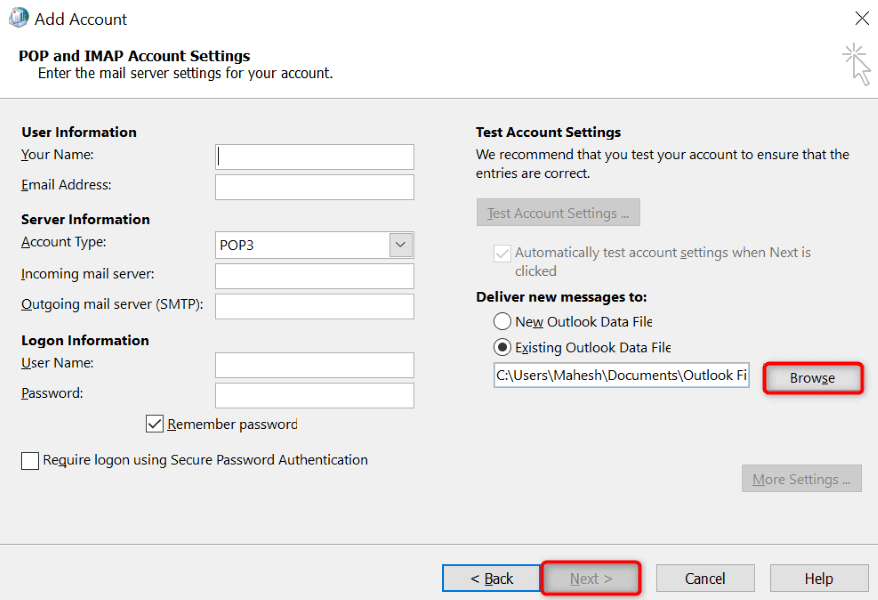
- Select Next and finish the email configuration process.
Step 3: Set the New Profile as the Default
To ensure Outlook automatically loads your newly-created profile when you launch the app, follow these steps:
- Open Control Panel on your PC.
- Navigate to User Accounts > Mail (Microsoft Outlook).
- Select Show Profiles on the open window.
- Select the Always use this profile drop-down menu and choose your newly-created profile.
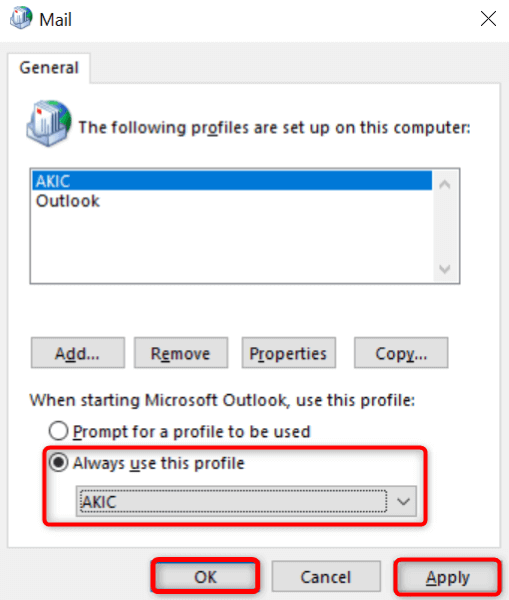
- Choose Apply followed by OK to save your changes.
3. Temporarily Turn Off Your Antivirus and Firewall
Your computer’s antivirus or firewall program might be causing interference with Outlook. This sometimes prevents you from sending and receiving new emails. In this case, temporarily turn off both those items and see if your issue is fixed.
How you turn off your antivirus and firewall depends on the programs you’re using. You’ll follow the following steps if you’re a Microsoft Defender Antivirus and Microsoft Defender Firewall user.
Turn Off the Antivirus
- Open the Start menu, find Windows Security, and launch the app.
- Select Virus & threat protection in the app.
- Choose Manage settings in the Virus & threat protection settings section.
- Turn off the Real-time protection toggle.
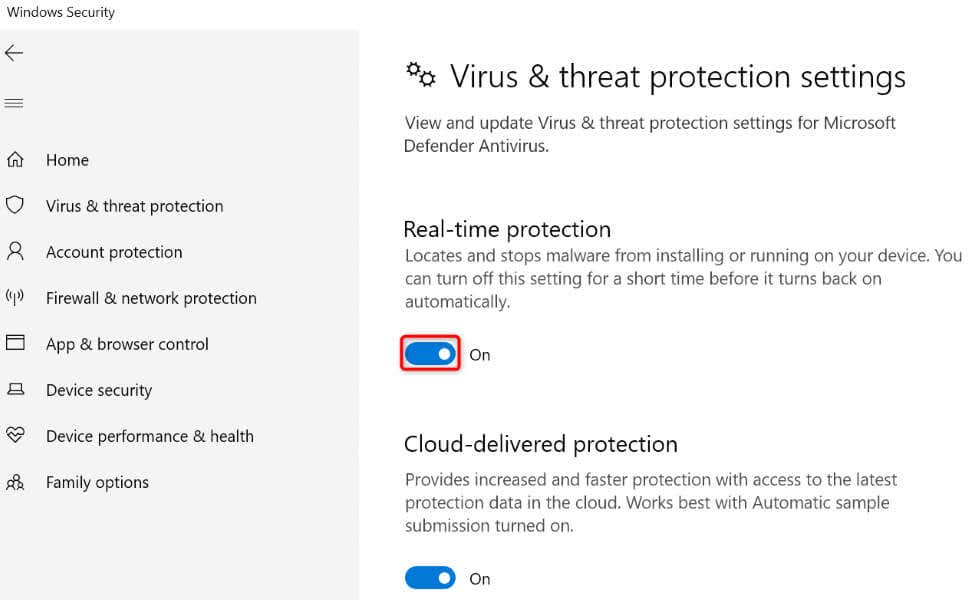
- Select Yes in the User Account Control prompt.
Turn Off the Firewall
- Open the Windows Security app.
- Select Firewall & network protection.
- Select the network that says (active).
- Turn off the Microsoft Defender Firewall toggle.
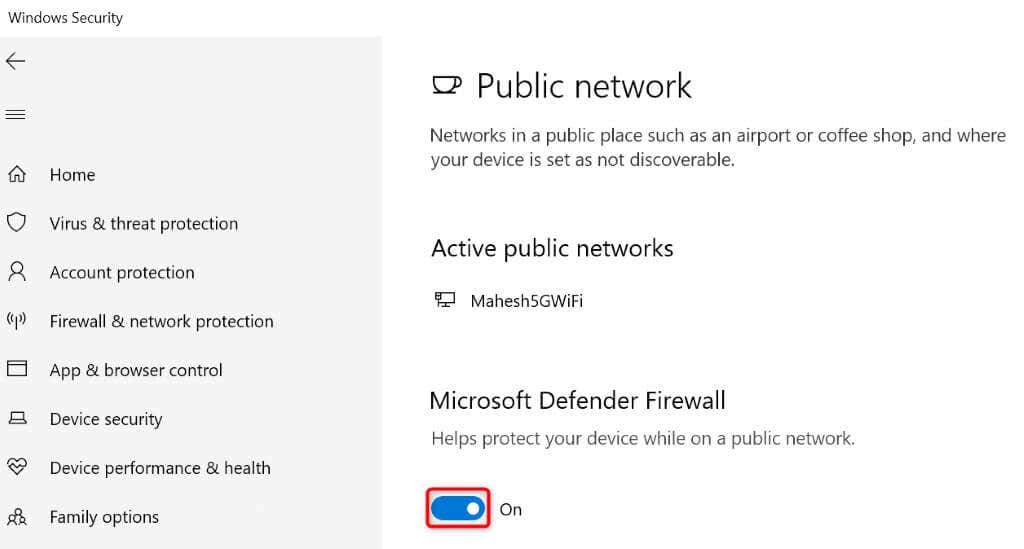
- Select Yes in the User Account Control prompt.
Launch Outlook and try to send or receive your email. Make sure to turn both the antivirus and the firewall back on when you’ve finished your tasks in Outlook. Keeping those items off makes your PC vulnerable to various threats.
4. Update the Offline Address Book
One reason you get the above error is that your Outlook cache is corrupted. Sometimes, this happens due to invalid address book entries. In this case, update Outlook’s offline address book to fix the issue.
- Launch Outlook and select the Send/Receive tab.
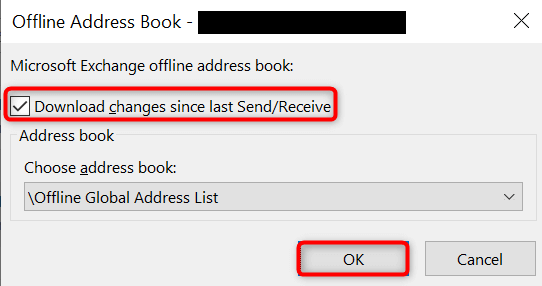
- Choose Send/Receive Groups in the Send & Receive section and select Download Address Book.
- Enable the Download changes since last Send/Receive option and choose OK.
- Quit and relaunch Outlook.
5. Repair Outlook
If you still get the above error, Outlook itself might be faulty. In this case, use Microsoft Office’s built-in repair tool to find and fix issues with your app. This tool helps you repair problems with other Office apps as well.
- Launch Control Panel on your PC.
- Select Uninstall a program.
- Choose your Microsoft Office installation on the list and select Change at the top.
- Choose Yes in the User Account Control prompt.
- Select Quick Repair and choose Repair in the open tool.
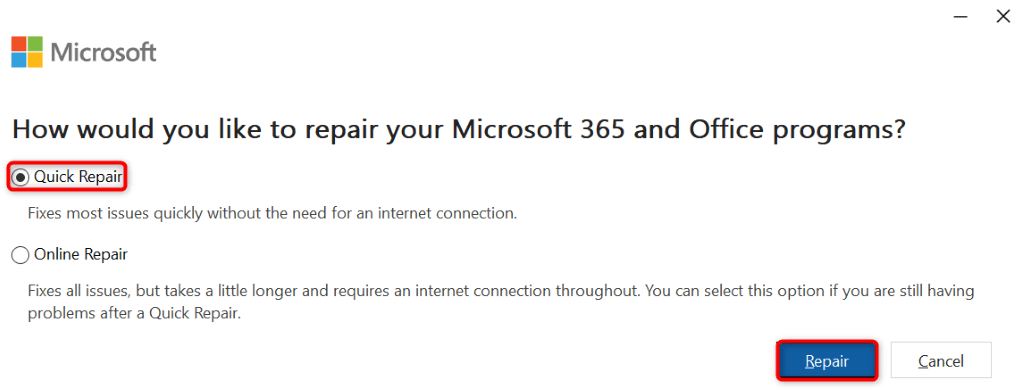
- If the problem persists, use the Online Repair option in the tool.
6. Uninstall and Reinstall Outlook
If nothing works, your last resort is to remove and reinstall Outlook on your PC. Doing so deletes all the app files, some of which might be faulty, and brings new working files.
After re-installing the app, you’ll add your email account to access all your emails.
On Windows 11
- Open Settings by pressing Windows + I.
- Select Apps in the left sidebar and Installed apps on the right pane.
- Find Microsoft Office, select the three dots next to the app, and choose Uninstall.
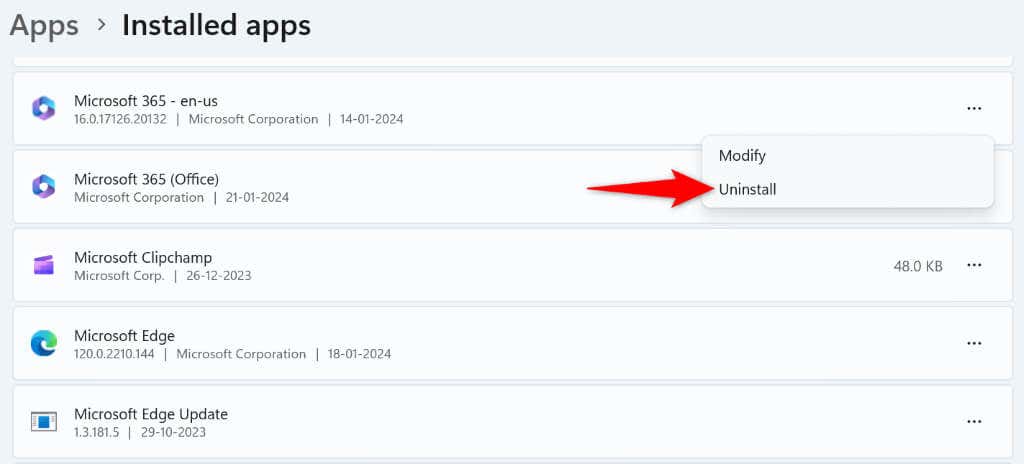
- Select Uninstall in the prompt.
On Windows 10
- Launch Settings using Windows + I.
- Select Apps in Settings.
- Find Outlook, select the app, and choose Uninstall.
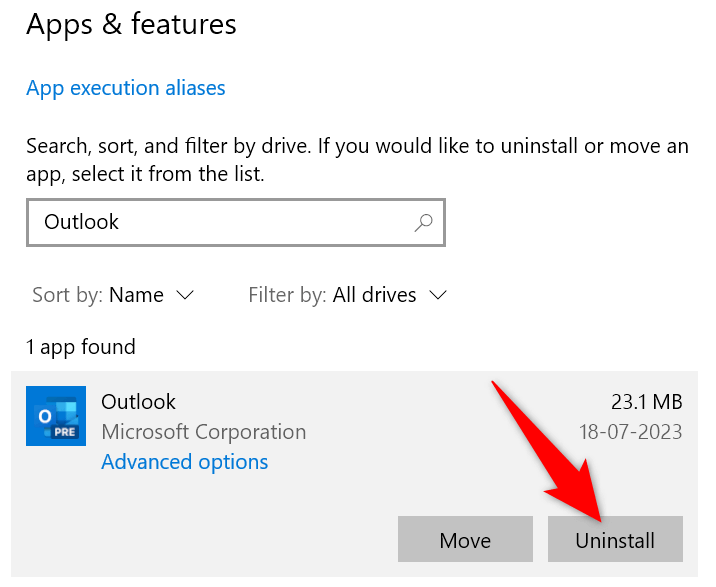
- Select Uninstall in the prompt.
Use your Microsoft Office installer to reinstall Outlook on your PC.
Resolve the Outlook Error Preventing You From Sending and Receiving Emails
Outlook’s 0x8004010f error prevents you from working on your emails and disrupts your workflow. If the error persists and you can’t find a way to fix it, the methods above will help you resolve the problem. These methods resolve issues with the items that can cause Outlook to display the above error, helping you restore your email environment. Happy emailing!
Related Posts
Mahesh has been obsessed with technology since he got his first gadget a decade or so ago. Over the last few years, he’s written a number of tech articles on various online publications including but not limited to MakeTechEasier and Android AppStorm. Read Mahesh’s Full Bio
