

Your C: drive, or a second drive, is not showing in File Explorer in Windows 11, and your files seem to have vanished with it. If Windows booted normally from this PC’s own drive, your C: drive almost certainly still exists, because Windows runs from it, so the most likely causes are a view setting, a stuck Explorer process, a hidden-drive policy, or a missing drive letter, not a dead disk.
Quick Diagnosis: Is the Drive Hidden or Actually Missing?
Run these three checks before you change anything. They tell you which fix to jump to.
- Press
Win + Eto open File Explorer. - Click in the address bar, type
C:\(or the letter of your missing drive, likeD:\), and pressEnter. - If the drive’s folders open, the drive is fine. It’s only hidden from the view. Start with Fix #1 and work down to Fix #5.
- If you see “Windows cannot find ‘D:\’. Make sure you typed the name correctly, and then try again.”, the drive has no letter, or Windows can’t see it. Go to the next step.
- Right-click Start and select Disk Management.
- Find your drive in the bottom half of the window. Read its status label, then use the table below.

| What you see | Likely cause | Go to |
|---|---|---|
C:\ opens from the address bar but isn’t listed | Explorer opens to Home, or the navigation pane is collapsed | Fix #1 |
| Drive was there an hour ago, now gone | Explorer process glitch | Fix #2 |
| Drives listed but no letters shown, so you can’t tell which one is C: | Folder Options setting (labels only) | Fix #3 |
| Volume shows Healthy in Disk Management with no letter | Drive letter removed or never assigned | Fix #4 |
| Volume has a letter in Disk Management but Explorer hides it | Group Policy or NoDrives registry value | Fix #5 |
| Drive vanished right after a Windows update | Storage controller driver changed | Fix #6 |
| Drive has a letter but throws errors when opened | File-system corruption | Fix #7 |
| Disk shows Offline, Not Initialized, Unallocated, or RAW | Disk-level or hardware problem | Fix #8 |
| Disk doesn’t appear in Disk Management at all | Cable, power, enclosure, or failed drive | Fix #8 |
Warning: Never change, remove, or reassign the drive letter of your C: system drive in Disk Management. Windows, your apps, and your user profile depend on that letter. Changing it can leave the PC unbootable. Every Disk Management step here applies to secondary drives only.
Fixes, From Least to Most Invasive
These fixes start with the safest checks and move toward ones that change system settings or touch the disk. Fixes #1–#3 change nothing on your disks. Fixes #4–#7 need administrator rights, and Fix #8 covers disk-level and hardware problems. Fixes #1–#3 and #5 apply to C: and every other drive. Fix #4 and the disk-level steps in Fix #8 are for secondary, external, or new disks only, never the C: volume.
Fix #1: Open This PC and Set File Explorer to Start There
Symptoms:
- File Explorer opens to Home with recent files and Quick access, and no drives listed
- The left sidebar is missing, or This PC isn’t in it
Why it happens: Windows 11 opens File Explorer to Home by default, and Home doesn’t list your drives. This PC does. If the navigation pane is also turned off, it can look like your drives are gone. This fix only helps when the drive is fine and just out of view, which is the case if the address bar test above opened it. If the drive isn’t listed under This PC either, move on to the later fixes.
- Press
Win + Eto open File Explorer. - Click This PC in the left navigation pane.
- Look under Devices and drives for Local Disk (C:) and your other drives.
If the left sidebar is missing entirely:
- Click View in the File Explorer toolbar.
- Hover over Show.
- Click Navigation pane so it has a check mark.
If the sidebar is visible but This PC isn’t in it:
- Right-click an empty spot in the navigation pane.
- Select Show all folders.
- As a shortcut, you can also type
shell:MyComputerFolderin the address bar and pressEnterto open This PC directly.
To make File Explorer always open to This PC:
- In File Explorer, click the See more (…) button in the toolbar.
- Select Options.
- On the General tab, open the Open File Explorer to dropdown.
- Select This PC.
- Click Apply, then OK.
Check it worked: Close File Explorer and press Win + E again. It should open straight to This PC with your drives listed.
Fix #2: Restart Windows Explorer From Task Manager
Symptoms:
- A drive was visible earlier and disappeared with no changes on your part
- A USB drive you just plugged in doesn’t appear, even though Windows played the connect sound
- The taskbar or File Explorer feels sluggish or frozen
Why it happens: The Windows Explorer process (explorer.exe) runs both File Explorer and the taskbar. After long uptime, an update, or a driver change, it can stop refreshing the drive list. Restarting it rebuilds the view without rebooting.
- Press
Ctrl + Shift + Escto open Task Manager. - Click Processes in the left sidebar.
- Find Windows Explorer under Apps or Windows processes.
- Right-click Windows Explorer and select Restart.
Your taskbar and desktop icons will vanish for a second or two, then come back. That’s normal.
If Task Manager won’t cooperate, use Command Prompt instead:
- Press
Win + R, typecmd, and pressEnter. - Run
taskkill /f /im explorer.exe. - Run
start explorer.exe.
Check it worked: Press Win + E, click This PC, and confirm the drive is back. If it still isn’t there, a full restart is worth one try before Fix #3.
Fix #3: Turn On Drive Letters in Folder Options
Symptoms:
- Drives appear as “Local Disk” or “New Volume” with no letter in brackets
- You can’t tell which drive is C: and which is D:
- You think C: is missing because nothing is labeled “C:”
Why it happens: A Folder Options setting can hide drive letters next to drive names. It’s often switched off by tweaking tools or customization apps. This setting only changes how drives are labeled. It doesn’t hide or remove a drive, so if a drive is truly missing from This PC, this fix won’t bring it back. Use it when your drives are listed but you can’t tell which one is C:.
- Open File Explorer and click See more (…) in the toolbar.
- Select Options.
- Click the View tab.
- In Advanced settings, scroll down to Show drive letters.
- Tick the Show drive letters check box.
- Click Apply, then OK.
While you’re on this tab, also check Hide empty drives. When it’s ticked, an empty card reader slot or blank USB stick won’t appear in This PC. Untick it if your missing drive is new or empty.
Check it worked: Open This PC. Each drive should now show a letter, such as Local Disk (C:).
Fix #4: Assign a Letter to a Secondary Drive in Disk Management
Warning: Do this only for a secondary drive (D:, E:, and so on). Never change, remove, or add paths to the volume currently assigned C:. If the C: volume is the only one without a visible letter in File Explorer, skip this fix. Your problem is a view or policy setting (Fixes #1, #3, or #5).
Symptoms:
- The address bar test returns “Windows cannot find ‘D:\'”
- Disk Management shows the volume as Healthy but with no letter in its box
- A drive you reconnected, or one from another PC, no longer shows up
Why it happens: File Explorer lists volumes under This PC by drive letter. A volume with no letter won’t appear there, unless it’s mounted to an empty NTFS folder, in which case you reach it through that folder. System partitions such as EFI and Recovery are hidden on purpose. Letters can be dropped when you move a drive between PCs, swap a USB enclosure, or when a cloning tool or update reshuffles partitions.
- Right-click Start and select Disk Management. You can also press
Win + R, typediskmgmt.msc, and pressEnter. - In the bottom pane, find the healthy volume with no letter. It’s usually labeled with a size and file system like NTFS but no “(D:)”.
- Right-click the volume’s box itself, not the Disk 1 label on the left.
- Select Change Drive Letter and Paths.
- Click Add.
- Select Assign the following drive letter and pick a letter from the dropdown. Letters later in the alphabet, such as
MorS, avoid clashes with USB sticks. - Click OK.
Don’t assign letters to small partitions labeled EFI System Partition, Recovery Partition, or OEM Partition. They’re meant to stay hidden, and giving them a letter just adds clutter (or invites accidental deletion).
If Change Drive Letter and Paths is greyed out, the volume is probably one of those system partitions, or the disk is offline. See Fix #8.
Check it worked: Within a few seconds, the drive should appear in This PC with its new letter. For a deeper look at the tool, see our Disk Management guide.
Fix #5: Remove a Hidden-Drive Policy (Group Policy or NoDrives Registry Value)
Symptoms:
- Disk Management shows the drive with a letter, but File Explorer doesn’t list it
- Typing the letter in the address bar opens it anyway (hidden), or shows “This operation has been cancelled due to restrictions in effect on this computer. Please contact your system administrator.” (blocked)
- The PC used to belong to an employer or school, or someone set up parental restrictions
Why it happens: Windows has policies that hide chosen drive letters from File Explorer, and a second set that blocks access to them. On Pro and Enterprise, they’re set in Group Policy. On Home, the same settings live as registry values. Both are common on hand-me-down work PCs and shared family computers.
If your PC is still managed by a workplace or school, these settings will come back after you remove them. In that case, talk to your IT department rather than fighting the policy.
On Windows 11 Pro or Enterprise: Group Policy
- Press
Win + R, typegpedit.msc, and pressEnter. Approve the admin prompt. - Go to User Configuration > Administrative Templates > Windows Components > File Explorer.
- In the right pane, double-click Hide these specified drives in My Computer.
- Select Not Configured, then click OK.
- Double-click Prevent access to drives from My Computer.
- Select Not Configured, then click OK.
- Right-click Start, select Terminal (Admin), and run
gpupdate /forceto apply the change. Running it in Terminal lets you see whether the policy refresh completed or reported an error.
On Windows 11 Home: the NoDrives registry value
Home edition doesn’t include gpedit.msc. If you try it, you’ll see “Windows cannot find ‘gpedit.msc’. Make sure you typed the name correctly, and then try again.” Use the registry instead.
- Press
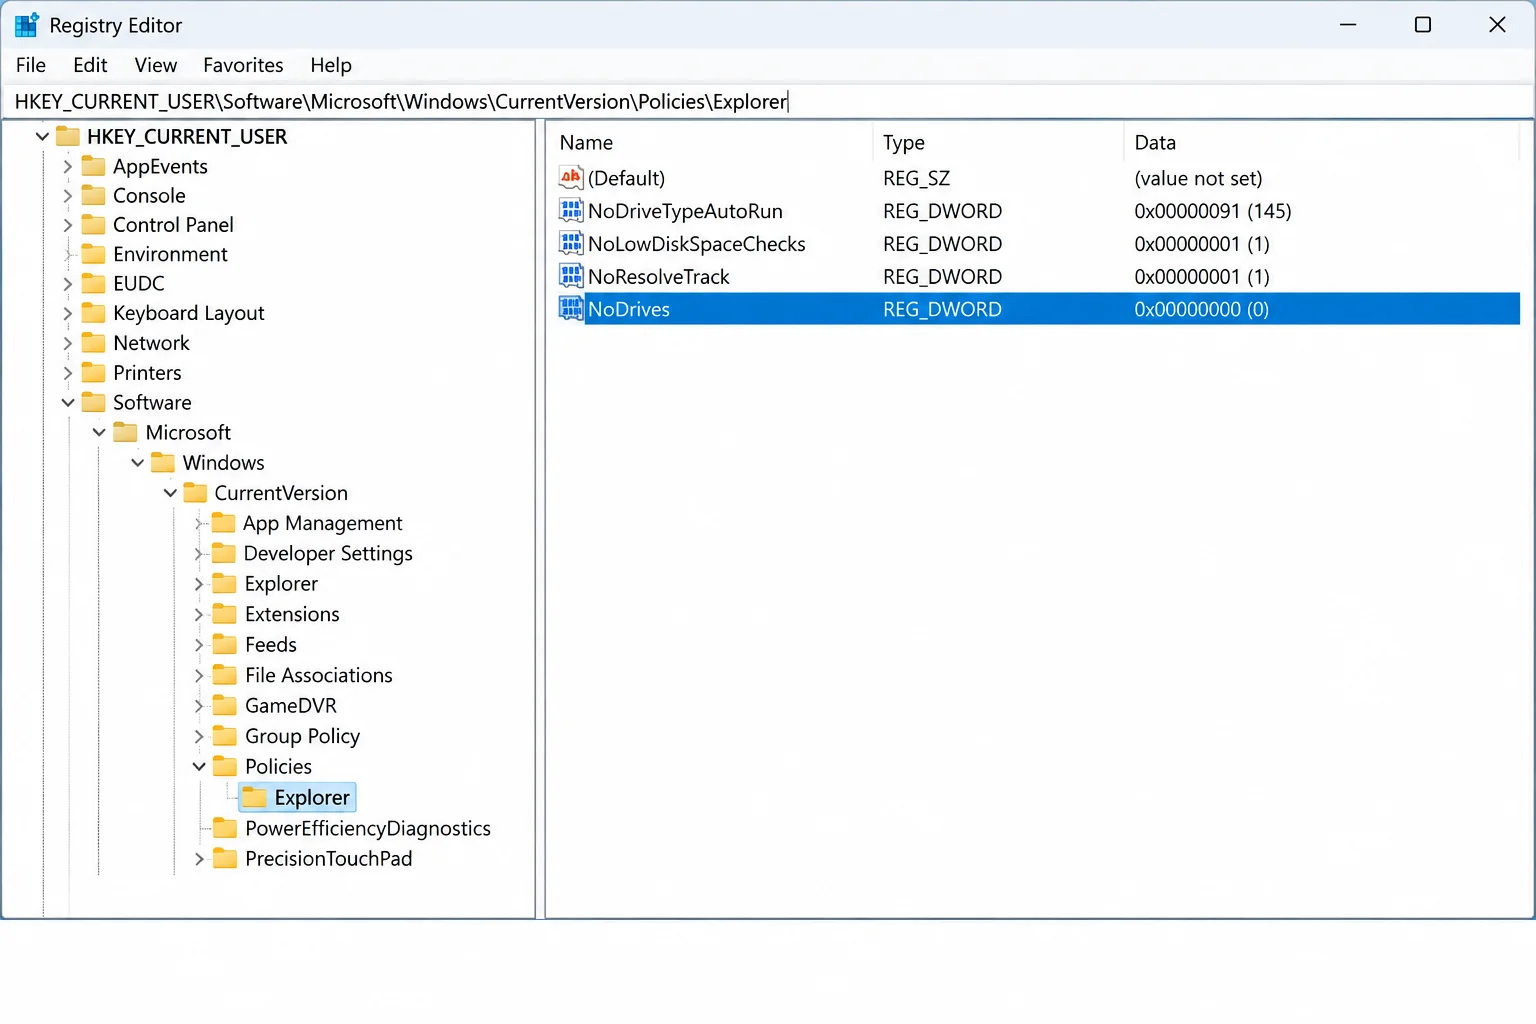
Win + R, typeregedit, and pressEnter. Approve the admin prompt. - Paste this path into the Registry Editor address bar and press
Enter:HKEY_CURRENT_USER\Software\Microsoft\Windows\CurrentVersion\Policies\Explorer - Click File > Export and save a backup of the key to your desktop.
- In the right pane, look for a value named NoDrives.
- Right-click NoDrives and select Delete, then click Yes. Setting its value data to
0works too. - If you see NoViewOnDrive, delete it as well. That’s the one that blocks access.
- Repeat steps 2–6 at the machine-wide location:
HKEY_LOCAL_MACHINE\Software\Microsoft\Windows\CurrentVersion\Policies\Explorer - Restart Windows Explorer (Fix #2) or sign out and back in.
Prefer the command line? These do the same check from an admin Command Prompt. Run the four reg query lines first:
reg query "HKCU\Software\Microsoft\Windows\CurrentVersion\Policies\Explorer" /v NoDrives
reg query "HKLM\Software\Microsoft\Windows\CurrentVersion\Policies\Explorer" /v NoDrives
reg query "HKCU\Software\Microsoft\Windows\CurrentVersion\Policies\Explorer" /v NoViewOnDrive
reg query "HKLM\Software\Microsoft\Windows\CurrentVersion\Policies\Explorer" /v NoViewOnDrive
If a reg query line returns “ERROR: The system was unable to find the specified registry key or value.”, that location isn’t hiding anything. For each line that does return a value, run the matching delete command below (deleting a value that doesn’t exist just returns the same error and changes nothing):
reg delete "HKCU\Software\Microsoft\Windows\CurrentVersion\Policies\Explorer" /v NoDrives /f
reg delete "HKLM\Software\Microsoft\Windows\CurrentVersion\Policies\Explorer" /v NoDrives /f
reg delete "HKCU\Software\Microsoft\Windows\CurrentVersion\Policies\Explorer" /v NoViewOnDrive /f
reg delete "HKLM\Software\Microsoft\Windows\CurrentVersion\Policies\Explorer" /v NoViewOnDrive /f
Then restart Windows Explorer (Fix #2) or sign out and back in.
How NoDrives decides which drives to hide: It’s a bitmask, where each letter has its own number and the numbers add up. A = 1, B = 2, C = 4, D = 8, E = 16, F = 32, and so on, doubling each letter. A decimal value of 4 hides only C:. A value of 12 hides C: and D:. A value of 67108863 hides every drive. Microsoft’s guide to hiding drives with Group Policy lists the same per-letter values. If you need to keep some drives hidden on purpose, recalculate the number instead of deleting the value.
Check it worked: Open This PC. The drive should be listed, and the address bar test should no longer show the “restrictions in effect” message.
Fix #6: Update, Roll Back, or Reinstall the Storage Controller Driver
Symptoms:
- The drive disappeared right after a Windows update or a driver update
- Disk Management doesn’t list the disk, or lists it intermittently
- Device Manager shows a yellow warning triangle next to a controller or disk
Why it happens: The storage controller driver is the software that lets Windows talk to your SATA, NVMe, or USB drives. If a drive vanished right after an update, a changed or incompatible driver is one possible cause. Only work through this fix when the timing fits and Disk Management doesn’t list the disk. On PCs that use Intel Rapid Storage Technology (RST) or VMD, get storage drivers from your PC maker rather than swapping them by hand.
- Right-click Start and select Device Manager.
- Expand Storage controllers. NVMe and Intel RST/VMD controllers live here.
- Also expand IDE ATA/ATAPI controllers (SATA AHCI controllers) and Disk drives.
- Look for any entry with a yellow warning icon.
If the problem started after an update, roll back first:
- Right-click the controller and select Properties.
- Open the Driver tab.
- Click Roll Back Driver. If it’s greyed out, there’s no previous version saved, so move on to updating.
- Pick a reason, click Yes, and restart the PC.
To update the driver:
- Right-click the controller and select Update driver.
- Select Search automatically for drivers.
- Restart if prompted.
Windows’ built-in search often finds nothing new. Your PC or motherboard maker’s support page is the better source for storage drivers.
Caution: Don’t uninstall anything under Storage controllers or IDE ATA/ATAPI controllers. One controller often runs your C: drive and your other drives at the same time, so removing it can stop Windows from booting, even if you’re only trying to fix a secondary drive. For controllers, stick to Roll Back or Update, and use your PC or motherboard maker’s driver package and instructions.
To reinstall the device entry for an external USB drive only:
- Before you start, create a restore point (search Create a restore point in Start) or have a Windows recovery USB on hand.
- Expand Disk drives and right-click the entry for that specific USB disk, not a controller.
- Select Uninstall device, then click Uninstall. Don’t tick the option to delete the driver software.
- Unplug the drive, plug it back in, or click Action > Scan for hardware changes.
If the drive vanished after a cumulative update and the driver steps don’t help, you can remove the update in Settings > Windows Update > Update history > Uninstall updates. Back up your files and create a restore point first, and keep in mind that removing an update also removes its security fixes. Reinstall it, or let Windows Update offer a newer one, once your drive is back.
Check it worked: Open Disk Management. The disk should be listed with a status of Online and its volume marked Healthy. Then check This PC.
Fix #7: Run CHKDSK to Repair File-System Errors
Symptoms:
- The drive shows in Disk Management with a letter, but File Explorer hangs or errors when you open it
- You see “The file or directory is corrupted and unreadable.”
- The drive was unplugged without ejecting, or the PC lost power
Why it happens: When the file system’s index gets damaged, Windows may refuse to mount the volume cleanly. CHKDSK scans the file system and repairs the damage.
Before you run CHKDSK: Skip this fix if the drive clicks or grinds, keeps disconnecting and reconnecting, or shows a warning under Drive health or in
Get-PhysicalDisk. On a failing disk, a scan adds stress, and its repairs can make professional data recovery harder. In that case, copy off what you can and go straight to Fix #8. Run CHKDSK only on a drive that seems physically healthy.
Back up anything you can still reach on the drive first. An external hard drive or a cloud folder works fine for a quick copy.
- Right-click Start and select Terminal (Admin). Approve the admin prompt.
- Run this command, replacing
D:with your drive letter:
chkdsk D: /f- If Windows asks to dismount the volume, type
Yand pressEnter. Close any open files on that drive first. - Wait for the scan to finish and read the summary. “Windows has scanned the file system and found no problems.” means the file system wasn’t the cause.
If you’re checking C:, Windows can’t lock the drive it’s running from. You’ll see: “Chkdsk cannot run because the volume is in use by another process. Would you like to schedule this volume to be checked the next time the system restarts? (Y/N)”. Type Y, press Enter, and restart. The scan runs before Windows loads.
Use chkdsk D: /r only if /f finds problems it can’t fix. It also scans for bad sectors and can take hours on a large hard drive.
If you see “The type of the file system is RAW. CHKDSK is not available for RAW drives.”, stop here and go to Fix #8. CHKDSK can’t help with that one.
Check it worked: Open This PC and try opening the drive. Folders should load without errors.
Fix #8: Check Disk Status, Cables, and BIOS/UEFI
Everything above assumes Windows can see the disk. Disk Management’s status labels tell you when it can’t, or when the disk structure itself is broken. These are the states that mean “stop tweaking settings.”
| Disk Management shows | What it means | Safe next step |
|---|---|---|
| Offline | Windows sees the disk but has switched it off | Right-click the Disk 1 label on the left > Online |
| “The disk is offline because of policy set by an administrator” | Windows’ SAN policy kept a newly attached disk offline | Same fix: right-click the disk label > Online |
| Not Initialized / Unknown | No partition table Windows can read | If the disk is brand new, initialize it as GPT. If it held data, don’t initialize. Recover data first |
| Unallocated (black bar) | No volumes on the disk | If you know it’s empty, right-click > New Simple Volume. If it held data, don’t create a volume. Recover data first |
| RAW | A volume exists, but its file system is unreadable | Don’t format. Copy what you can with recovery tools, or contact a recovery service |
| Disk not listed at all | Windows can’t detect the hardware | Check cables, ports, power, and BIOS/UEFI |
When you open a RAW drive, Windows offers: “You need to format the disk in drive E: before you can use it. Do you want to format it?” Click Cancel. Formatting won’t fix the drive. It wipes the file table your recovery tools need.
If the disk doesn’t appear in Disk Management at all:
- For an external drive, try a different USB port and cable, plugged directly into the PC rather than a hub.
- For a desktop’s internal drive, shut down, unplug the power, and reseat the SATA data and power cables. A cheap replacement SATA cable rules out a bad one.
- Restart and press the key your PC shows at boot (often
F2orDel) to enter BIOS/UEFI. Check whether the drive appears there. - If it doesn’t show in BIOS, Windows can’t fix it. The drive, its enclosure, or the port has failed. If an external drive is a standard SATA drive in a removable enclosure, connecting the bare drive with a SATA-to-USB adapter can show whether the enclosure or the drive is at fault. Many portable drives have the USB connector built into the drive itself, or use hardware encryption, so this test doesn’t apply to them, and opening the case can void the warranty. If the data matters, contact the maker or a recovery service instead.
You can also check drive health in Settings > System > Storage > Advanced storage settings > Disks & volumes. Select a disk, click Properties, and look at Drive health (shown for NVMe drives). A warning there, or clicking and grinding noises from a hard drive, means it’s time to back up and plan an SSD upgrade. For more on external drives, see our guide to an external hard drive not showing up in Windows.
Windows 11 Edition and Version Notes
- Windows 11 Home:
gpedit.mscisn’t included. Use the registry steps in Fix #5. Every other fix works the same. - Windows 11 Pro and Enterprise: Use Group Policy first. If you only delete the registry value, a configured policy will put it back.
- 24H2 and 25H2: These menu paths match both versions. Folder Options is reached through the See more (…) button. The classic ribbon is gone, so pressing
Altwon’t show a Tools menu. - Admin rights: Most steps in Fixes #4–#7, including Group Policy, machine-wide registry changes, driver changes, drive letter changes, and CHKDSK repairs, run with administrator rights. On a standard account, Windows asks for an admin password, or the option isn’t available.
Common Configuration Mistakes
| Mistake | What happens | Do this instead |
|---|---|---|
| Changing the C: drive letter to “fix” it | Windows and apps can’t find their files; the PC may not boot | Never touch C: in Disk Management. Use Fixes #1, #3, and #5 |
| Right-clicking the Disk 1 label to change a letter | Change Drive Letter and Paths isn’t on that menu | Right-click the volume’s box to the right of the label |
Deleting NoDrives only under HKEY_CURRENT_USER | Drive stays hidden because the value also exists under HKEY_LOCAL_MACHINE | Check both locations in Fix #5 |
| Entering a NoDrives value in hexadecimal by mistake | The wrong drives get hidden | Select Decimal in the Edit DWORD dialog before typing the number |
| Assigning a letter to the EFI or Recovery partition | Extra drives appear that you shouldn’t touch | Remove the letter and leave those partitions hidden |
| Initializing or formatting a disk that showed data last week | The file table gets overwritten, making recovery harder | Recover data first, then initialize or format |
Getting Help
If none of the fixes work, gather this information before you post on a forum or call support. It saves a lot of back-and-forth.
Event logs: Press Win + X, select Event Viewer, and open Windows Logs > System. Look for errors or warnings from sources named Disk, Ntfs, volmgr, stornvme, or storahci around the time the drive disappeared. Boot-time CHKDSK results are under Windows Logs > Application with the source Wininit.
Disk details: Run these in Terminal (Admin) and copy the output:
Get-Disk
Get-Volume
Get-PhysicalDisk | Select-Object FriendlyName, MediaType, HealthStatus, OperationalStatus
A HealthStatus of Warning or Unhealthy points to hardware.
Where to ask:
- Microsoft Q&A has community threads on this exact problem, including a reader who couldn’t locate C: after installing Windows (accessed October 7, 2026).
- Microsoft Support for Windows for official help and contact options.
- Your PC or drive maker’s support line, especially if the drive is under warranty.
- A local data recovery service if the drive is RAW or undetected and holds files you can’t lose. Don’t run repair tools on it first.
Prevention Tips
- Eject external drives properly: Use the Safely Remove Hardware icon in the system tray before unplugging. Sudden removal is a common cause of file-system errors and RAW drives.
- Give secondary drives fixed letters: Assign letters later in the alphabet (like
S:for storage) so USB sticks don’t grab them first. - Keep a backup: A scheduled backup to an external drive or cloud storage turns a scary disappearance into a minor annoyance.
- Protect against power loss: A UPS on a desktop prevents the sudden shutdowns that corrupt file systems mid-write.
- Check for policies on second-hand PCs: When you buy or inherit a used business PC, check the
NoDrivesregistry value and Group Policy right away. - Watch drive health: Glance at Drive health in Settings > System > Storage > Advanced storage settings > Disks & volumes every few months.
Frequently Asked Questions
Why did my C: drive disappear from File Explorer?
It almost certainly didn’t disappear. Windows can’t run without its system drive, so if you’re reading this on that PC, C: is there. The usual causes are File Explorer opening to Home instead of This PC (Fix #1), a frozen Explorer process (Fix #2), a hide-drives policy (Fix #5), or drive letters turned off so nothing is labeled C: (Fix #3).
Is it safe to change my C: drive letter in Disk Management?
No. Never change, remove, or reassign the C: letter. Windows, your installed apps, and your user profile all store paths that start with C:\.
Changing it can break apps or leave the PC unbootable. Changing letters is only safe for secondary data drives.
How do I restart File Explorer without restarting my PC?
Press Ctrl + Shift + Esc, find Windows Explorer on the Processes page, right-click it, and select Restart. Your taskbar will flicker and come back within a few seconds.
How do I tell if a drive is hidden by policy versus actually missing?
Type the drive letter (for example D:\) into File Explorer’s address bar. If the folders open, the drive is only hidden. If you get the “restrictions in effect on this computer” message, a policy is blocking it.
If Windows can’t find the drive at all, check Disk Management. A drive listed there with a letter is a policy issue.
A drive with no letter needs Fix #4. A drive that isn’t listed is a hardware or driver problem.
What’s the registry fix for hiding drives on Windows 11 Home?
Open regedit, go to HKEY_CURRENT_USER\Software\Microsoft\Windows\CurrentVersion\Policies\Explorer, and delete the NoDrives value (or set it to 0). Check the same path under HKEY_LOCAL_MACHINE too. Then restart Windows Explorer or sign out.
When is a missing drive a hardware problem instead of a software one?
When Disk Management shows the disk as RAW, Not Initialized on a disk that held data, or doesn’t list it at all. It’s also hardware when the drive doesn’t appear in your BIOS/UEFI setup, or when Get-PhysicalDisk reports Unhealthy. Settings changes won’t fix these.
Will chkdsk delete my files?
CHKDSK doesn’t delete normal, healthy files. It repairs the file system’s index.
Damaged fragments it can’t place back are saved as .chk files in a FOUND.000 folder at the drive’s root. On a failing drive, the scan adds stress, so back up what you can before running /r.
Why did my drive disappear after a Windows update?
A common cause is that the update replaced your storage controller driver or reshuffled drive letters. Try rolling back the driver in Device Manager (Fix #6), then check Disk Management for a missing letter (Fix #4). If neither helps, uninstall the update from Settings > Windows Update > Update history > Uninstall updates.
Wrapping Up
For a “missing” C: drive, start with Fix #1. If File Explorer is just opening to Home, clicking This PC brings everything back. For a missing secondary drive that shows as Healthy in Disk Management with no letter, Fix #4 (assigning a letter) is the one to try. If the drive keeps vanishing, shows up as RAW, or makes clicking noises, stop troubleshooting and copy your data off, because that’s a failing drive. And one more time: leave the C: drive letter alone.
| Step | Action | Applies To |
|---|---|---|
| Fix #1 | Open This PC and set Explorer to open there | C: and all drives |
| Fix #2 | Restart Windows Explorer in Task Manager | All drives |
| Fix #3 | Turn on Show drive letters in Folder Options | All drives |
| Fix #4 | Assign a letter in Disk Management | Secondary drives only, never C: |
| Fix #5 | Clear Group Policy or the NoDrives value | Pro/Enterprise (gpedit), Home (registry) |
| Fix #6 | Roll back or update the storage controller driver | Drives lost after an update |
| Fix #7 | Run chkdsk X: /f | Drives with file-system errors |
| Fix #8 | Bring online, check cables, BIOS, drive health | Offline, RAW, or undetected disks |
Last updated: October 7, 2026 | Applies to File Explorer and Disk Management on Windows 11 24H2 and 25H2