

“Setup is preparing your computer for first use” loops on every reboot when Windows 7 can’t complete its initial configuration, typically after restoring a system image to different hardware. On Windows 10 and 11, a functionally identical hang appears under different wording: “Just a moment” or “We’re getting things ready” during the out-of-box experience. You can try to fix registry errors or check the Windows Update service to resolve the issue.
Windows 7: “Setup Is Preparing Your Computer for First Use”
Fix #1: Clear the stuck setup keys in the registry
When a Windows 7 image is restored to different hardware, values under HKEY_LOCAL_MACHINE\SYSTEM\Setup get left in an “in-progress” state, telling Windows to re-run first-use configuration on every boot. Zeroing them out stops the loop. You can also try to troubleshoot device and printer issues or check the screensaver and power options.
- Navigate to
HKEY_LOCAL_MACHINE\SYSTEM\Setupin the left panel.
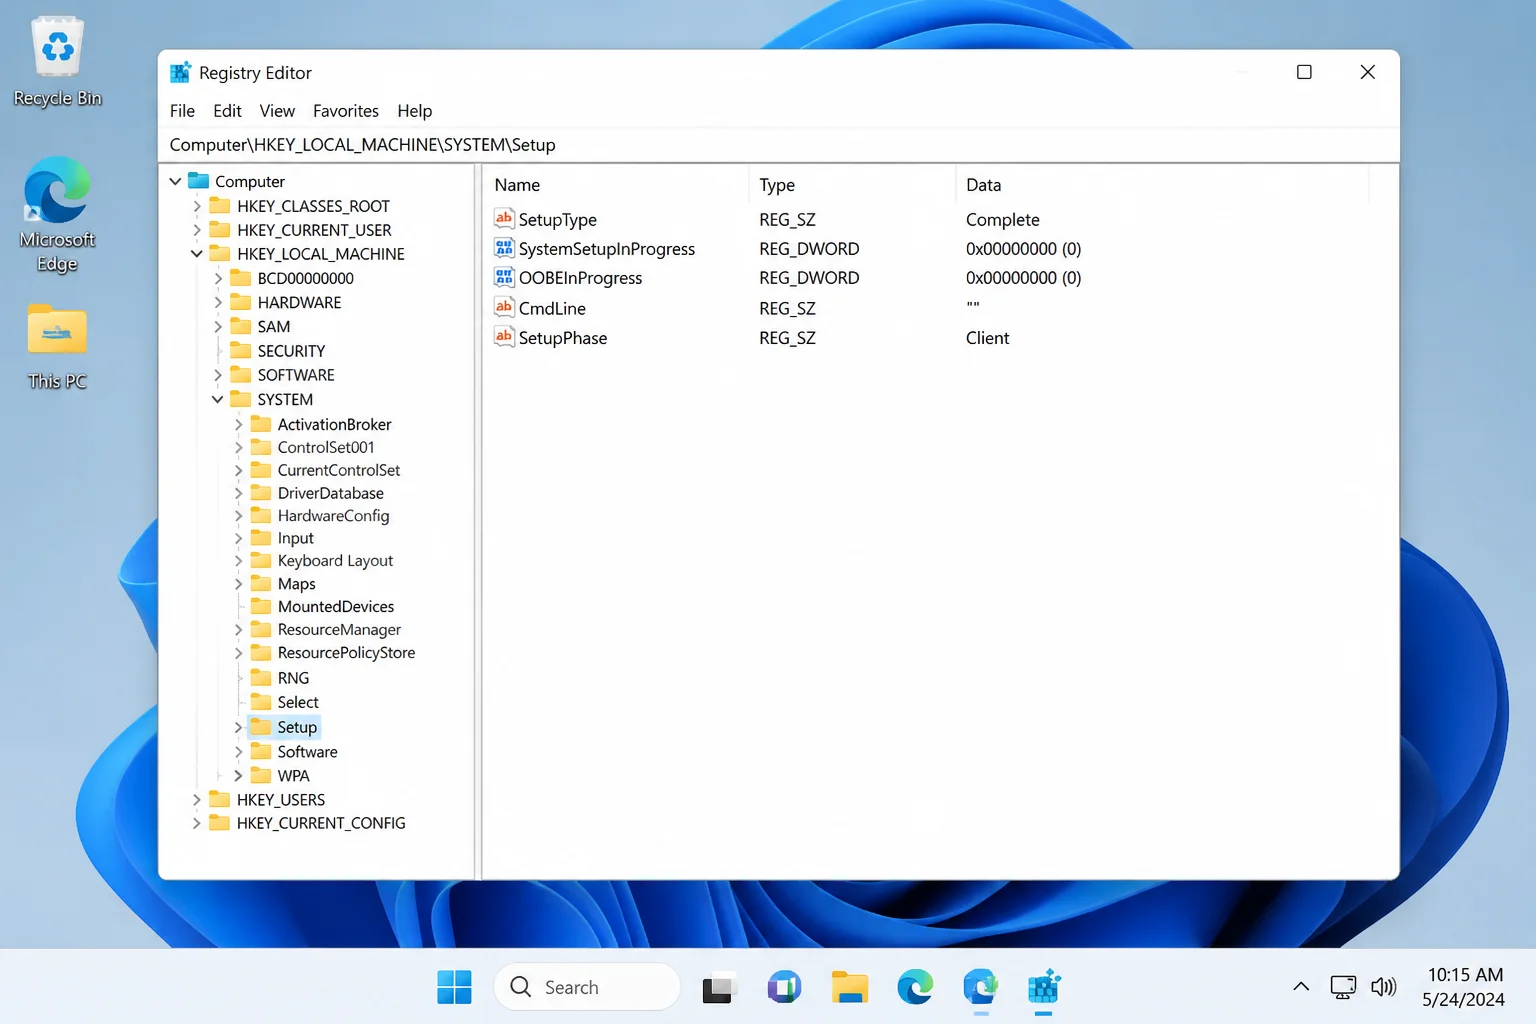
- Check each value in the right pane and correct any that don’t match the table below:
| Registry Value | Correct Setting |
|---|---|
SetupType | 0 |
SystemSetupInProgress | 0 |
SetupPhase | 0 |
OOBEInProgress | 0 |
CmdLine | (completely empty) |
- Double-click any value that doesn’t match, enter the correct data, and click OK.
- For
CmdLine: if it contains anything, such asoobe/windowsdeploydelete all of that text and leave the field completely blank, then click OK.
- Close Registry Editor and restart your PC. You can also try to enable the switch user option or fix the taskbar thumbnail previews.
The loop should be gone after the restart. This fix goes directly to the root cause and resolves it cleanly for most people who’ve migrated a Windows 7 image to new hardware. For more information, you can visit the Microsoft support page or Microsoft Learn.
Fix #2: Kill hung MSI installers at the locked screen
If you can’t reach a desktop at all, you can still break out of the stuck screen using a built-in keyboard shortcut. Background MSI installer processes often stall silently and hold the entire setup hostage, but it’s a clever trick that actually works: once those processes are gone, setup advances to the user account prompts on its own. You can also try to speed up your Windows 11 boot times or update your Xbox Series X without internet.
- At the stuck screen, press
Shift + F10to open a Command Prompt window.
- Type
taskmgr.exeand press Enter to open Task Manager.
- Under the Processes tab, look for any msiexec.exe entries showing 0% CPU and no disk activity.
- Right-click each one and select End Process.

- Watch the “preparing” screen; setup should advance to user account or region prompts within about a minute.
Nicely done if it works. Setup finishes smooth from there, no registry editing required. You can also visit the Wilders Security forum for more information.
Fix #3: Disable unknown devices via Device Manager
A missing driver for a storage controller or chipset device can cause setup to hang indefinitely, waiting for hardware it can’t initialize. This fix is worth a look if Fix #2 didn’t advance things. You can also try to play videos on Chromebooks or install large language models on your Mac.
- Press
Shift + F10at the stuck screen to open a Command Prompt (if it isn’t already open).
- Type
devmgmt.mscand press Enter to open Device Manager.
- Expand each category and look for any device with a yellow warning triangle (⚠).
- Right-click each unknown device and select Disable.
- If you have drivers on a USB drive, right-click the device instead, choose Update driver software → Browse my computer for driver software, and point it to the USB drive root with subfolders checked.
- Close Device Manager and wait for the “preparing” screen to advance.
Once you reach the desktop, install the correct drivers for your hardware and re-enable any devices you disabled. You can also visit the Open Mutual blog for more information.
Fix #4: Run Startup Repair from Windows 7 installation media
If the loop can’t be broken from within the stuck screen, Startup Repair can detect and fix corrupted boot or setup files without a full reinstall. You can also try to fix the “Windows cannot connect to this network” error or fix the Task Host window preventing shutdown.
- Insert your Windows 7 DVD or bootable USB drive and restart your PC.
- At the manufacturer logo, press
F12,F11, orEscto open the boot device menu; the exact key varies by manufacturer.
- Select your DVD or USB drive to boot from it.
- At the Install Windows screen, click Repair your computer, not Install now.
- Select your Windows installation from the list and click Next.
- Click Startup Repair and let it run to completion.
- Your PC restarts automatically when the repair finishes.
Fix #5: Restore from OEM recovery media or do a clean install
If none of the above has broken the loop, the underlying image is likely too corrupted or hardware-incompatible to repair. A fresh installation is faster than continuing to fight it. You can also try to set up Windows 11 privacy and security settings or enable or disable the AI agent in the Windows 11 taskbar.
Option A, OEM recovery disc or partition: Contact your PC manufacturer (HP, Dell, Lenovo, Toshiba, etc.) for recovery media specific to your model. Boot from that media and follow the on-screen prompts to restore the factory Windows 7 image.
Option B, Clean install: Obtain a Windows 7 ISO from Microsoft’s archived sources, create a bootable USB with Rufus, boot from it, and select Custom (advanced) installation. Format the target drive and install fresh with drivers matched to your current hardware.
A note on Windows 7: Microsoft ended support in January 2020. If your hardware can run Windows 10 or 11, migrating to a supported OS is the more secure long-term solution rather than continuing to maintain a Windows 7 installation. You can also visit the Seven Forums for more information.
Windows 10 and 11: Stuck on “Just a Moment” or “Getting Things Ready”
Windows 10 and 11 don’t use the “Setup is preparing your computer for first use” wording, but they show the same type of hang during the out-of-box experience, usually on brand-new or recently reset PCs.
Fix #6: Force a power cycle
A brand-new Windows 10 or 11 PC that’s been sitting on “Just a moment” or “This might take several minutes” for more than 30 minutes with no visible disk activity can often be freed with a hard restart. It actually works more often than it should. You can also try to fix Windows Hello not working or fix the TPM device not detected issue.
- Hold the power button for 5–10 seconds to force the PC off.
- If your desktop has a physical power switch on the PSU (on the back of the case), flip it off, wait 10 seconds, and flip it back on.
- Press the power button to start normally.
- Let Windows boot without interrupting it, the setup screen should advance past the stuck point on its own.
Fix #7: Run Startup Repair from WinRE
If a power cycle doesn’t help or the PC keeps failing to boot normally, the Windows Recovery Environment (WinRE) has a Startup Repair tool that scans and fixes corrupted boot files automatically. You can also try to fix the “Windows could not complete the installation” error.
- Power on your PC, then hold the power button to force it off as soon as you see the Windows logo or spinning dots.
- Repeat this two or three times, Windows will enter Automatic Repair mode on the next boot.
- On the recovery screen, click Advanced options.
- Go to Troubleshoot → Advanced options → Startup Repair.
- Let Startup Repair finish. Your PC restarts automatically when done.
Fix #8: Boot into Safe Mode to remove problem drivers
Safe Mode loads Windows with only the minimum required drivers, which lets you uninstall any recently added hardware driver or OEM software that’s blocking setup from completing.
- Enter WinRE using the forced-shutdown method from Fix #7.
- Go to Troubleshoot → Advanced options → Startup Settings → Restart.
- When your PC restarts and shows the Startup Settings menu, press F4 to enter Safe Mode.
- Once in Safe Mode, right-click the Start button and select Device Manager.
- Look for devices with yellow warning triangles, right-click them, and select Uninstall device.
- Restart normally, Windows reinstalls the driver automatically and can finish setup without the conflict.
Fix #9: Reset This PC from WinRE
If Startup Repair and Safe Mode haven’t resolved the hang, Reset this PC reinstalls Windows from scratch without requiring external installation media, it’s the modern, supported equivalent of a factory restore.
- Enter WinRE using the forced-shutdown method from Fix #7.
- Go to Troubleshoot → Reset this PC.
- Choose your reset option: – Keep my files: reinstalls Windows and removes apps, but keeps your personal documents. – Remove everything: full wipe and reinstall; use this if the PC was brand new and has nothing worth saving.
- Follow the on-screen prompts. Your PC restarts several times during the process.
Conclusion
For Windows 7, the registry fix (Fix #1) is the gem that clears this for most people; it targets the root cause directly and takes under five minutes. If you’re already locked at the stuck screen with no desktop access, Fix #2 (killing hung MSI installers via Task Manager) is the step most guides miss. On Windows 10 and 11, a simple power cycle (Fix #6) resolves OOBE hangs more often than you’d expect. Bookmark this for the next time you’re setting up new hardware. If the loop persists after all of these fixes, a failing hard drive or corrupted OEM firmware is likely the real culprit, and no software fix will hold for long. You can also visit the YouTube channel for more information.