So you want to start video editing with Adobe Premiere, the top choice for video editors at any experience level. You buy and download the program, open it up, but then you’re suddenly hit with the realization that you don’t really know what to do, or where to start.
You’ll soon find, though, there’s no reason to be overwhelmed. Whatever the reason is for wanting to start, whether you’re starting a YouTube channel or are editing your first short film, you’ll see that once you get yourself acquainted with the program, your editing time seems to fly by.
If you follow the pointers in this Adobe Premiere tutorial, you’ll be all set to start editing your media confidently. You’ll also be able to build on your knowledge more easily once you get the basics down. Keep in mind that with programs like Premiere, there’s more than one way to do everything, so don’t feel like you have to stick to these specific methods at all times.
Starting a New Project
Once you get Adobe Premiere opened up, you have a few options on the home screen. You can either start a new project, open one you’re working on, or you can see a list of your most recent projects to open.
Assuming you’re starting from scratch, clicking on New Project will bring you to a window where you can choose the settings of this project. It may look confusing, but here is a broken down version of each part.
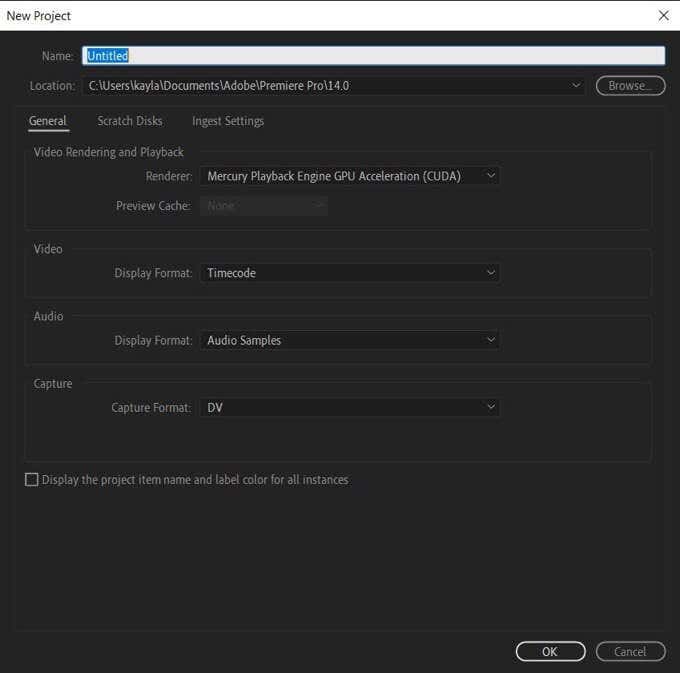
First, there’s the name of your project, and the location where you choose your project to be saved. Then there’s Video Rendering and Playback, which is the way your computer processes the video you’re producing and plays back the final result to you in real-time.
What you choose for this option determines how fast your video will be rendered and played back to you. Your available options depend on your computer’s graphics card, but Mercury Playback Engine GPU Acceleration (Open CL) is supported by most computers and recommended.
You can then choose by what metric you want your video displayed, either Timecode or Frames (you don’t need to worry about feet + frames unless you recorded with a 16mm or 35mm camera). Timecode is how the video you shot logged and saved each frame of the video. This option is recommended as it will show you how long your video comes out to and makes it easier to locate specific frames.
The Audio display option really comes down to how precisely you want to edit your audio files, but the Audio Samples option is fine unless you need to edit audio down to the millisecond.
The Capture Format section is not important unless you are directly capturing video to Adobe Premiere, in which case you’d choose whether you’re shooting in Digital Video or High Definition Video.
Inserting Your Video and Audio
After setting your project options, you will be brought to your main workspace. You can change how you want your workspace to look by moving each panel, or choosing Window > Workspaces in the top bar and selecting one of the pre-created ones. In this article the Editing workspace will be used.
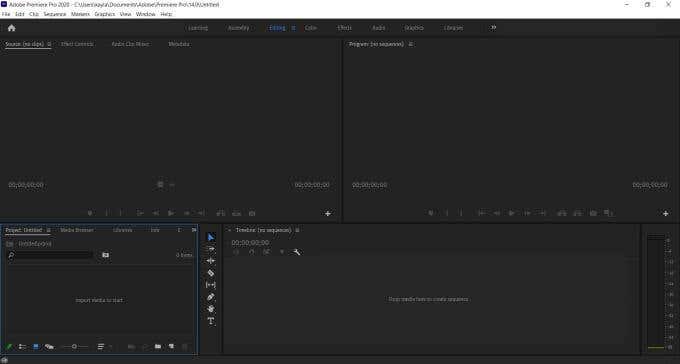
The first thing you want to do is load all the media you’ll be using into your project. First, locate the Media Browser in the bottom left box. From here, you can search for media right from your computer.
Once you find the video or audio you want, clicking on it will display it in the Source window right above. In this window you can cut what portions you want and insert it into your timeline (the bottom right panel) using the Mark In and Mark Out tools (the bracket-shaped icons below your source video.)
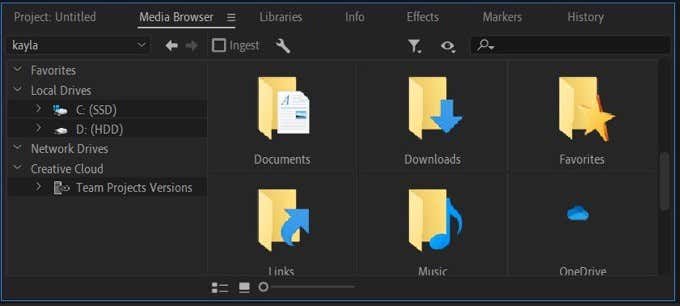
To insert the video, you can either drag the video from the Video Only icon underneath the video in the source window, or you can drag the video straight from the media browser if you want the entire video and any audio it may have.
Alternatively, you can use the Insert tool (third from the right below your source video) to insert the video wherever the marker is in the Timeline.
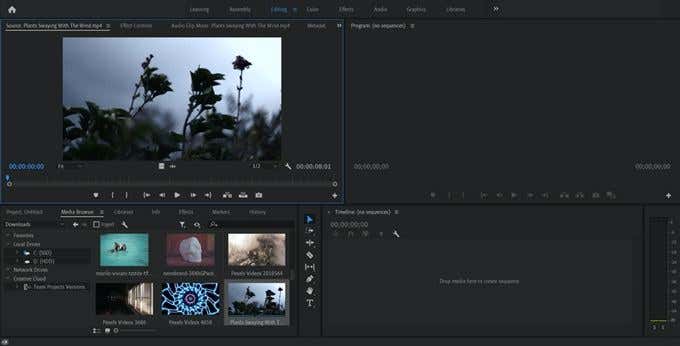
Audio works the same to locate and insert into a sequence if you have separate audio files, such as music or sound effects. If you want to take only the audio itself from a video, you can simply drag the Audio Only icon into your project.
Basic Adobe Premiere Tools Explained
When video editing, the tools Adobe Premiere has to offer you will be your best friend. There are many different tools within the program, but here’s an explanation of the basic ones you’ll likely be using most often.
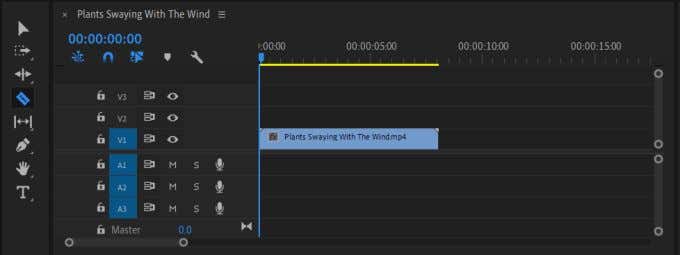
Selection Tool
This is the icon that looks like a pointer. It’s the topmost tool in the box next to your sequences. This tool allows you to select video or audio in your timeline, or select the buttons and options within the interface. You can also left-click outside media in your timeline and drag to create a selection box to select multiple clips.
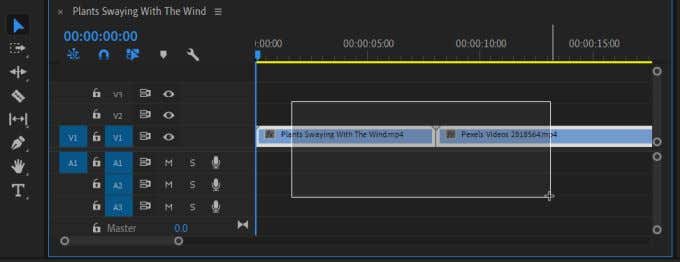
Track Select Forward + Backward Tool
This is the next icon under the Selection Tool, denoted by a box and arrow. You may notice in the bottom-right corner of the icon there is a small triangle.
This means that by clicking and holding down on the icon you can access the other tools related to it. By doing this you can use the Track Select Forward tool, which can move an entire track in your timeline forward, or the Track Select Backward tool, which does the opposite.
Ripple Edit Tool
You can use this to trim the In and Out points of your clips, and you can use the Rolling Edit tool to simultaneously edit one clip’s Out point and another’s In point, in order to close gaps.
Under this tool there is also Rate Stretch if you need to speed up or slow down an entire clip. You can click and drag from the In or Out points to use this tool. It won’t cut anything from the clip, it’ll just speed or slow the frame rate.
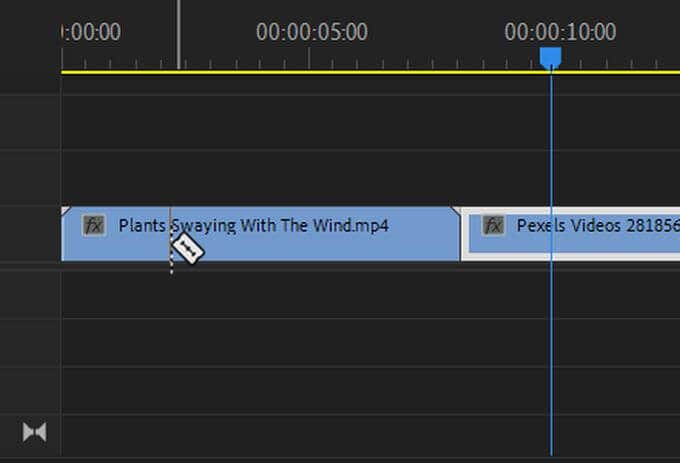
Razor Tool
This is the razor-shaped icon. With this tool, you can easily cut clips at any point you wish.
Type Tool
This tool, which looks like a capital T, allows you to click directly on your video playback and create simple text. You can also click and hold to access the Vertical Type tool, which creates a vertical text box.
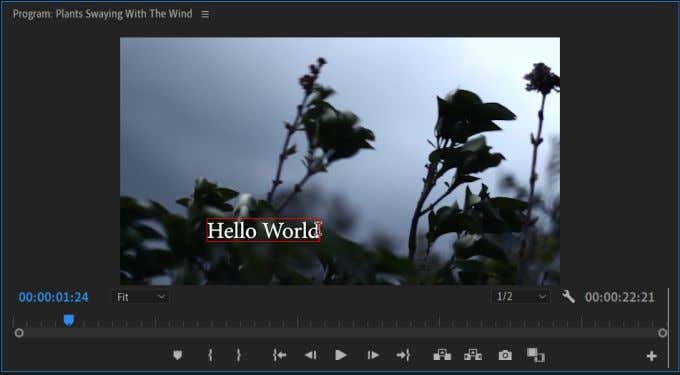
With all these tools, by hovering your mouse over them, you might see a letter in parentheses next to the tool name. This is what key on your keyboard the tool is tied to, so you can use these shortcuts to quickly access them.
Basic Audio Editing Tools
Not only does Premiere have tools to edit your video, but there are also many audio editing options available in case you need to manipulate it in some way.
After inserting audio into your timeline, you can edit it the same way you edit video, using the same tools. Besides this, there are also designated audio effects to enhance the sounds of your project.
To access them, click on the Effects tab at the top of your workspace. This should open the Effects panel to your right side, and from here you can go to Audio Effects. To use any of them, simply drag your chosen effect to your audio clip.
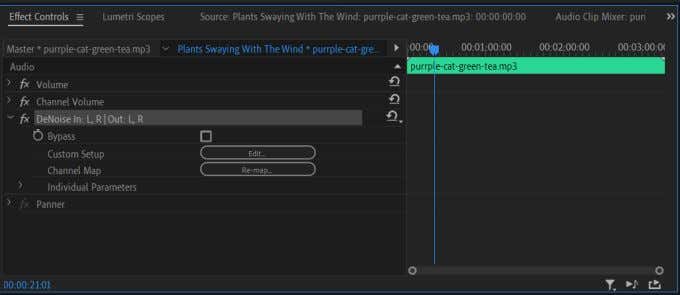
An extremely useful effect is the DeHummer and DeNoise effects. If you’re noticing a lot of background noise in your audio clip, these effects can help you get rid of it. You can find them under Noise Reduction/Restoration. Once you’ve applied them, you can play with them in the Effect Controls panel, but they should remove most noise automatically.
Another good thing to keep in mind is that you can control the volume of audio directly from your timeline. If you look at your audio clip, you’ll notice there is a white horizontal line. You can drag this line up or down to change the volume. If you’d like the volume to be loud in certain spots and quiet in others, you can use a feature called Keyframes to do this.

Drag one of the circles on the scrollbar in the audio section of the timeline to widen it. You should see a diamond-shaped icon to the left of your audio timeline. If you click this icon, you’ll add a Keyframe, and if you add at least two you can drag them independently of the other. Using this you can easily fade in/out your audio.
Title Creation in Premiere
If you need to create more detailed titles than the simple text tool will allow you, the Legacy Title feature in Premiere has plenty more tools for title-making. Simply click File > New > Legacy Title to open up the creation window.
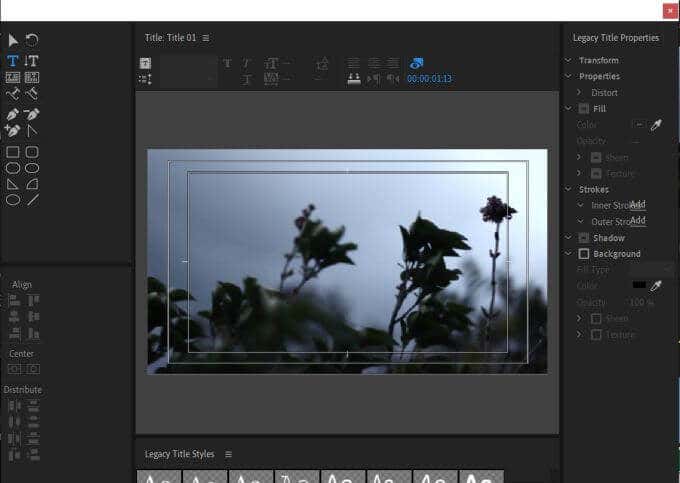
Use the Type tool in this window to type your text. Under the Transform section to the right, you can change the placement, size, opacity, and more. Under Properties, there are lots of options for unique title creation, such as adding slant, kerning, or tracking. You can also change the font itself and the size.
Not only can you create text, but you can also use the shape tools to add basic shapes into your title.
Changing The Look of Your Video With Color Grading
If you want the look of your video to feel more consistent, you can easily adjust the color, lighting, and other visual aspects using Lumetri Color in Premiere. You can find this under the Color panel.
With Lumetri Color you have many different tools at your disposal. Under Basic Correction, you can do some quick changes to improve your clip’s look, such as White Balance, Contrast, Highlights/Shadows and Whites/Blacks. If you’d like to do more advanced and detailed changes, the rest of the options give you more freedom.
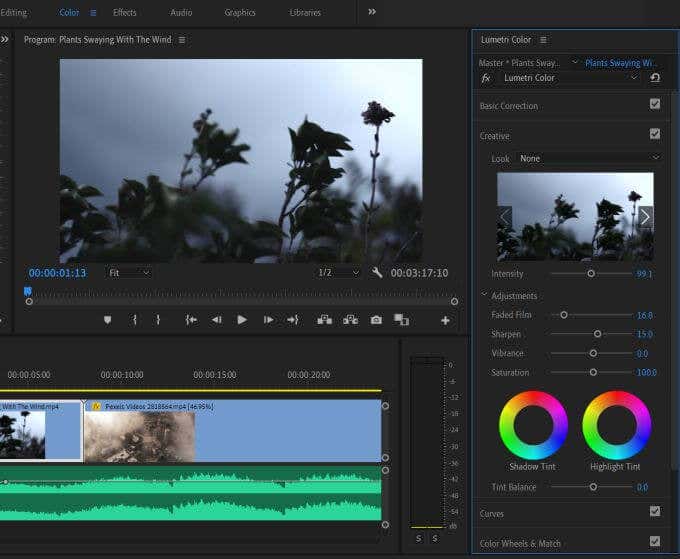
If you’re overwhelmed with the amount of tools here, though, there’s also the option to download LUTs and color presets to automatically color grade your clips. There are plenty of free ones you can find online.
Once you’ve downloaded one, you can browse for them under the LUT option in Basic Correction, or under Look in the Creative dropdown under Lumetri Color.
Exporting and Rendering Your Video
The editing is done, and you’re happy with the result. So how do you get your edited video out into a shareable format? Thankfully, Adobe Premiere makes it easy to render your video directly in the program and export it.
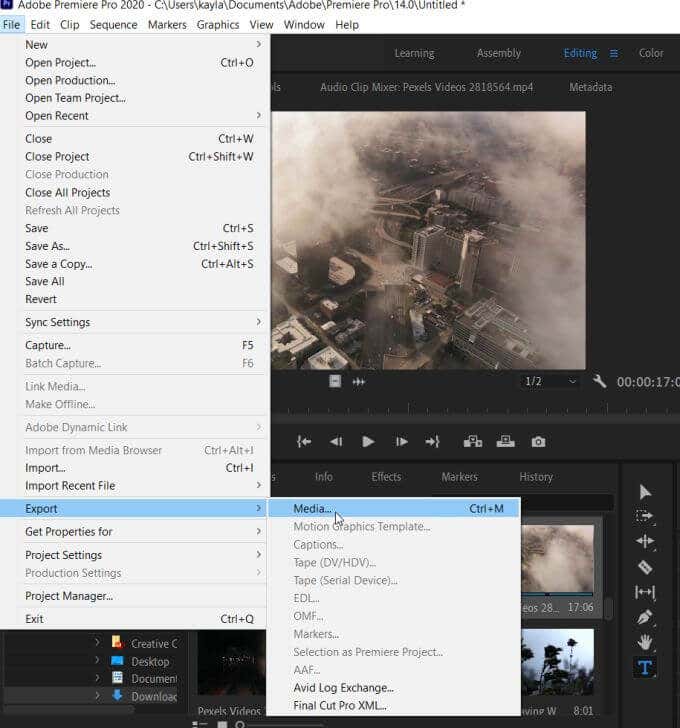
To begin this process, first activate the timeline panel by clicking inside it, then locate the very top toolbar and click File > Export > Media. A screen will pop up for you to choose your export options. First, make sure you are exporting the sequence you want to export. You can see what you are exporting by dragging the blue marker through the preview.
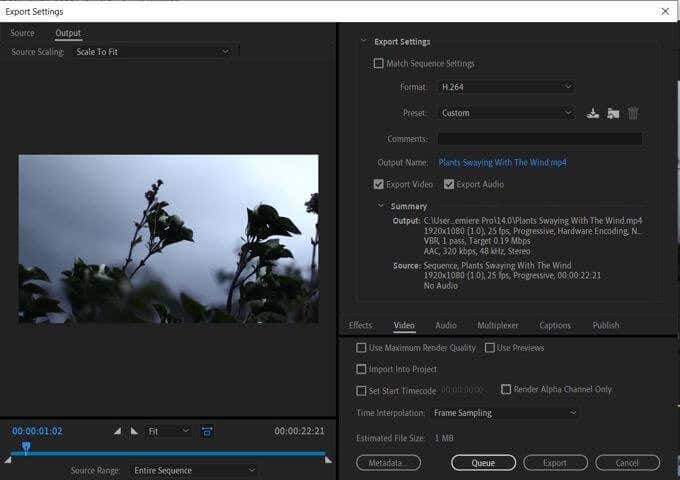
Next, you’ll want to choose a format to save your video in. Unless you’re required to save your video in a certain format, using H.264 is generally recommended for the best quality output.
Then there’s an option to choose a preset. This depends on how you’ll be sharing your video. There are presets that will make your video better supported by Facebook, YouTube, Twitter, and other platforms already available to choose. Or, you can choose custom to choose your own settings. Generally, though, the Match Source – High Bitrate preset is good for most uses.
Make sure to name your project and choose where you’d like the exported video to be saved, and that the Export Video and Export Audio are checked according to what you want exported.
When you’re finished, you can then click Export at the bottom and your finished video will be sent to your chosen location.
Related Posts
Since she was a child, Kayla has had a fascination with technology, video games, and filmmaking. Growing up she wrote on multiple personal blogs about these topics, enjoying the process of breaking down technical concepts. Most recently her focus has shifted to writing, and Kayla now reviews and writes technology, video editing, and gaming related articles. Read Kayla’s Full Bio
