

Your hosts file is not working in Windows 11: you added a line to C:\Windows\System32\drivers\etc\hosts and saved it, but the site still loads from its real address, or ping says “Ping request could not find host”. This almost always comes down to one of ten silent mistakes, ranging from a hidden .txt extension to a browser that looks up addresses on its own.
60-second check first: Open Command Prompt and run
ping example.test, using the hostname you added.pingdoesn’t need a reply, so “Request timed out” is fine; only the IP in square brackets on the first line matters. If it matches your entry, Windows is reading the file and the browser, a proxy, or a VPN is the problem (Fixes #5, #6, and #8). If it shows the site’s real address or “Ping request could not find host”, Windows isn’t using your entry, so start at Fix #1. If you just changed an existing entry and see the old IP, runipconfig /flushdnsand ping again before assuming the file is wrong.
Common Issues and Fixes
Fix #1: Confirm You Edited the Right File (Location, Name, No .txt Extension)
Symptoms:
- Your edits are saved, but
pingstill returns the old IP. - The etc folder contains two files that look like
hosts. - The file shows as “Text Document” in File Explorer’s Type column.
Why it happens: Windows only reads a file named exactly hosts, with no extension, in C:\Windows\System32\drivers\etc. Notepad often adds .txt when you save, and File Explorer hides extensions by default. As a result, hosts.txt looks like hosts on screen, but Windows ignores it completely.
Fix:
- Open File Explorer with
Windows + E. - Paste
C:\Windows\System32\drivers\etcinto the address bar and pressEnter. - On Windows 11, click View > Show > File name extensions. On Windows 10, open the View tab and tick File name extensions.
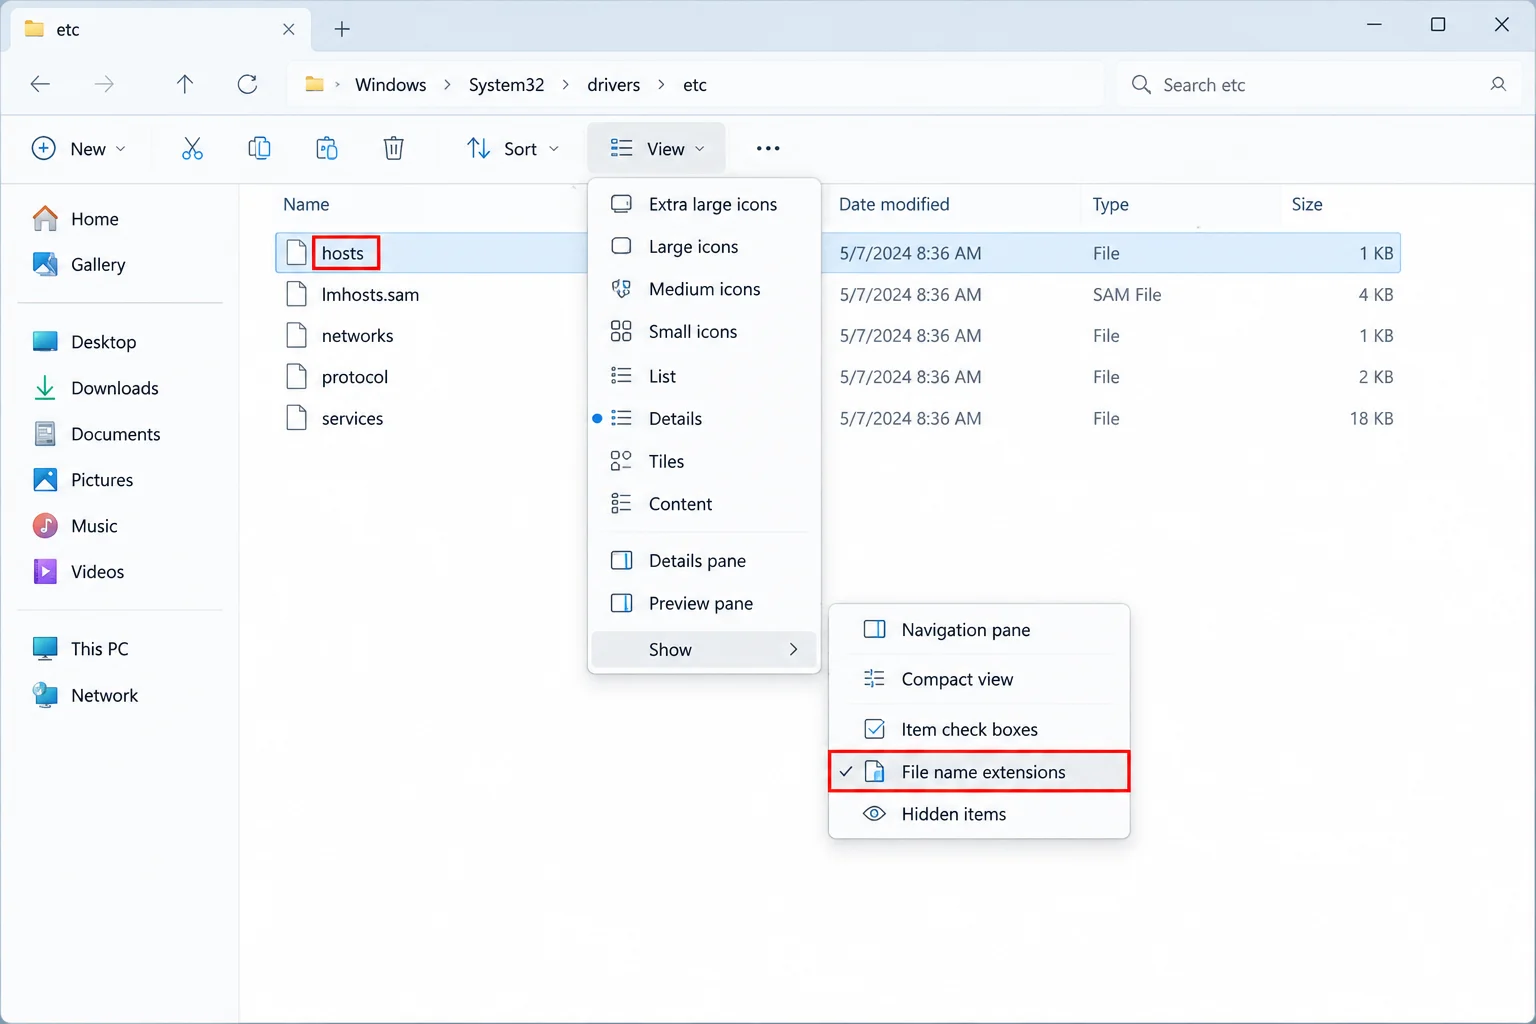
- If you see
hosts.txt, check whether a plainhostsfile also exists. - If only
hosts.txtexists, right-click it, choose Rename, delete.txt, and pressEnter. - Click Yes at the warning about changing the extension, then click Continue at the admin prompt.
- If both files exist, copy your custom lines from
hosts.txtintohosts(see Fix #2), then deletehosts.txt. - Also confirm you edited the file on the
C:drive. A copy on your Desktop or in Downloads does nothing.
Verify: Run ping yourhostname. The IP in brackets should match your entry. If an old result sticks, run ipconfig /flushdns and ping again.
Fix #2: Save the File With Administrator Rights
Symptoms:
- Notepad shows “You don’t have permission to save in this location. Contact the administrator to obtain permission.” and offers to save in Documents instead.
- Classic Notepad shows “Access to C:\Windows\System32\drivers\etc\hosts was denied.”
- The save seems to work, but your changes are gone when you reopen the file.
Why it happens: The etc folder is protected. Standard users can read hosts but normally can’t write to it. If Notepad isn’t elevated, Windows blocks the save or redirects it to another folder, and your real hosts file stays unchanged.
Fix:
- Close every open Notepad window. Windows 11 Notepad restores old tabs, and a restored, non-elevated hosts tab can’t save.
- Press the
Windowskey and typeNotepad. - Right-click Notepad and choose Run as administrator.
- Click Yes at the User Account Control prompt.
- In Notepad, click File > Open.
- Browse to
C:\Windows\System32\drivers\etc. - Change the file type dropdown from *Text Documents (\.txt) to All Files (\.\)**. The hosts file has no extension, so a
.txtfilter hides it.
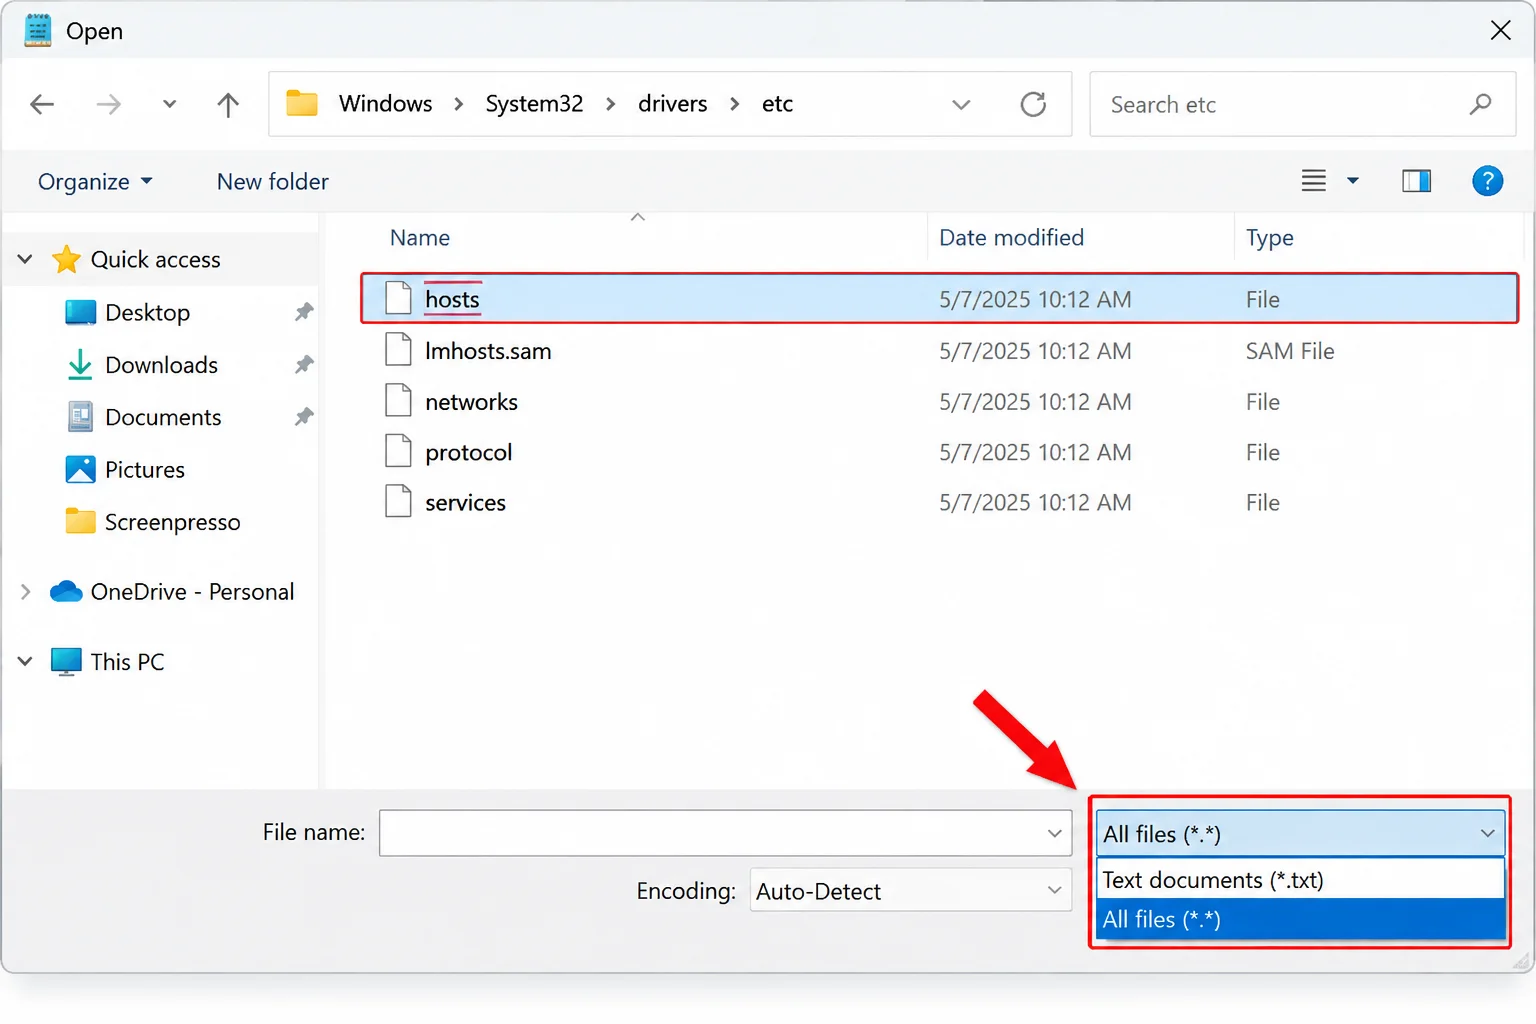
- Select hosts and click Open.
- Make your edit.
- Save with File > Save or
Ctrl + S. Don’t use Save As, which can add.txtagain.
Verify: Close Notepad, reopen hosts in a normal, non-admin Notepad, and confirm your line is still there. Then run ping yourhostname.
Fix #3: Check the Entry Format (IP, Space or Tab, Hostname, No Leading #)
Symptoms:
- The line is clearly in the file, but Windows ignores it.
- Other entries in the same file work, but this one doesn’t.
Why it happens: Windows reads each line strictly as IP address, whitespace, hostname. A leading # turns the whole line into a comment. That’s the most common trap, because the default file’s example lines all start with #, and people copy them. Typos, ports, and http:// also make the line invalid.
Fix:
- Open the hosts file in Notepad as administrator (see Fix #2).
- Find your entry and make sure it doesn’t start with
#. - Make sure the IP address comes first, followed by at least one space or tab, then the hostname.
- Remove any
http://,https://, trailing/, or port numbers such as:8080. - Put each entry on its own line.
- Press
Ctrl + Sto save.
Correct examples:
192.168.1.10 example.test
127.0.0.1 ads.example.com
192.168.1.50 nas.home # comments after the hostname are fine
This is what a working file looks like, with commented example lines at the top and your active entries at the bottom:

Verify: Run ping example.test. The bracketed IP should now match (flush with ipconfig /flushdns first if an old result sticks).
Fix #4: Flush the Windows DNS Cache
Symptoms:
- You fixed the file, but
pingstill shows the old IP. - The entry works for new hostnames but not for sites you visited recently.
Why it happens: The Windows DNS Client service caches lookups, including failed (“not found”) ones. It normally picks up hosts changes on its own, so you don’t need to flush after every edit. Flushing is a diagnostic step for when you suspect an old or “not found” answer is still being served.
Fix:
- Press the
Windowskey, typecmd, and open Command Prompt. An administrator prompt works too. - Run this command:
ipconfig /flushdns- Look for “Successfully flushed the DNS Resolver Cache.”
- If you see “Could not flush the DNS Resolver Cache: Function failed during execution.”, press
Windows + R, typeservices.msc, and check that DNS Client is running.
For more options, including PowerShell’s Clear-DnsClientCache, see our guide on how to flush the DNS cache in Windows 11.
Verify: ipconfig /flushdns clears the resolver cache. Run ping yourhostname to trigger a fresh lookup, then run ipconfig /displaydns and look for your hostname. Microsoft documents that this cache includes entries preloaded from the Hosts file, so if your hostname is listed with the right IP, Windows is using your entry. ping showing the right IP is the main test; displaydns is supporting evidence.
Fix #5: Clear Your Browser’s Own DNS Cache and Restart It
Symptoms:
pingshows the correct IP, but the browser still opens the old site.- A private window works, but a normal one doesn’t.
Why it happens: Chrome, Edge, and Firefox keep their own DNS cache and can reuse connections that are already open to the old server. Flushing Windows doesn’t touch either one. Separately, the browser’s page cache can show you an old copy of the page even after the name resolves correctly, which is why the last step does a hard reload.
Fix:
- In Chrome, go to
chrome://net-internals/#dnsand click Clear host cache. - In Edge, go to
edge://net-internals/#dnsand click Clear host cache. - In Chrome or Edge, open the Sockets section on the same page (
#sockets) and click Flush socket pools. - In Firefox, go to
about:networking#dnsand click Clear DNS Cache. - Close every browser window. Check the system tray, since Chrome and Edge can keep running in the background.
- Reopen the browser and load the site with
Ctrl + F5to bypass the page cache.
If the site still misbehaves in just one browser, our guide on how to fix a website not loading in one browser only covers extensions and profile issues.
Verify: Open an InPrivate or Incognito window and visit the site. If it loads from your hosts IP there, the normal window just needs its cache cleared.
Fix #6: Test With Secure DNS (DNS over HTTPS) Turned Off
Symptoms:
pingandipconfig /displaydnsboth show your hosts IP.- The browser still goes to the real site, even after Fix #5.
Why it happens: Secure DNS, also called DNS over HTTPS (DoH), changes how the browser sends DNS queries: they go to an encrypted DNS provider instead of through Windows. It isn’t meant to change which answer wins, and browsers are designed to keep honoring hosts-file entries with it on (Firefox, for example, excludes names listed in the hosts file from DoH by default). So if ping already shows your hosts IP, DoH alone usually isn’t the cause. Check for a proxy, VPN, extension, or managed browser policy first (Fix #8). Turning Secure DNS off is a secondary test for browser-specific resolver behavior, not the main fix.
Fix:
- In Chrome, go to Settings > Privacy and security > Security.
- Scroll to Use secure DNS and turn it off.
- In Edge, go to Settings > Privacy, search, and services > Security and turn off Use secure DNS to specify how to lookup the network address for websites.
- In Firefox, go to Settings > Privacy & Security, scroll to DNS over HTTPS, and choose Off.
- Restart the browser.
Our guide on how to turn off Secure DNS in Chrome, Edge, and Firefox has step-by-step screenshots for each browser.
Verify: Reload the site. If it now goes to your hosts IP, the browser’s secure DNS setup (often combined with a policy or extension) was routing around Windows. Turn Secure DNS back on when you’re done testing, and look for the policy or extension responsible rather than leaving it off.
Fix #7: Add Both www and Non-www Versions (and IPv6 Where Needed)
Symptoms:
example.comworks, butwww.example.comstill goes to the real site, or the other way around.- The site redirects you and ends up at the real server.
- A blocked domain still loads on some networks.
Why it happens: To Windows, example.com and www.example.com are two separate names, and the hosts file doesn’t support wildcards like *.example.com. Also, if your network uses IPv6, the browser may get the site’s real IPv6 address from DNS and skip your IPv4-only entry.
Fix:
- Open the hosts file in Notepad as administrator.
- Add a line for each version of the name:
192.168.1.10 example.com
192.168.1.10 www.example.com
- If you’re blocking a domain, add an IPv6 line for each name as well:
127.0.0.1 ads.example.com
::1 ads.example.com
- If you’re redirecting to a test server, add an IPv6 line only if that server really has an IPv6 address.
- Save with
Ctrl + S. If an old result sticks, runipconfig /flushdns.
Verify: Run ping example.com, ping www.example.com, and ping -6 example.com. Each should return the address you set.
Fix #8: Rule Out a VPN, Proxy, or Third-Party DNS App
Symptoms:
- The hosts file works with the VPN off but fails with it on.
pingis correct, but the browser still reaches the real site.- Behavior changes between home and work networks.
Why it happens: When your browser goes through a proxy, the proxy looks up the hostname on its end and never sees your hosts file. Depending on how they’re configured, VPN apps, VPN browser extensions, and DNS filtering apps can also send lookups to their own DNS servers instead of resolving them locally. Some also change network settings when they connect.
Fix:
- Disconnect your VPN client completely. Pausing it isn’t enough.
- Turn off any VPN or proxy browser extensions.
- Go to Settings > Network & internet > Proxy.
- Turn off Use a proxy server under Manual proxy setup if you didn’t set it up on purpose.
- Temporarily quit any DNS filtering or “secure DNS” desktop app, then restart the browser.
Verify: Retest the site. If it works now, add the hostname to the VPN’s split-tunnel or bypass list, or test with the VPN off.
Fix #9: Check Whether Microsoft Defender Flagged or Restored the File
Symptoms:
- Your entries vanish minutes or hours after saving.
- Windows Security shows a notification mentioning
SettingsModifier:Win32/HostsFileHijack. - The file’s Date modified keeps changing when you haven’t touched it.
Why it happens: Malware often hijacks the hosts file, so Defender watches it. Microsoft’s SettingsModifier:Win32/HostsFileHijack detection targets entries for domains used by Windows and critical services, so even an entry you added yourself (for example, one blocking a Microsoft domain) can be flagged and removed. Other antivirus suites with “hosts file protection” behave similarly.
Fix:
- Open Windows Security from the Start menu.
- Go to Virus & threat protection > Protection history.
- Look for entries that mention
hostsorHostsFileHijack.
- Click the entry and read the details: the affected file path and exactly what was detected.
- Open the hosts file and check every line that doesn’t start with
#. Delete anything you don’t recognize, then run a Full scan (or a Microsoft Defender Offline scan) from Scan options. - Only if every flagged entry is one you added yourself and know is safe, copy the file somewhere as a backup, then choose Actions > Allow on device.
- Re-add your entry, then save.
- If you use another antivirus suite, check its settings for hosts file protection and review what it blocked the same way.
For a full walkthrough, see our guide on how to check if Windows Defender blocked a file.
Warning: If Protection history shows hosts changes you didn’t make, don’t allow them. Run a full scan with Scan options > Full scan. Unknown entries pointing banking or search sites to strange IPs are a classic malware sign.
Verify: Check the file again after 30 minutes and after a restart. Your entries should still be there.
Fix #10: Check File Encoding and Permissions
Symptoms:
- The file looks perfect in Notepad, but nothing in it works, not even entries that used to.
- The file was edited with a script, a different editor, or copied from another PC.
Why it happens: Windows reads a hosts file saved as plain ANSI or UTF-8 text reliably. The usual troublemaker is UTF-16 (“Unicode”): it looks normal in Notepad, but Windows may not parse the entries. Broken permissions or a Read-only flag can also block saves without an obvious error.
Fix:
- Open the hosts file in Notepad as administrator.
- Check the encoding shown in the status bar at the bottom right. If the status bar is hidden, turn it on from the View menu.
- Only if it shows UTF-16 (or Unicode) and your entries aren’t working, copy the file somewhere as a backup, then click File > Save as.
- Set Save as type to *All files (\.\)*.
- Set Encoding to UTF-8 and keep the file name as
hosts. - Click Save and confirm the overwrite.
- In File Explorer, right-click
hostsand choose Properties. - On the General tab, clear Read-only if it’s ticked, then click Apply.
- On the Security tab, confirm SYSTEM and Administrators have Full control and Users have Read & execute.
Verify: Run ping yourhostname. The bracketed IP should match your entry, and ipconfig /displaydns should list your hostname.
How to Confirm the Hosts File Is Working (ping vs. nslookup)
Use these two tools together. They answer different questions.
- Open Command Prompt.
- Run
ping example.test.pinguses the full Windows lookup process, including the hosts file. The IP in brackets should match your entry.
- Run
nslookup example.test.nslookupskips the hosts file and asks your DNS server directly.
Reading the two together:
- ping shows your IP, nslookup shows the real one. This is correct. Your hosts file is working.
- Both show the real IP. Windows isn’t reading your entry. Go back to Fixes #1 through #4.
- ping is right, the browser is wrong. The browser is bypassing Windows. See Fixes #5, #6, and #8.
Error Messages Quick Reference
| Error message or symptom | Where you see it | What it means | Go to |
|---|---|---|---|
| “You don’t have permission to save in this location. Contact the administrator to obtain permission.” | Notepad save dialog | Notepad isn’t running as administrator | Fix #2 |
| “Access to C:\Windows\System32\drivers\etc\hosts was denied.” | Classic Notepad | Same as above, or the file is Read-only | Fix #2, Fix #10 |
| “Ping request could not find host example.test. Please check the name and try again.” | Command Prompt | No valid hosts entry and no DNS record | Fix #1, Fix #3 |
| “Could not flush the DNS Resolver Cache: Function failed during execution.” | Command Prompt | DNS Client service stopped or blocked | Fix #4 |
| “*** [server] can’t find example.test: Non-existent domain” | nslookup | Normal for hosts-only names, because nslookup skips the hosts file | Testing section |
“This site can’t be reached” / ERR_NAME_NOT_RESOLVED | Chrome or Edge | Browser found no address; often a typo in the entry | Fix #3, Fix #5 |
ERR_CONNECTION_REFUSED | Chrome or Edge | Hosts file worked, but nothing is running at that IP | Check the target server |
“Your connection is not private” / NET::ERR_CERT_COMMON_NAME_INVALID | Browser | Hosts file worked, but the target server’s certificate doesn’t match the name | Expected when testing a new server |
SettingsModifier:Win32/HostsFileHijack | Windows Security | Defender flagged your hosts edit | Fix #9 |
Platform-Specific Notes
On Windows 11
The new Notepad reopens previous tabs automatically. If the hosts file comes back in a non-admin window, saving will fail. Close that tab and reopen the file from an elevated Notepad. File extensions are under View > Show > File name extensions.
On Windows 10
Classic Notepad adds .txt more aggressively when you use Save As, so stick to Ctrl + S. The extension toggle is on the View tab of the File Explorer ribbon. Everything else works the same way.
If You Use WSL
By default, WSL generates Linux’s /etc/hosts from your Windows hosts entries when a distribution starts. That’s controlled by the generateHosts setting in /etc/wsl.conf; if it’s set to false, edit /etc/hosts inside Linux instead. Otherwise, run wsl --shutdown in Command Prompt, then reopen your Linux terminal to pick up your changes.
Configuration Mistakes With Correct Examples
| Wrong | Why it fails | Correct |
|---|---|---|
# 192.168.1.10 example.test | Leading # makes it a comment | 192.168.1.10 example.test |
example.test 192.168.1.10 | Hostname before IP | 192.168.1.10 example.test |
192.168.1.10example.test | No space or tab between them | 192.168.1.10 example.test |
127.0.0.1:8080 example.test | Hosts files can’t include ports | 127.0.0.1 example.test |
192.168.1.10 https://example.test/ | Protocols and slashes aren’t allowed | 192.168.1.10 example.test |
127.0.0.1 *.example.com | Wildcards aren’t supported | One line per subdomain |
192.168.1.10 example.com only | www is a different name | Add a second line for www.example.com |
Getting Help
Windows doesn’t keep a log of hosts file reads, so gather this information before asking for help:
- Your hosts entries: Copy the custom lines, not the default comments.
- Cache contents: Output of
ipconfig /displaydnsfor your hostname. - Network setup: Output of
ipconfig /all, plus whether a VPN or proxy is active. - Defender history: Windows Security > Virus & threat protection > Protection history, or Event Viewer at Applications and Services Logs > Microsoft > Windows > Windows Defender > Operational.
- DNS client events: Event Viewer at Applications and Services Logs > Microsoft > Windows > DNS Client Events > Operational. This log is off by default, so right-click it and choose Enable Log before reproducing the problem.
Official references from Microsoft:
- How to reset the hosts file back to the default
- Troubleshoot DNS client resolution issues
- Host name resolution, including the Hosts file (TechNet archive)
For community help, post on Microsoft Q&A or the Microsoft Community forums and include the information above.
Prevention Tips
- Back up before editing: Copy
hoststo a USB flash drive or a Documents folder before big changes, so you can roll back in seconds. - Always open Notepad as administrator first: Then open the file with File > Open. This avoids both the permission and
.txtproblems. - Keep extensions visible: Leave File name extensions turned on in File Explorer permanently.
- Label your entries: Add a comment like
# test server, remove after launchat the end of each line so you remember what to delete later. - Ping after every edit:
ping yourhostnamecatches mistakes right away. Flush withipconfig /flushdnsonly if an old result sticks. - Consider a network-wide option for blocking: If you’re adding hundreds of ad domains to every PC, a Raspberry Pi running Pi-hole, or a router with built-in ad blocking and local DNS entries, handles it once for every device.
Frequently Asked Questions
Why does my hosts file edit not do anything in Windows 11?
The usual causes, in order, are a file saved as hosts.txt, a save that failed without admin rights, a leading #, and a stale DNS cache. Run the 60-second check at the top to narrow it down.
Where exactly is the hosts file located and what must it be named?
It’s at C:\Windows\System32\drivers\etc\hosts. The name must be exactly hosts with no extension. Any other name or location is ignored.
Do I need administrator rights to edit the hosts file?
Normally, yes. Anyone can read it, but the file is protected, so saving changes requires elevation for most users. Open Notepad with Run as administrator before opening the file.
What is the correct format for a hosts file entry?
Use an IP address, at least one space or tab, then the hostname, one entry per line. For example: 192.168.1.10 example.test. Don’t include http://, ports, or wildcards.
How do I flush the DNS cache in Windows 11?
Open Command Prompt and run ipconfig /flushdns. You should see “Successfully flushed the DNS Resolver Cache.” You only need it when an old or “not found” result is sticking, not after every edit.
Why does ping show the right IP but my browser still goes to the old site?
Your browser has its own DNS cache, and it may use Secure DNS, a proxy, or a VPN extension. Clear its host cache, restart it, and test with Secure DNS off (Fixes #5, #6, and #8).
Does DNS over HTTPS / Secure DNS break the hosts file?
Not normally. DoH changes how the browser sends DNS queries, not whether it honors hosts-file entries. If ping shows your hosts IP but the browser doesn’t, check proxies, VPNs, extensions, and browser policies first; turning Secure DNS off briefly is a secondary test.
Do I need both www and non-www entries?
Yes. example.com and www.example.com are separate names, and each needs its own line.
Can a VPN or antivirus override my hosts file?
Yes. Proxies and some VPNs look up names on their own servers, which skips your hosts file. Defender and other antivirus tools can remove entries they consider suspicious.
How do I test if my hosts file change actually worked?
Run ping yourhostname and check that the IP in brackets matches your entry. Then compare it with nslookup yourhostname. A different result from nslookup is expected, because nslookup skips the hosts file.
How do I reset the hosts file back to default?
- Open Notepad as administrator.
- Open
C:\Windows\System32\drivers\etc\hosts. - Select all text with
Ctrl + Aand delete it. - Paste in Microsoft’s default content:
# Copyright (c) 1993-2009 Microsoft Corp.
#
# This is a sample HOSTS file used by Microsoft TCP/IP for Windows.
#
# This file contains the mappings of IP addresses to host names. Each
# entry should be kept on an individual line. The IP address should
# be placed in the first column followed by the corresponding host name.
# The IP address and the host name should be separated by at least one
# space.
#
# Additionally, comments (such as these) may be inserted on individual
# lines or following the machine name denoted by a ‘#’ symbol.
#
# For example:
#
# 102.54.94.97 rhino.acme.com # source server
# 38.25.63.10 x.acme.com # x client host# localhost name resolution is handled within DNS itself.
# 127.0.0.1 localhost
# ::1 localhost
- Save with
Ctrl + S. - Run
ipconfig /flushdns.
Wrapping Up
Use one rule. If ping shows the wrong IP, the problem is the file or Windows itself (Fixes #1 to #4, #7, #9, and #10). If ping is right but the browser is wrong, look at the browser, a proxy, or a VPN (Fixes #5, #6, and #8). If both are right and the site still fails, the hosts file did its job, so check the target server. Most of the time it’s the boring stuff: a hidden .txt extension or a Notepad that wasn’t elevated. And if entries you never added keep appearing, stop troubleshooting and run a full Defender scan.
Last updated: September 27, 2026 | Applies to the Windows hosts file on Windows 11 and Windows 10