If you’ve had Facebook for a while, then you’ve probably built up a large archive of posts. What was considered “cool” to post in the past may now seem inappropriate. It isn’t just our friends and family that may look through these older posts. Employers actively look at social media profiles before they hire.
While you should certainly boost your Facebook privacy settings to prevent this, you may want to consider a more drastic approach. One way to protect yourself is to bulk delete all Facebook posts on your profile, removing them from view permanently. If you want to delete all of your Facebook posts, here’s what you’ll need to do.
How to Bulk Delete All Facebook Posts on PC or Mac
One of the easiest ways to go through and delete all of the Facebook posts on your profile is to use the website interface on a PC or Mac. The Facebook website allows you to review and clear out your older Facebook posts, where you can either archive your posts to hide them from view or delete them entirely.
If you’re worried about deleting your posts, don’t worry—Facebook uses a recycle bin system to give you an opportunity to change your mind. Posts placed in the Facebook recycle bin can be restored within 30 days. If you want to speed up their removal, however, you can delete Facebook posts immediately.
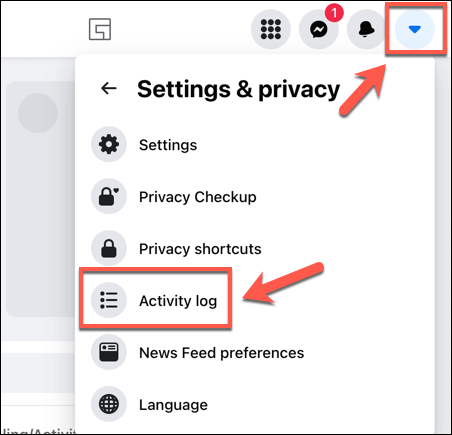
- To start, open the Facebook website and sign in, then select the downwards arrow icon in the top right. In the pop-up menu below, select Settings & privacy > Activity log.
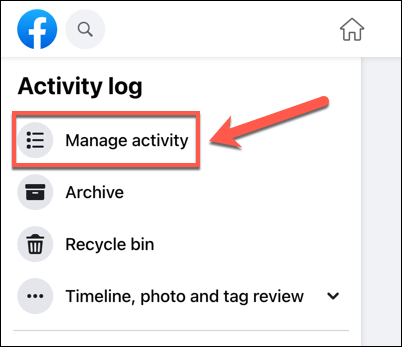
- In the Activity log menu, select the Manage activity option on the left.
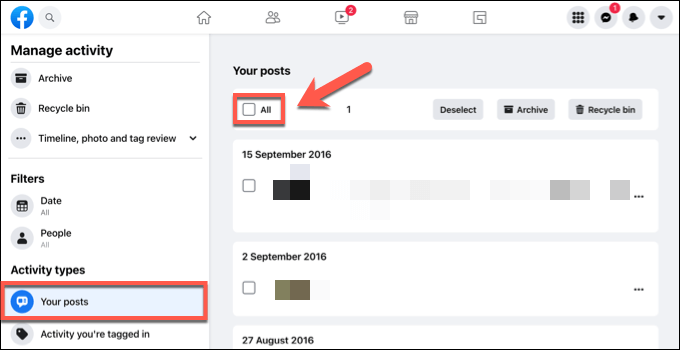
- In the Manage Activity menu, make sure that the Your posts option is selected on the left. You can review each post manually and select the checkbox next to each post to select it for removal or, alternatively, select the All box to select all of your profile posts.
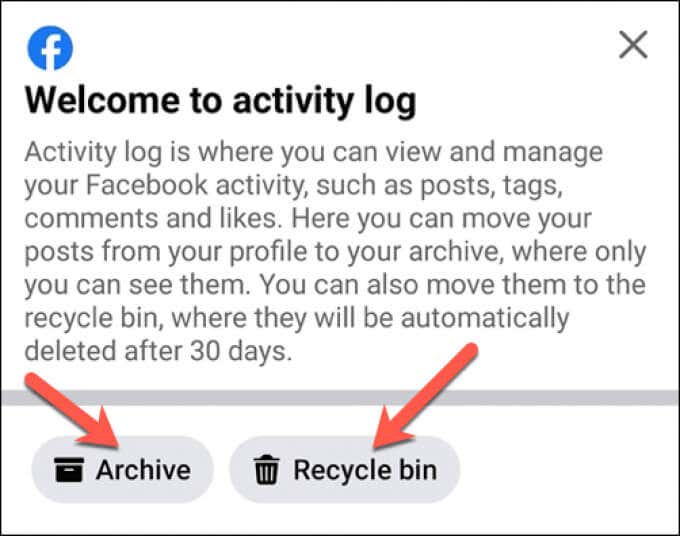
- Once you’ve reviewed and selected the posts, you can choose to archive the posts or delete them. Archiving them will hide the posts so that only you can view them in the future, but they’ll remain on Facebook. Select Archive to do this, or press Recycle bin to prepare the posts for removal.
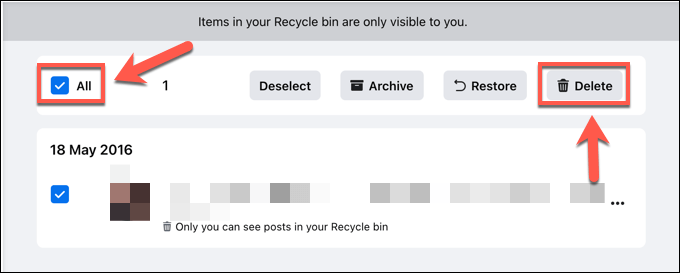
- If you archive the posts, select Archive in the left-hand menu to review them later. If you selected Delete, however, select Recycle bin from the menu list to remove them permanently. Select the posts you wish to delete, or select All to select them all, then select Delete to remove them permanently.
Once removed, Facebook posts can’t be retrieved—they’re gone forever. If you move posts to the Facebook recycle bin, but don’t delete them manually afterwards, you’ll still have 30 days to restore them or move them to your archive before Facebook deletes them automatically.
How to Delete All Facebook Posts Using Your Mobile Device
If you prefer to use Facebook on your Android, iPhone, or iPad device, you can use the Facebook app to bulk delete all Facebook posts on your profile. These steps follow a similar process to the Facebook website method demonstrated above and should work for both Android and Apple devices.
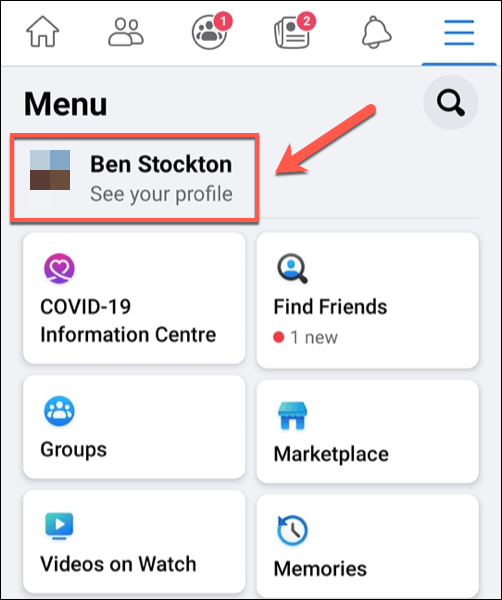
- To begin, open the Facebook app on your mobile device and sign in (if you aren’t already), then select the menu icon > See your profile to proceed.
- On your profile page, select the three-dots menu icon underneath your name.
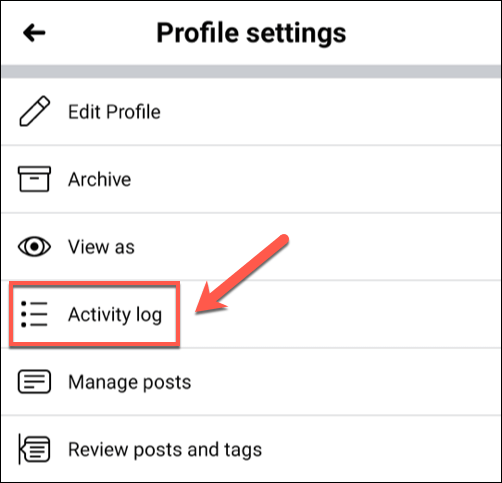
- In the Profile settings menu, select the Activity log option.
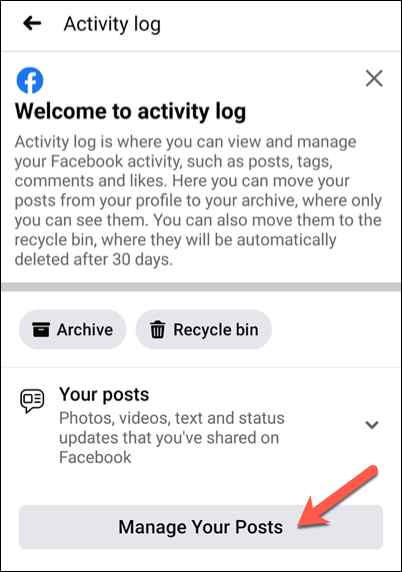
- Under the Your posts section of the Activity log menu, select the Manage Your Posts button.
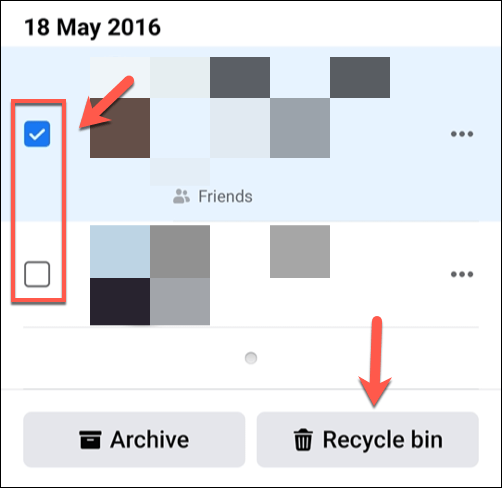
- Like the Facebook website, you can select individual posts to delete or archive by selecting the checkbox next to each post. If you’d rather delete all of the posts, however, tap to select the All checkbox. Select either Archive or Recycle bin at the bottom to archive or prepare the posts for deletion.
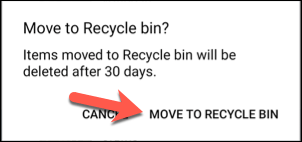
- If you choose to delete the posts, you’ll need to confirm that you want to move them to the recycle bin, where they’ll remain for 30 days before being deleted. Select the Move to Recycle Bin option to confirm your choice.
- Return to the Activity log menu to review your choices. If you want to review posts you’ve archived, tap the Archive option. Otherwise, tap Recycle bin to review posts that you’ve moved for deletion.
- In the Recycle bin menu, you can review posts that you’ve scheduled for deletion. To delete them immediately, however, select the individual posts or select the All checkbox to select them all. Select Restore to restore them, Archive to move them to your archive, or Delete to delete them permanently.
If you choose to delete your Facebook posts from the Facebook recycle bin, they can’t be retrieved and they’re lost forever. The same applies to any posts that remain in the recycle bin for 30 days or longer, as these posts will be removed at that point.
If you want to keep any of the posts, use the Archive function instead. This restores the posts, but hides them from view. Only you can review posts that you’ve archived, ensuring that any embarrassing posts you’ve made in the past are hidden from friends, family, and potential employers.
Better Privacy on Facebook
If you’ve deleted all of your Facebook posts, you’ve taken one step closer to removing the influence of the controversial social media network from your life. You can also consider downloading and deleting your data from Facebook to ensure you have a full archive of the information the company has collected in the past.
It doesn’t just stop there, however. You can block personalized Facebook ads to stop companies tracking you elsewhere using Facebook. Or, if you’re dealing with trolls, you may want to block someone on Facebook Messenger. You could also consider deactivating your Facebook account or deleting it entirely.

