With some practice and patience, you can learn how to animate in Photoshop and turn your work into a GIF to share online. Photoshop’s animation tools are often unknown but they’re well worth learning. We will be taking you through each step necessary to learn how to animate in Photoshop.
Like most animation tools, you’ll need to create each frame as separate images, so you’ll need to set aside some time to create each frame manually, especially if you plan to make a complicated animation.
Start By Making Your Animation Frames In Photoshop
To begin with, you’ll need to save a separate image for each of the frames you plan to use. It’s up to you how complex you want to make your animation, but for this test we’ll be creating a simple animated logo.
The trick for learning how to animate in Photoshop is to make small movements and save a new photo each time you make a movement. Each movement should have the same weight to it. For example, if you want a line of text to slide across the screen, each frame should make the text move the same number of pixels so the animation looks smooth.

If you’re not sure how you can get from point A to B in your animation, start with the end frame first, then create the first frame. Finally, fill in the frames in between.
As you save each image, name them numerically so that you don’t get confused with their position.
How To Animate a Sequence Of Images In Photoshop
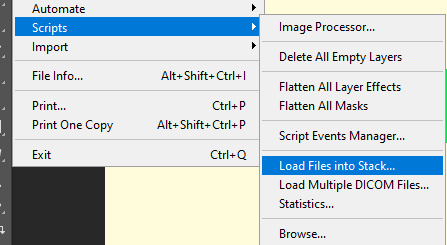
Once you have your frame-by-frame images it’s time to turn them into an animation. Make sure to follow the steps below carefully.

- Click File, Click Scripts, then click Load Files Into Stack..
- Click Browse… and select all of your frames for your animation.
- Click OK and wait for the images to load into seperate layers.
- Click Window and then Timeline to open the animation window.
- Click the dropdown arrow in the timeline panel and select Create Frame Animation.
- Click Create Frame Animation.
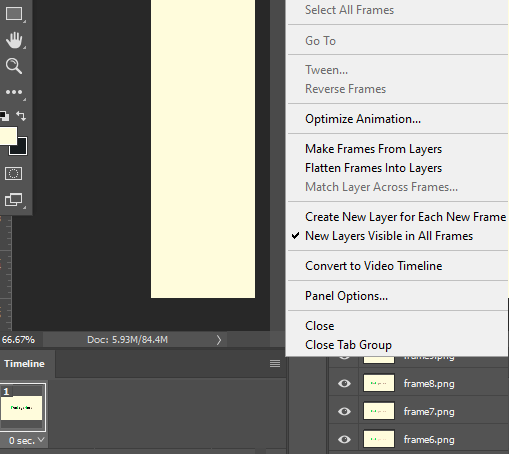
You will now have a layer in your timeline. The next step is to turn each of your layers into a new frame. Follow the steps below.
- Click Select at the top and then click All Layers.
- Click the three stack menu icon on the left side of the timeline panel.
- In the menu that appears, click Create New Layer for Each New Frame.
- Click the three stack menu icon and now click Make Frames From Layers.

You will now have all of your images loaded into separate frames. The next task is to choose a time for how long each frame will play. It may take some testing to get the right speed, but you can choose the frame time for each individual frame by clicking the arrow under each frame next to the 0 sec text.
You can experiment with different times, but it’s best to start by choosing the same time with each frame. If an animation contains different scenes or phases of animation, you may want to adjust the timings for each of those phases/scenes individually.
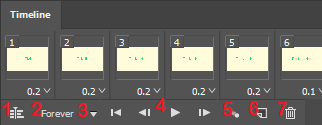
At any time you can click the play button to view the animation. There are a number of other controls on the timeline window too, which we have explained from left to right below.
Timeline Switch
Switch the timeline between a frame-by-frame timeline and a traditional movie timeline.
Playback Amount
Change whether the animation plays forever or for a certain number of loops before stopping. This will impact the end result once it is saved as a GIF. You can change this setting again before you export the animation later.
Playback Dropdown
The dropdown arrow you see on the timeline controls is another method for accessing the playback amount.
Playback Controls
Play, pause, stop, and jump the animation to the end or the beginning with the four available playback controls.
Tween
Use the Tween feature to generate “in-between” frames to make your animation look smoother. The Tween feature will be explained in more detail below.
Duplicate Frame
This button will duplicate any currently selected frame and will place it in the timeline after the original.
Delete Frame
This option will delete any selected frame.
How To Export Your Photoshop Animation
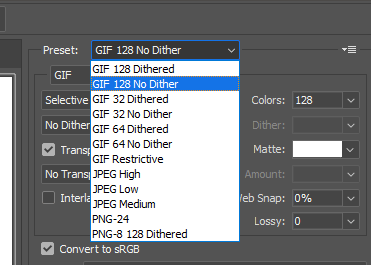
Once you’re happy with your Photoshop animation, you can export it by following the steps below.
- Click New.
- Click Export and then click Save for Web (Legacy)…
- If you have an animation with detailed colors, select GIF 128 Dithered under the preset dropdown.
- If you have an animation with simple block colors, choose GIF 128 No Dither.
- Make sure you have your preferred option set in the Looping Options at the bottom.
- Finally, click Save… and choose a place to save your GIF on your PC.
How To Make An Animation Smooth In Photoshop
Unless you’re experienced at making frame by frame animation, the end result may look a little jolty. Thankfully you can use the Tween feature to fill in the gaps automatically in your animation to make things look smoother.
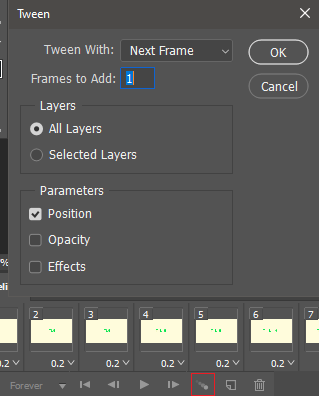
To do this, hold the shift key, click two individual frames in the timeline window, and click the Tween icon. Next, click to choose whether the Tween setting will use position, opacity, or effects. For most movement-based animations, you’ll want to use position.
Make sure All Layers are selected and then click OK. Repeat this process for each paired frame. For example frame 1 and 2, then frame 3 and 4, and so on.
Summary
We hope that our guide on how to animate in Photoshop has helped. If you need any more help, feel free to leave a comment below.
Related Posts
- How to Fix App Notifications in Windows?
- Using an Old Device? 5 Account Security Settings You Should Enable
- How to Find Features Moved from Control Panel to Settings in Windows 11?
- How to Back Up Your Android Downloads Automatically?
- Camera Not Working in Zoom or Teams? Quick Fixes for Windows and macOS
Ollie stumbled upon writing online whilst participating in a mobile network forum back in 2011. Since then, he has developed an incredible passion for writing about all sorts of tech from smartphones, PC hardware, software, and everything in between. Read Ollie’s Full Bio
