Do meeting participants struggle to hear you during Zoom calls? Does your microphone abruptly stop working mid-meeting? These are some embarrassing online meeting moments we all try to avoid. If this describes your current situation, the solutions in this guide will help you fix audio-related issues on Zoom.
You may experience microphone failures on Zoom for varying reasons ranging from temporary software glitches to incorrect audio settings, or even hardware problems.

So before anything, check that the microphone is working correctly. You can fire up other video conferencing apps and check if they detect your mic. For external headphones and portable USB microphones, make sure the cables aren’t broken. Likewise, confirm that they are correctly plugged into the appropriate ports on your computer.
You could also switch the microphone to another port on your PC or try using it on another computer. This would help determine whether the microphone isn’t working on Zoom because you have a faulty mic or a damaged port.
If the microphone is still not working on Zoom, refer to these troubleshooting recommendations below.
1. Check that Microphone Isn’t Muted
If participants cannot hear you in a Zoom meeting, make sure your microphone is not muted. That should be your first course of action. Look to the bottom-left corner of the meeting window and click Unmute.

Quick Tip: Use Alt + A (for Windows) or Shift + Command + A (for Mac) to quickly unmute or mute your microphone in Zoom.
If your headphone or external microphone has a dedicated mute button, check that it hasn’t been toggled on by accident.
To prevent Zoom’s microphone from automatically muting your microphone, go to Settings > Audio and uncheck the option that reads Mute my microphone when joining a meeting (for Windows) or Mute my mic when joining a meeting (for Mac).
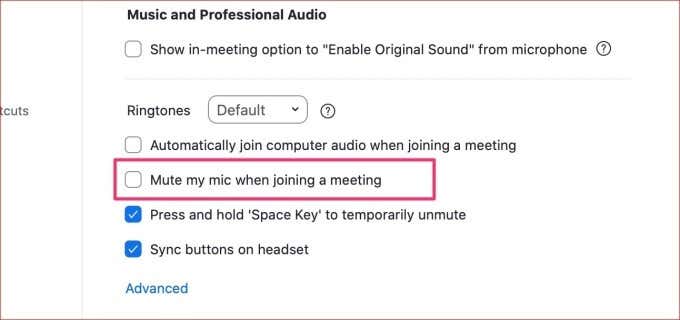
2. Check Zoom’s Microphone Selection
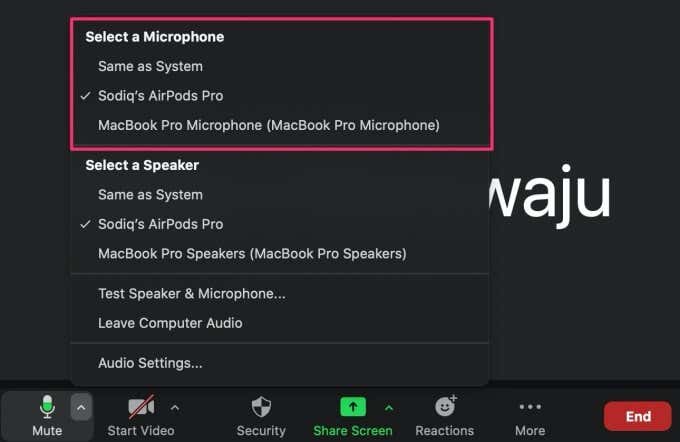
When there are multiple audio devices connected to your computer, Zoom uses the mic of the active audio device. Nonetheless, you should still vet Zoom’s microphone selection.
In the meeting windows, click the arrow-up icon to the right of the Mute button and choose your preferred microphone in the Select a Microphone section.
3. Adjust Your Microphone’s Volume
Do your coworkers often ask that you speak a little louder during Zoom meetings? Then you should increase your mic’s volume. Conversely, turn down the microphone’s volume if you appear to be speaking too loudly.
Adjust Microphone Volume on Windows
If you’re using a Windows computer, follow the steps below to increase (or decrease) your microphone’s input volume.
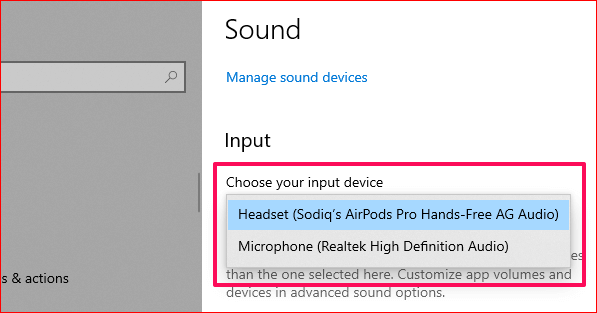
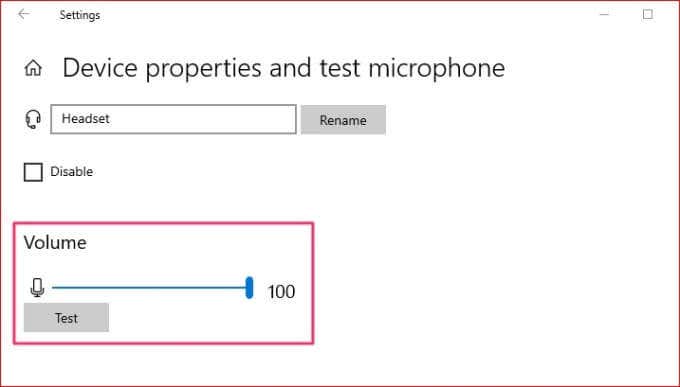
1. Go to Settings > System > Sound and select your audio device in the Choose your input device section.
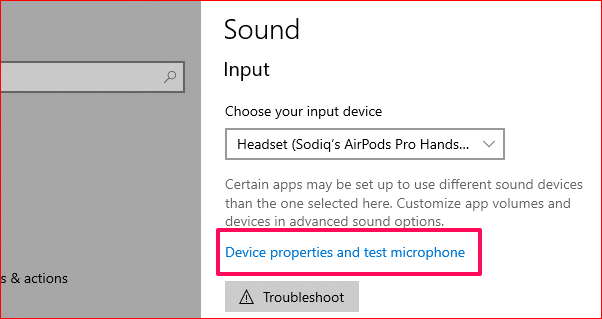
2. Next, click Device properties and test microphone to enter the device settings page.
3. Here, use the Volume slider to adjust the microphone’s volume to your preference.
Adjust Microphone Volume on Mac
Here’s how to check and adjust the input volume of your Mac’s built-in microphone as well as external audio devices.
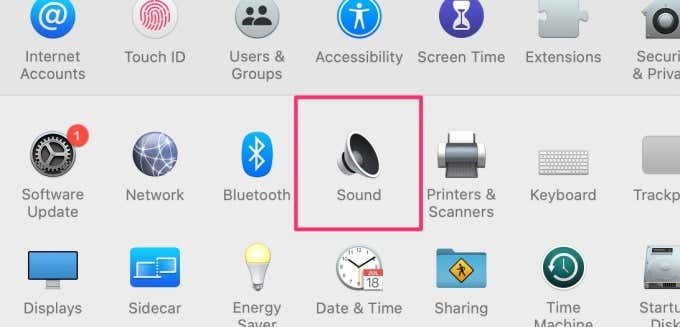
1. Launch System Preferences and click Sound.
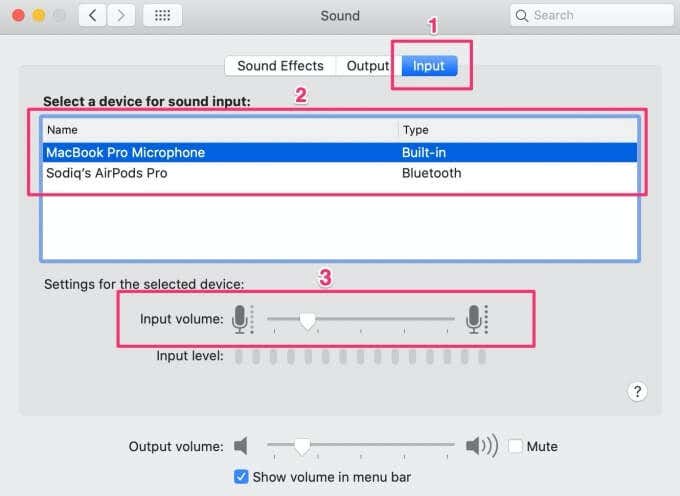
2. Navigate to the Input tab and click on your input device (i.e. microphone).
3. Move the Input volume slider to the right to increase the microphone’s volume.
Adjust Microphone Volume in Zoom
You can also adjust the microphone’s volume via Zoom’s audio settings menu. Go to Settings > Audio and move the slider below the Input Level bar.
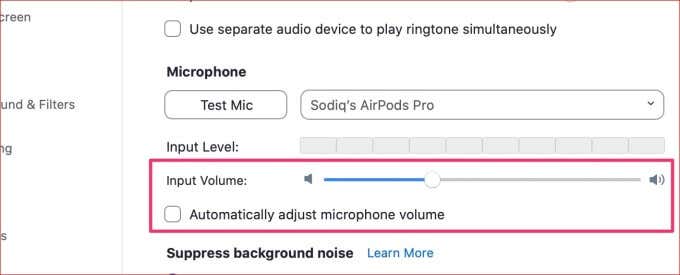
If the volume slider is greyed out, uncheck the Automatically adjust microphone volume option.
4. Reduce or Disable Zoom’s Background Noise Suppression
By default, Zoom fine-tunes your microphone’s output using its Background Noise Suppression technology. This filters out distracting ambient noises to improve your meeting experience. Despite its perceived benefits, Background Noise Suppression sometimes results in reduced microphone output and other audio problems.
Reduce the aggressiveness of Zoom’s noise suppression and check if that resolves the microphone hitch. Go to the Zoom audio settings page and switch the Suppress background noise option from Auto to Low (faint background noises).
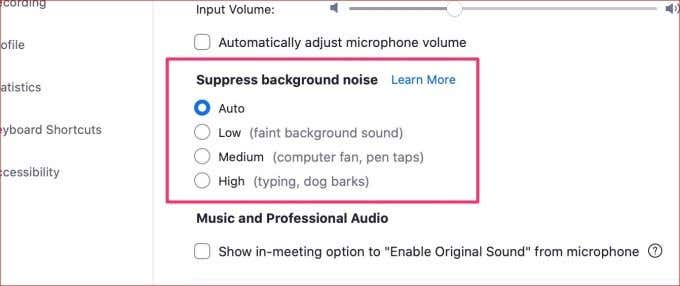
If your mic’s output still sounds unnatural and ‘over-filtered,’ disable Zoom’s noise suppression. To do this, check the box that reads Show in-meeting option to “Turn On Original Sound”. You’ll find this option in the Music and Professional Audio section (see screenshot above).
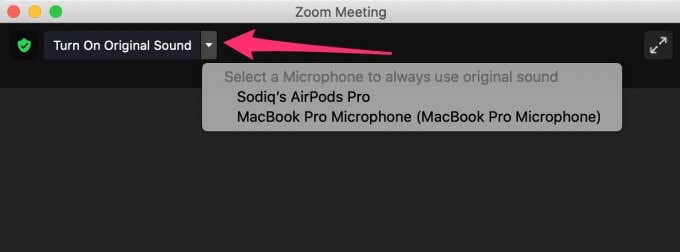
Head back to the meeting window and click the Turn on Original Sound button at the top-right corner. If you have multiple audio devices connected to your computer, click the drop-down icon next to the option and select your preferred microphone.
5. Make Sure Zoom Can Access Your Microphone
You also want to ensure that Zoom has access to your computer’s microphone.
Check Zoom’s Microphone Permission on Windows
Launch the Windows Settings app and go to Privacy. Navigate to the App permissions section on the left sidebar and select Microphone.
You need to enable two important permissions on this page for any microphone (built-in or external) to work with Zoom on your computer. First, toggle on the Allow apps to access your microphone option.
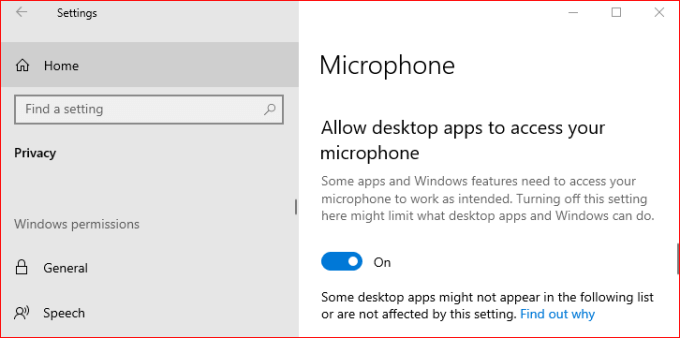
Scroll further down the page and also toggle on Allow desktop apps to access your microphone.
Check Zoom’s Microphone Permission on Mac
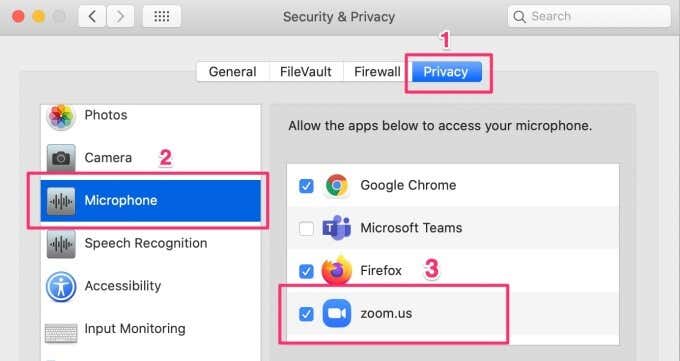
Go to System Preferences > Security & Privacy and go to the Privacy tab. On the left sidebar, click Microphone and make sure Zoom (or zoom.us) is enabled.
6. Restart Zoom (and Your Computer)
Zoom—like every other Windows app—may malfunction due to temporary glitches with the app or your computer. If that’s the case, close the app and try again. Should the problem continue when you relaunch Zoom, try restarting your computer.
7. Troubleshoot Your Computer’s Microphone (Windows)
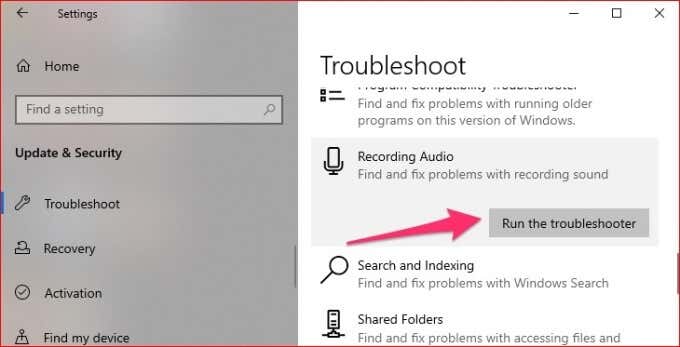
Windows has a built-in tool that helps to diagnose and fix problems with microphones connected to your computer. To use this tool, go to Settings > Updates & Security > Troubleshoot > Recording Audio and click the Run the troubleshooter.
If you have more than one microphone connected to your computer, select the problematic device, and click Next to proceed.
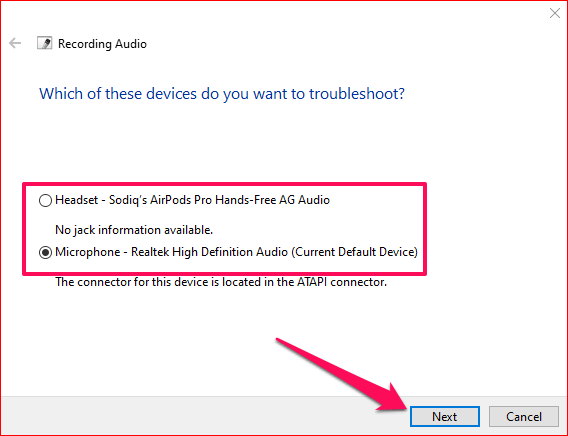
If the troubleshooter detects a problem, it’ll either fix it automatically or provide instructions on how to fix the issue.
8. Update Zoom
Finally, make sure you have the latest version of Zoom installed on your computer. Zoom often rolls out updates that patch bugs and fix issues such as microphone failures. To update Zoom, click the Profile icon at the top-right corner and select Check for Updates from the menu.
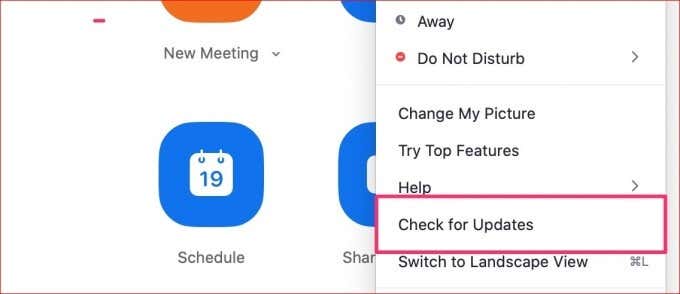
If an updated version of the app is available, click the Update button to install it on your computer. Hopefully, this helps to fix the Zoom microphone not working issue.
Restore Zoom’s Microphone, Get Heard
Besides the tips listed above, we also recommend updating the microphone driver of your Windows computer. Some external headphones and microphones have their individual drivers; make sure those are also updated.
Finally, close other apps that could be using your computer’s microphone. If, for example, you have a voice recording app running in the background, that could cause your PC’s microphone not to work with Zoom (or other apps).
Things can go south with Zoom pretty quickly, especially when you least expect it. Sometimes you’re set for a meeting but Zoom’s camera refuses to work. Other times, it’s audio-related problems. Use the tips in this article to resolve microphone issues on Zoom for Mac and Windows computers.
Related Posts
Sodiq has written thousands of tutorials, guides, and explainers over the past 4 years to help people solve problems with Android, iOS, Mac, and Windows devices. He also enjoys reviewing consumer tech products (smartphones, smart home devices, accessories, etc.) and binge-watching comedy series in his spare time. Read Sodiq’s Full Bio
