If you want to add minutes to a time notation in Microsoft Excel, there are several ways to do it, as long as you understand how Excel calculates time.
To add minutes to time in Excel, follow the steps outlined below.
Understanding Time in Excel
Time in Excel is represented as fractional days. For instance, an hour is 1/24 of a day, and a minute is therefore 1/1440 (since a day has 1440 minutes). You can add minutes to time by combining the original time data with the fraction that represents the minutes you want to add.
Excel translates the decimal equivalent of these fractions into easy calculations that can be manipulated further using formulas.
Excel’s Time Format
Excel represents time using the 24-hour time format, h:mm. Every time value is a fraction of a day, with midday represented as 0.5.
Serial Numbers and Time
In Excel, dates and times are stored as serial numbers. The integer part signifies the date, while the decimal part reflects the time. For instance, 12:00 PM is 0.5 since it’s half a day. You’ll need to understand this when working with time, as Excel internally calculates with these numbers.
How to Add, Subtract, and Calculate Time in Excel
Working with time in Excel requires an understanding of the cumulative time value, which combines hours, minutes, and seconds. Excel treats these as parts of a day, making calculations straightforward once you get the hang of it.
Adding Minutes to Time
To add minutes to an existing time in Excel, you can use the TIME functions. TIME, for instance, uses the following syntax: TIME(hour, minute, second).
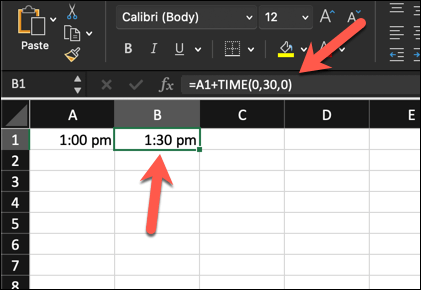
If you have a time value in another cell, you can add to this using time. For instance, if the time in A1 is 1:00 PM, you can use the following formula to add 30 minutes to it:
=A1+TIME(0,30,0).
This is because the minute value is 30, which TIME converts into the required decimal fraction to add to the original time in A1, returning 1:30 PM.
Subtracting Time
Subtracting time in Excel provides the difference between two time values. This is much easier, as long as you have two time values to work from.
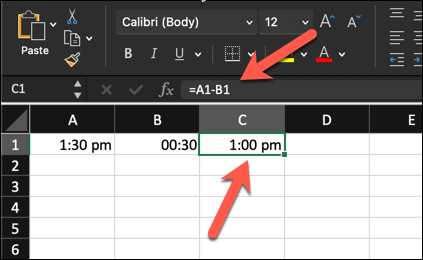
For instance, if A1 contains 1:30 PM, and A2 contains 0:30 (meaning 30 minutes), you can use the simple subtraction calculation =A2-A1 to remove 30 minutes, returning 1:00 PM.
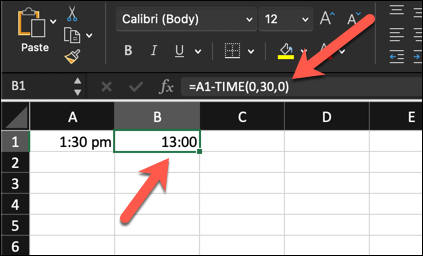
You can also use TIME to do this. For instance, =A1-TIME(0,30,0) would subtract 30 minutes from the value in A1. If A1 contains 1:30 PM, this would also return 1:00 PM.
Calculating Elapsed Time
You might be looking to calculate the elapsed time or the difference between a start and end time. At its most basic, this is the same as subtracting one time value from another, so you can use a similar subtraction as the one shown above.
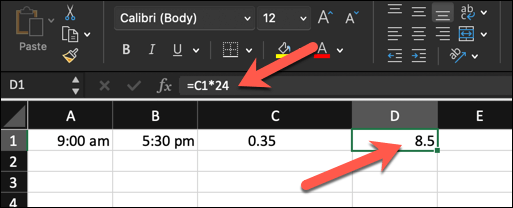
For example, if your start time is 9:00 AM in cell A1 and the end time is 5:30 PM in cell A2, your formula would be =A2-A1. This will give you the duration between these two times as a decimal fraction of a complete date—0.33.
You can then times that value by 24 to see the value as the total number of elapsed hours or minutes.
Related: After mastering time manipulation, why not learn how to add and subtract dates in Excel, too?
Advanced Time Calculations in Excel
If you’re trying to manage more complex time calculations, you might need to look at more advanced Excel time calculations instead.
Handling Durations Over 24 Hours
To accurately record times that span more than 24 hours, you’ll need to adjust Excel’s time format. By default, Excel interprets time cycles every 24 hours, which can cause confusion with elapsed time.
To handle durations exceeding 24 hours, follow these steps, which will work for both Windows and Mac users.
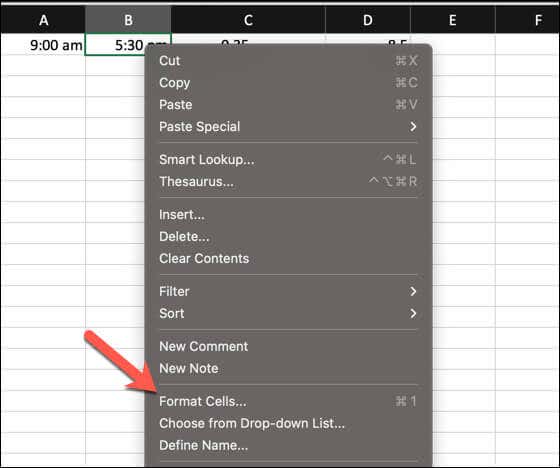
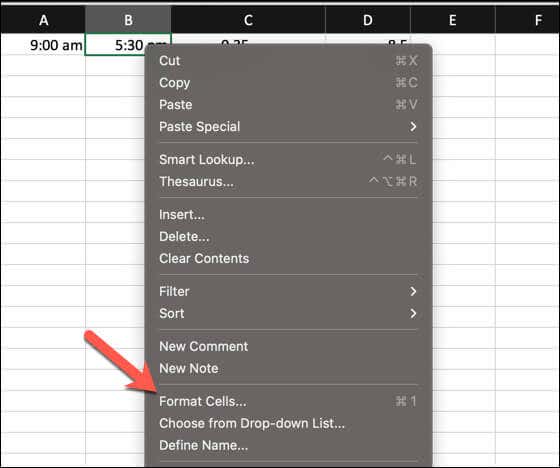
- Right-click the cell you want to format and select Format Cells.
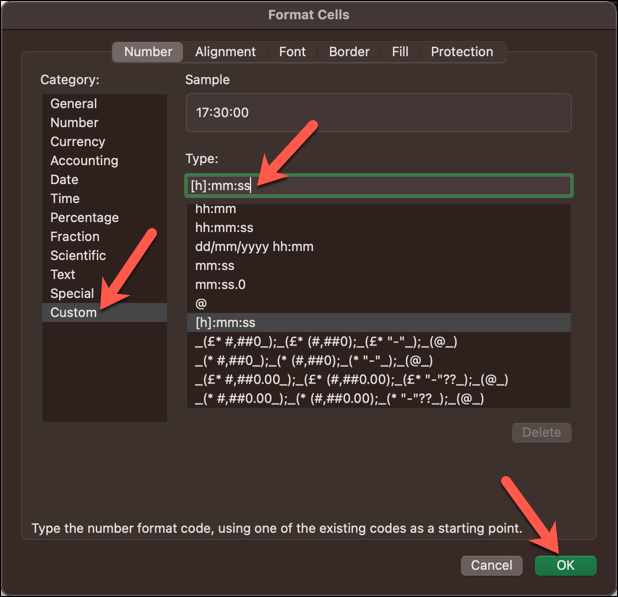
- In the Format Cells dialog, choose Custom from the Category list.
- Type [h]:mm:ss for the Type value to display elapsed time that spans across multiple days without resetting at 24 hours.
- Press OK to update the number type.
Using Formulas for Cumulative Time
Summing up time to get a cumulative value might involve adding multiple time segments. You can easily do this using a SUM formula.
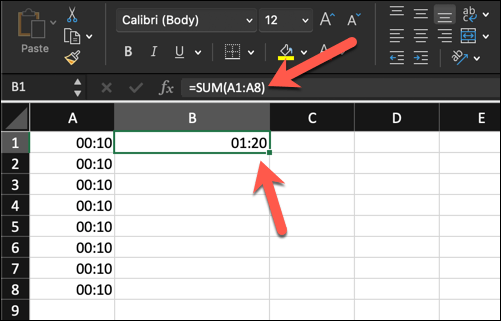
Let’s assume you have individual time values in separate cells over cells A1 to A8. You can use the SUM function in a formula, such as =SUM(A1:A8), to add up these time values to get the total.
If the result doesn’t format correctly, especially if the total cumulative time value is over 24 hours, change the cell number formatting using the steps in the previous section to handle longer durations.
Using a Custom Number Format in Excel
In Excel, custom number formats allow you to fine-tune how your data looks without altering the actual values. You might have start and end times within your dataset and need to format the cells to display the elapsed time precisely.
We’ve explained already how you can use a custom number format to deal with complex time values, such as those that go over the 24-hour limit. You can customize the formatting further to control and display the existing time values in a cell exactly how you need them, whether that’s in hours, minutes, or seconds.
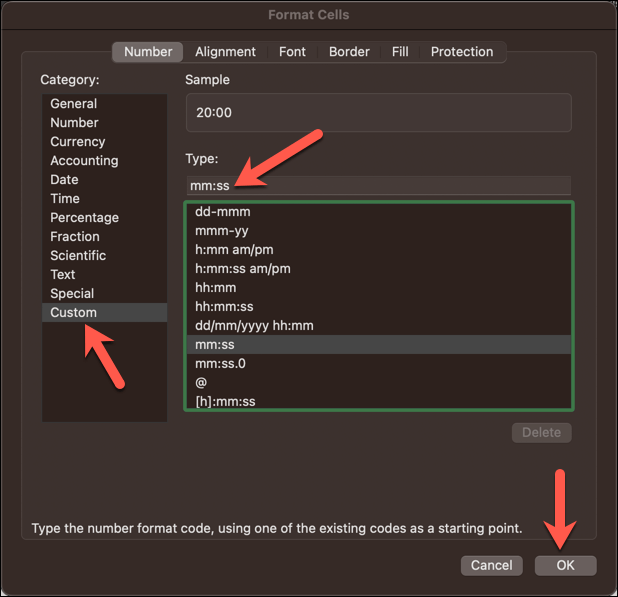
To customize the time format for specific tasks, follow these steps.
- Begin by selecting the cell where you have the existing time value.
- Right-click on the cell and choose Format Cells.
- Navigate to the Number tab in the dialog box.
- From the Category options on the left, select Custom.
- In the Type box, you can enter the format code. For instance, use mm:ss to display minutes and seconds, or hh:mm:ss to include the hour.
- Confirm by clicking OK. Your cell will now reflect the time with the added minutes in the format specified.
Working Out Time in Excel
Using basic calculations or the TIME function in Excel, you can easily add minutes to existing times in your Excel spreadsheet. This will be useful for all kinds of applications, from timesheets to project management tools.
Need to quickly put the current time into your Excel spreadsheet? You can add a timestamp in Excel using a quick keyboard shortcut.
Related Posts
Ben Stockton is a freelance technology writer based in the United Kingdom. In a past life, Ben was a college lecturer in the UK, training teens and adults. Since leaving the classroom, Ben has taken his teaching experience and applied it to writing tech how-to guides and tutorials, specialising in Linux, Windows, and Android. He has a degree in History and a postgraduate qualification in Computing. Read Ben’s Full Bio

