Stream is Microsoft’s video-sharing service where users can view, upload, and share videos securely with other people in the same organization. It’s only available to Microsoft 365 subscribers, and it’s browser-based—i.e., there’s no stand-alone Stream desktop app.
While Microsoft Stream is definitely not a robust video editor, it does allow you to trim the beginning and/or end of a video quite easily. If trimming is the only kind of editing you need to do to your video, Stream will work just fine.
If, on the other hand, you want to do more intensive video editing, you’ll be better off with a better video editor that can handle elements like soundtracks, cutting from the middle of a video, adding b-roll, and transitions between clips.
How to Find Your Videos in Microsoft Stream
To begin, find or upload the video you want to trim on Microsoft Stream. Videos that you record from within the Microsoft 365 platform are automatically saved to your Microsoft Stream, including any Microsoft Teams meetings that you have recorded or screen recordings you have made with Stream.
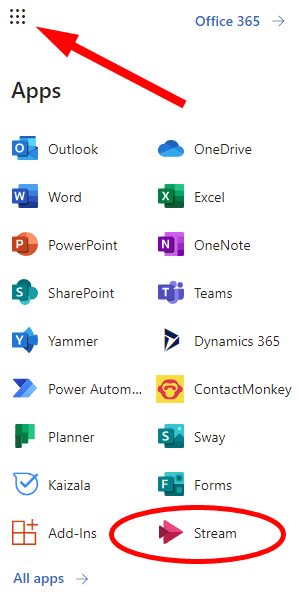
- Log into your Microsoft 365 account in a web browser, open the list of apps via the checkerboard icon in the top-left corner of the page, and select Stream.
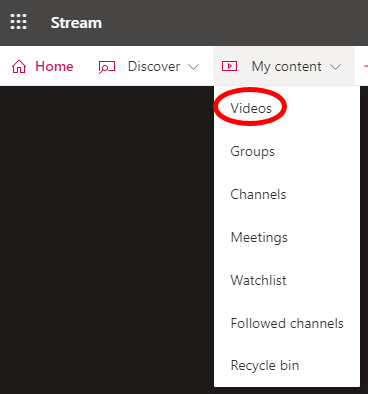
- Next, select My Content from the menu and then select Videos.
You will see a list of all the videos saved to your Stream.
How to Upload a Video to Microsoft Stream
If you want to upload a video from your device to Microsoft Stream so you can trim it, follow these steps.
- Select the Create menu and choose Upload Video.
- Note the warning.
- Drag the video file you want to upload into the Stream browser window or select the link to browse your files and select the video you want to upload.
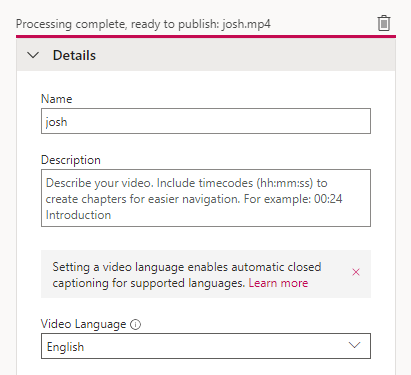
- Once your video has uploaded, you can add some details. Give your video a Name and Description. If you want to enable automatic closed captioning, set the Video Language.
- This is also where you can pick which image to use for your video’s Thumbnail.
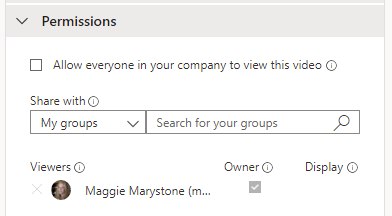
- Set the permissions for your video. Watch out, because videos are automatically set to be viewable by anyone in your organization! Uncheck that box if you want to restrict viewing. You can opt to share your video with specific people, a particular Channel on Microsoft Teams, or a group.
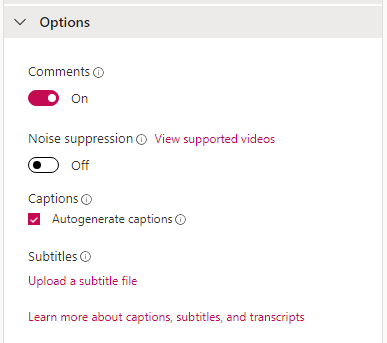
- Next, set the Options for your video. These include turning comments on or off, turning on Noise suppression, using auto generated captions, or uploading a subtitles file.
- When everything looks good, select the Publish button.
(Note: You can edit all these details, permissions, and options later by visiting My content > Videos and selecting the Update video details icon.)
Trimming Your Video in Microsoft Stream
It’s important to note that in order to use the trimming feature in Stream, you must use a supported browser. Currently, supported browsers include:
- Apple Safari 10 or higher on Mac OS 10.10 or higher
- Google Chrome on Windows 7 or higher or on Mac OS 10.10 or higher
- Microsoft Edge on Windows 10
- Firefox version 42 or higher on Windows 8.1 or higher
Now it’s time to find your video and trim it.
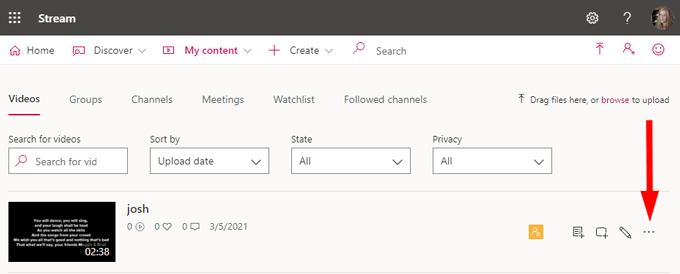
- First, visit My Content > Videos and find the video you want to trim. Select the More/Ellipsis icon to the right of your video.
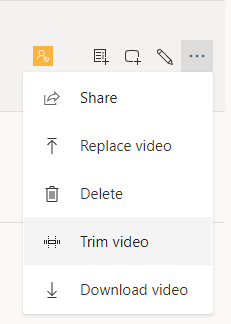
- Select Trim video.
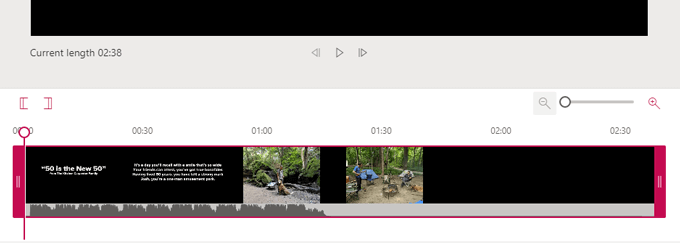
- Stream will open your video. You’ll see the video player with rewind, play, and fast forward controls. Beneath that is the video’s timeline. That’s where you can trim off the ends of your video.
- Drag the pink trim handles left and right to set the trim points. Essentially, any part of the timeline that appears before the left trim handle or after the right trim handle will be discarded.
- The vertical pink line with the circle at the top is called the playhead. As the video plays, the playhead will show you where you are in the timeline. If you want to set a trim point to the playhead, use the Set trim start point and Set trim end point buttons. They will snap the trim point to wherever the playhead is on the timeline.
- You can zoom in and out on the timeline by using the magnifying slider. Zooming in will help you be more precise as you set your trim start and end points.
- When you’re satisfied with your video, select the Apply button at the top of the screen. Stream will permanently discard the parts of your video before the trim start point and after the trim end point, so make sure you have an untrimmed version of the video saved if you think you might need those discarded parts later.
The time it will take for your trimmed video to become available will depend on the video’s size and bitrate. As soon as a 360p version of the video is ready, Stream will make the video available for you (and others) to play.
As higher resolution versions are encoded, your video will play in the highest resolution available. Find your trimmed video by going to My content > Videos.
Videos in the Workplace Are Here to Stay
In a world where virtual meetings are the norm, not the exception, giving stakeholders access to meeting recordings and other video presentations allows them to stay in the loop on business processes and decisions, even if they weren’t able to attend the meeting. Cutting unimportant chit chat and dead time from the beginning and end of meeting recordings is just one example of when trimming videos can be valuable.
And, of course, you can use Stream to trim other kinds of videos, too. Training videos, product demonstrations, and onboarding videos can all benefit from trimming.
Related Posts
Maggie Marystone is a freelance technology writer, human rights worker, and storyteller based in Chicago. Read Maggie’s Full Bio
