If you’re experiencing a bit of system sluggishness after closing it, you might not realize that it is Microsoft Edge running in the background, even after you’ve closed the browser. This behavior can impact the performance of your system negatively, and if you’re using a laptop, it can cause battery drain issues.
Microsoft Edge has settings that determine whether it continues to operate in the background. To stop this, you’ll need to prevent Edge from running when it’s not actively in use. We’ll explain a few methods to do this below.
Force Microsoft Edge to Close Using Task Manager
When Microsoft Edge continues to run in the background, it’ll continue to use system resources and potentially affect performance. To ensure that Edge completely closes, you can use the Task Manager to force Edge to exit completely.
To shut down Microsoft Edge via Task Manager, follow these steps.
- Right-click the taskbar and select Task Manager.

- In the Processes tab, look for any sign of Microsoft Edge.
- Select the Microsoft Edge process to highlight it. In the top-right corner of the window, press End Task to terminate the process.
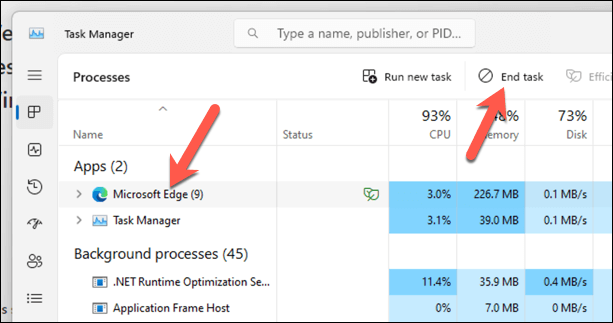
After completing these steps, the Edge process will stop and should no longer impact your system’s performance. However, this is only a temporary solution—you’ll need to change your system settings to stop it happening again in the future.
How to Change Microsoft Edge Power Settings
Microsoft Edge has a particular setting that allows it to run certain applications or extensions in the background, even if it appears to be closed. If this is undesirable behavior, you’ll need to adjust these power settings in Microsoft Edge using the following steps.
- Open Microsoft Edge on your PC and press the three-dot menu in the top-right corner.
- Select Settings from the drop-down menu. Alternatively, type edge://settings/system into the Edge address bar and press Enter.
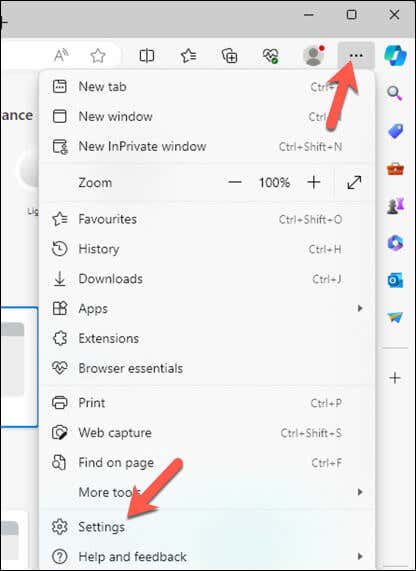
- In the Settings menu, press System and performance.
- Locate the Continue running background extensions and apps when Microsoft Edge is closed setting and toggle the switch to the Off position.
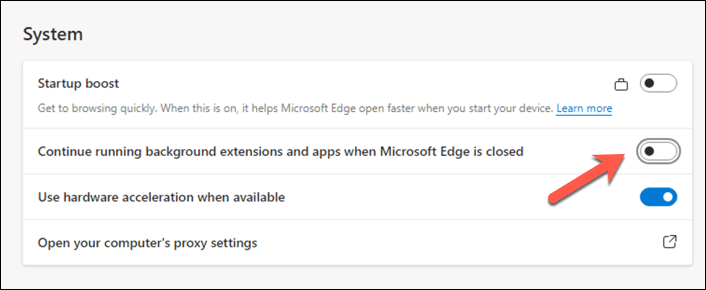
- Restart Edge to make sure that the setting is in effect.
Edit the AllowPrelaunch Key in Windows Registry
If you want to control how Edge impacts your system performance, you can modify the Windows Registry. You can make changes to the AllowPrelaunch registry key, which will prevent Edge from preloading when your computer starts. This will ensure Edge only runs when you explicitly open it.
To modify the AllowPrelaunch setting in the registry, follow these steps.
- Press Win + R to open the Run box, type regedit into Run, and press Enter to launch the Registry Editor.
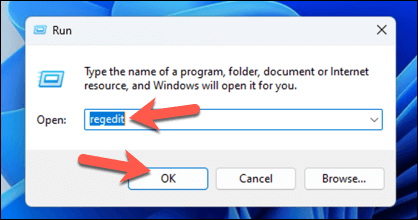
- Use the navigation bar at the top or the tree menu on the left to navigate to this key: HKEY_LOCAL_MACHINESOFTWAREPoliciesMicrosoftEdge.
- Look for a DWORD named AllowPrelaunch. If it doesn’t exist, you’ll need to create it. To do this, right-click in the right pane, select New > DWORD (32-bit) Value, and name it AllowPrelaunch.
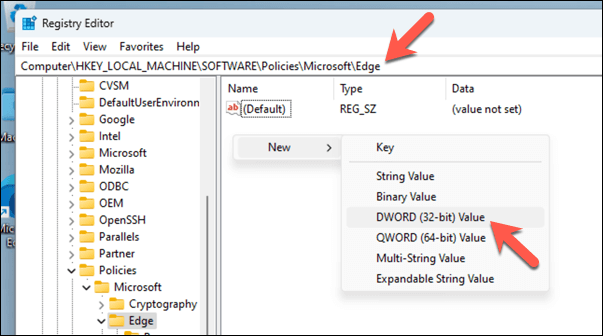
- Double-click AllowPrelaunch and set the Value data to 0 to prevent Edge from running at startup.
- Click OK to apply the changes, then close the Registry Editor and reboot your computer to apply the new setting.
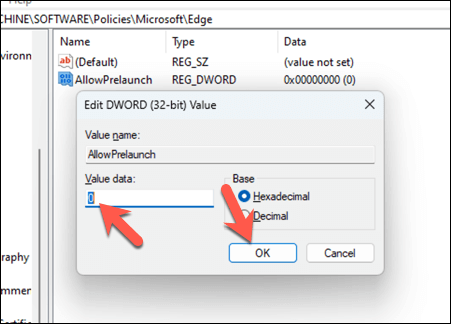
This change will stop Edge from preloading after your computer boots up and when the system is idle. If you want to revert this setting and allow Edge to preload again, simply change the AllowPrelaunch value back to 1.
Editing the registry directly is risky, so make sure to follow the instructions carefully and back up your registry first—that’ll allow you to easily revert the changes if you run into any problems.
Changing Your Microsoft Edge Settings
The steps above will help you to stop Edge from running in the background when it’s closed. If your Windows 11 PC seems sluggish, making changes to background applications like Edge can help you speed things up.
Having trouble with Edge? If Edge isn’t opening properly, you can always reset the application in your Windows Settings menu.
Related Posts
- How to Fix Windows 11 Boot Loops After Jan 2026 Update
- How to Remove Copilot AI in Window 11? New Update Available in Beta
- January 2026 Patch Tuesday: 7 Things Windows Users Should Do Before and After Updating
- How to Fix Windows 11 December Update Bugs (File Explorer Flashes, WSL + VPN Issues)
- How to Repair a Corrupted User Profile in Windows 11
Ben Stockton is a freelance technology writer based in the United Kingdom. In a past life, Ben was a college lecturer in the UK, training teens and adults. Since leaving the classroom, Ben has taken his teaching experience and applied it to writing tech how-to guides and tutorials, specialising in Linux, Windows, and Android. He has a degree in History and a postgraduate qualification in Computing. Read Ben’s Full Bio

