Follow these simple step-by-step instructions
In this troubleshooting guide, we are going to offer a number of tips for when your USB 3.0 ports aren’t working. Usually, there are only a few different causes for a faulty USB slot – we hope that these tips will help you to fix it by trying to solve each of these causes step by step.
The tips we offer will be straightforward for you to try for yourself, regardless of your computer literacy. Just make sure to read each suggestion carefully and follow the steps we recommend.
Hopefully, once you have finished reading, you will have pinpointed the issue and will have your USB 3.0 ports working again.
Make Sure Internal Cables are Connected
The first thing to consider is whether the internal cables are connected to your USB 3.0 ports. This will only matter if you have a PC and you are trying to use the front USB ports.
If you are struggling with USB 3.0 ports on the back of your PC or on a laptop, you can skip this suggestion. You will need to open your case to access the motherboard. Switch off your PC first and unplug it from the wall.
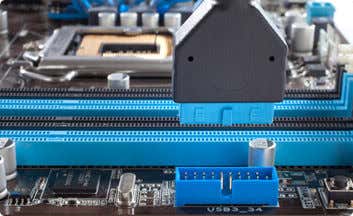
The image we have above, provided from ASUS, showcases what a USB cable looks like and where it needs to connect. The text ‘USB 3’ Usually, you will find this at the bottom of your motherboard. Make sure it is connected – if it is, you’re good to go.
If not, you should be able to find the loose USB 3.0 cable and connect it. If you can’t find one that looks like the image shown above, it may be because your computer case does not have USB 3.0 ports on the front.
Install the Latest Drivers
There’s a small chance you may need to update your USB 3.0 drivers. First, you must find out which drivers your PC actually needs. You can visit the device manager to find out. Follow the steps below for guidance.
- Press the Windows Key
- Search for Device Manager
- Click Device Manager once it appears
- In Device Manager, look for Universal Serial Bus controllers
- Click the small arrow next to the text to expand it
- Next, look for your USB 3.0 or 3.1 driver name
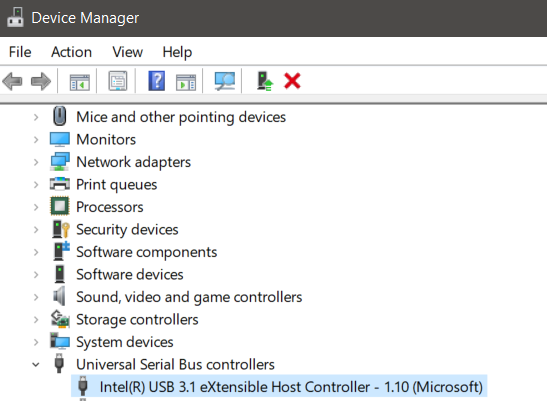
In my case, it was the Intel USB 3.1 eXtensible Host Controller. Now that we have the driver name, we can search google for it. This lead me to an Intel website with the download link for Windows 7.
Make note that you are downloading the right driver for the right operating system. Before downloading, click the lock icon in the top next to the website address to verify it’s the correct source.
If there isn’t an available link for your operating system, it may be because that manufacturer doesn’t offer driver downloads and expects you to get it through your operating system. In this case, you can check for updates by following the steps below.
- Press the Windows Key
- Search for Device Manager
- Click Device Manager once it appears
- In Device Manager, look for Universal Serial Bus controllers
- Click the small arrow next to the text to expand it
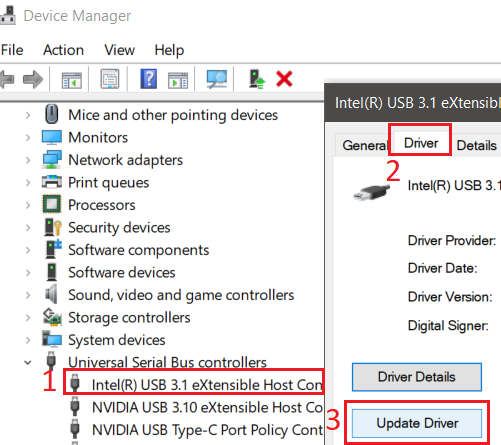
- Right click your USB 3.1 driver, and click Properties
- Click the Driver tab
- Click Update Driver
- Click Search automatically for updated driver software
Windows 10 may return a search for a new driver, or it may tell you that you already have the best driver installed. In that case, move on to the next step below.
Update to the Latest BIOS, or Check USB 3.0 is Enabled in BIOS
In many cases, your motherboard will be responsible for software issues related to your USB 3.0 ports or any other ports on the motherboard. For this reason, updating to the latest BIOS may fix things.
To do this, you must first find your motherboard name so that you can locate the newest BIOS drivers on the internet.
First, you can locate your motherboard name by following the steps below.
- Open the Start menu
- Search for CMD
- Click Command Prompt when it appears
- In Command Prompt, enter wmic baseboard get product, manufacturer
- Take note of the results

In my case, you can see which product and manufacturer I have. So, I need to search for a new driver for the MS-16P7 motherboard from Micro-Star International (MSI). It’s quite simple to do – each manufacturer will have their own website for their products and there will be support pages for each motherboard.
In my case, I had to search for the specific laptop that used my motherboard when searching MS-16P7, but it didn’t take long to find.

Before you download, once again make sure you click the lock icon to ensure you are connected to the manufacturer’s website. Download the BIOS.
Before we install the new BIOS, you should check to make sure you don’t already have the latest BIOS. To do this, follow the steps below.
- Open the Start menu
- Search for CMD
- Search for System Information
- Click System Information once it appears
- In the System Summary Tab, look for BIOS Version/Date
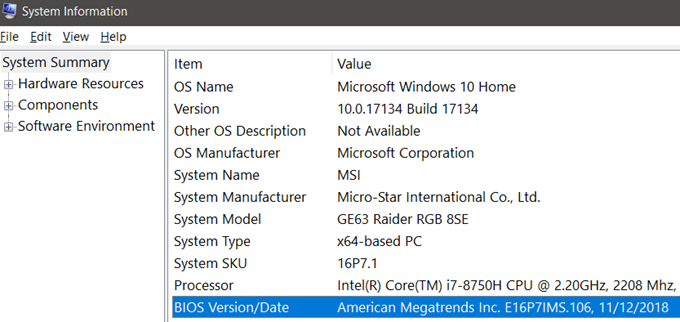
In the Value field, take note of the date listed and compare it to the date on the BIOS manufacturer website. If the latest BIOS on the website is a more recent date, you can install it.
It is now time to install the new BIOS. For this step, you will need a USB drive. Locate the recently downloaded BIOS update on your PC. Extract it if it’s an archive, and drag the containing files onto your USB.
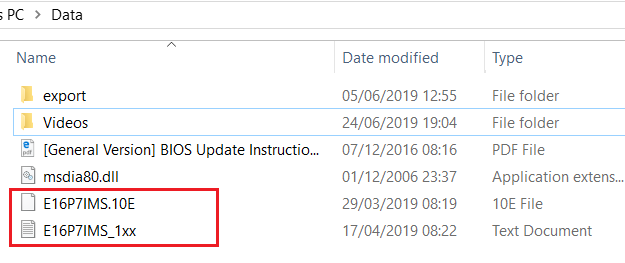
This is important: You must make sure the files are at the root level. They cannot be in any folder.
When you download a BIOS update, you will be given a PDF or .txt file that explains the steps for installing the new update.

As you can see from the image above, this file, included in the BIOS archive, provided me with the steps I needed. The reason you need to read this is because each BIOS will have different steps, but overall the process is similar.
You must switch off your PC, then switch it back on. During boot up, enter the BIOS by pressing a certain key as your PC is turning on, then look for the update BIOS option. You can find the right key in the support material or on-screen as you boot up. If you need guidance, please read the materials provided from your manufacturer.
Summary
That brings us to the end of our guide on how to fix USB 3.0 ports. I hope that you have found this guide useful. If you are still having issues with your USB ports, please let me know and I’ll try to provide my help as soon as I can.


