The Windows operating system runs many processes in the background to enable an optimal user experience. These processes can be relatively cryptic, and if you don’t know anything about them you may wonder what they’re doing and whether they’re safe.
In this article, we’ll explain all you need to know about the SearchApp.exe process, whether it’s safe, and how to disable it.
What is SearchApp.exe
SearchApp.exe is a Microsoft Windows executable file that facilitates the search function in the start menu, file explorer, and taskbar. Previously, Windows integrated this process with Cortana under the name SearchUI.exe.
That means whenever you use the search bar in the Taskbar, File Explorer, or the Start Menu, SearchApp.exe is initiated to run the search feature.
Is SearchApp.exe Safe?
The Microsoft SearchApp.exe is a completely harmless, functional aspect of Windows 10 and 11.
However, it is commonplace for hackers to name their malware after trusted processes to avoid detection from antivirus or anti-malware, as well as the users themselves. If this is the case, harmful malware masked as SearchApp.exe may be present in your computer and could access and impact your data or system files.
If you believe this could be the case, there are ways to ensure that the SearchApp.exe program on your computer is indeed the harmless windows process and not some form of trojan software, spyware, or virus.
How to Determine if the SearchApp.exe Program is Malware
There are a number of ways to determine if the SearchApp.exe process is an authentic and harmless Windows process. We also recommend that you use multiple methods to ensure that your SearchApp.exe is legitimate, as sophisticated malware can hide very effectively.
Check the Folder Location of SearchApp.exe
The first thing you should check to determine if the SearchApp.exe process is the standard Windows process or a malware program is its location.
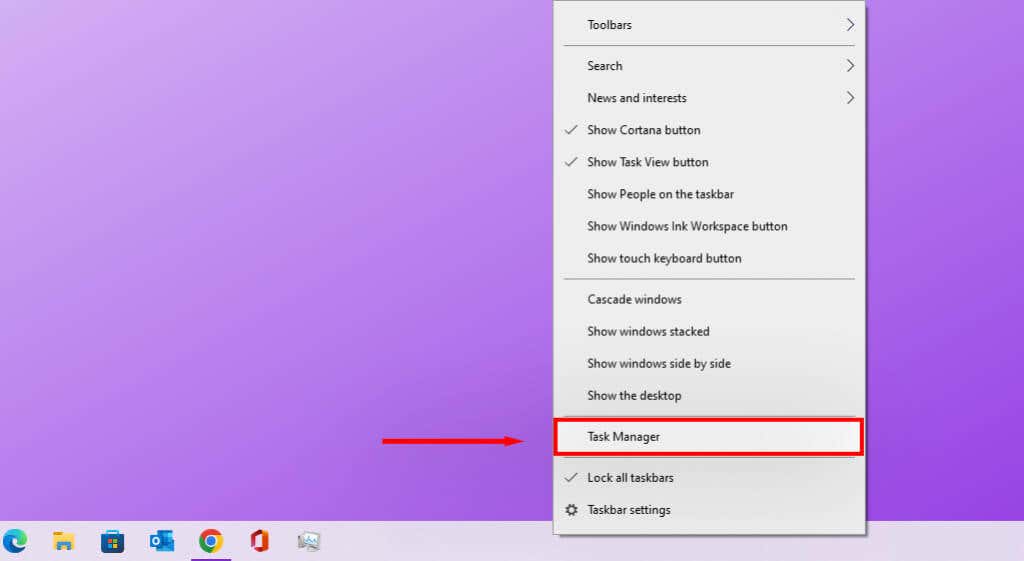
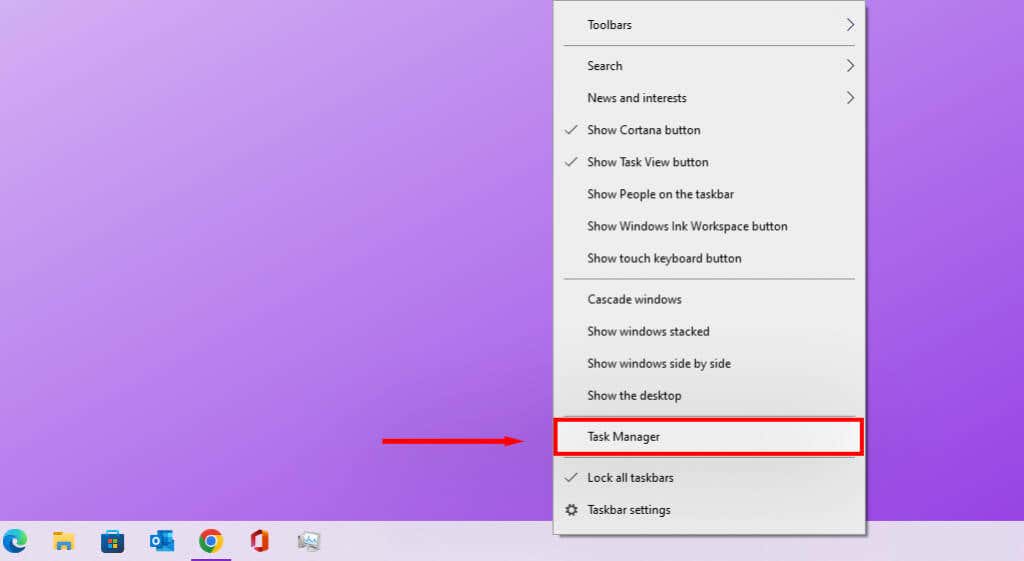
- Open Task Manager by pressing the Ctrl + Shift + Esc keys together or by right-clicking the taskbar and choosing Task Manager.
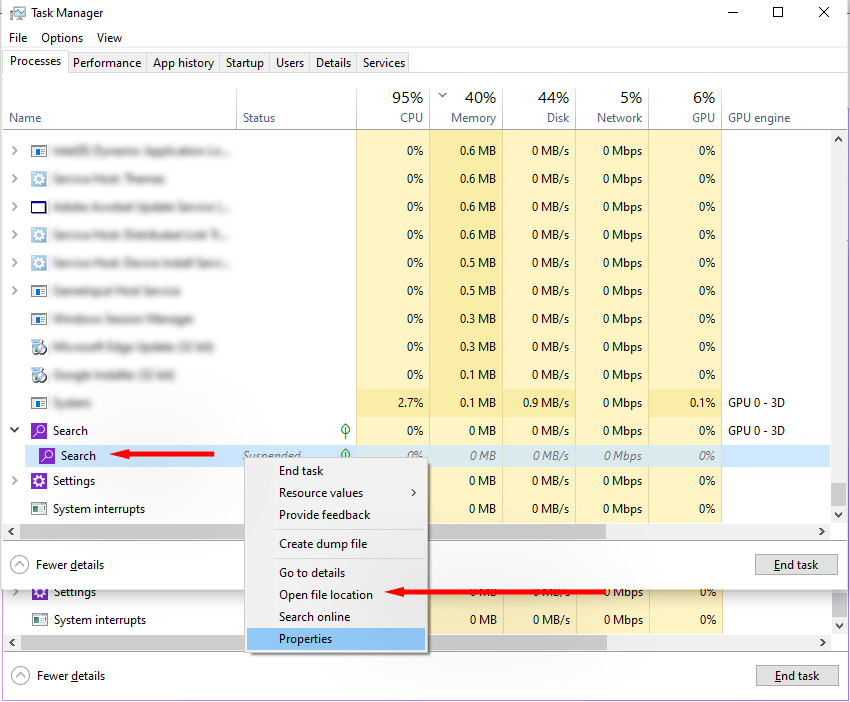
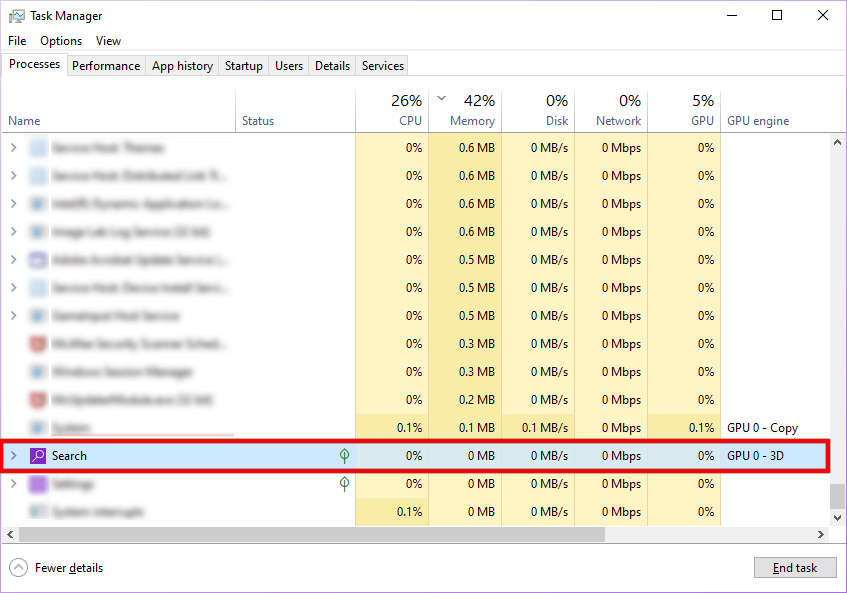
- In the Task Manager Processes tab, scroll down until you find Search, then double-click it.
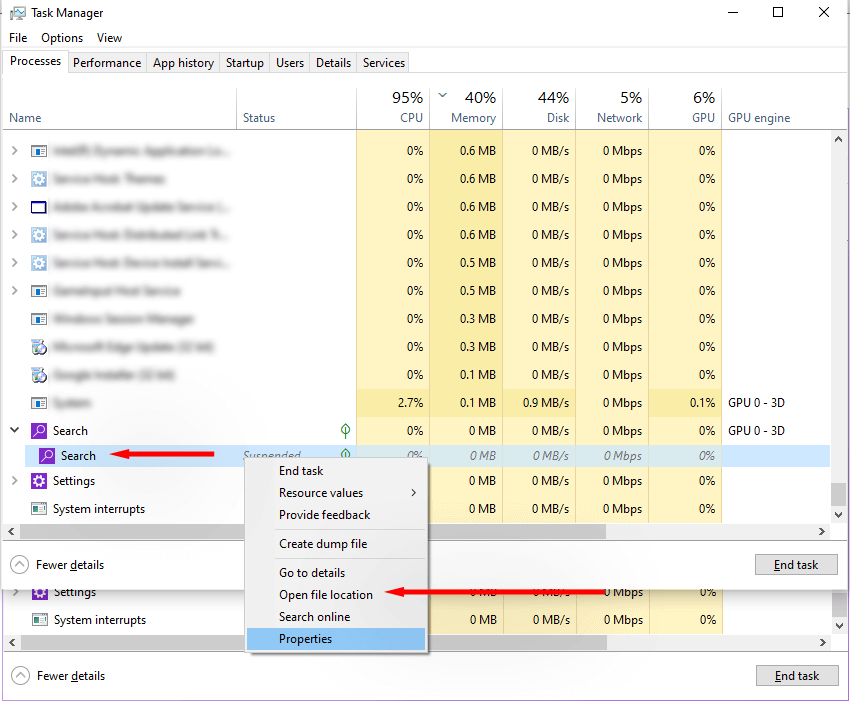
- Right-click the process named Search (it may be the only one listed) and select Open file location.
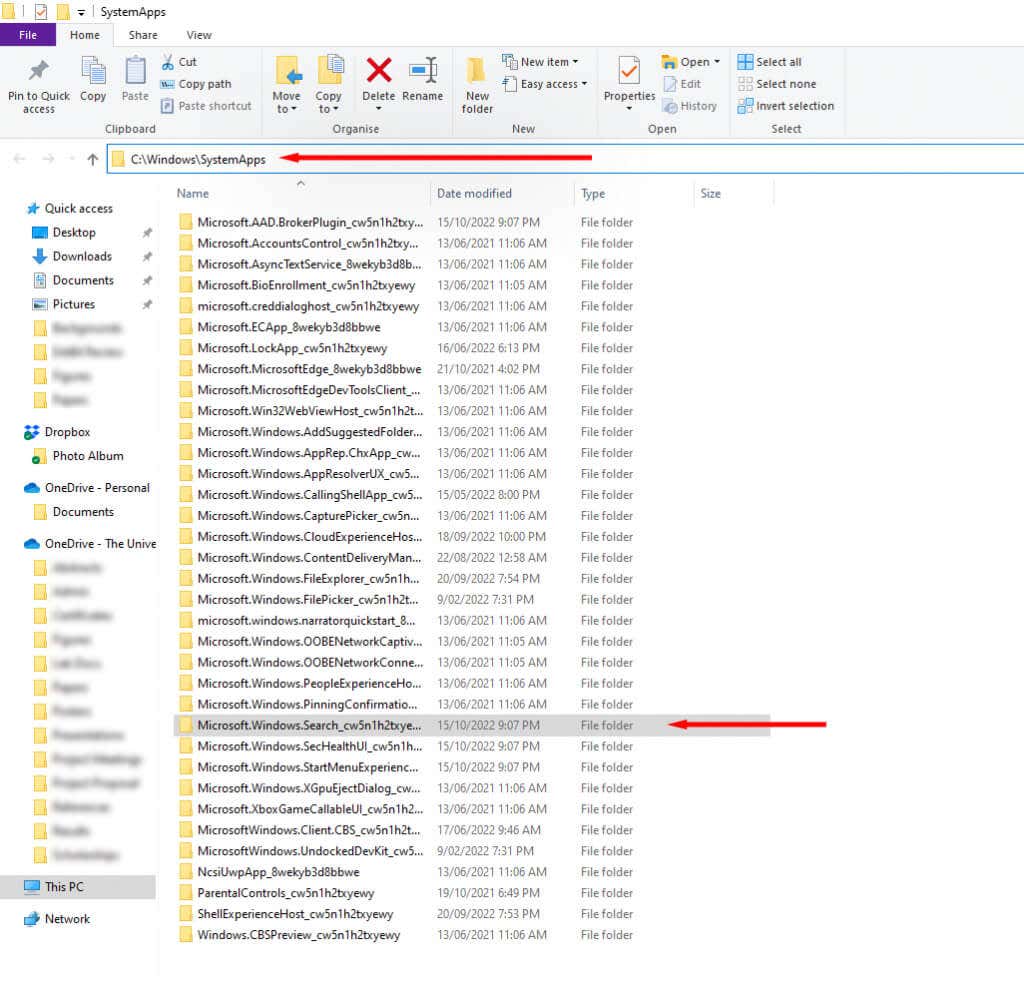
- Click the address bar at the top of the File Explorer to determine the location of the Microsoft.Windows.Search_cw5n1h2txyewy file. If it’s the authentic Microsoft SearchApp.exe file, its location will be: C:\Windows\SystemApps.
The chances of the file being harmless are high when it’s in the right location. However, if you find the SearchApp.exe process in any other folder, such as Program Files, then it’s highly likely that it is malware.
Use Program Properties to Check SearchApp.exe’s Digital Signatures
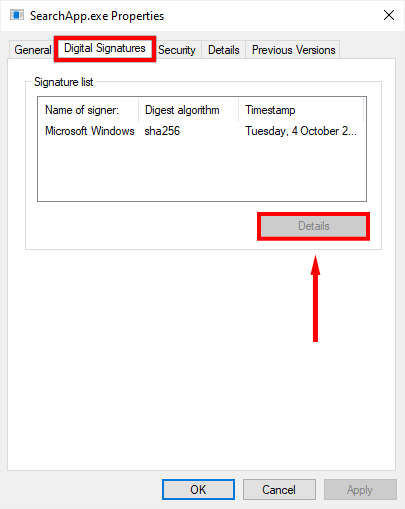
Authentic programs and files contain digital signatures that Windows uses to identify trusted files. Microsoft leaves digital signatures on all of its programs and files. To determine if your SearchApp.exe is legitimate, you can check if it has a Microsoft signature or not.
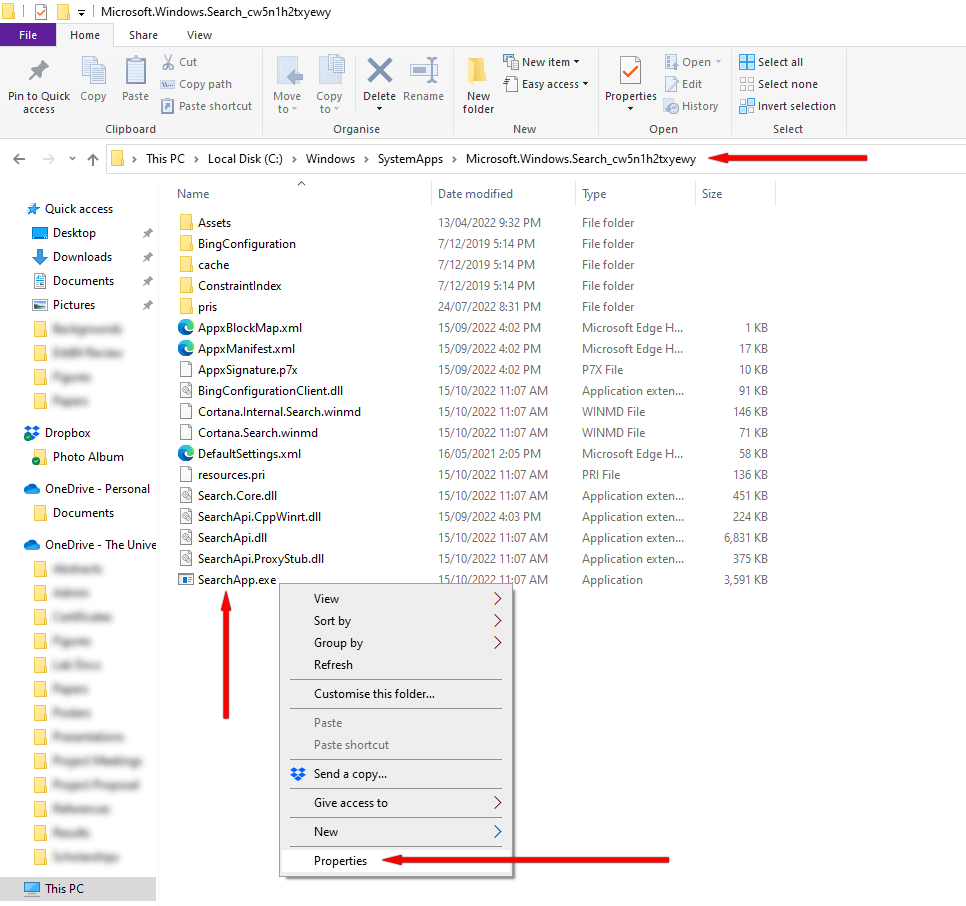
- Open File Explorer and type the following into the address bar: C:\Windows\SystemApps\Microsoft.Windows.Search_cw5n1h2txyewy. Then, locate SearchApp.exe, right-click it, and select Properties.
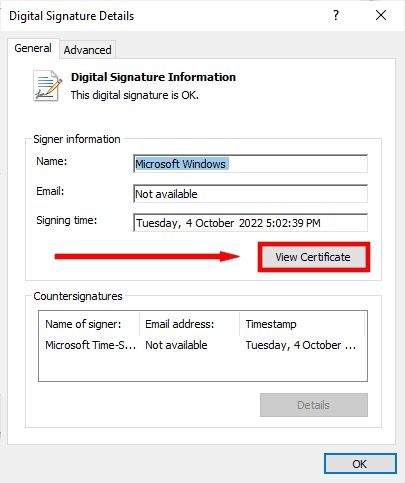
- Navigate to the Digital Signatures Tab and select Details.
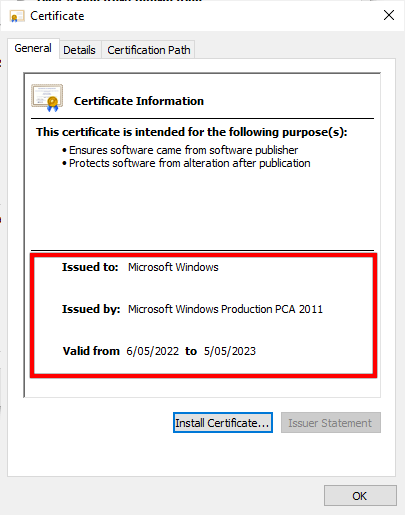
- Go to the General Tab and select View Certificate.
If the certificate was issued by Microsoft Windows, it is likely authentic. If not, it’s likely malware.
Use Command Prompts To Check The Digital Signature Of SearchApp.Exe
If you can’t see the Digital Signatures tab in the file’s properties window or are having trouble navigating to SearchApp.exe’s properties you can use this method to check the digital signature of SearchApp.exe.
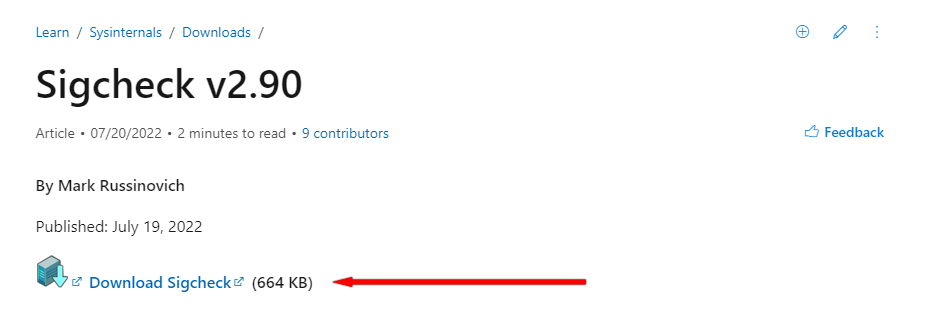
- Open your browser and navigate to the Sigcheck page on the Microsoft website.
- Download Sigcheck.
- Open the downloaded file, right-click sigcheck.exe, and select Copy.
- In the File Explorer address bar, type the following: C:\Windows\SystemApps\Microsoft.Windows.Search_cw5n1h2txyewy
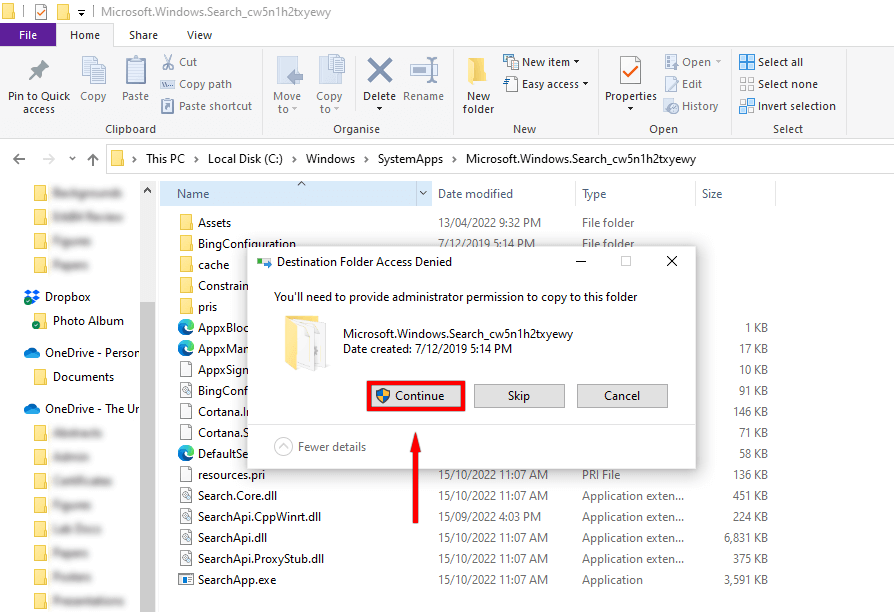
- Right-click in the window and select Paste. If your computer asks, grant admin permission to be pasted. The sigcheck.exe file should now be in the SearchApp.exe folder.
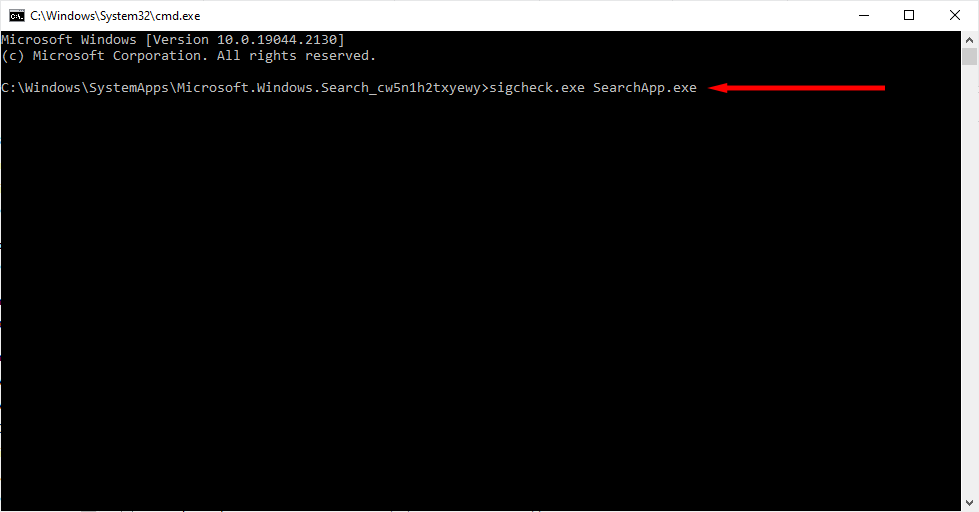
- In the address bar type cmd and press Enter. This should open the Command Prompt window.
- In the Command Prompt window, type the following and press Enter:
sigcheck.exe SearchApp.exe
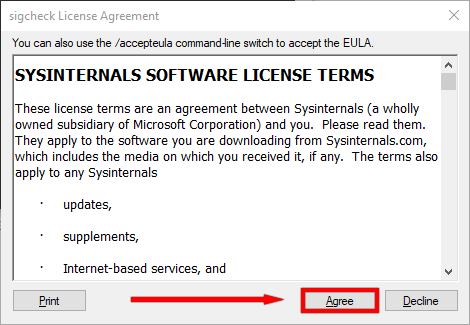
- This may open a license agreement, if so click Agree.
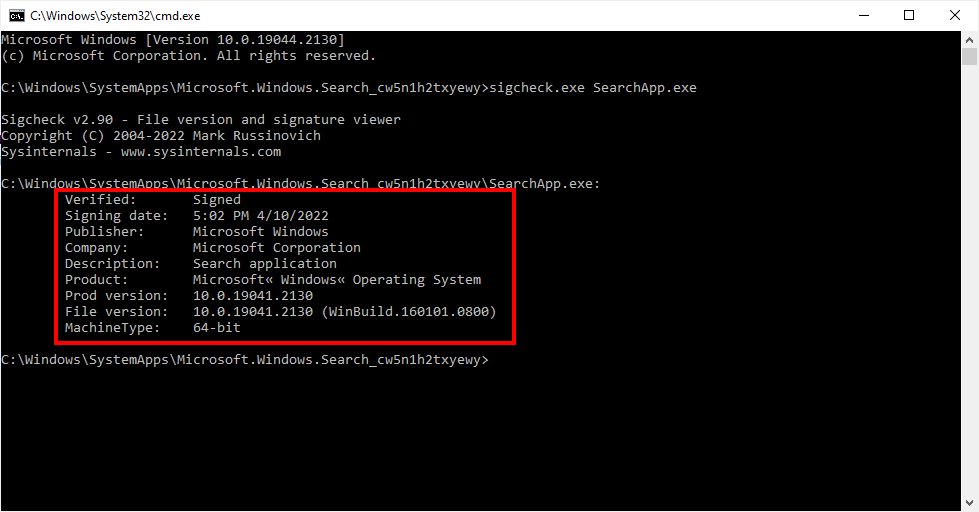
- You should now be able to see the digital signature of SearchApp.exe.
If the publisher is Microsoft Windows and the company is Microsoft Corporation then it is likely the authentic Microsoft process. If not, it could be malware.
Check The Resources SearchApp.exe is Consuming Using Task Manager
When the search on the Taskbar, Start Menu, or File Explorer is used, the SearchApp.exe process is initiated and, as a result, will use some resources to process the search. You can check how many resources the SearchApp.exe process is using to get an idea of whether it’s legitimate or not.
- Right-click the Taskbar and select Task Manager.
- In Task Manager, find Search and check the amount of resources it’s using.
If SearchApp.exe is using minimal resources, it is likely legitimate. If it is exhibiting high CPU usage of more than 50%, the SearchApp.exe may be either corrupted or malware.
Temporarily Delete The SearchApp.Exe Folder
If your SearchApp.exe is using a lot of system resources, or you are noticing other signs that you have malware, you can temporarily delete the SearchApp.exe process to see the effect. This is also helpful in fixing any minor bugs related to the process.
- Right-click the Taskbar and select Task Manager.
- In the Task Manager, find Search and double-click it.
- Right-click Search and click Open file location.
- Keeping the folder open, return to the Task Manager window.
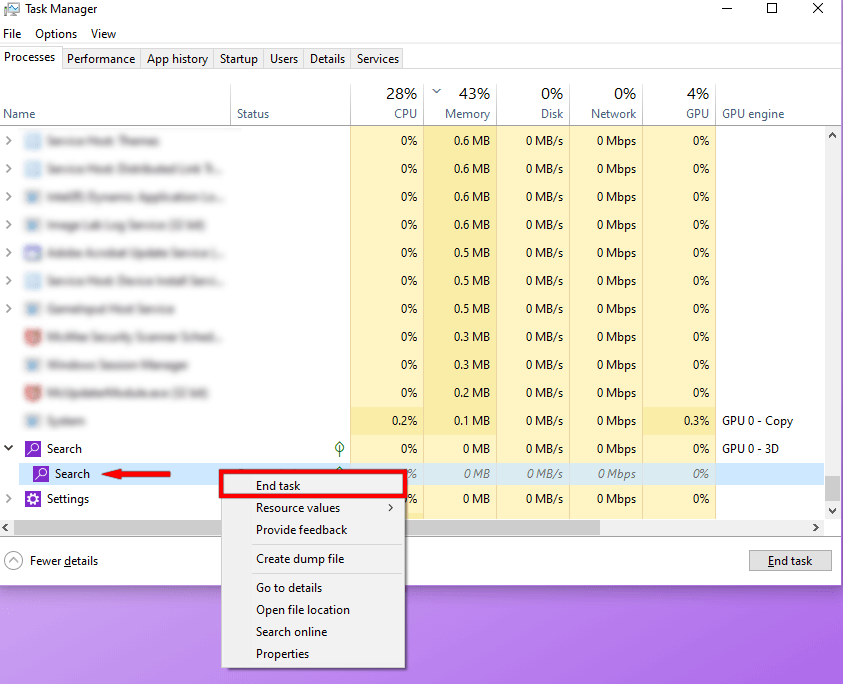
- Right-click the Search process again and select End Task.
- The process will show up again in a moment. Once it does Right-click it and select End Task again.
- Repeat this process until the process doesn’t show up.
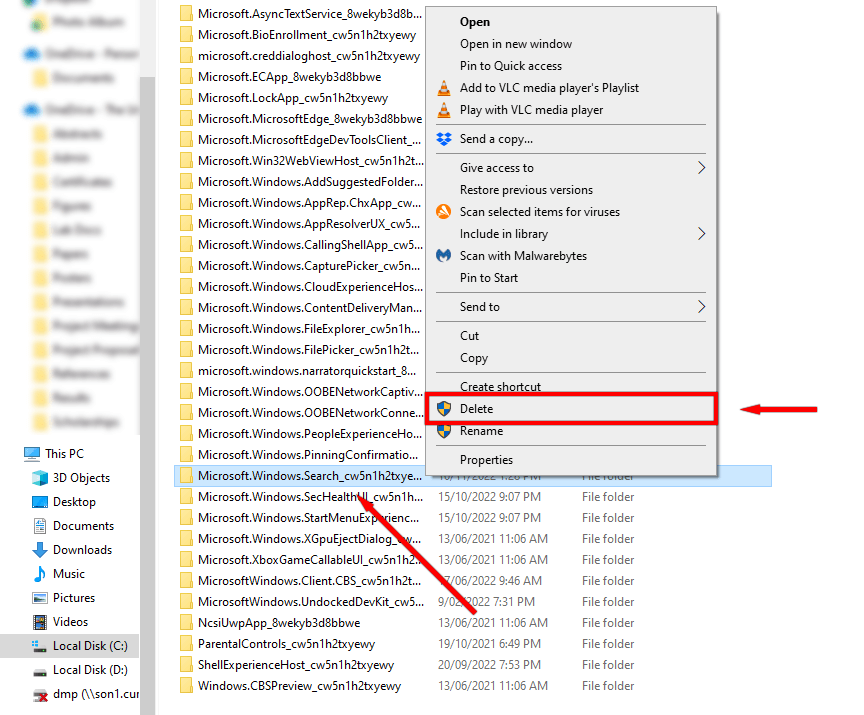
- Return to the folder location you opened earlier, right-click the SearchApp.exe file, and select Delete.
- You will be asked for admin permission to delete the file. If you’re the admin, click Yes. If not, select the admin account and enter the password to allow the operation.
The search process will be now disabled until you shut down or restart your computer.
What to do if Your SearchApp.Exe Process is Malware
If you suspect that the SearchApp.exe is malware, you have a few options.
Use Antivirus Software to Run A Full System Scan
Perform a full system scan of your computer with an antivirus to detect and delete viruses and malware. If you don’t have a third-party antivirus installed, you can use Windows Defender.
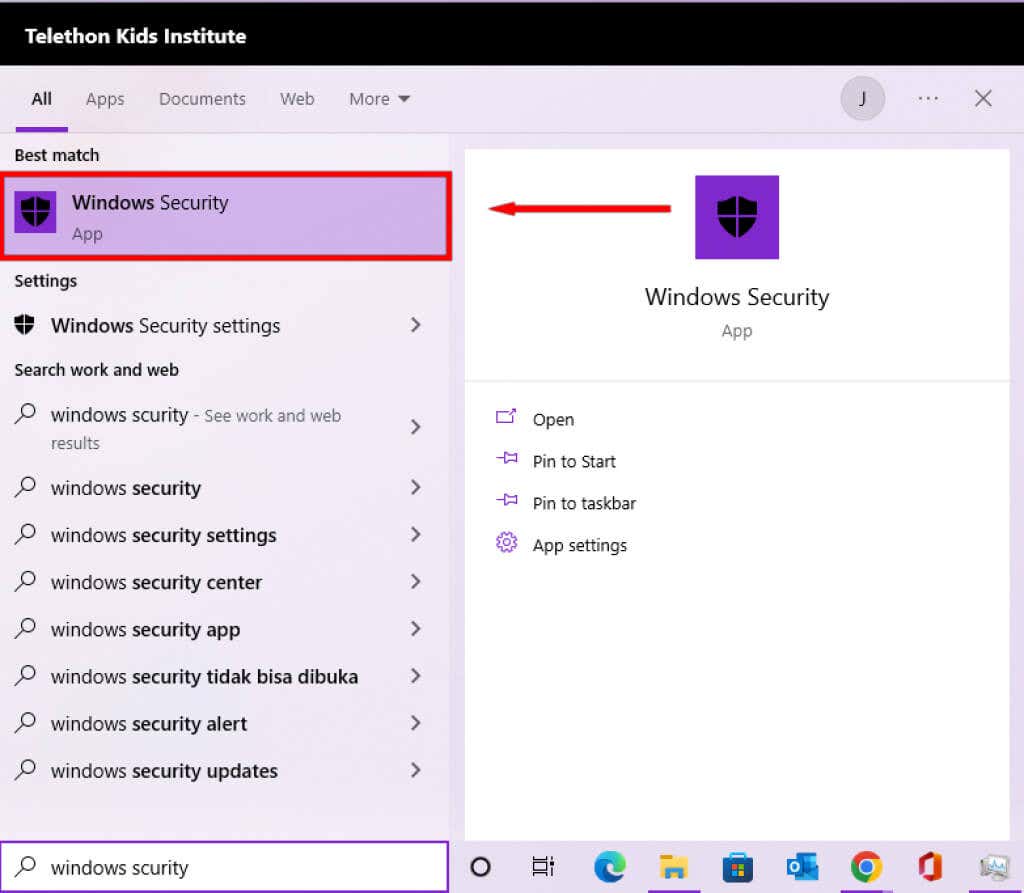
- In the Taskbar, search for and open Windows Security.
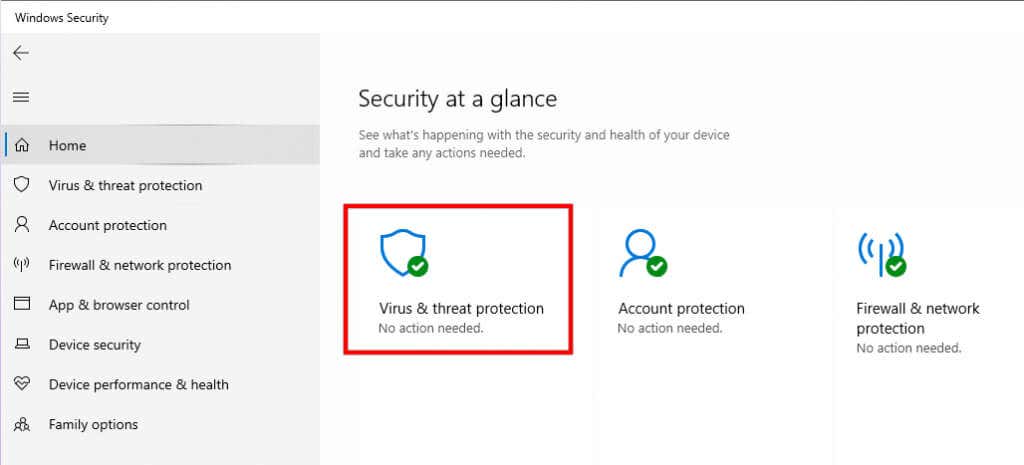
- Select Virus & threat protection.
- Under Current threats, click Scan options > Full scan > Scan.
The scan may take a long time. Once complete, use the methods previously listed to determine if your suspicious SearchApp.exe process has been fixed.
Delete It Using The Command Prompt
You can permanently uninstall the SearchApp.exe file and its components. However, this will disable the search functionality on your Windows device. Only do this if you’re certain the SearchApp.exe process is malware and antivirus methods have not removed it.
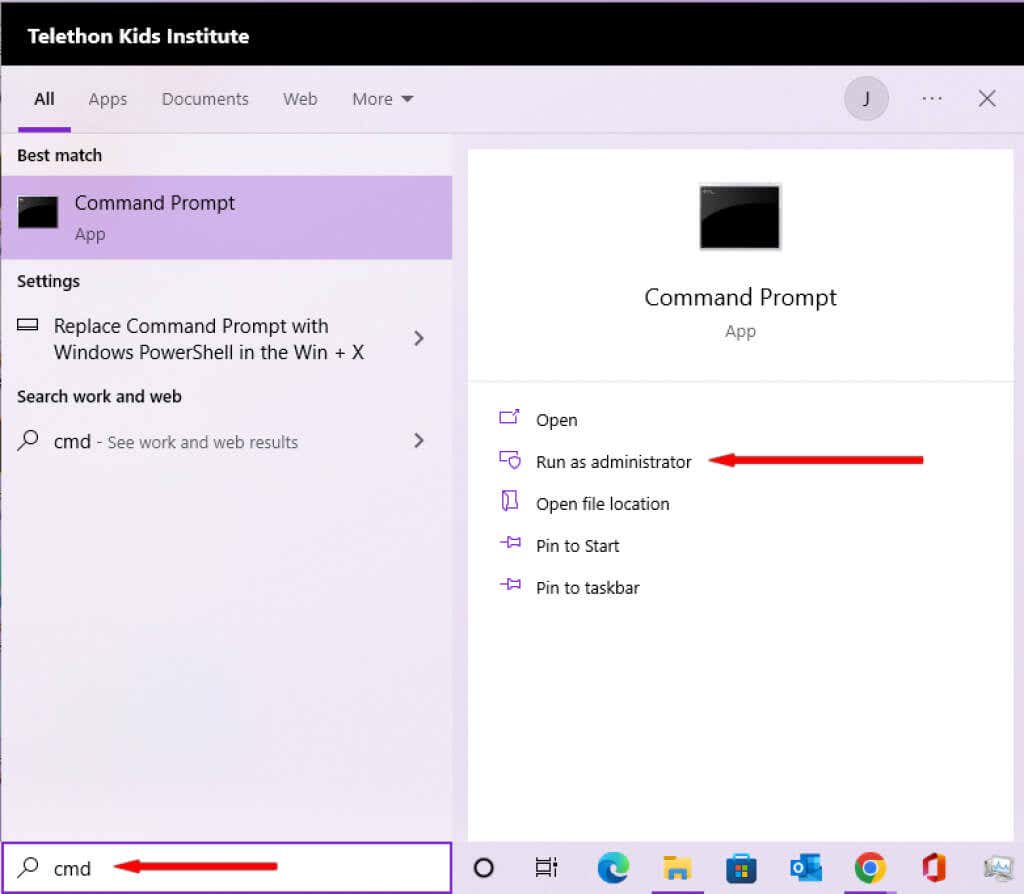
- Open the Start menu, type cmd and select Run as administrator.
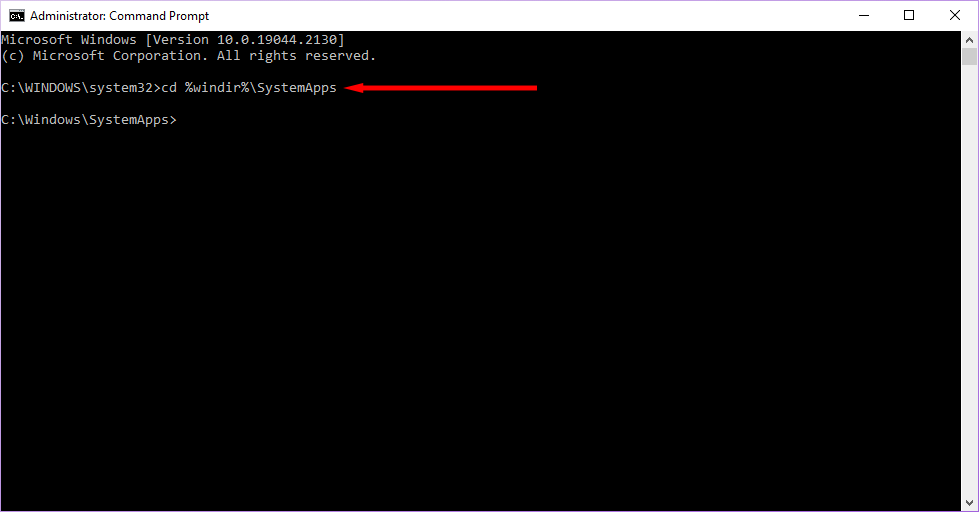
- Type the following command and press Enter: cd %windir%\SystemApps
- Open the Task Manager and locate Search.
- In Command Prompt, type the following and press Enter: taskkill /f /im SearchApp.exe
- Repeat the previous step until you don’t see the Search process on Task Manager.
- In Command Prompt type the following command and press Enter:
move Microsoft.Windows.Search_cw5n1h2txyewy Microsoft.Windows.Search_cw5n1h2txyewy.old
This will permanently disable SearchApp.exe.
Stay Safe From Malware
By now, you should know what SearchApp.exe is and be able to determine if yours is authentic or not. Hopefully, your SearchApp.exe is safe and you have no future problems. However, if not, the methods above should help you get your system clean once again.
Related Posts
Jake Harfield is an Australian freelance writer whose passion is finding out how different technologies work. He has written for several online publications, focusing on explaining what he has learned to help others with their tech problems. He’s an avid hiker and birder, and in his spare time you’ll find him in the Aussie bush listening to the birdsong. Read Jake’s Full Bio

