Microsoft Windows displays a “DNS Server Not Responding” error when your system can’t connect to the specified DNS servers or the DNS system doesn’t respond. However, you can change a few options on your computer to resolve the error. Here’s how.
Some ways to fix your DNS problems include removing your DNS cache, turning off your antivirus and firewall, disabling IPv6, using alternate DNS servers, and more.
Use a Different Web Browser
You get a DNS server error on your system because your current web browser has an issue. This prevents the browser from connecting to your specified servers.
In this case, you can switch to an alternate web browser and see if your issue gets resolved. For example, if you’re currently using Google Chrome as your browser, you can switch to Mozilla Firefox or Microsoft Edge to see if you can connect to your sites.
If this solves the problem, you can reset your primary browser to fix your DNS issues.
Restart Your Router
Another way to get around many DNS server issues is by rebooting your router. Your router disables and re-enables all of its features when you give it a reboot, fixing many minor problems with the device.
You can restart most routers by pressing the Power button on the device. You can also use the power socket switch or your router’s settings page in your web browser to turn your device off and back on.
Launch your web browser and try to access your sites when your router restarts and establishes an internet connection.
Delete Your DNS Cache
Windows uses a DNS cache to help you quickly translate domain names to IP addresses. Sometimes, cache corruption prevents your web browser’s access to sites.
In this case, you can clear your DNS cache, which helps fix many issues. Your computer will rebuild this cache as you browse sites.
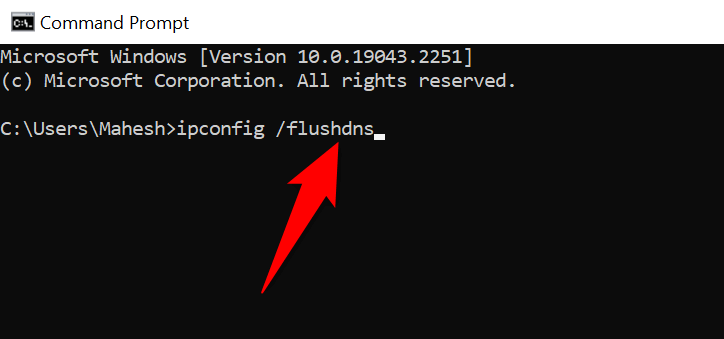
- Open the Start menu, find Command Prompt, and launch the tool.
- Enter the following command on the CMD window and press Enter: ipconfig /flushdns
- Close Command Prompt when you’ve deleted your DNS cache.
Turn Off Your Firewall
Your firewall’s job is to monitor your PC’s incoming and outgoing network connections. This utility may have detected your access to your DNS servers as a potential threat, blocking your connection and resulting in a “DNS Server Not Responding” error.
You can fix this by temporarily disabling your firewall. Here’s how to do that for Microsoft Defender Firewall:
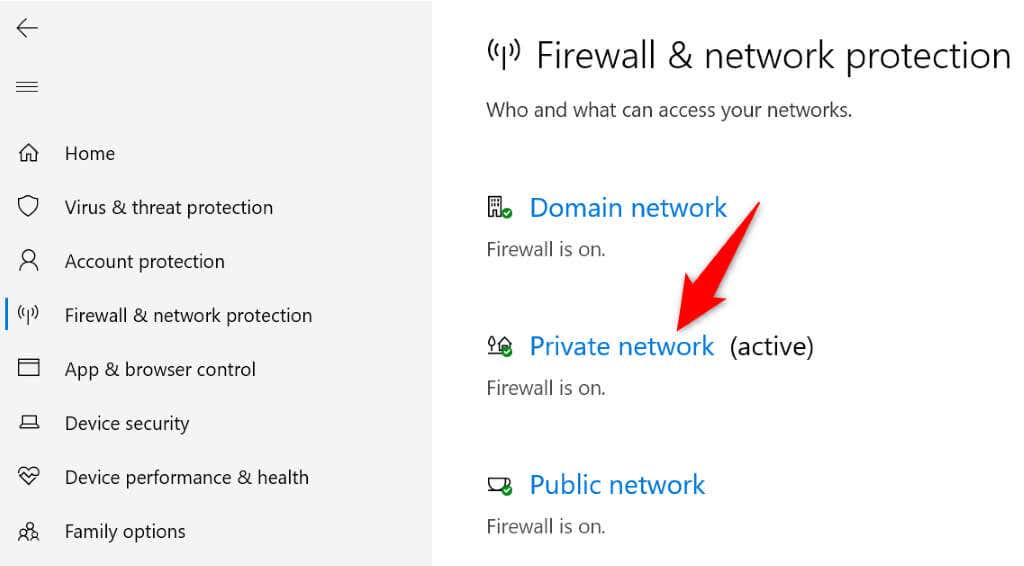
- Open Start, locate Windows Security, and launch the app.
- Select Firewall & network protection on the app’s main window.
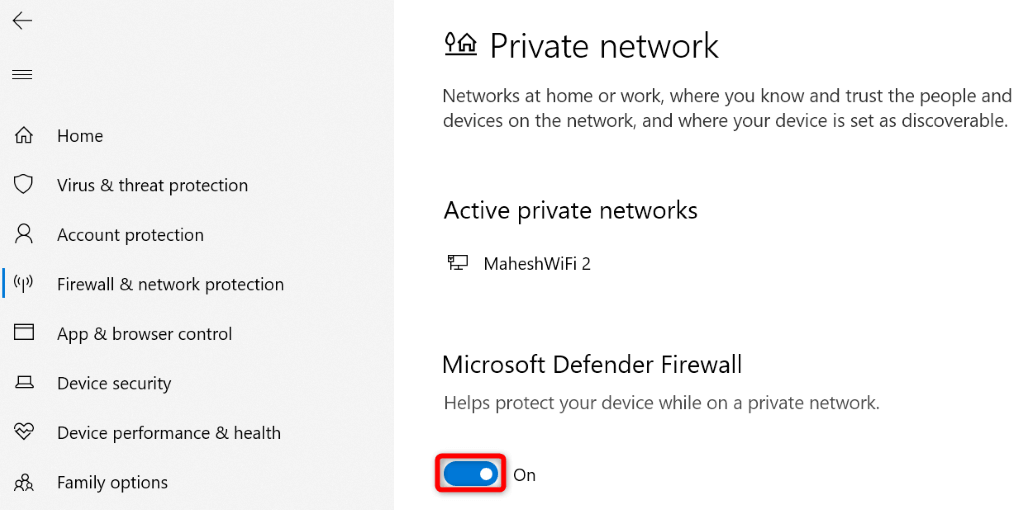
- Choose the network that says (active).
- Turn off the Microsoft Defender Firewall toggle.
- Select Yes in the User Account Control prompt.
Disable Your Antivirus
A possible reason you’re getting the “DNS Server Not Responding” error is that your antivirus program has detected your access to your DNS servers as a threat. This may have led the program to block your activity, resulting in the above error message.
You can check that by turning off your antivirus protection temporarily. Here’s how to do that for Microsoft Defender Antivirus:
- Launch the Windows Security app on your PC.
- Select Virus & threat protection in the app.
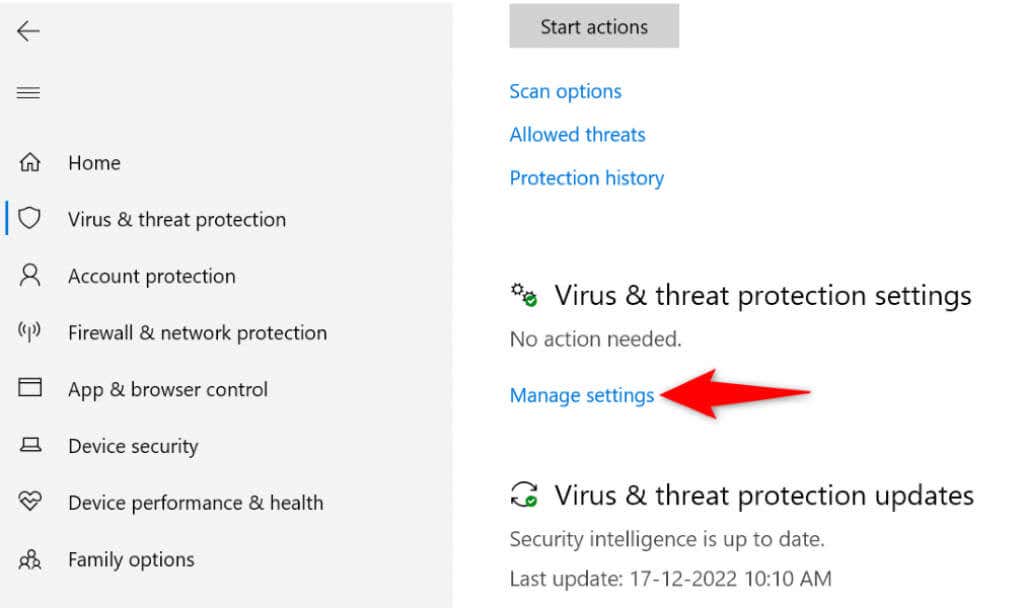
- Choose Manage settings in the Virus & threat protection settings section.
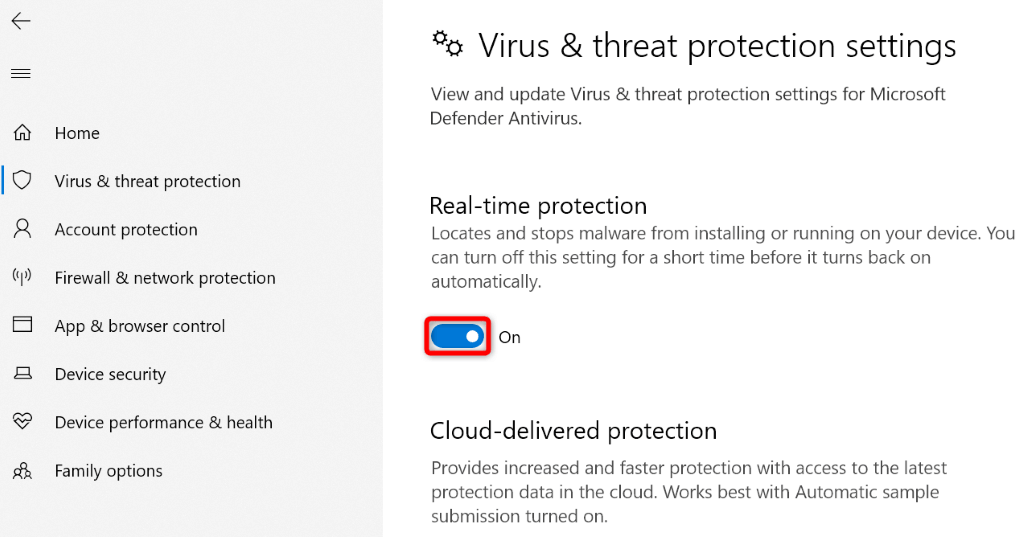
- Disable the Real-time protection option.
- Select Yes in the User Account Control prompt.
Turn Off IPv6
Sometimes, your PC’s Internet Protocol Version 6 feature doesn’t work well with your specified DNS servers, causing various issues. In this case, you can toggle off the protocol and see if that fixes the problem.
You can turn IPv6 back on any time you want.
- Launch Control Panel on your Windows PC.
- Select Network and Internet > Network and Sharing Center in Control Panel.
- Choose Change adapter settings on the left.
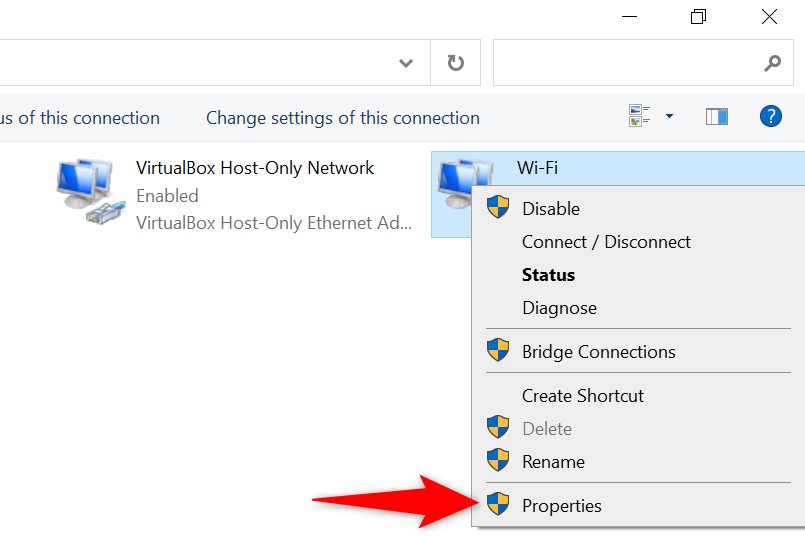
- Right-click your network adapter and select Properties.
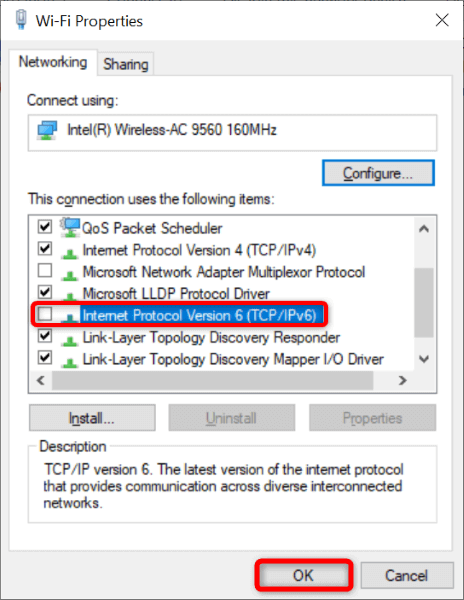
- Uncheck Internet Protocol Version 6 (TCP/IPv6) and choose OK at the bottom.
Change Your DNS Servers
Like all other online services, your DNS servers can face outages. When this happens, your web browsers and other apps can’t locate online addresses, resulting in various DNS error messages.
In this case, you can switch to alternate DNS servers. There are some good third-party servers to choose from, like Google’s public DNS and OpenDNS.
- Navigate to Control Panel > Network and Internet > Network and Sharing Center > Change adapter settings on your computer.
- Right-click your network adapter and choose Properties.
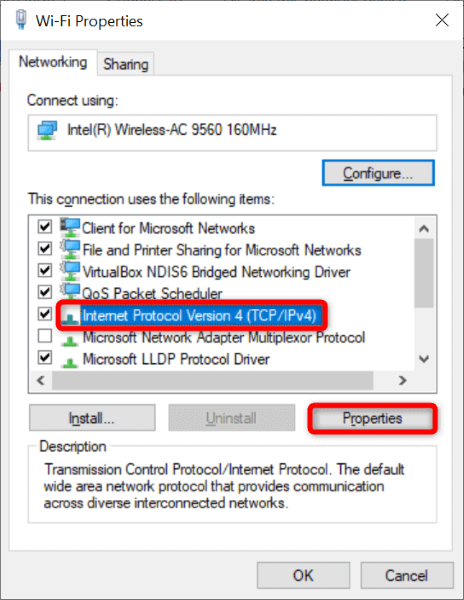
- Select Internet Protocol Version 4 (TCP/IPv4) on the list and choose Properties.
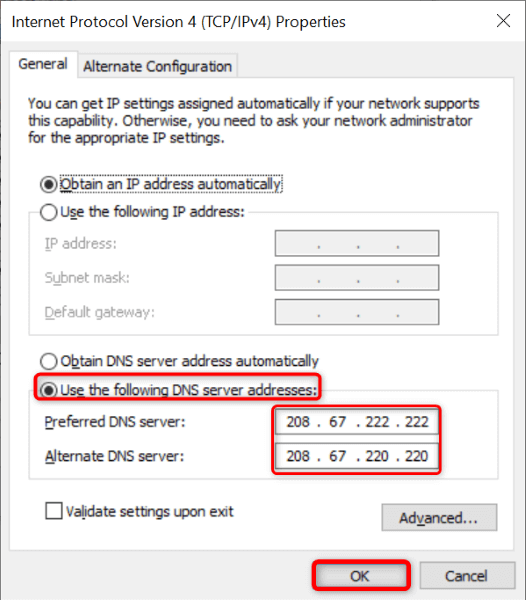
- Turn on the Use the following DNS server addresses option.
- Enter 208.67.222.222 in the Preferred DNS server field and 208.67.220.220 in the Alternate DNS server field.
- Select OK at the bottom.
Disable Your Other Network Connections
If your Windows PC continues to display the “DNS Server Not Responding” error, your other network adapters may be interfering with your primary one.
You can fix that by disabling all your network adapters except the one you are using on your PC. Here’s how.
- Access Control Panel > Network and Internet > Network and Sharing Center > Change adapter settings on your PC.
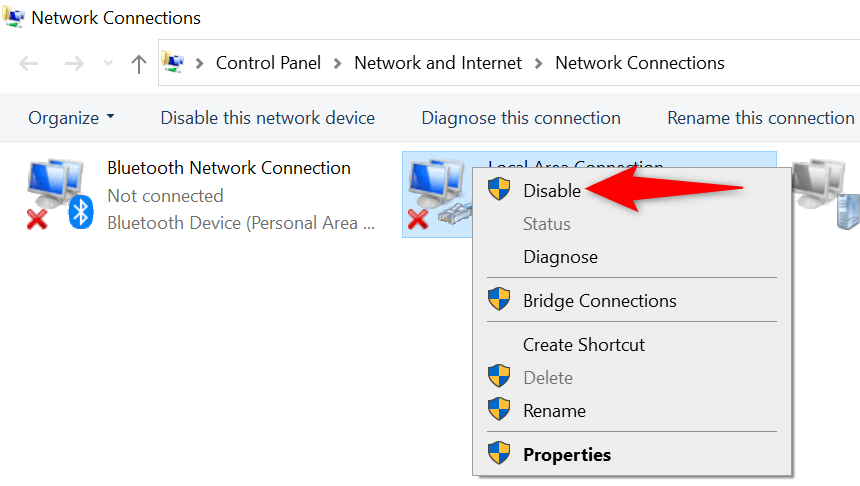
- Right-click each unused network adapter and choose Disable.
Update Your Network Adapter Drivers
Outdated drivers often cause various issues, and your “DNS Server Not Responding” may result from old network adapter drivers. In this case, you can update your drivers to the latest version and resolve your issue.
- Launch Start, find Device Manager, and open the tool.
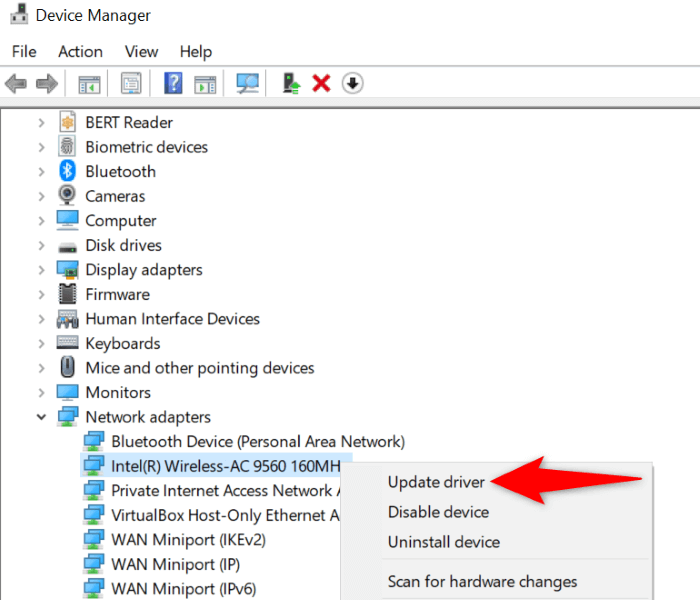
- Expand Network adapters, right-click your adapter, and choose Update driver.
- Select Search automatically for drivers.
- Let Device Manager install the available drivers.
Resolve DNS Server Issues on Your Windows 10/11 PC
DNS server issues are common, and you can encounter them anytime. The good thing is it’s easy to deal with most of these problems. You can change a few options on your system, switch to alternate servers, and update the network adapter drivers to fix your issue.
You can then access your sites and allow your apps to connect to any web host without issues.
Related Posts
- Preparing for Windows 10 End of Support: Upgrading to Windows 11
- How to Fix a “This file does not have an app associated with it” Error on Windows
- How to Fix an Update Error 0x800705b4 on Windows
- How to Resolve “A JavaScript error occured in the main process” Error on Windows
- How to Fix the Network Discovery Is Turned Off Error on Windows
Mahesh has been obsessed with technology since he got his first gadget a decade or so ago. Over the last few years, he’s written a number of tech articles on various online publications including but not limited to MakeTechEasier and Android AppStorm. Read Mahesh’s Full Bio
