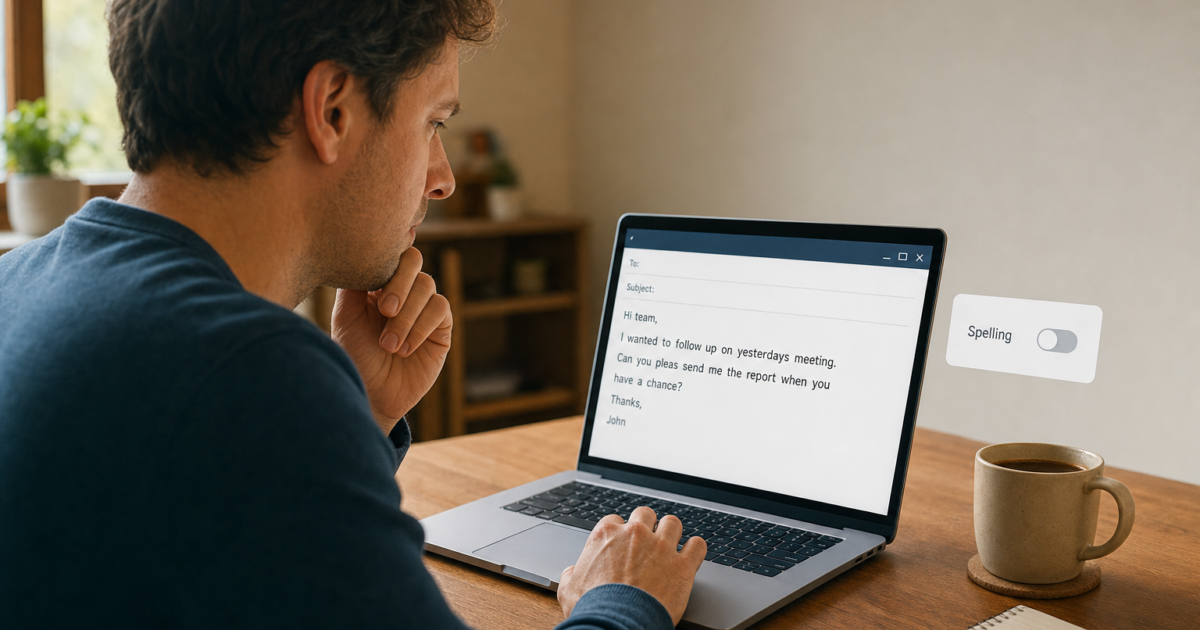
Outlook’s spell checker has stopped catching typos. No red underlines, no warnings, nothing. The fix depends on whether you’re using the new cloud-based Outlook or the classic desktop version, so start with the section that matches yours.
New Outlook (Cloud-Based)
New Outlook is the streamlined, cloud-based app available from the Microsoft Store or as the default mail app in Windows 11. It has a simplified ribbon and no File menu. If you see a File menu, you’re on classic Outlook; skip to the next section.
Fix #1: Enable spell check in Editor Settings
New Outlook uses a built-in Editor tool for proofing instead of borrowing from Word. If spell check is silent, Editor is likely disabled or misconfigured.
- Open New Outlook and start a new email.
- Click the Message tab in the ribbon.
- Click Editor, then select Editor Settings.
- Make sure Check spelling as you type is toggled on. Enable grammar checking here too if you want it.
- Close the settings panel and type a deliberate typo to test.
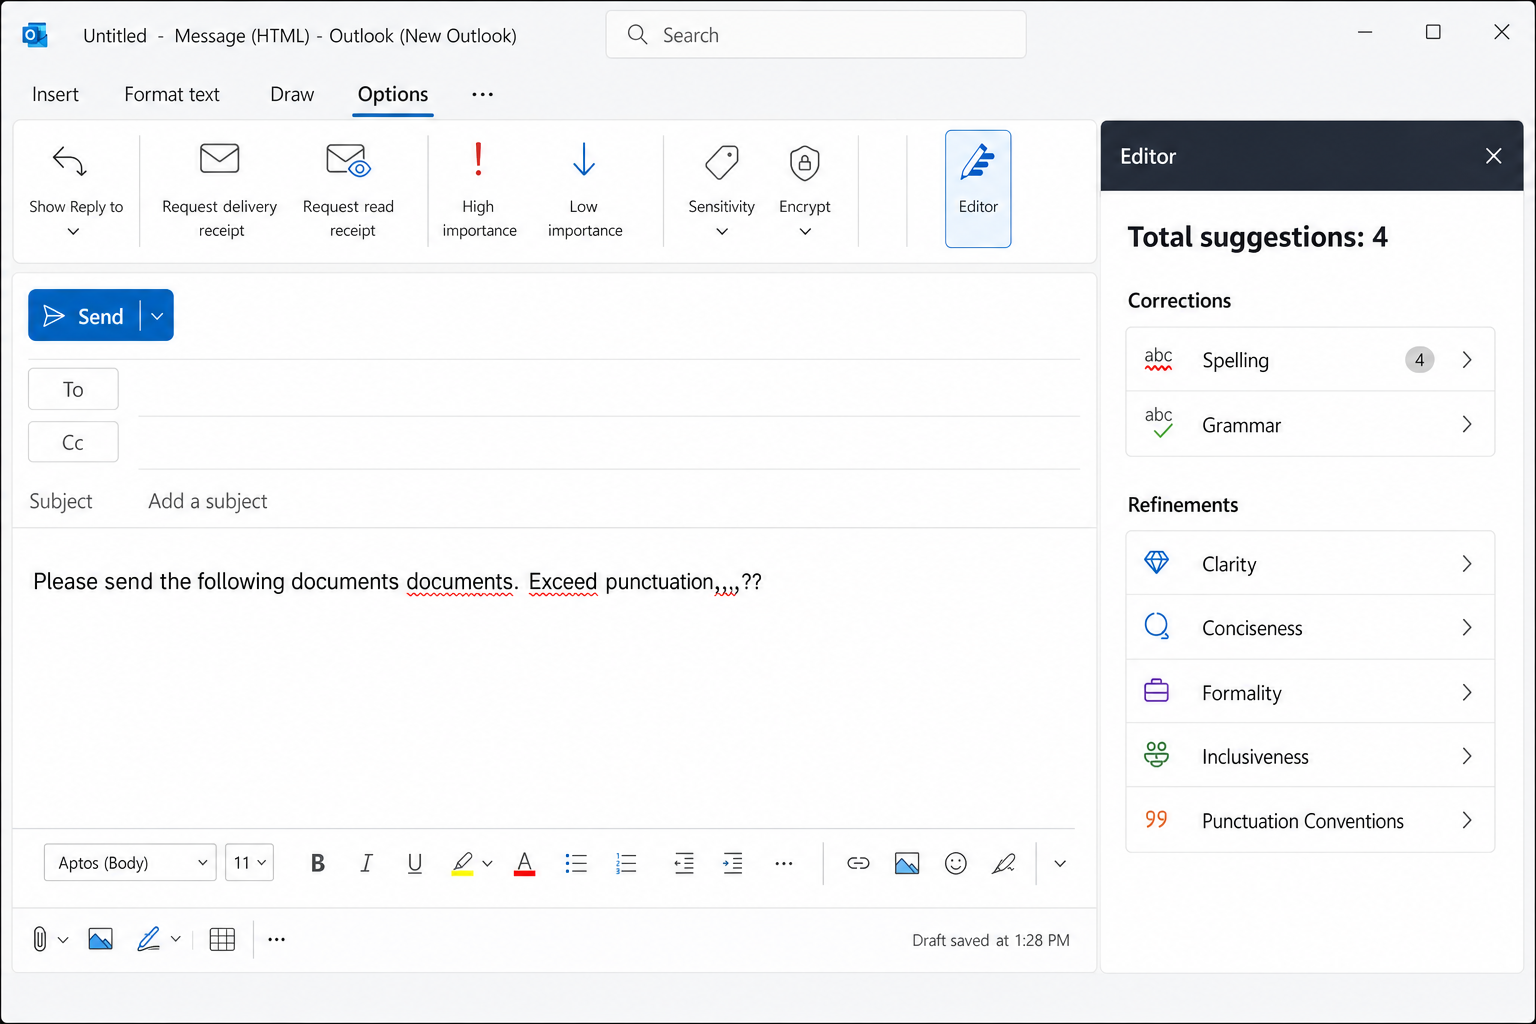
If the Editor button is grayed out and you can’t click it, the problem is a privacy setting. Move to Fix #2.
Fix #2: Enable optional connected experiences (required for cloud spell check)
New Outlook’s spell checker is cloud-based. If you’ve disabled optional connected experiences, a common privacy tweak, spell check won’t function at all.
- Click the gear icon at the top right of New Outlook to open Settings.
- Select General from the left panel.
- Click Privacy and Data, then select Privacy Settings.
- Find Turn on optional connected experiences and enable it.
- Close Settings and restart Outlook.
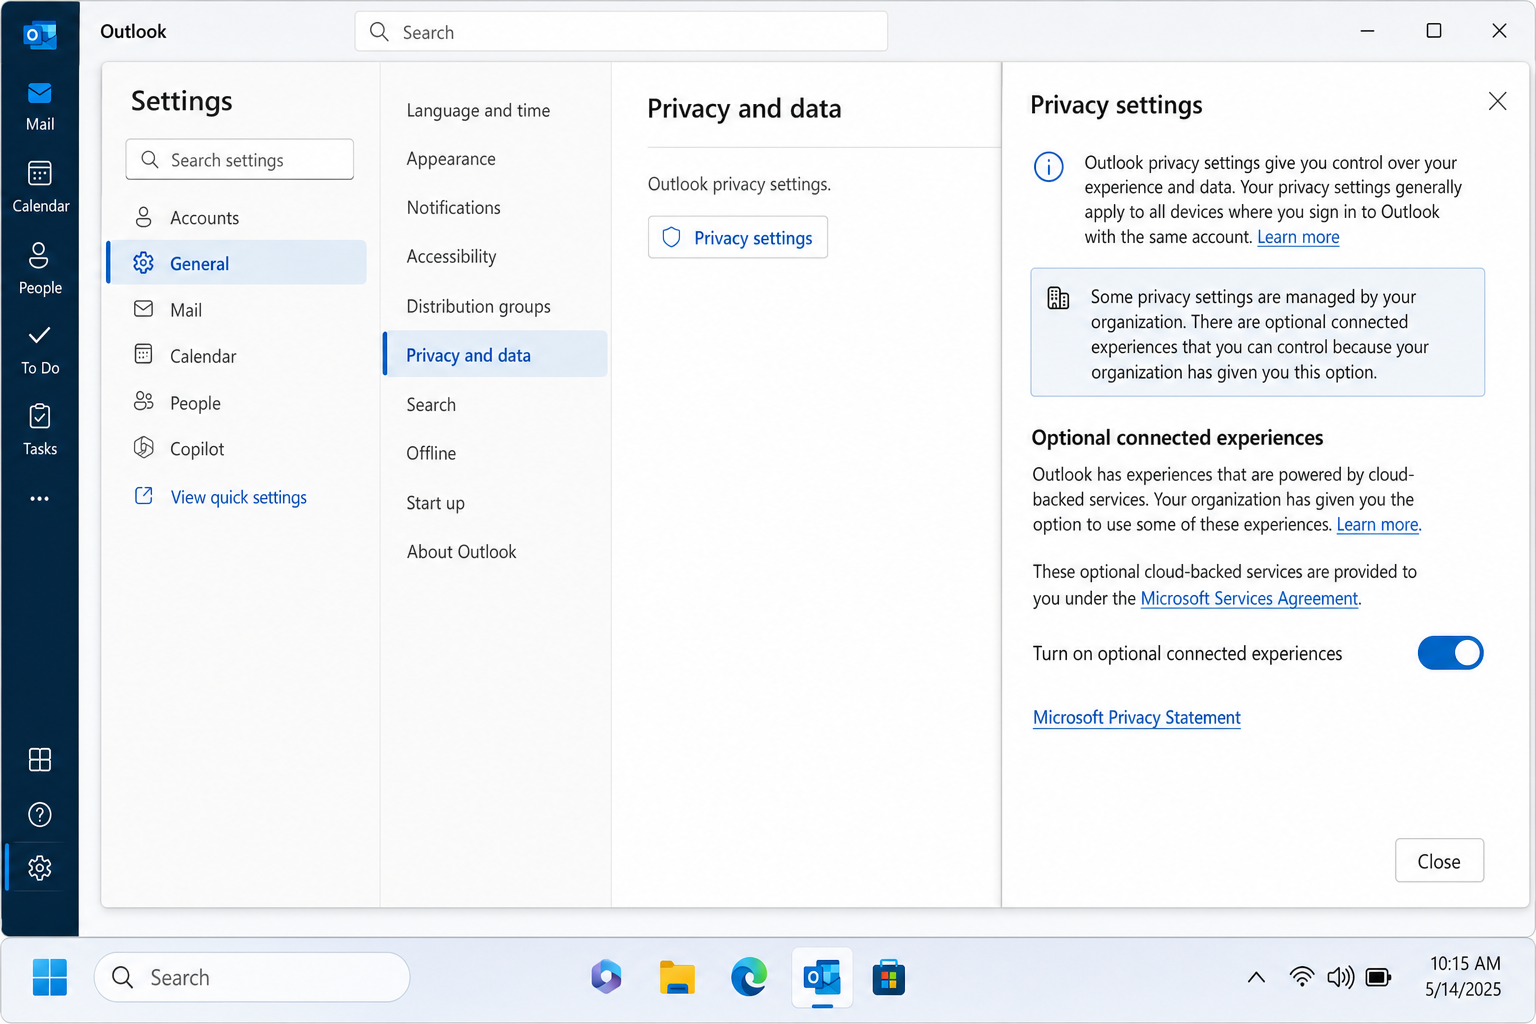
Note: The exact label and menu nesting for this setting can vary depending on your Outlook build or organization policy. You may see it listed simply as Privacy or under a slightly different path. If the steps above don’t match what you see, check Microsoft’s privacy settings documentation for New Outlook for the exact wording in your version. If your organization manages this setting via policy, you may not be able to change it, so contact your IT department.
Once Outlook restarts, the Editor button should be active and spell check should resume. If you’d rather not enable connected experiences for privacy reasons, the classic desktop version of Outlook doesn’t require them, so consider switching back.
Classic Desktop Outlook (Microsoft 365 / Outlook 2019 and earlier)
Classic Outlook is the full-featured desktop app installed with Microsoft 365, Office 2021, Office 2019, or Office 2016. You can identify it by the File menu in the top-left corner. If you’re using the newer simplified app without a File menu, see the New Outlook section above.
Fix #3: Turn on “Check spelling as you type” in Outlook Options
This is the most common reason spell check goes quiet after an update. The setting gets reset.
- Open Outlook and click File > Options.
- Select Mail from the left panel, then click Spelling and Autocorrect.
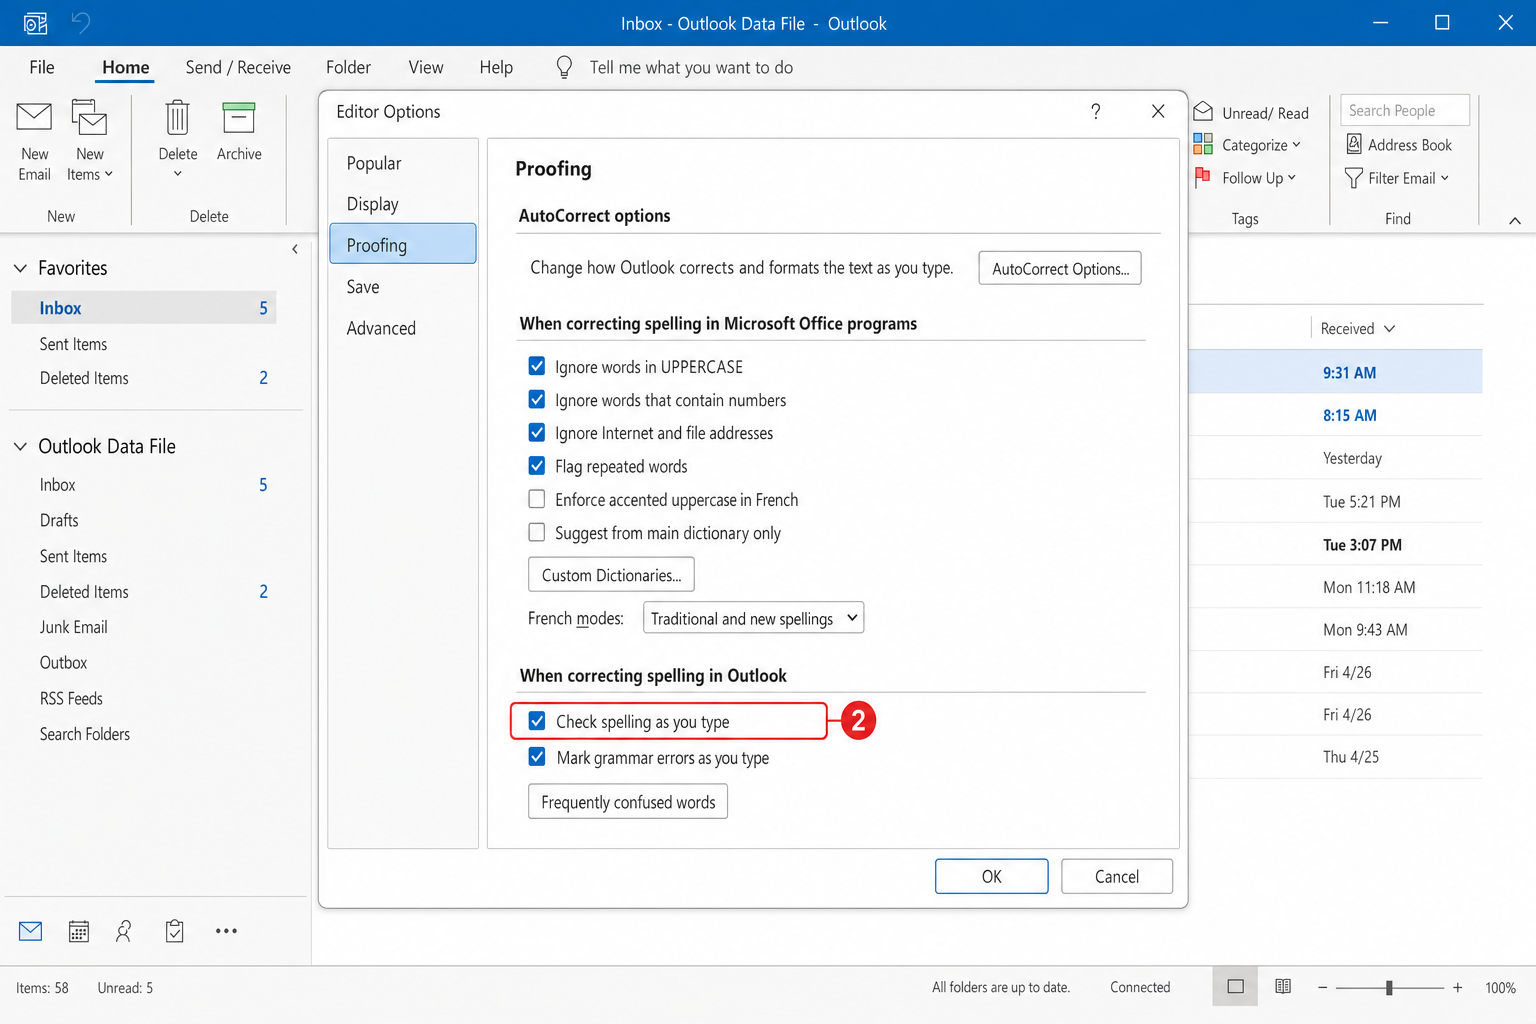
- Click Proofing in the Editor Options window that opens.
- Under When correcting spelling and grammar in Outlook, check Check spelling as you type.
- Click OK twice to close both dialogs, then restart Outlook.
You can also press F7 at any time to run a manual spell check on your current message, which is useful for confirming whether spell check is working at all.
Fix #4: Fix the language detection setting
If spell check runs but misses errors, or marks correctly spelled words as wrong, automatic language detection is often the culprit, especially if you write emails in more than one language. There’s also a per-message setting that can silently disable spell check for a single email, even when your global settings are correct.
- Open a new email in Outlook.
- Click the Review tab in the ribbon.
- Click Language > Set Proofing Language.
- Select your preferred language from the list.
- Uncheck Detect language automatically.
- Also make sure Do not check spelling or grammar is unchecked. If this box is checked, spell check is disabled for this specific message regardless of your global settings.
- Click OK.
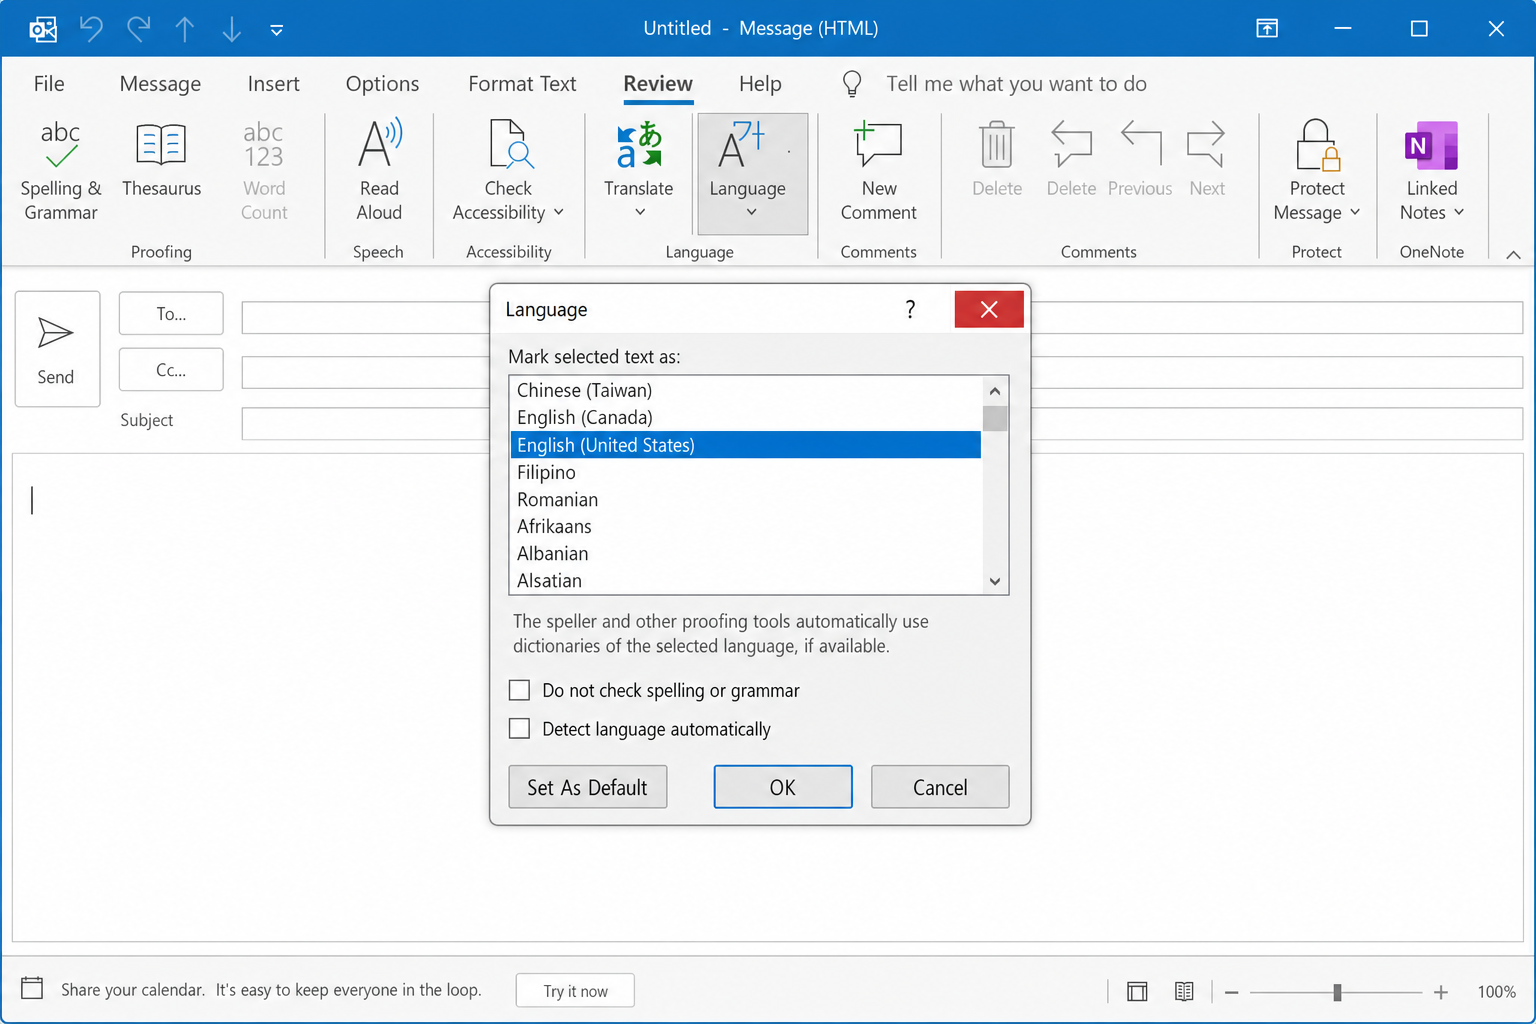
Tip: The Do not check spelling or grammar flag is stored per-message and can be inherited when you paste text from another source, use a template, or reply to a message that had it set. If spell check suddenly stops working on one email but works fine on others, this is the first thing to check.
Fix #5: Re-enable the proofing add-in in Word
Classic Outlook uses Word’s proofing engine. If the proofing add-in got disabled in Word, which can happen silently after a crash or update, Outlook loses its spell checker too.
- Open Microsoft Word (not Outlook).
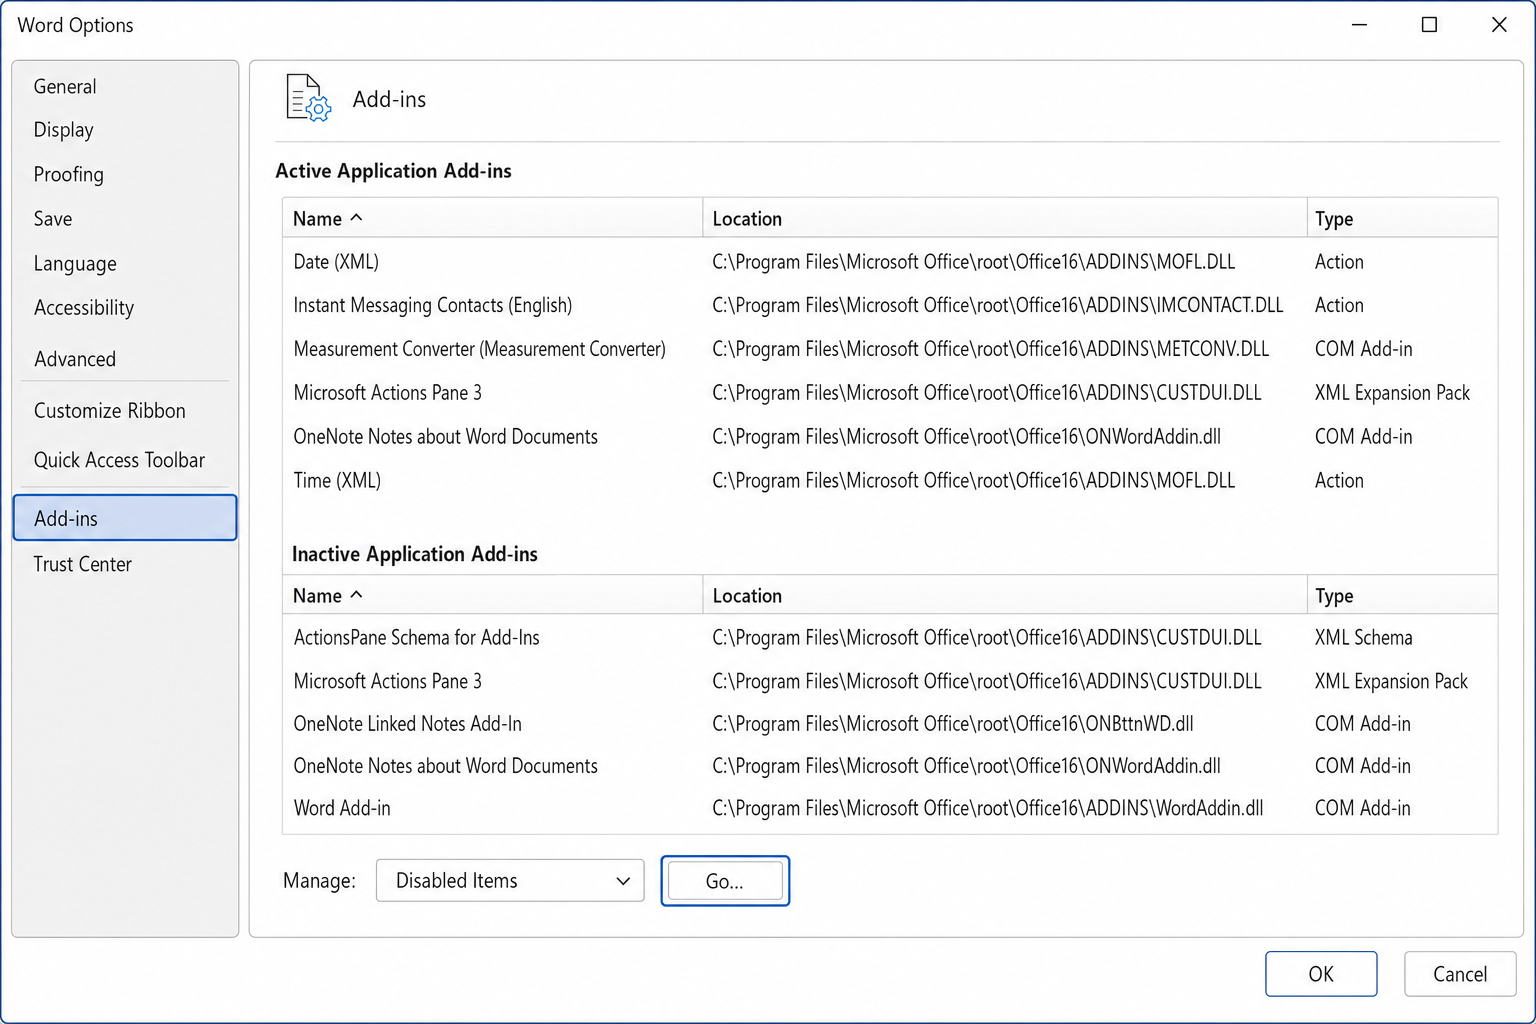
- Click File > Options > Add-Ins.
- At the bottom of the window, set the Manage dropdown to Disabled Items and click Go.
- If you see any proofing-related item in the list, select it and click Enable.
- Click Close, restart Word, then restart Outlook.
Fix #6: Clear the proofing override registry key
A corrupted proofing override key in the registry can silently break spell check. Deleting it is safe. Office recreates it automatically on next launch.
- Press Windows + R, type
regedit, and press Enter. Click Yes if prompted by UAC. - Navigate to:
HKEY_CURRENT_USER\Software\Microsoft\Shared Tools\Proofing Tools\1.0\Override - Right-click the Override key in the left panel and select Delete.
- Close Registry Editor and restart Outlook.
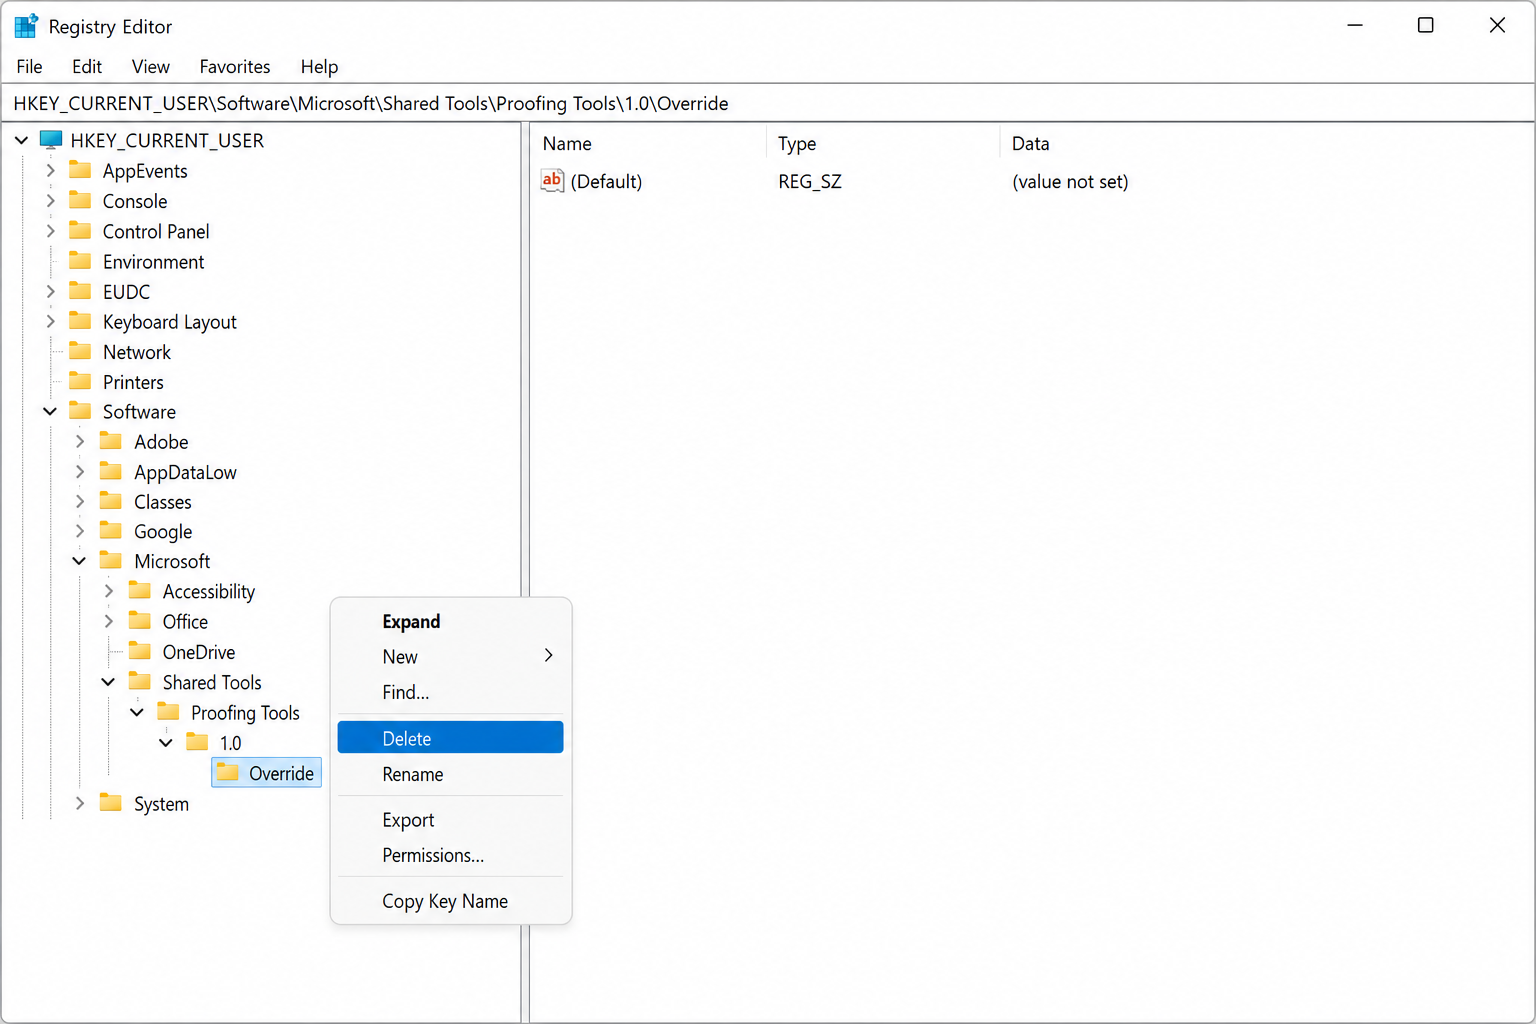
If you can’t find the Override key, it may not exist on your system. Skip to Fix #7.
Fix #7: Run an Office repair
If nothing above has worked, the proofing tools themselves may be partially corrupted. An Office Online Repair reinstalls them cleanly without touching your files or settings.
- Press Windows + R, type
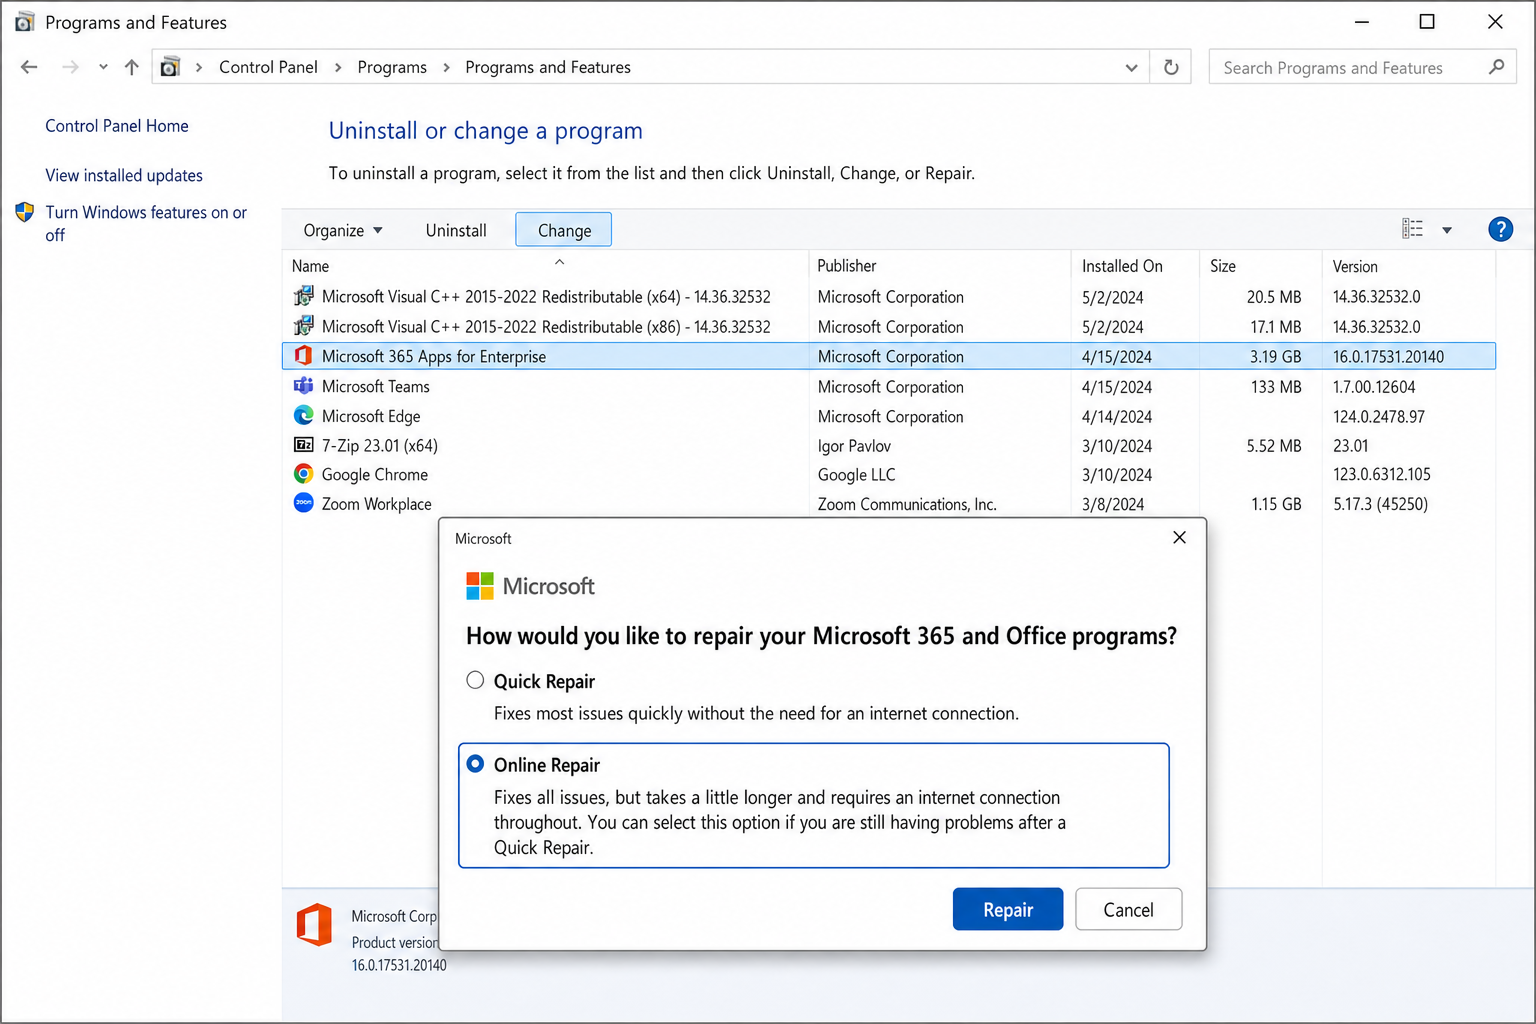
appwiz.cpl, and press Enter. - Find Microsoft Office (or Microsoft 365) in the list, click it, and select Change.
- Choose Online Repair and click Repair. (Online Repair is more thorough than Quick Repair, so use it here.)
- Wait for the repair to finish. It may take 10–20 minutes depending on your connection.
- Restart your computer when prompted.
When the fixes don’t work
If spell check is still broken after an Online Repair, the most likely culprits are a corrupted Windows user profile or a Group Policy setting pushed by your organization that’s locking proofing options. Try signing into Windows with a different local account and testing Outlook there. If spell check works in the new profile, your original profile is the problem. Contact your IT department or Microsoft Support at support.microsoft.com.
Conclusion
For classic desktop Outlook, Fix #3 (turning on “Check spelling as you type” in Options) resolves this for most people after an upgrade resets the setting. For New Outlook users, Fix #2 is the one that catches people off guard. The spell checker simply won’t load without optional connected experiences enabled, and there’s no obvious error message to tell you why.