Let’s talk about how you can reduce background noise and get better sound with your microphone. Whether you’re in a call or recording your voice, these tips will be useful.
There are a number of different areas we will cover, so make sure to read through each section carefully.
Once you’ve finished reading, you’ll know how to make sure your microphone quality is as good as possible.
Start with Hardware
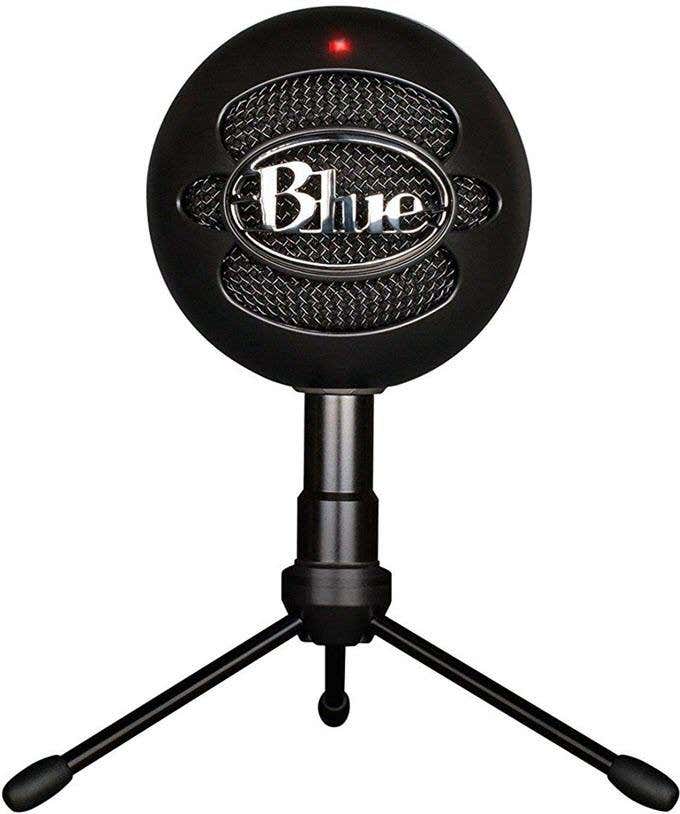
If you truly care about achieving better sound quality, you’ll really need to invest a little into a better microphone and some equipment. Thankfully, it really is only a little. You can pick up the Blue Snowball Ice for less than $50, for example.
You can then get a good mic stand or arm for less than $10 on Amazon, and a pop filter for a similar price. With this equipment, you’ll be able to set yourself up with a microphone that can focus on your vocals and not much of anything else.
It doesn’t stop at your microphone, though. You should think about how you set up your office or gaming room and think about how you can rearrange your hardware so that your microphone isn’t picking up key presses, movements of your mouse, or other small noises.
You should also consider how keeping windows and doors closed will help to reduce outside audio being picked up, and make sure to let everybody that lives with you know that you are recording and need some quiet time.
Using Software to Remove Background Noises
If you’d like to get the cleanest audio possible, you can go a step further by using software to stop your microphone from picking up noises outside of your vocal range.
You can use a noise gate to make sure your microphone only starts to pick up audio once it hears sounds within a certain decibel range. This is perfect for stopping the hum of fans, cars outside, or even talking in other rooms.
There’s no noise gate setting that works for everybody, so you’ll need to tweak the open and close threshold so that the noise gate picks up your voice, but nothing else, and also that it doesn’t cut off in case you start speaking a little quieter.
Some programs, like OBS, have a noise gate built in under the microphone filter settings, but if you need a system wide option for Windows 10, there are two popular options.
The first option is NoiseBlocker, a very easy to use noise gate software that either costs $9.99 for full use, or you can use it for free for 1 hour per day. NoiseBlocker can be set up to actively listen to specific noises and it will block them out.
The other option is NoiseGator, which is a completely free alternative, but there are occasionally some frustrating bugs that can often cause it to stop working. NoiseGator can be used to create a gate that will stop your microphone from recording unless sounds fall within a set decibel range.
Unfortunately, the NoiseGator developer has abandoned the project so there’s no hope for fixes to these problems. Some users have never had issues with NoiseGator, however, so it’s worth experimenting with both to find out which one works best.
Cleaning Up Audio after Recording
Generally, there is a chain of order to follow when it comes to recording high quality audio. The first step is to try your hardest to get the cleanest, highest quality audio with your hardware. This means creating a quiet environment and setting up your microphone correctly.
If you try your hardest to minimize background noise, speak clearly, and soundproof your room, you won’t have to worry too much about trying to fix the audio after the fact. The next step is to use software like NoiseGator or NoiseBlocker to reduce background sounds even further.
If, even at this point, your audio isn’t perfect, you can clean it up for free in a software called Audacity. We’ll take you through some quick steps to ensure your sound is as clean as possible, without causing any issues with your voice quality in any way.
First, download Audacity for free. Next, ensure that each time you record, you have a few seconds of silence before you start speaking. This will allow you to capture a sound profile you can reduce in Audacity to eliminate any remaining background noise.
After, make sure you try to keep your recording in as few files as possible. Ideally, it’s best that you have one single recording, because it will make it easier to edit and keep consistent. You can always cut out areas where you make mistakes and need to repeat yourself.
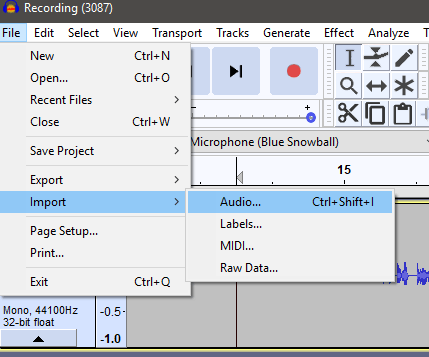
With these tips in mind, it’s time to open Audacity. Once inside Audacity, click File, Import, Audio. Navigate to the audio you’d like to import and click Open.
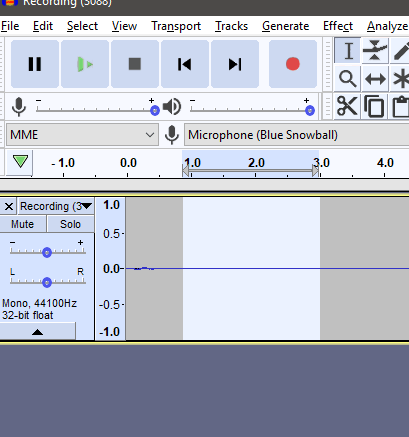
Once opened, it’s time to reduce background noise. First, click and drag the beginning of the timeline to get an empty area of sound. This should be the sound you recorded before you started speaking. It should look like the image above.
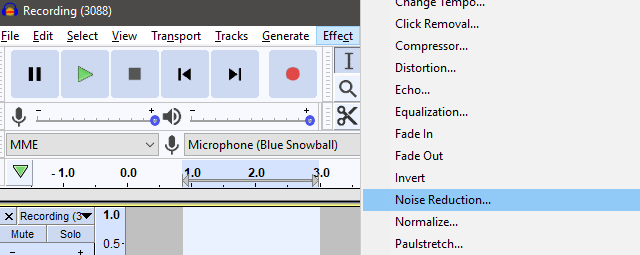
Next, click Effect in the top toolbar and then click Noise Reduction.
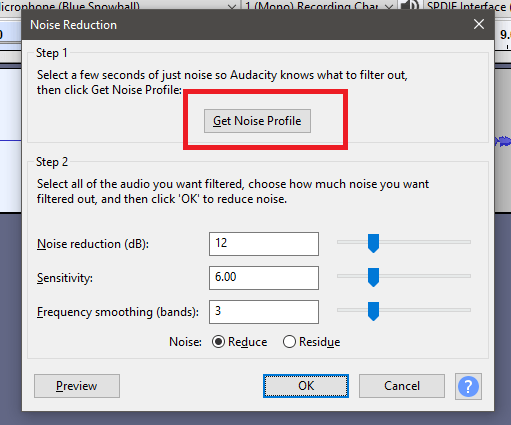
A pop up window will appear. In this window, click Get Noise Profile, making sure that the empty audio is still highlighted.
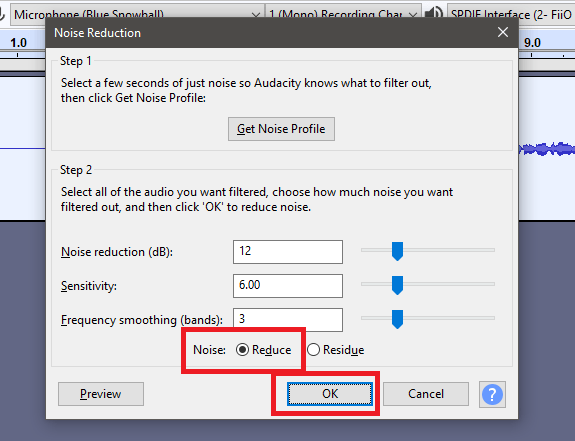
Next, press Ctrl+A to select the whole audio clip. Then, click Effect and click Noise Reduction again. This time, click OK after making sure the whole clip is highlighted and Noise is on the ‘Reduce’ option. The background audio will now be removed.
Take a listen through by clicking the play button. If you notice some of your speech is too loud or there’s some abnormality in the levels of your speech, you can use Effects > Compressor.
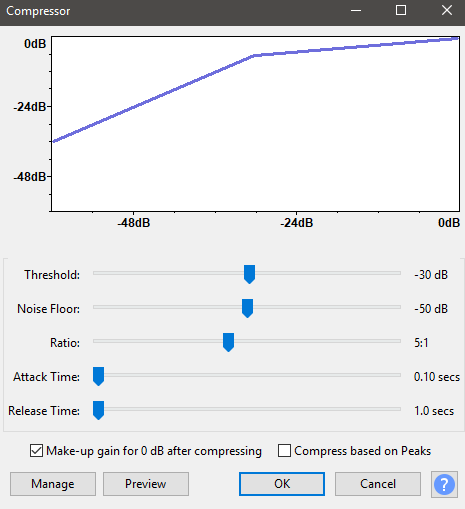
Use the image above as a guideline for good vocal settings for general speech. If it’s too quiet or too loud, overall, you can also use Effects > Amplify to boost or reduce the overall volume.
The setting you use will depend on how loud you’d like your voice, but usually a range of a 3-10 decibel increase or decrease is enough to put your voice within a reasonable level.
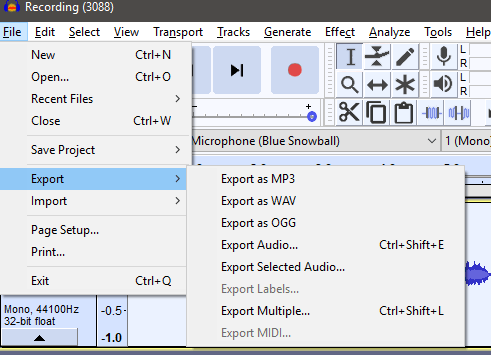
Once you have finished, you can click File > Export, and then Export as a file type of your choice. By default, you’ll have MP3, WAV, and a few other audio files available. If you’re not sure what to use, I’d suggest MP3.
Summary
Thanks for reading our guide on how to reduce background noise and get better sound with your microphone. If you’ve read this far, you’ll know how to improve your hardware setup, install software to get better sound, and make changes to already recorded audio to clean up your voice clips.
Need any help or have any questions? Let me know by leaving a comment and I’ll try to respond as soon as I can.
Related Posts
Ollie stumbled upon writing online whilst participating in a mobile network forum back in 2011. Since then, he has developed an incredible passion for writing about all sorts of tech from smartphones, PC hardware, software, and everything in between. Read Ollie’s Full Bio
